This repository provides instructions for setting up an Amazon EC2 virtual machine to run CARLA, the open-source simulator for autonomous driving research.
- An AWS account
- About 20 minutes of free time on your hands
By following the steps below, you will
- Launch and configure a virtual machine on Amazon Web Services (AWS) (~10 minutes)
- Install CARLA (~10 minutes)
- Simulate
When you've completed these steps, you'll have a working CARLA environment.
- Feb 2020 - CARLA 0.9.5 instructions
- Mar 2020 - Updated to use CARLA 0.9.8 (and simplified the process)
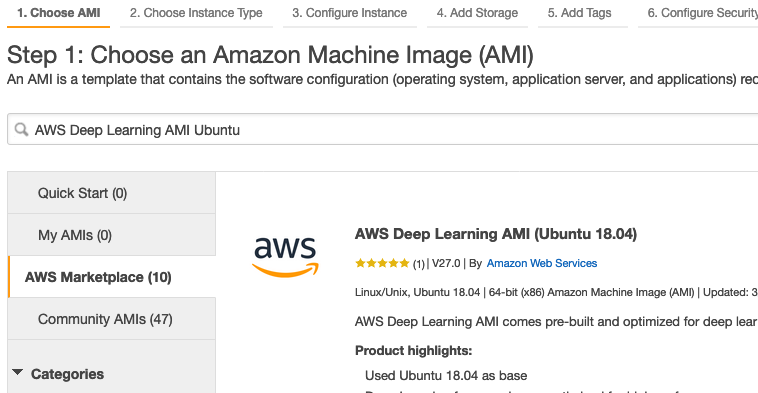
We'll use the AWS Deep Learning AMI for Ubuntu 18.04.
- From the AWS EC2 console, click the Launch Instance button, then click on the "AWS Marketplace" tab in the left navigation.
- In the search box, search for "AWS Deep Learning AMI Ubuntu", then click the Select button.
- This AMI is optimized for GPU applications. Use the wizard to follow the steps to launch your image on an EC2 machine. Currently, the most cost-effective instance type for running CARLA is the g4dn.xlarge, which is $0.526/hr as of March 2020. Make sure to stop the instance when not in use to avoid high charges.
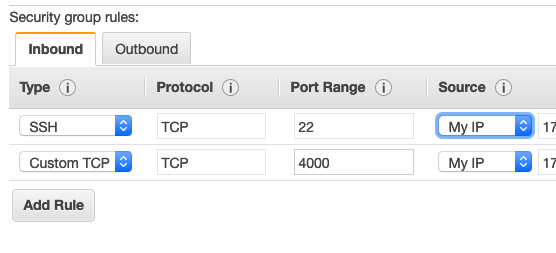
Modify the EC2 security group for your instance. Allow TCP access on ports 22 and 4000 from your IP address. This will allow you to SSH into your machine and use NoMachine to connect to the desktop and view CARLA simulations.
After the AMI boots, SSH into the machine and check nvidia-smi to confirm you have NVIDIA drivers by default. If you don't see something similar to the below, you've launched the wrong instance.
+-----------------------------------------------------------------------------+
| NVIDIA-SMI 440.59       Driver Version: 440.59       CUDA Version: 10.2     |
|-------------------------------+----------------------+----------------------+
| GPU  Name        Persistence-M| Bus-Id        Disp.A | Volatile Uncorr. ECC |
| Fan  Temp  Perf  Pwr:Usage/Cap|         Memory-Usage | GPU-Util  Compute M. |
|===============================+======================+======================|
|   0  Tesla T4            On   | 00000000:00:1E.0 Off |                    0 |
| N/A   45C    P8    16W /  70W |      0MiB / 15109MiB |      0%      Default |
+-------------------------------+----------------------+----------------------+

+-----------------------------------------------------------------------------+
| Processes:                                                       GPU Memory |
|  GPU       PID   Type   Process name                             Usage      |
|=============================================================================|
|  No running processes found                                                 |
+-----------------------------------------------------------------------------+
NoMachine allows you to access the virtual machine render the simulation much faster than VNC.
cd ~
wget https://download.nomachine.com/download/6.11/Linux/nomachine_6.11.2_1_amd64.deb
sudo dpkg -i no*.deb
rm no*.deb
Visit https://www.nomachine.com/ to download a NoMachine client for your OS.
Setting a password is useful if you're going to be in the Ubuntu desktop a lot.
sudo passwd ubuntu
You'll use an Ubuntu desktop to give you GUI access to your CARLA simulation:
sudo apt-get update && sudo apt-get upgrade -y
sudo apt-get install -y ubuntu-desktop gnome-panel gnome-settings-daemon metacity nautilus gnome-terminal xfce4 xterm
export DEBIAN_FRONTEND=noninteractive
sudo apt-get install -y lubuntu-desktop
Install CARLA 0.9.8 per the instructions at https://carla.readthedocs.io/en/latest/start_quickstart/:
sudo apt-key adv --keyserver keyserver.ubuntu.com --recv-keys 304F9BC29914A77D
sudo add-apt-repository "deb [arch=amd64 trusted=yes] http://dist.carla.org/carla-0.9.8/ all main"
sudo apt-get update
sudo apt-get install carla-simulator
Conda will allow you to run multiple Python projects without worrying about dependency collisions, and isolate the Python libraries CARLA needs:
cd ~
conda create -n carla python=3.5
source activate carla
Install the required libraries needed to run the simulation:
pip install pygame numpy
First, reboot:
sudo reboot
After a few minutes, create a connection with the NoMachine client, using the Public DNS address of your EC2 machine:
- Choose Password authentication
- Leave "Don't use a proxy" selected
- Name your connection, then press done
When you've created the connection, open it, and login with your "ubuntu" username and password. After a few moments, you'll be presented with the Ubuntu login screen. After you sign in answer a few questions to setup your system, you'll be taken to your Ubuntu desktop:
Open Ubuntu's terminal application. In one window, start CARLA:
cd /opt/carla-simulator/bin
SDL_VIDEODRIVER=offscreen ./CarlaUE4.sh
For some machines, the command doesn't seems to work so you can try an alternate command that may do the trick for you.
    cd /opt/carla-simulator/bin
    DISPLAY= ./CarlaUE4.sh -opengl -carla-port=2000
No window will open yet, CARLA is just waiting for you to interact with it via the Python API. If you run into errors, I've found another reboot of the system usually fixes it.
In another terminal window (or tab), start the simulation:
source activate carla
cd /opt/carla-simulator/PythonAPI/examples
python manual_control.py
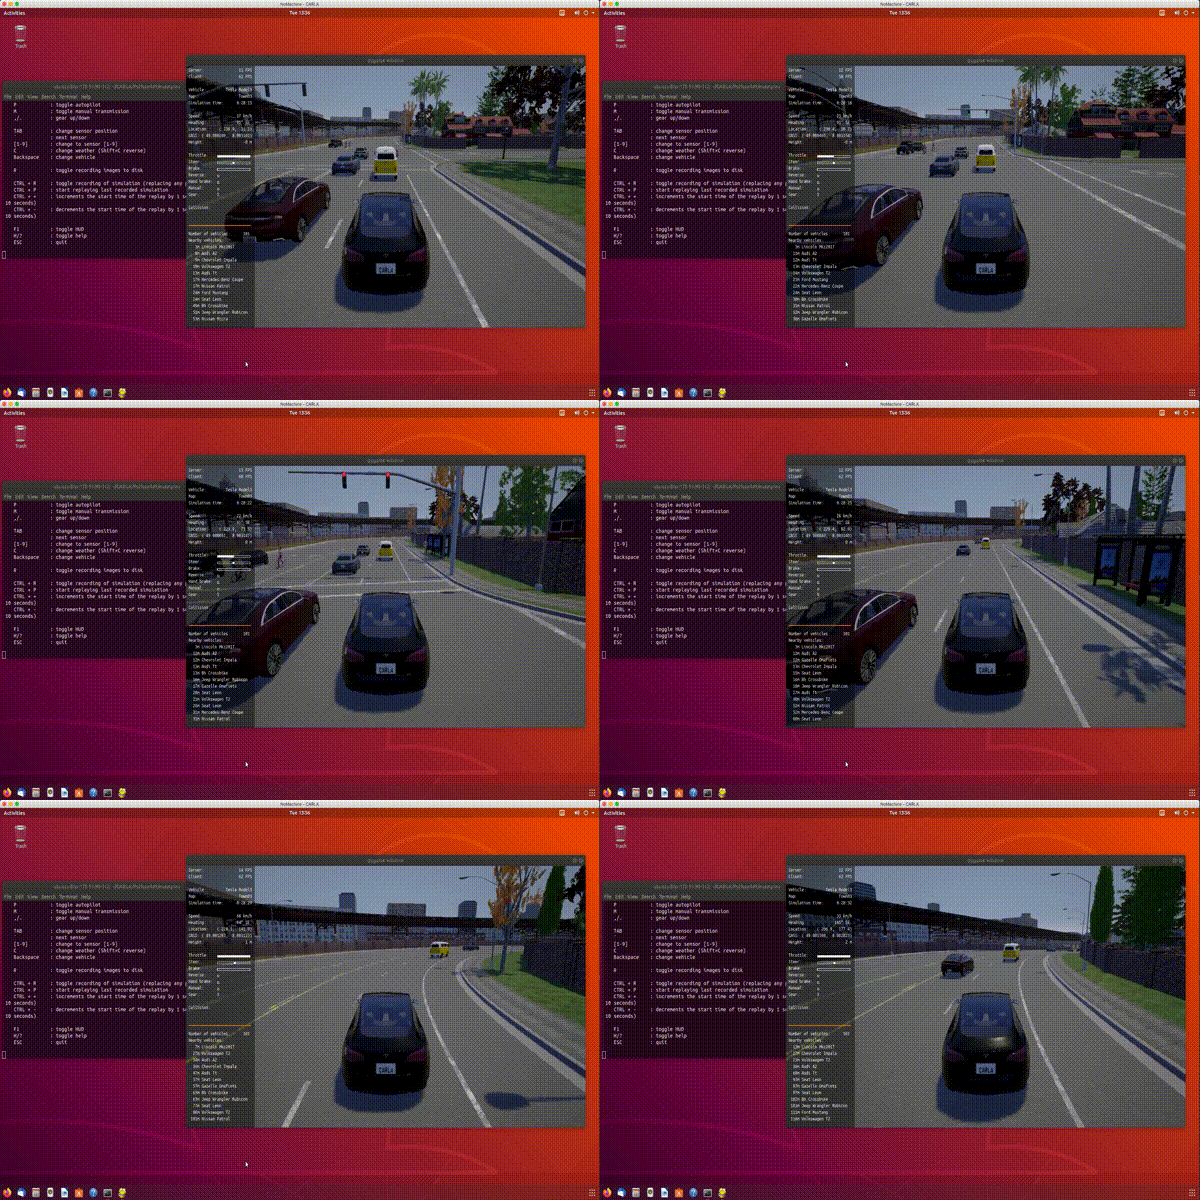
This will bring up the CARLA simulation window. You can control your car with the W,A,S,D keys. Check the source for manual_control.py for ways to change or interact with your environment.


