by Jarrett Yeo for NTU Open Source Society
Date last updated: 25 October 2017
TL;DR: If you are searching for cut-to-the-chase instructions for installing Python 3.6 and pip, click here. That's the only section in this tutorial that you'll need, you can skip the rest.
This pre-workshop offers a comprehensive crash course for the uninitiated and requires zero knowledge of Python and pip (well that's why you're probably here itfp).
Disclaimer: This document is meant to get you up to speed with what you'll need for our workshops. Neither the author nor NTU OSS claims or owns the appended resources. We also do not accept any responsibility for things that happen to your machine because of this tutorial.
If you have a question regarding any of the instructions here, it's likely that it has been already addressed in Section 4: FAQ & Troubleshooting. You'll be able to find answers to the most commonly asked questions that we've came across and addressed.
Alternatively, feel free to raise your hand any time during the pre-workshop or email your questions to me.
For errors, typos or suggestions, please do not hesitate to post an issue. Thank you!
0.1 Workshop Requirements
0.2 Introduction to Python, Modules & Packages
0.3 Introduction to pip
0.4 Introduction to the Terminal
-
0.4.1 Opening the Terminal on Windows
-
0.4.2 Opening the Terminal on Mac
-
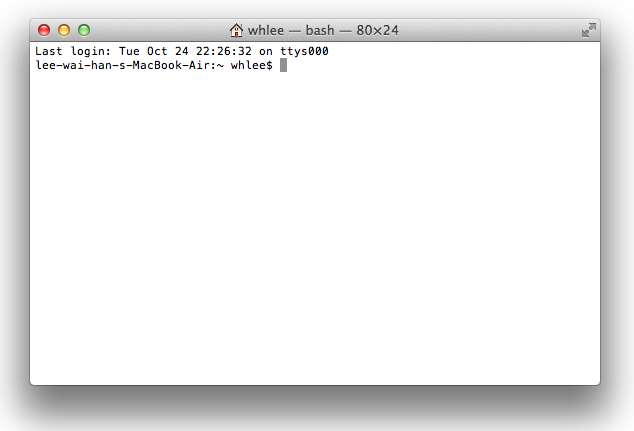
0.4.3 Overview of the Terminal
-
0.4.4 Interpreting, Entering & Executing Commands in the Terminal
0.5 Introduction to Basic Computer Terms
Section 1: Installing Python 3.6.x and pip
1.0 Introduction
1.1 Installing Python 3.6.x and pip on Windows
-
1.1.1 Steps for Installing Python 3.6.x and pip on Windows
-
1.1.2 Verifying your Installation (Windows)
1.2 Installing Python 3.6.x and pip on Mac
-
1.2.1 Steps for Installing Python 3.6.x and pip on Mac
-
1.2.2 Verifying your Installation (Mac)
Section 2: Using Python and pip in the Terminal
2.0 Introduction
2.1 Using Python 3.6 on Windows
2.2 Using Python 3.6 on Mac OS X
Section 3: Downloading Packages with pip
3.0 Introduction
3.1 Using pip on Windows
3.2 Using pip on Mac
Section 4: FAQ & Troubleshooting
For many of our workshops, you'll need the following to get started:
- Python 3.6.x
- pip
- A good text editor of your choice:
Let's get the text editor first. Just choose either Atom or Sublime, download it, and install it. Thereafter, you can easily edit your Python files using the downloaded text editor.
You'll also need to have basic knowledge on using your computer's terminal / console, as well as basic computer terms.
If you already have Python 3.6.x (3.6, not 2.7) installed without pip and want to know how to install pip, please visit Section 4: FAQ & Troubleshooting.
Note
The following sections provide a brief introduction to Python, pip, your computer's terminal, and basic computer terms (coming soon!) for the uninitiated.
If you would like to skip to the installation instructions directly, go to Section 1: Installing Python 3.6.x and pip.
Python is a popular programming language that emphasizes code readability and clarity. All Python files end with the .py extension (e.g. setup.py).
While your machine's default text editor (e.g. Notepad) can view and edit .py files perfectly, editing code gets much easier and more visually appealing with good multi-purpose text editors such as Atom or Sublime. That's why we got you to have one.
Next, Modules are single .py files that contain Python definitions and statements while you can understand Packages as collections of modules for now.
Think of packages as expansion packs to Python (which is your 'main game'). There are thousands of open source packages that enable you to easily achieve a wide variety of cool things such as data analysis, machine learning and even creating your own games. All you need to get started is to install the packages and import them in your code – we’ll show you how later.
Pip is a recursive synonym that stands for “Pip Installs Python/Packages”. It is a package installation manager that allows you to, well, install packages easily.
You'll be learning how to use pip later.
In most tutorials, the terms "terminal", "console", "command line", "command prompt", "bash console", "power shell" and "shell" are loosely used interchangeably even though they technically refer to different things. However, these terms most probably refer to the same text-based interface in which you can type and execute text commands on your computer. It is a powerful and flexible tool that allows developers to easily send and execute commands to your computer.
In this tutorial, we will use "terminal" to refer to the aforementioned interface. Click here if you are a Windows user, or here if you are a Mac user.
There are several ways of opening your Terminal (known more commonly as "command prompt") on Windows:
1. Fastest Way
Hit the Windows key and type "cmd", and hit the Enter key. If that doesn't open the (correct) terminal, repeat the previous but try "cmd.exe" instead.
Note
If you have other external command line tools such as Git CMD installed on your computer, this might not work for you - your computer might open the other tools instead.
2. Alternative Way
If the above doesn't work for you, while holding down the Windows key on your keyboard, press the "R" key, then release both keys. A window should appear. Key in "cmd.exe" and hit the enter key.
There are several ways of opening your Terminal on Mac:
1. Fastest Way
If you have Launchpad (the silver icon with a rocketship) already pinned to your Dock, just click on it and search "terminal" and hit the return key.
2. Slower Way
If not, you can open Finder, search for "terminal", select "This Mac" under Search, and double-click on the "Terminal" application.
3. Slowest Way
Open Finder, double-click on "Macintosh HD" under Devices, double-click on "Applications" folder, double-click on "Utilities" folder, and double-click on the "Terminal" application.
Note
In the Utilities folder, you will find an application called "Console". This is different from the Terminal - the Console is a system logging tool on Mac.
Whenever your terminal is ready for you to input commands, you will see something along the lines of C:\Users\YourName> on Windows, or YourName:~ YourName$ on Mac OS X.
It is important to note that commands are case-sensitive (e.g. -V and -v are different) and typically run line-by-line, and every line of command is executed when you hit the enter or return key on your keyboard.
In most tutorials online, terminal commands that you are instructed to execute usually begin with a $. However, you only ever enter whatever that comes after $ as the command, and never with $. For our workshops, to make things simpler, we usually drop $ altogether to avoid confusing you.
Note
$is just the terminal prompt in a Unix-based system (e.g. Mac OS X) used to signpost the start of where you can enter your command. On Windows,>is the terminal prompt instead, but it is convention to use$to signal commands for Windows as well.
For instance, $ ping www.google.com indicates that you should enter only ping www.google.com in your Terminal with the enter key thereafter to execute the command.
You do not need to enter the above command, it is meant only for illustration purposes.
Coming Soon
Installing Python and pip is fundamentally different on Windows and on Mac OS X.
Click here if you are a Windows user, and here if you are on a Mac.
As of 20 October 2017, installing a fresh copy of Python 3.6.x on Windows from the official Python website allows you to seamlessly install pip concurrently. Find out how below.
Note
Save yourself from loads of trouble later: Do NOT rush through the installation, please follow ALL steps below! You have been warned!
-
Download Python 3.6 here. The webpage should automatically detect your operating system (i.e. Windows); else, choose your operating system accordingly under the "Downloads" tab. We will mainly be using Python 3.6, so click on "Download Python 3.6.x".
-
Run the installer.
-
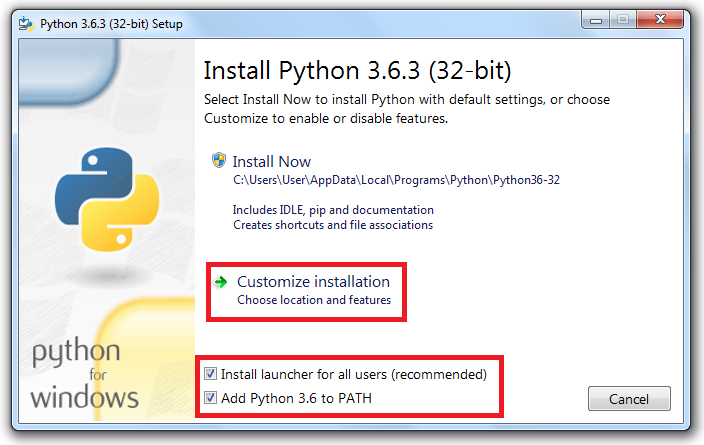
Remember to enable the following options during the installation:
Ensuring that these options have been selected during installation will save you a lot of trouble when you want to start using Python and pip later. Consider yourself warned!
Tick the checkbox for "Install launcher for all users" and for "Add Python 3.6 to PATH" in the main screen. Thereafter, click on "Customise Installation".
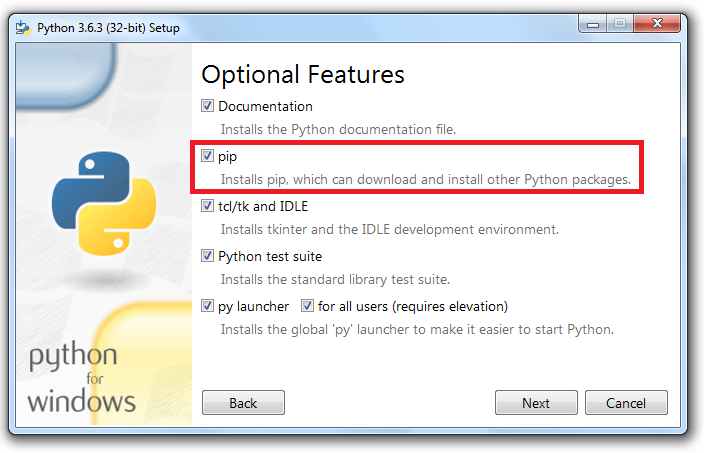
Tick the checkbox for installing "pip" at the "Optional Features" screen.
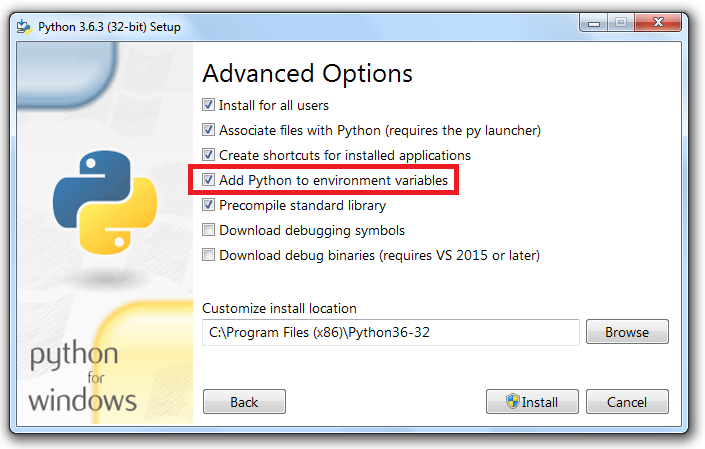
Tick the checkbox for "Add Python to environment variables" at the "Advanced Options" screen.
-
Complete the installation & restart your computer if prompted.
-
Let's check if Python 3.6.x has been properly installed on your machine. Open your console and execute the following:
python -VNote
Commands are case-sensitive. In this case, the letter "V" is capitalised, while "python" is not. Thereafter, hit the enter or return key to execute/run the command. -
Your console should return you something like this (it should say 3.6.x instead of 2.7.9):
Python 3.6.3 -
Next, check if pip is installed. Excute this on your terminal:
pip --version -
You should see something like this:
pip 9.0.1 from c:\program files (x86)\python36-32\lib\site-packages (python 3.6)Did your console return you something similar like the screenshots above? That means you're good to go - both Python 3.6.x and pip have been installed on your machine!
If you have problems installing Python and pip, or already have Python installed without pip and want to know how to install pip, please visit Section 4: FAQ & Troubleshooting.
Once you are done, let's proceed to Section 2: Using Python and pip in the Terminal.
Mac OS X 10.8 and its successive versions come with Python 2.7 pre-installed by Apple. The simplest and safest way to have a copy of Python 3.6.x on your Mac is to download and install a separate copy of Python 3.6.x without removing Python 2.7. You should NOT delete Python 2.7 from your Mac because they are system files required for Apple and non-Apple apps to work.
As of 20 October 2017, installing a fresh copy of Python 3.6.x on Mac OS X from the official Python website allows you to seamlessly install pip concurrently. Find out how below.
Note
Save yourself from loads of trouble later: Do NOT rush through the installation, please follow ALL steps below! You have been warned!
-
Download Python 3.6 here. The webpage should automatically detect your operating system (i.e. Mac OS X); else, choose your operating system accordingly under the "Downloads" tab. We will mainly be using Python 3.6, so click on "Download Python 3.6.x".
-
Run the installer.
-
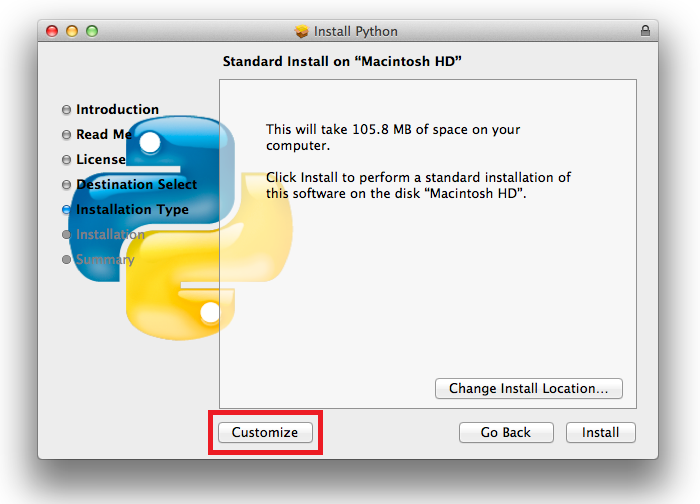
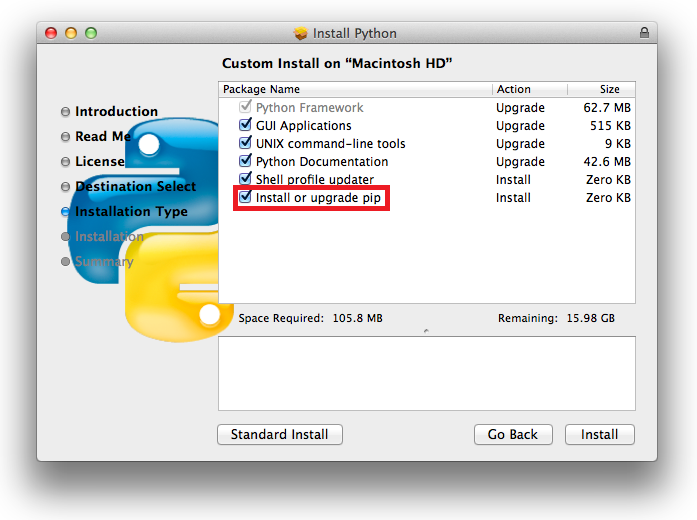
Remember to enable the following options during the installation:
Ensuring that these options have been selected during installation will save you a lot of trouble when you want to start using Python and pip later. Consider yourself warned!
At the Installation Type screen, click on the "Custom Install" button.
Tick the checkbox for "Install or upgrade pip" at the "Custom Install" screen. You can just ensure that all checkboxes are ticked here.
-
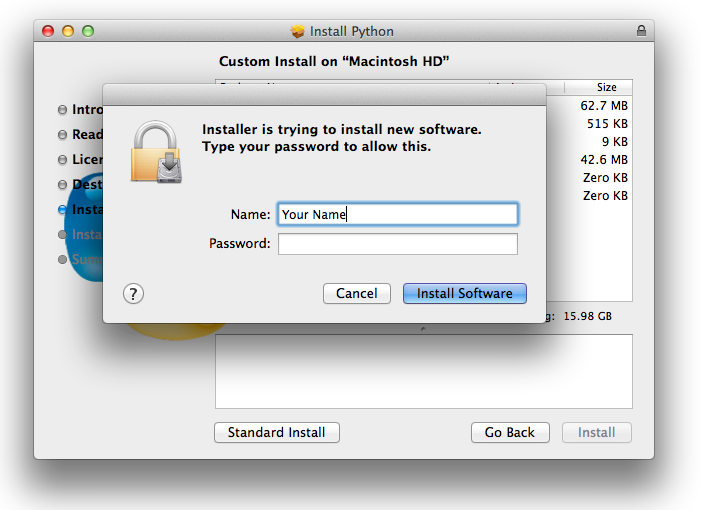
When prompted in the "Install Software" pop-up, key in your password. If you do not have one, simply hit the return key or cick on "Install Software".
-
Complete the installation & restart your computer if prompted.
-
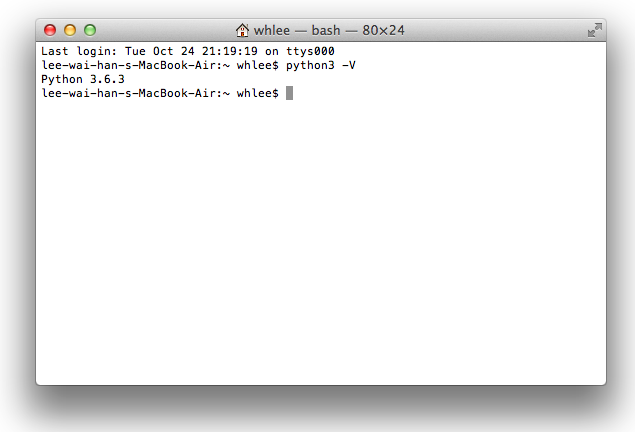
Let's check if Python 3.6.x has been properly installed on your machine. Open your console and execute the following:
python3 -VNote
Remember, it ispython3, notpython. Please note that commands are case-sensitive, in this case, the letter "V" is capitalised, while "python" is not. Thereafter, hit the enter or return key to execute/run the command. -
Your console should return you something like this (it should say 3.6.x instead of 2.7.9):
Python 3.6.3 -
Next, check if pip is installed. Excute this on your terminal:
pip3 --version -
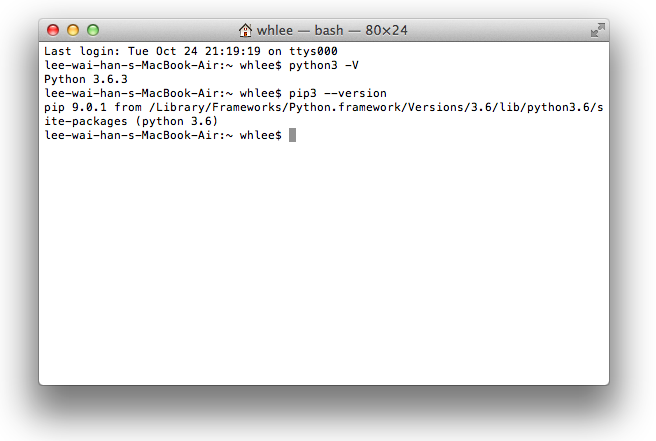
You should see something like this:
pip 9.0.1 from /Library/Frameworks/Python.framework/Versions/3.6/lib/python3.6/site-packages (python 3.6)Did your console return you something similar like the screenshots above? That means you're good to go - both Python 3.6.x and pip have been installed on your machine!
If you have problems installing Python and pip, or already have Python installed without pip and want to know how to install pip, please visit Section 4: FAQ & Troubleshooting.
Once you are done, let's proceed to Section 2: Using Python and pip in the Terminal.
Using Python 3.6 and pip is different on Windows and on Mac OS X. Though you have already executed python commands, it is important for you to take note of the different commands that tutorials use and how you can smartly adapt your commands according to your version of python and your operating system.
Let's get started. Click here if you are a Windows user, and here if you are on a Mac.
Executing commands is dead simple for Windows users.
In our workshops, if you are given the instruction to execute the command python -V or pip install requests, you simply enter it as it is in your terminal.
For example, if you are instructed to execute python, you key in python into your terminal and hit the enter key. To execute pip install requests, that would be pip install requests with enter once you are done. You do not need to execute any of these commands, they are meant for illustration.
Let's head over to Section 3: Downloading Packages with pip.
Things get slightly tricker for Mac users following this tutorial.
If you have followed our instructions to install Python and pip on your Mac, you need to change all python commands to python3. The same goes for pip - you should really be keying pip3 instead.
For example, if you are instructed to execute python, you key in python3 into your terminal and hit the enter key. To execute pip install requests, that would be pip3 install requests with enter once you are done. Note the 3 that comes after the commands. You do not need to execute any of these commands, they are meant for illustration.
Trivia
The chances are that you will have 2 versions of Python in your machine: 2.7 that is the system default shipped with your Mac, as well as 3.6.x which we have just downloaded. Because Python 2.7 is the default,pythoncommands will run on Python 2.7. For us to write code and install packages for Python 3, we need to specify so usingpython3instead.
Reiteration: To run Python 3.6, Mac users need to executepython3. In a similar fashion,pipcommands need to be changed topip3so that the packages installed are for Python 3.6, not 2.7.
Let's head over to Section 3: Downloading Packages with pip.
Many of our workshops materials (as well as the countless others on the web) will instruct you to install packages using pip.
The instructions vary depending on your operating system. Go to Section 3.1 Using pip on Windows if you are a Windows user, or Section 3.2 Using pip on Mac if you are using a Mac. Let's show you how.
For workshop tutorials, we will usually provide instructions on which packages to get using pip; in fact, we will most probably give you the pip commands that you should enter into your terminal as well.
For example, if you are given the following instruction to execute pip install requests, all you need to do is to open up your terminal and key in pip install requests and hit the return or enter key. As the command suggests, this command instructs pip to install the requests package. All you need is to wait patiently for your machine to download and install the package.
If you are not given an explicit command to execute, but are instructed to install a package such as selenium via pip instead, all you need is to open your console and run the following:
pip install selenium
If you need to download multiple packages, you may also key in all of the package names after pip install with a space separating each of them. As an example, to download requests, beautifulsoup and telepot at the same time, you can run the following in your console:
and beautifulsoup
pip install requests beautifulsoup telepot
For workshop tutorials, we will usually provide instructions on which packages to get using pip; in fact, we will most probably give you the pip commands that you should enter into your terminal as well.
As iterated in Section 2.2 Using Python 3.6 on Mac OS X, you need to add 3 behind your python and pip commands instead to tell your computer that you are executing commands using Python 3.6.
For example, if you are given the following instruction to execute pip install requests, you need to open your terminal and key in pip3 install requests (note the additional 3) and hit return/enter. As the command suggests, this command instructs pip3 to install the requests package for Python 3. All you need is to wait patiently for your machine to download and install the package.
If you are not given an explicit command to execute, but are instructed to install a package such as selenium via pip instead, all you need is to open your console and run the following:
pip3 install selenium (again, note the additional 3)
If you need to download multiple packages, you may also key in all of the package names after pip3 install with a space separating each of them. As an example, to download requests, beautifulsoup and telepot at the same time, you can run the following in your console:
and beautifulsoup
pip3 install requests beautifulsoup telepot
Open this in your browser.
If you are prompted to save the file, save it on your Desktop as the default filename (i.e. "get-pip.py"). Otherwise, if you see a bunch of text loaded in your browser, right-click and hit "Save as..." and save it on your Desktop as "get-pip.py".
Open up your Terminal (Command Prompt), type in cd Desktop and hit the enter key, then python get-pip.py and the enter key. Wait patiently for it to install pip. You can delete the get-pip.py file once you are done.
Once your Terminal is done with doing what it needs to, check for the pip version using:
pip --version
It should print something similar to pip 9.0.1 from c:\program files (x86)\python36-32\lib\site-packages (python 3.6). This means you're good to go.
Note
If that still doesn't work, the easiest way would be to uninstall Python and reinstall it by following the instructions above closely.
Open Terminal and run sudo easy_install pip. This installs pip for both Python 2.7 and Python 3.6.x.
When prompted by the terminal, key in your password and hit the enter key. Remember, your password will be invisible and not show as you type. This is perfectly normal.
Wait patiently for it to download and install pip.
Once your Terminal is done with doing what it needs to, check for the pip3 version using:
pip3 --version
It should print something similar to pip 9.0.1 from /Library/Frameworks/Python.framework/Versions/3.6/lib/python3.6/site-packages (python 3.6). This means you're good to go.
If this doesn't work, use Method 2 below.
Open this in your browser.
If you are prompted to save the file, save it on your Desktop as the default filename (i.e. "get-pip.py"). Otherwise, if you see a bunch of text loaded in your browser, right-click and hit "Save as..." and save it on your Desktop as "get-pip.py".
Open up your Terminal (Command Prompt), type in cd Desktop and hit the enter key, then sudo python get-pip.py and the enter key. You will be prompted to enter your password. Just key it in (the Terminal will NOT show anything as you type, just type carefully). Wait patiently for it to download and install pip. You can delete the "get-pip.py" file once the terminal is done.
Once your Terminal is done with doing what it needs to, check for the pip version using:
pip3 --version
It should print something similar to pip 9.0.1 from /Library/Frameworks/Python.framework/Versions/3.6/lib/python3.6/site-packages (python 3.6). This means you're good to go.
Note
If that doesn't work, trysudo python3 get-pip.pyinstead.
And ifsudo python3 get-pip.pystill doesn't work, the easiest way would be to uninstall Python and reinstall it by following the instructions above closely.
Question: When I try to run python or python -V or other commands beginning with python in my console, it returns me ‘python’ is not recognized as an internal or external command". Help?
There are three main possibilities, please check from the first:
-
You have entered the wrong command. Please check this first. Commands are case-sensitive!
-
You did not add Python to your
PATHenvironment variable. Follow the steps in this guide. -
You did not install Python correctly. Please uninstall Python and re-install it.
Question: When I try to run pip --version or other commands beginning with pip or pip install in my console, it returns me ‘pip’ is not recognized as an internal or external command". Help?
There are two main possibilities, please check from the first:
-
You have entered the wrong command. Please check this first. Commands are case-sensitive!
-
You do not even have pip installed in the first place. Please go to the first question in this FAQ on installing pip.
The easiest way would be to uninstall your current version of Python and re-install it using the instructions above.
Question: When I try to run $ pip or $ python or other commands beginning with $ in my terminal, it returns me ‘$’ is not recognized as an internal or external command". Help?
You need to take a look at the tutorial again. You do NOT enter $ into your commands. They are meant to signpost to you that the commands that you are supposed to execute comes after itself.
For instance, $ pip or $ python indicates that you should enter only pip or python respectively in your Terminal (with the enter key thereafter to execute the command).
Question: When I try to run $ pip on Windows 8 or 10, it returns me "PermissionError: [WinError 5] Access is denied". Help?
You need to run command prompt as an administrator. Do this by hitting the windows key, searching "cmd.exe", right-clicking on the program, and selecting "Run as Administrator". Click "OK" when prompted. You'll be able to install packages using pip thereafter.
This tutorial has been tested using a Windows 7 computer running Home Premium SP1 and a MacBook Air running OS X Version 10.9.5. It is accurate as of 23 October 2017.
Many thanks to Chang Kai Lin, Ries for sacrificing her MacBook Air and loaning it to me indefinitely for testing, and the NTU Open Source Society committee for making this happen!
This tutorial took a wayyy longer than expected in my attempt to cover many of the commonly-asked questions as well as requests for help during our previous workshops. Hopefully, this will be a helpful resource for the uninitiated budding Python enthusiasts to kickstart their coding journey.
For a programming language that claims to be "batteries-included", not having a package installer that comes with it right from the beginning really seems to be puzzling.
