Author: Joshua Bowden Date: 16/05/024
Original Code and Instructions from: https://earthly.dev/blog/mongodb-docker/
To run,
- Get application code
- Set up a MongoDB in a docker container
- Run the Flask Python application
git clone https://github.com/jcbowden/qcif_chat.git
cd qcif_chat
pip install -r requirements.txt
# we use a volume, so data is persisted if container is stopped
sudo docker run -d \
    -p 27017:27017 \
    --name test-mongo \
    -v data-vol:/data/db \
    mongo:latest

# or, with security
docker run -d
    -p 27017:27017 \
    --name secure-mongo \
    -v mongo-data:/data/db \
    -e MONGODB_INITDB_ROOT_USERNAME=db-user \
    -e MONGODB_INITDB_ROOT_PASSWORD_FILE=/run/secrets/mongo-root-pw \
    mongo:latest
(change IP address first - currently using localhost in all html template files)
ip -4 address
(find the machines externally acessible address)
cd templates
sed -i -e 's/localhost/<YOUR_IP_ADDRESS>/g' *
cd ..

#  N.B. using --host=0.0.0.0  so we can access the webpages
#  from outside the machine in which it is running.
python -m flask --app app_session --debug run  --host=0.0.0.0
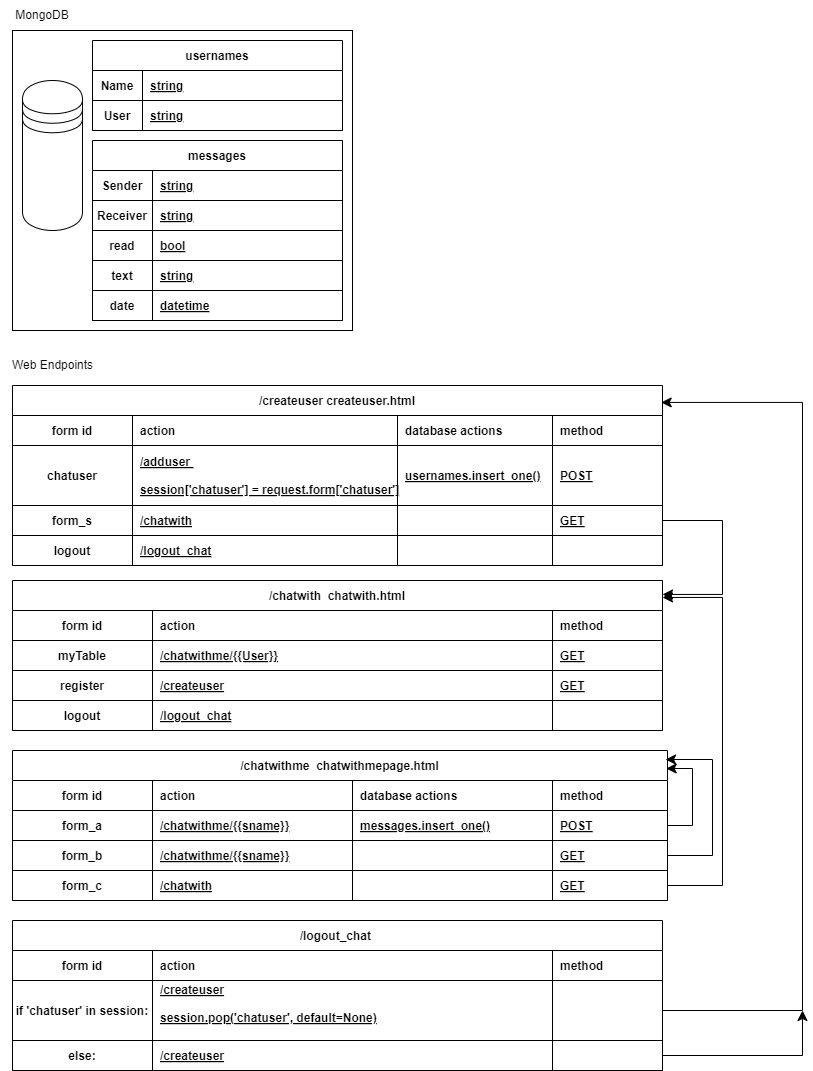
The application creates a database table of usernames and a separate table of messages. The messages have a Sender (the current user) and a Receiver field, that correspond to a User in the usernames table. The Sender is a user that has his/her User username string added to the sessions['chatuser'] cookies. The Receiver is selected from a list of users that are presented in the chatwith.htmlpage table.
Once a Receiver is chosen by the Sender then the /chatwithme/<Receiver> page is presented. The page presents a text area , that allows a message to be written and then inserted into the database when the (form_a) Send Message button is pressed. A formatted version of the message is also added in a list to the /chatwithme/<Receiver> page. All previous messages between the Sender and the Receiver are presented, and sorted in chronological order using the message time stamp. A user (Sender) can check for messages from the Receiver by pressing the (form_b) Update Messages button, and can also opt to chat with someone else (form_c) Chat with another user button, which brings them back to the chatwith.htmlpage table.
A user can then logout as the current Sender, which removes the session['chatuser'] field from the session dictionary.

There is probably an easier Javascript polling option to do this, however, there is this option too.
To get changestream, we need MongoDB run as a replica set. Set up a Docker network and connect 3 images to it
docker network create mongoCluster
docker run -d --rm -p 27017:27017 --name mongo1 --network mongoCluster mongo:5 mongod --replSet myReplicaSet --bind_ip localhost,mongo1
docker run -d --rm -p 27018:27017 --name mongo2 --network mongoCluster mongo:5 mongod --replSet myReplicaSet --bind_ip localhost,mongo2
docker run -d --rm -p 27019:27017 --name mongo3 --network mongoCluster mongo:5 mongod --replSet myReplicaSet --bind_ip localhost,mongo3

# Access the MongoDB command line
docker exec -it mongo1 mongosh --eval "rs.initiate({
 _id: \"myReplicaSet\",
 members: [
   {_id: 0, host: \"mongo1\"},
   {_id: 1, host: \"mongo2\"},
   {_id: 2, host: \"mongo3\"}
 ]
})"


# Check that the replica set is running:
docker exec -it mongo2 mongosh --eval "rs.status()"