FriendshipFrame
Work in Progress
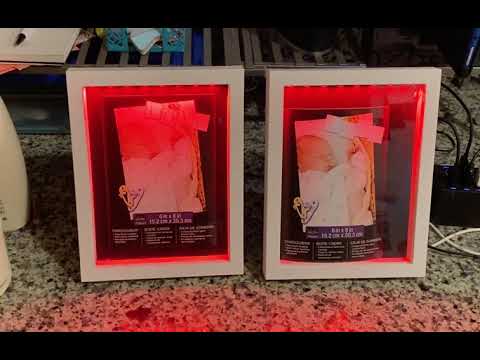
This documents how to make a friendship lamp from inexpensive parts. Inspired by UncommonGoods which sell for $175 a set. These can be made for $10 each and have more features, such as Alexa support. Based on this instructable: https://www.instructables.com/Color-Synchronized-Touch-Lamps/
Per Lamp:
Wemos D1 Mini - You can get for about $3 each on Aliexpress or Amazon. Real or knockoffs work. Can use almost any ESP board.
WS2812 LEDs - A couple bucks each. I have used either an 8 LED ring or 8 LEDs cut from a strip for each. Should work with 12 too

Touch Switch - Tin Foil and Resister

For the code in the repository (can easily be changed if desired):
Resister is between PIN 4 and Pin 5 (D1 and D2 on board)
Wire to foil between Pin 5 (D1 on board) and resister
WS2812 is on Pin 2 (D4 on board)
Of course, to Ground and 5V too.

Software
SyncLight Code Linked Below
  Modified code based on: https://github.com/tueftla/syncenlight/
MQTT Server - Must be on an external network.
  I used a https://mosquitto.org/ in a docker.
  Could work with free cloud MQTT server (like https://www.maqiatto.com/), but I haven't tried

0. Setup MQTT server, using authentication.
  Such as: https://blog.feabhas.com/2020/02/running-the-eclipse-mosquitto-mqtt-broker-in-a-docker-container/ and
  http://www.steves-internet-guide.com/mqtt-username-password-example/
1. Compile SyncLight Script
  A. Get Arduinu IDE
  B. In Preferences->Additional Board Manager URLS-> Add: http://arduino.esp8266.com/stable/package_esp8266com_index.json
  C. Tools->Board->Board Manager->Esp8266 Version 2.5.2 (later did not work for me)
  D. Tools->Board->Esp8266 Version 2.5.2->Generic Esp8266
  E. Install the Libraries (version is imporant). Sketch->Include Library->Manage Libraries
    Adafruit NeoPixel 1.7.0 (later could work)
    ArduinoJson 5.13.5
    CapacativeSensor 0.5.1 (later could work)
    PubSubClient 2.8.0 (later could work)
    WifiManager 0.11.0
   F. Add ESPAlexa Manually https://github.com/Aircoookie/Espalexa/ (used version 2.5.0)
2. Compile and upload the code. Change the pins if you want
3. Connect to Board's Wifi "FriendLight-XXX"
4. Add Wifi, MQTT Server, User, Password, FriendCode (AliceBob in above code)
   A. FriendCode is the MQTT Topic that sync's the lights
5. Put in 3d printed case, picture frame, etc and send to friend. Best if you pre-setup their wireless.
Operation:
Touch to toggle between off/on for your's and your friends's light
When it turns on, it will select a random color.
Alexa will turn it off/on and set the color.
Old Version Below:
This was an attempt to use tasmota to run the friendship lamp. While powerful, it was too hard to configure and did not support resister-based touch sensor.
This documents how to make a friendship lamp from inexpensive parts. Inspired by UncommonGoods which sell for $175 a set. These can be made for $10 each and have more features, such as Alexa support. You need a MQTT server which is exposed to the internet. Since I wanted to use Tasmota and not compile custom code, I could not get to work with a free cloud MQTT server (like https://www.maqiatto.com/). If anyone knows how to have tasmota use a free cloud server, please let me know. Amazon may be an option, but only free for 12 months.
Parts:
Wemos D1 Mini (x2) - You can get for about $3 each on Aliexpress or Amazon. Real or knockoffs work. Can use almost any ESP board.
WS2812 LEDs - A couple bucks each. I am using an 8 LED ring for each.
Touch Switch - Tin Foil and Resister (not done yet)

For simpler build, probably could use RF MagicHome Devices (https://tasmota.github.io/docs/devices/MagicHome-with-ESP8285/)
Stay away from IR, because those need rules to use the remote.
Software:
Tasmota - You need to compile script support instead of rules.
  Wemos bin posted. Or use https://github.com/benzino77/tasmocompiler to make your own.
MQTT Server - Must be on an external network.
  I used a https://mosquitto.org/ in a docker. TLS should probably be used, but haven't done that yet.
Steps
0. Setup MQTT server, using authentication.
  Such as: https://blog.feabhas.com/2020/02/running-the-eclipse-mosquitto-mqtt-broker-in-a-docker-container/ and
  http://www.steves-internet-guide.com/mqtt-username-password-example/
1. Compile Tasmota with Script supprt. Normal rules will not support color change.
2. Flash Tasmota to Wemos D1 Mini, give each a different hostname. Enable Alexa support
3. Configure MQTT. For Ease of Use Set the Topic of Every Device to AliceBob (or whatever your two names are).
  This should work for any number of lamps if you have lots of friends
4. Hook up WS2812s (Only need header on 5V side of Wemos if you are lazy)
  https://tasmota.github.io/docs/WS2812B-and-WS2813/
5. Set Tamsmota Module to Generic, Set GPIO Pin for the WS2812
6. Add the script below into the script section and be sure to activate
7. Check that the LEDs are synched in the web interface
8. Put in 3d printed case, picture frame, etc and send to friend. Best if you pre-setup their wireless.
Script Code
>D
col=""
ocol=""
chan1=0
chan2=0
chan3=0
powState=0

>E
; check for Color change (Color is a string)
col=Color
; color change needs 2 string vars
if col!=ocol
then ocol=col
=>publish cmnd/AliceBob/color %ocol%
endif

; or check change of color channels
chan1=Channel[1]
chan2=Channel[2]
chan3=Channel[3]

if chg[chan1]>0
or chg[chan2]>0
or chg[chan3]>0
then
=>publish cmnd/AliceBob/channel Channel
endif

; check PowerState
if powState!=pwr[1]
then
powState=pwr[1]
=>publish cmnd/AliceBob/power1 %powState%
endif