JDA (previously known as JDomainApp) is a multi-module Maven project that implements Domain-Driven Design in Java. Key features of JDA include:
- Micro software architecture (MOSA) which modularises the core domain model in micro-modules (one domain class per module). The architecture is also layered, MVC-enabled and service-ready (supports both RESTful and microservices).
- MOSA consists in 3 main layers: domain model (the core) layer, module layer and software layer. Each layer is described in a model.
- aDSL (annotation-based DSL) is used to express the models directly in OOPLs
- Language: Java
- Deployed as a multi-module Maven project: each main feature is implemented in a separate module project, allowing them to be selectively imported into software projects
JDA's development started in 2012 as a teaching tool in a software engineering subject at Hanoi University (Vietnam). It was first named jDomainApp, which means that it is a Java-based tool for domain-driven application development.
In 2014, the development of DomainAppTool, which is based on jDomainApp, began when a need was realised for a user-friendly tool that can be used to quickly and interactively execute and test the domain model. We observe that the development of DomainAppTool and, more generally, that of the jDomainApp framework continuously evolves. The tool is used not only to demonstrate the framework’s capabilities but to quickly experiment with any new domain modelling ideas that would eventually be incorporated into the framework.
The 2016-2019 period played a crucial role in the framework's development. Three conference papers were published with an aim to consolidate and formalise (to a certain extent) the core theories that underlie the framework and tool. Two papers, in particular, are the collaborative research works between the framework's author and Dr. Duc-Hanh Dang and Dr. Ha-Viet Nguyen from the Department of Software Engineering (VNU University of Engineering and Technology). These works were later developed into two ISI journal papers.
Another major development of the framework started very recently in 2021 when the framework received a 2-year funding to develop the microservices capabilities. This project has just completed the first phase and is currently in the start of the second phase. Also starting with this project, jDomainApp is officially renamed to become JDA.
At this point, we feel that JDA is stable enough to be released and thus decided to make the source code public. There are still issues to be resoved and untappeded potential to be explored. We hope that the framework would be used in software development and look forward to contributions by developers.
- MSA-based software constructor
- BackEnd generator
- FrontEnd generator (version 1.1)
- JDA fullstack tool
- JDA mobile (
jda-mobile) - JDA testing (
jda-test) - JDA domain model (
jda-dom) - Domain validator (
jda-dom-validator)
- JDA DODM: enhanced support for data management
- Software specification: consolidation and extension (frontend, backend, generator, etc.)
- JDA security (
jda-security)
- App: DDDNet
jda-app-dddnet - Other apps that use JDA: TBC
| Staff | Student? | Projects | Note |
|---|---|---|---|
| Nguyen Van Cong | 1.1 | ||
| Nguyen Thuy Linh | 1.1 | green energy app | |
| Luu Dao Dung Tri | x | 1.5 | linked to internship & IoT lab |
| Tran Duc Anh | x | 1.2, 1.3 | TBC |
| Nguyen Dang Duc Anh | x | 1.3 | |
| Hoang Khue | x | 1.3, 1.4 | |
| Vu Thanh Ha | MDSA | Software Engineer |
| Staff | Student? | Projects | Note |
|---|---|---|---|
| Tran Quang Linh | x | FrontEnd generator, React/Native (version 1.0) | Masters, VNU-UET, 2023 |
| Tong Van Hai | x | FrontEnd generator, Vuejs (version 1.0) | Masters, VNU-UET, 2023 |
| Hai Binh | x | MOSAR version 1.0 | Graduation project, HANU, 2020 |
Most of the feature documentations are written as ReadMe.md file in the framework modules that implement them. Thus, it is important to understand the JDA project structure and to browse it for detailed explanation of the features.
In Maven's terminology, a module is implemented as an artifact project.
JDA has a root (top-level) project whose structure is as follows:
jda:root	-> the root project
  common  -> module-common: (base) module used by other modules
  :dcsl    -> module-dcsl: implements DCSL language (used by most other modules)
  jda:main -> contains the core components of JDA
  jda:modules:root -> consists of independent modules that extend the core
  	:mbsl    -> implements MBSL language
  	:mccl    -> implements MCCL language
  	:sccl    -> implements SCCL language
    :restful  -> implements restful service
    ...
  jda.examples:root -> consists of application examples for JDA
  	jda.examples:courseman  -> coursemain examples
  	  jda.examples.courseman:basics
      :basics2
      :extsoftware
      :soict2019
    - jda.examples:drawing
    - :kengine
    - :processman
    - :vendingmachine
    - ...
Chapters 1-4 cover DCSL, how to develop the domain model using DCSL and the user interface of the JDA Tool. Overall, these chapters help demonstrate the basic solution for the software generation problem that JDA is designed to address. The enhanced software generation capabilities of JDA, that are being developed, are based on this basic design.
Listed at the back of each chapter are a number of exercises that should be used for practice.
Generally, the dependencies are configured for each project. However, due to historical reasons, JDA currently has some special dependencies that need to be installed manually. Follow the instructions below to install these dependencies.
These dependencies are located in the jda/local-maven-repo directory:
jayway-jsonpath
mvn install:install-file -Dfile=local-maven-repo/jayway/jsonpath/json-path/2.4.0/json-path-2.4.0.jar -DpomFile=local-maven-repo/jayway/jsonpath/json-path/2.4.0/json-path-2.4.0.pom
jscaledhtmltextpane
mvn install:install-file -Dfile=local-maven-repo/jscaledhtmltextpane/jscaledhtmltextpane/unknown/jscaledhtmltextpane-unknown.jar -DpomFile=local-maven-repo/jscaledhtmltextpane/jscaledhtmltextpane/unknown/jscaledhtmltextpane-unknown.pom
scrollabledesktop
mvn install:install-file -Dfile=local-maven-repo/scrollabledesktop/scrollabledesktop/unknown/scrollabledesktop-unknown.jar -DpomFile=local-maven-repo/scrollabledesktop/scrollabledesktop/unknown/scrollabledesktop-unknown.pom
JDA comes with a set of example applications that demonstrate different subsets of features. Refer to the ReadMe files in the examples project for details.
REMEMBER: Always perform commands on a module project from the JDA root directory:
From the root folder of the project, type this command:
mvn clean install -DskipTests=true
- Use the "Import existing Maven project" to import the artifact project you want to work with
- browse to the artifact folder and select it's pom on the dialog
- Configure the source code and test directories following the Maven standard:
- If the project has already been imported before and its Eclipse's
.classpathhas been commited then you just need to verify that the source code directories have their respective output directories set correctly (see below) - Add these two source directories to Eclipse:
- main source code:
src/main/java - test source code:
src/test/java - (optional) example source code:
src/example/java
- main source code:
- Ensure the following output directory arrangement:
src/main/java->target/classes(default)src/test/java->target/test-classessrc/example/java->target/example-classes
- If the project has already been imported before and its Eclipse's
- Eclipse will automatically look for dependencies in the local repo, and if not found then download them from Maven Central
- cd into the JDA's root directory
- type this command, where replace
module-Xby the actual module artifact name:mvn clean compile -pl :module-X -am- Option
-amis needed to compile the projects that this module depends on
- Option
- cd into the JDA's root directory
- type this command, where replace
module-Xby the actual module artifact name:mvn package -pl :module-X -am -DskipTests=true- Option
-amis needed to compile the projects that this module depends on - Option
-DskipTests=trueis used to skip executing the JUnit tests
- Option
This requires creating a single assembly containing all the project resources (not just the compile classes)
- create a
deploy.xmlfile for the module, place it in the foldersrc/main/assembly - update
pom.xmlto configure it to readdeploy.xmlas part of thepackagetask - cd into the module's directory
- Type this command:
(add the option
mvn package-DskipTests=trueif needed)
TODO: update this section to extend the deployment task in the previous section.
This creates an assembly that contains everything from the previous section plus all the test classes.
- Check that
maven-assembly-pluginis added to the JDA root'spom.xmland configured - Copy the template
assemply-test.xmlfile to the module's directory - Edit
pom.xmlto add 2 goals as shown in the templatepom.xml:- one uses
maven-jar-pluginwith thetest-jargoal - the other uses
maven-assembly-pluginwith thesinglegoal
- one uses
- cd into the JDA's root directory
- Type this command, replace
module-Xby the actual module artifact name:mvn clean compile test-compile assembly:single -pl :module-X -am
- the
test-compiletarget is to ensure that test sources are compiled
bin/mvn-java.bash <artifact> <FQN-program-class>
Given:
- module whose artifact-id is
jda-X - JUnit test class (in
src/test/java):TestClass - test method of the test class:
testMethod(omitted if run all test methods)
To run the JUnit test above:
mvn test -pl :jda-X -Dtest=TestClass#testMethod
-
run normally (terminates after completed):
bin/mvn-test.bash <artifact> <FQN-JUnit-test-class> -
run without termination (as a daemon, useful for GUI-typed test programs): (this does not work correctly yet!)
bin/mvn-test-daemon.bash <artifact> <FQN-program-class>
- Create a Maven project
- Example APP:
courseman-address - qualified artifact name (QAN):
org.jda.example.coursemanmsa.address-service
mvn archetype:generate -DgroupId=org.jda.app -DartifactId=courseman-address -DarchetypeArtifactId=maven-archetype-quickstart -DarchetypeVersion=1.4 -DinteractiveMode=false
- Edit
$APP/pom.xmlto add the JDA's Github repository and a dependency for the JDA module. This module is stored on the repository
...
   <repositories>
     <!-- JDA's deployment repository on GitHub -->
     <repository>
       <id>github-jda</id>
       <name>JDA: GitHub Apache Maven Packages</name>
       <url>https://maven.pkg.github.com/jdomainapp/jda</url>
     </repository>
   </repositories>

  <dependencies>
   ...
   <!-- JDA module artifact (stored on the repository (above)) -->
    <dependency>
     <groupId>org.jda.example.coursemanmsa</groupId>
     <artifactId>address-service</artifactId>
     <version>0.0.1-SNAPSHOT</version>
    </dependency>
  </dependencies>
- Configure your authentication to the JDA's Github repository in
~.m2repository
- Create file
~.m2/settings.xmlwith the following content. Replace the user name and password fields with your own:
<settings xmlns="http://maven.apache.org/SETTINGS/1.0.0"
  xmlns:xsi="http://www.w3.org/2001/XMLSchema-instance"
  xsi:schemaLocation="http://maven.apache.org/SETTINGS/1.0.0
                      http://maven.apache.org/xsd/settings-1.0.0.xsd">

  <activeProfiles>
    <activeProfile>github</activeProfile>
  </activeProfiles>

  <profiles>
    <profile>
      <id>github</id>
      <repositories>
        <!-- JDA -->
        <repository>
          <id>github-jda</id>
          <url>https://maven.pkg.github.com/jdomainapp/jda</url>
          <snapshots>
            <enabled>true</enabled>
          </snapshots>
        </repository>
        <repository>
          <!-- for testing -->
          <id>github-test</id>
          <url>https://maven.pkg.github.com/jdomainapp/test</url>
          <snapshots>
            <enabled>true</enabled>
          </snapshots>
        </repository>
      </repositories>
    </profile>
  </profiles>

  <servers>
    <server>
      <id>github-jda</id>
      <username>YOUR-GIT-USER-NAME</username>
      <password>YOUR-PASSWORD-OR-ACCESS-TOKEN</password>
    </server>
    <server>
      <id>github-test</id>
      <username>YOUR-GIT-USER-NAME</username>
      <password>YOUR-PASSWORD-OR-ACCESS-TOKEN</password>
    </server>
  </servers>
</settings>
- Install the app
First ensure that the dependencies in the
local-maven-repare installed. See a previous section.
Then, issue this command:
mvn install
The app is then installed in the local .m2 repository. For our $APP example, it should be something like this ~.m2/repository/org/jda/example/coursemanmsa/address-service/0.0.1-SNAPSHOT/address-service-0.0.1-SNAPSHOT.jar
For modules that implement app examples (e.g. microservice apps), use the following steps to package the app with all the dependencies (incl. JDA ones) and then run the app:
- Package the app
Use
mvn packageto package the app.
If the JDA module was created as a Spring-Boot project, make sure to package and deploy that module as such, using this command:
mvn clean package spring-boot:repackage
the application is then packaged as a .jar file in the target directory
- Run the app from the JAR file with the
java -jarcommand: Example:
java -jar target/address-service-0.0.1-SNAPSHOT.jar
-
Pull the JDA run-time docker image, named
jdare, from Docker's Hub: https://hub.docker.com/repository/docker/ducmle/jdare/general.- Use the image with the
latesttag
- Use the image with the
-
Run the necessary infrastructure services of the app on the host machine. These may include a combination of the followings (depending on the type of application): database, configuration server, discovery server, gateway server, Kafka server, etc.
-
Create a Docker container from the
jdareimage with a shell prompt. This container will be used to run the app in the next step:
docker run --name jdare -it --network host ducmle/jdare:latest bash
Option --network host is only needed if you are running microservices applications. It allows your application (running from within a container) to expose ports for public access through the host machine and also to allow your application to access the host machine's infrastructure services
- Copy the application jar file to the container
Use the
docker cpcommand on the host machine. For example:
docker cp target/courseman-address.jar jdare:/jda/courseman-address/
will copy the jar file target/courseman-address.jar to the application directory /jda/courseman-address in the container named jdare.
If the application directory does not yet exist, create it first.
- From the shell of the Docker container, run the application
.jarfile, using thejava -jarcommand.
If your JDA's module app exposes an application port (e.g. 8080) and multiple instances of the app needs to be executed then you can run each instance in a separate Docker container, mapping the application port in each container to a different host port.
-
Same as running a single instance app (see above)
-
Almost the same as running a single instance app (see above).
Note, however, that, instead of using localhost you must specify a host name in all the configurations of the JDA module app.
Suppose the infrastructure servers are inf-server1, inf-server2, etc.
- For each application instance, run a Docker container from the same
jdareimage with a shell prompt. The options are different from the case of running a single instance. Change the host port for each container!
docker run --add-host=inf-server1:host-gateway --add-host=inf-server2:host-gateway -p 7070:8082 --name jdare -it ducmle/jdare:latest bash
- Instead of using
--network host, we use-pto expose the application port (8080) to a specific host port (7070). Change this host port for each container! - the
--add-hostoptions use thehost-gatewayvalue to map each infrastructure server (started in the previous step) to the host machine
- Copy the application jar file to the container
Use the
docker cpcommand on the host machine. For example:
docker cp target/courseman-address.jar jdare:/jda/courseman-address/
will copy the jar file target/courseman-address.jar to the application directory /jda/courseman-address in the container named jdare.
If the application directory does not yet exist, create it first.
- From the shell of the Docker container, run the application
.jarfile, using thejava -jarcommand.
When developing multiple-instance app (e.g. microservices), you may want to reuse a Postgresql database running on the host machine for all the instances.
- Configure
pg_hba.confIn order for PostgreSQL server to accept connections from any IP address on the network, add the following entry to filepg_hba.conf.
host all all 0.0.0.0/0 md5
- Configure
pg_ident.confIn addition, in order for PostgreSQL to permit your app's database user to login in, add the following entry to yourpg_indent.conffile. Suppose the database user isadmin:
# MAPNAME       SYSTEM-USERNAME         PG-USERNAME
admin	          my-system-user-name     postgres
Replace my-system-user-name by your actual logged-in user of the host machine.
- Install the RDBMS (e.g. PostgreSQL,...)
- Create a database as per the configuration specified in the element
@SystemDesc.@DSDescof the software's SCC:dsUrl: server name, port and database name match the database configuration in the RDBMSuser: the database user namepassword: the database user password
- Run the software
You do not need to create the tables, the software will create them automatically.
URL: http://www.squirrelsql.org/index.php?page=home#installation
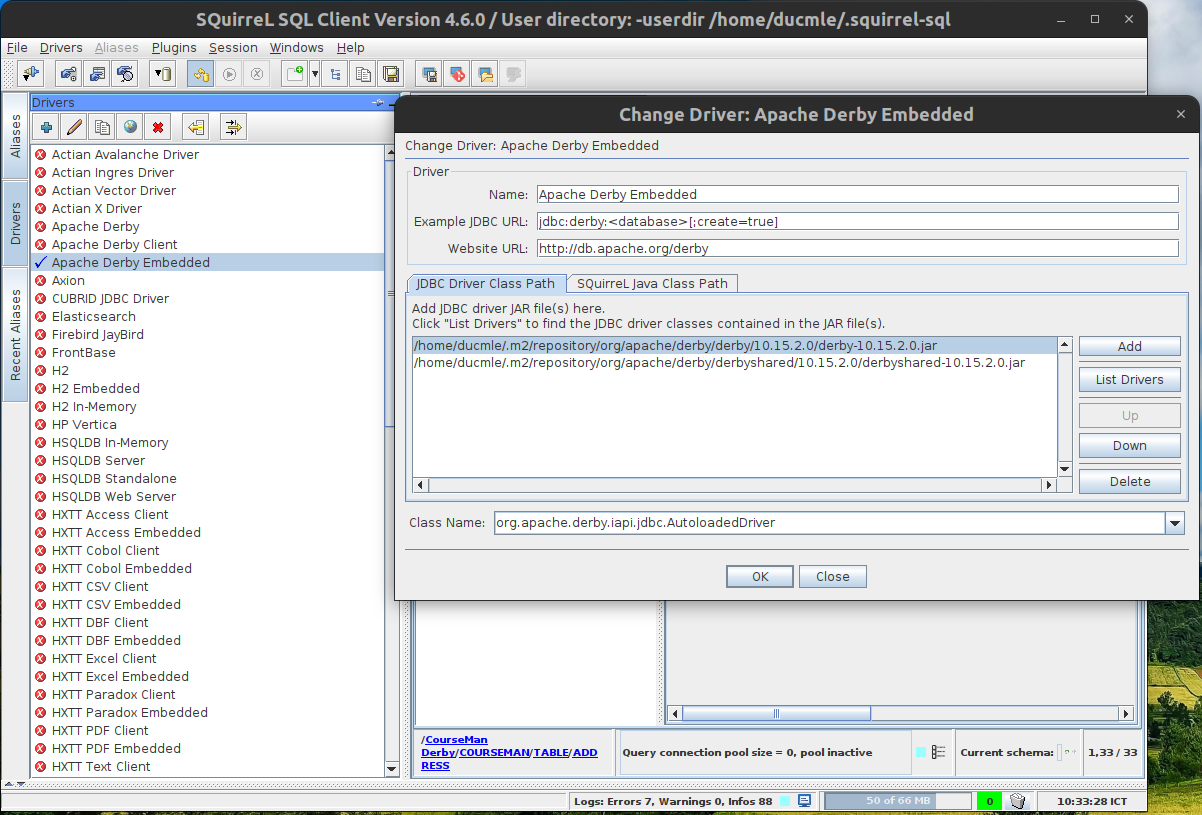
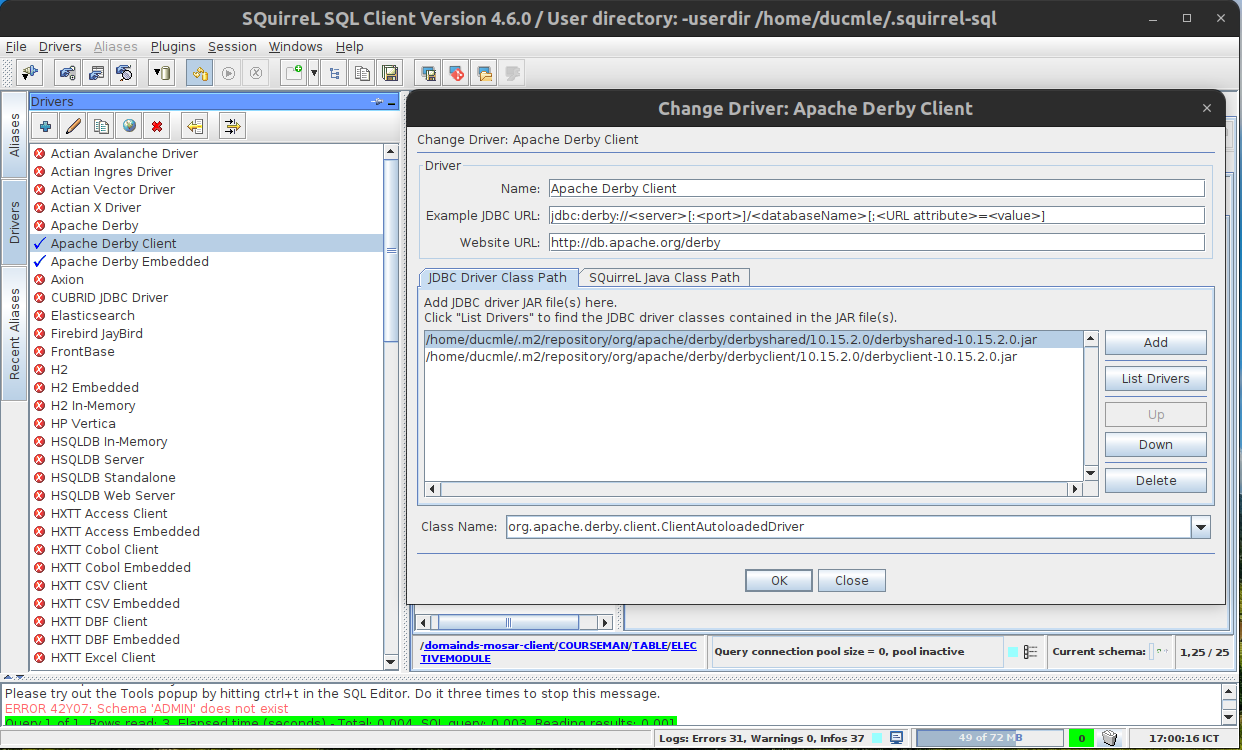
- needs two files:
derbyclient.jar(for client/server mode) ORderby.jar(for embedded mode)derbyshared.jar
- folder paths point to the local Maven repository folders of Apache Derby, which are as follow (
x.y.zis the version string):derby.jar=>$USER_HOME/.m2/repository/org/apache/derby/derby/x.y.z/derby-x.y.z.jarderbyclient.jar=>$USER_HOME/.m2/repository/org/apache/derby/derbyclient/x.y.z/derbyclient-x.y.z.jarderbyshared.jar=>$USER_HOME/.m2/repository/org/apache/derby/shared/x.y.z/derby-x.y.z.jar
- use the "List Drivers" button to automatically find the driver class
The following screenshot shows an example configurations for embedded and client/server modes. The embedded mode is the default use of the database in the CourseMan examples.
Configure Apache Derby JDBC EMBEDDED driver:
Configure Apache Derby JDBC CLIENT driver:
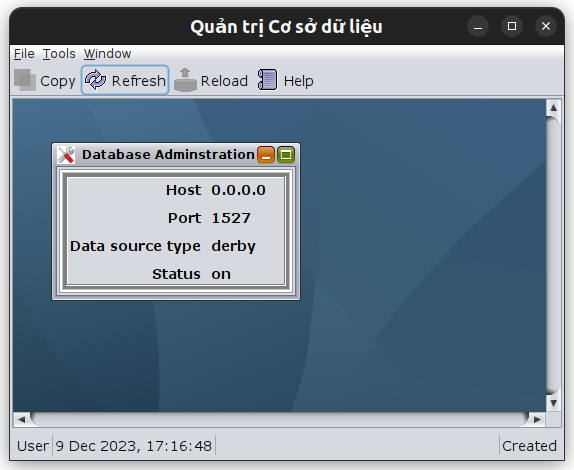
Start the DB server process so that client can connect. Run the following command from the project's working directory (e.g. /jda/examples/courseman/mosar):
:mosar$ mvn exec:java -DmainClass=jda.software.javadbserver.JavaDbServerProgram
This starts the server process with a UI shown in the following image:
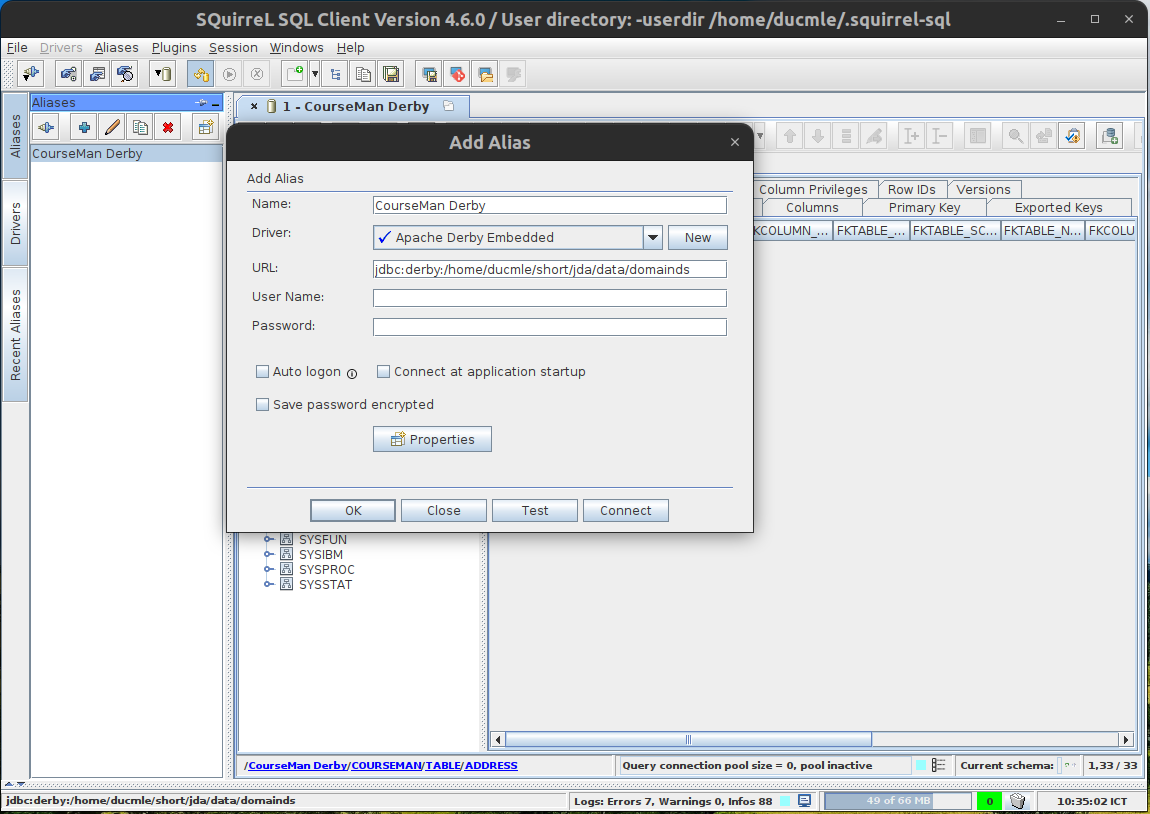
- For CourseMan examples, path to the db directory is in the
datasubfolder of your project directory (e.g..../data/domainds), as shown in the image below
Create an EMBEDDED connection alias to the db:
Create a CLIENT connection alias to the db:
