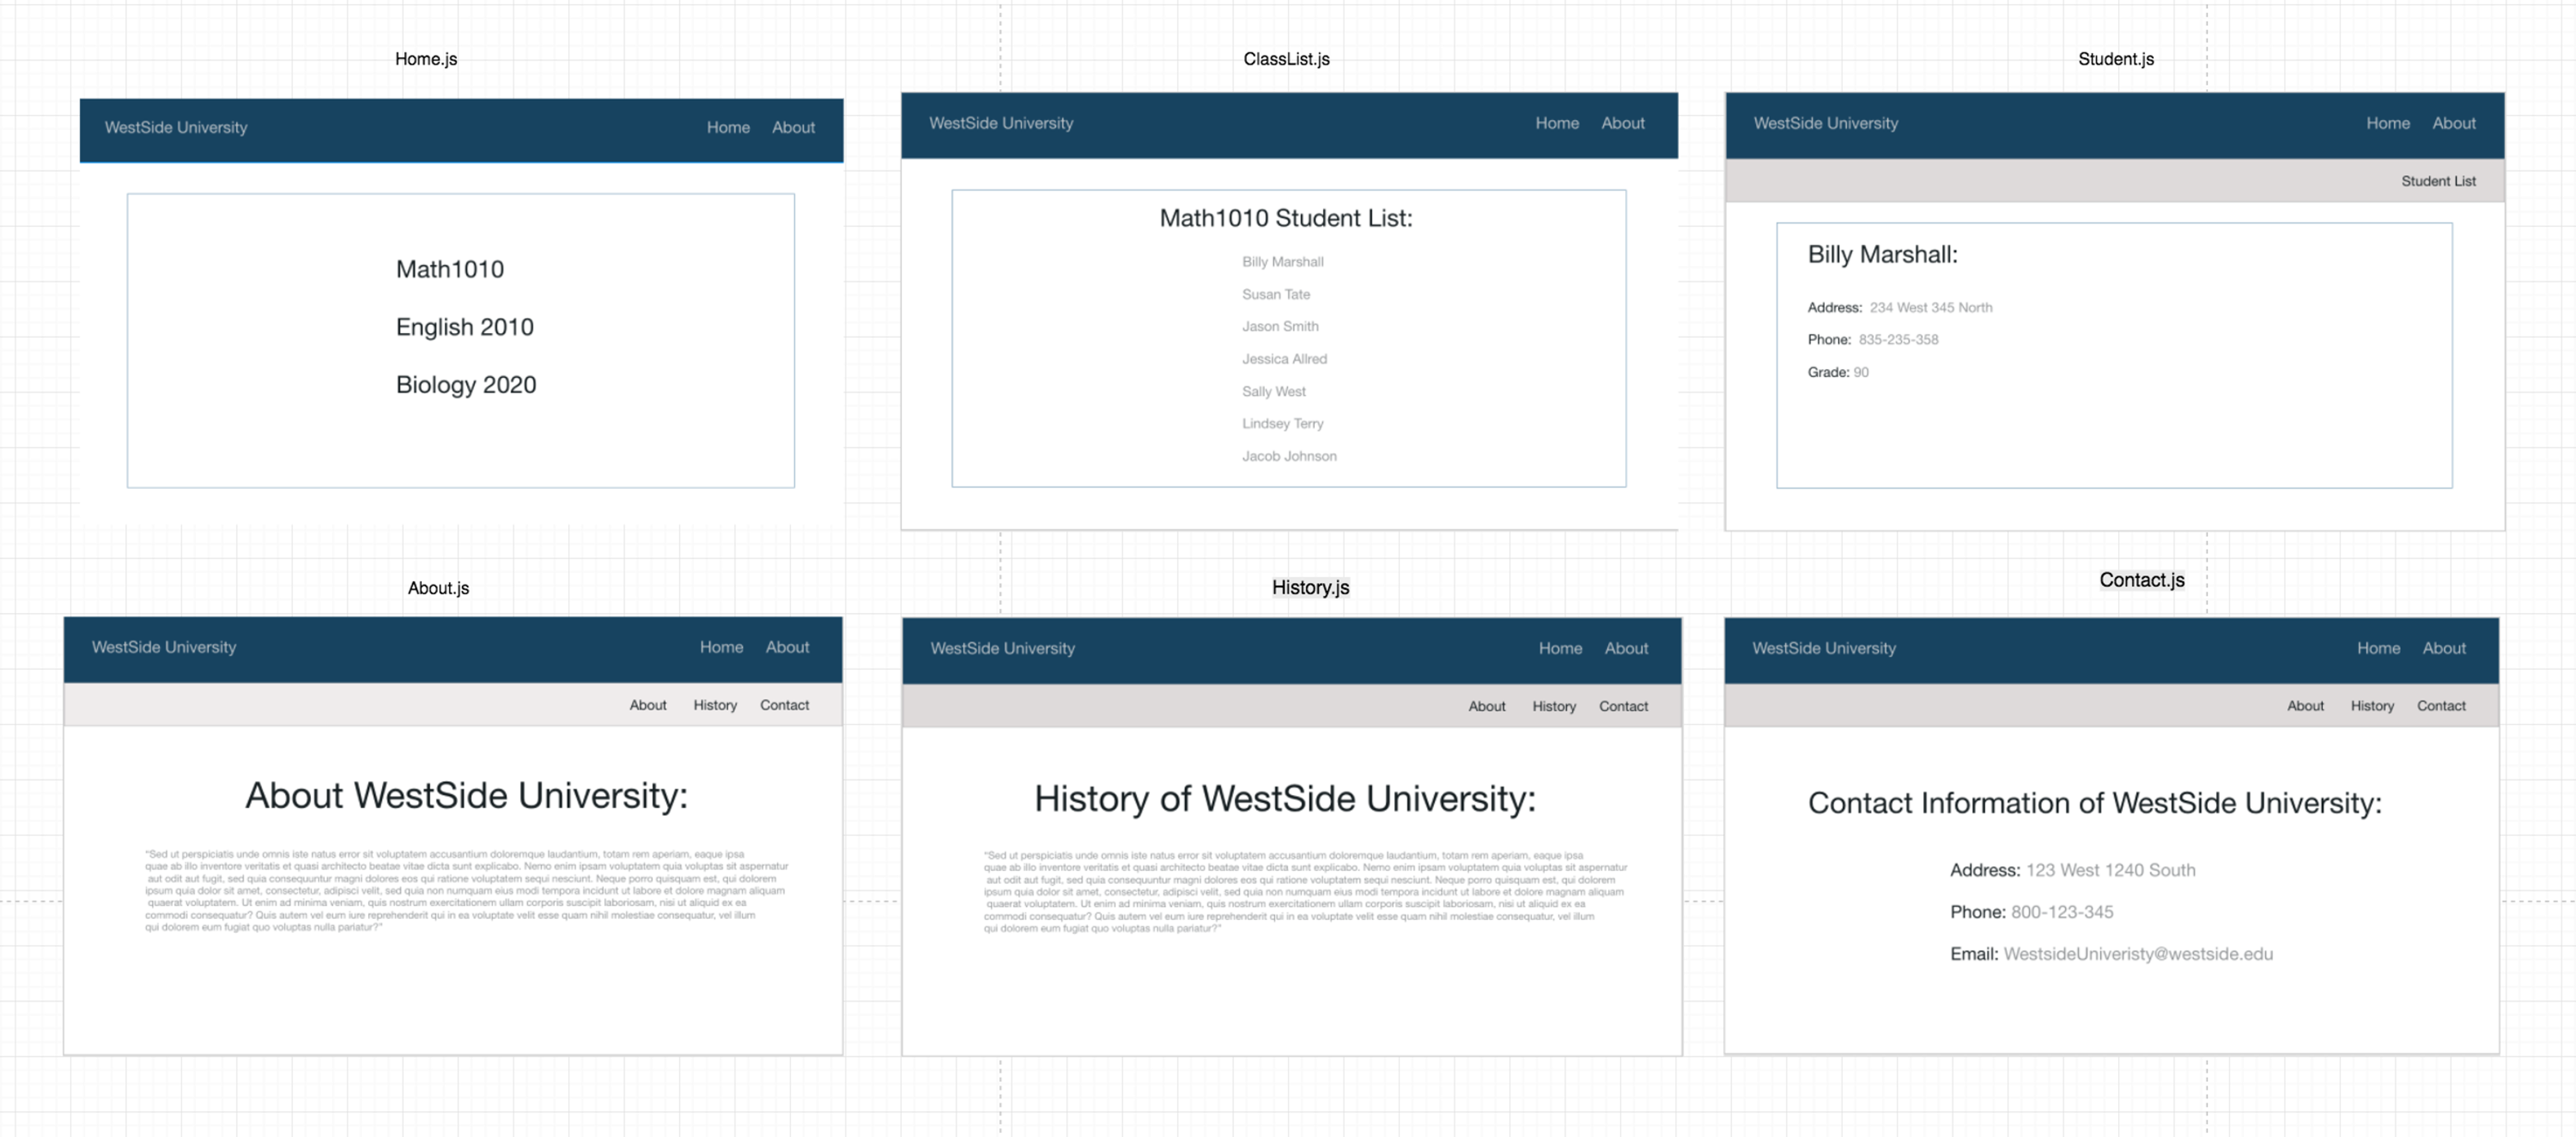
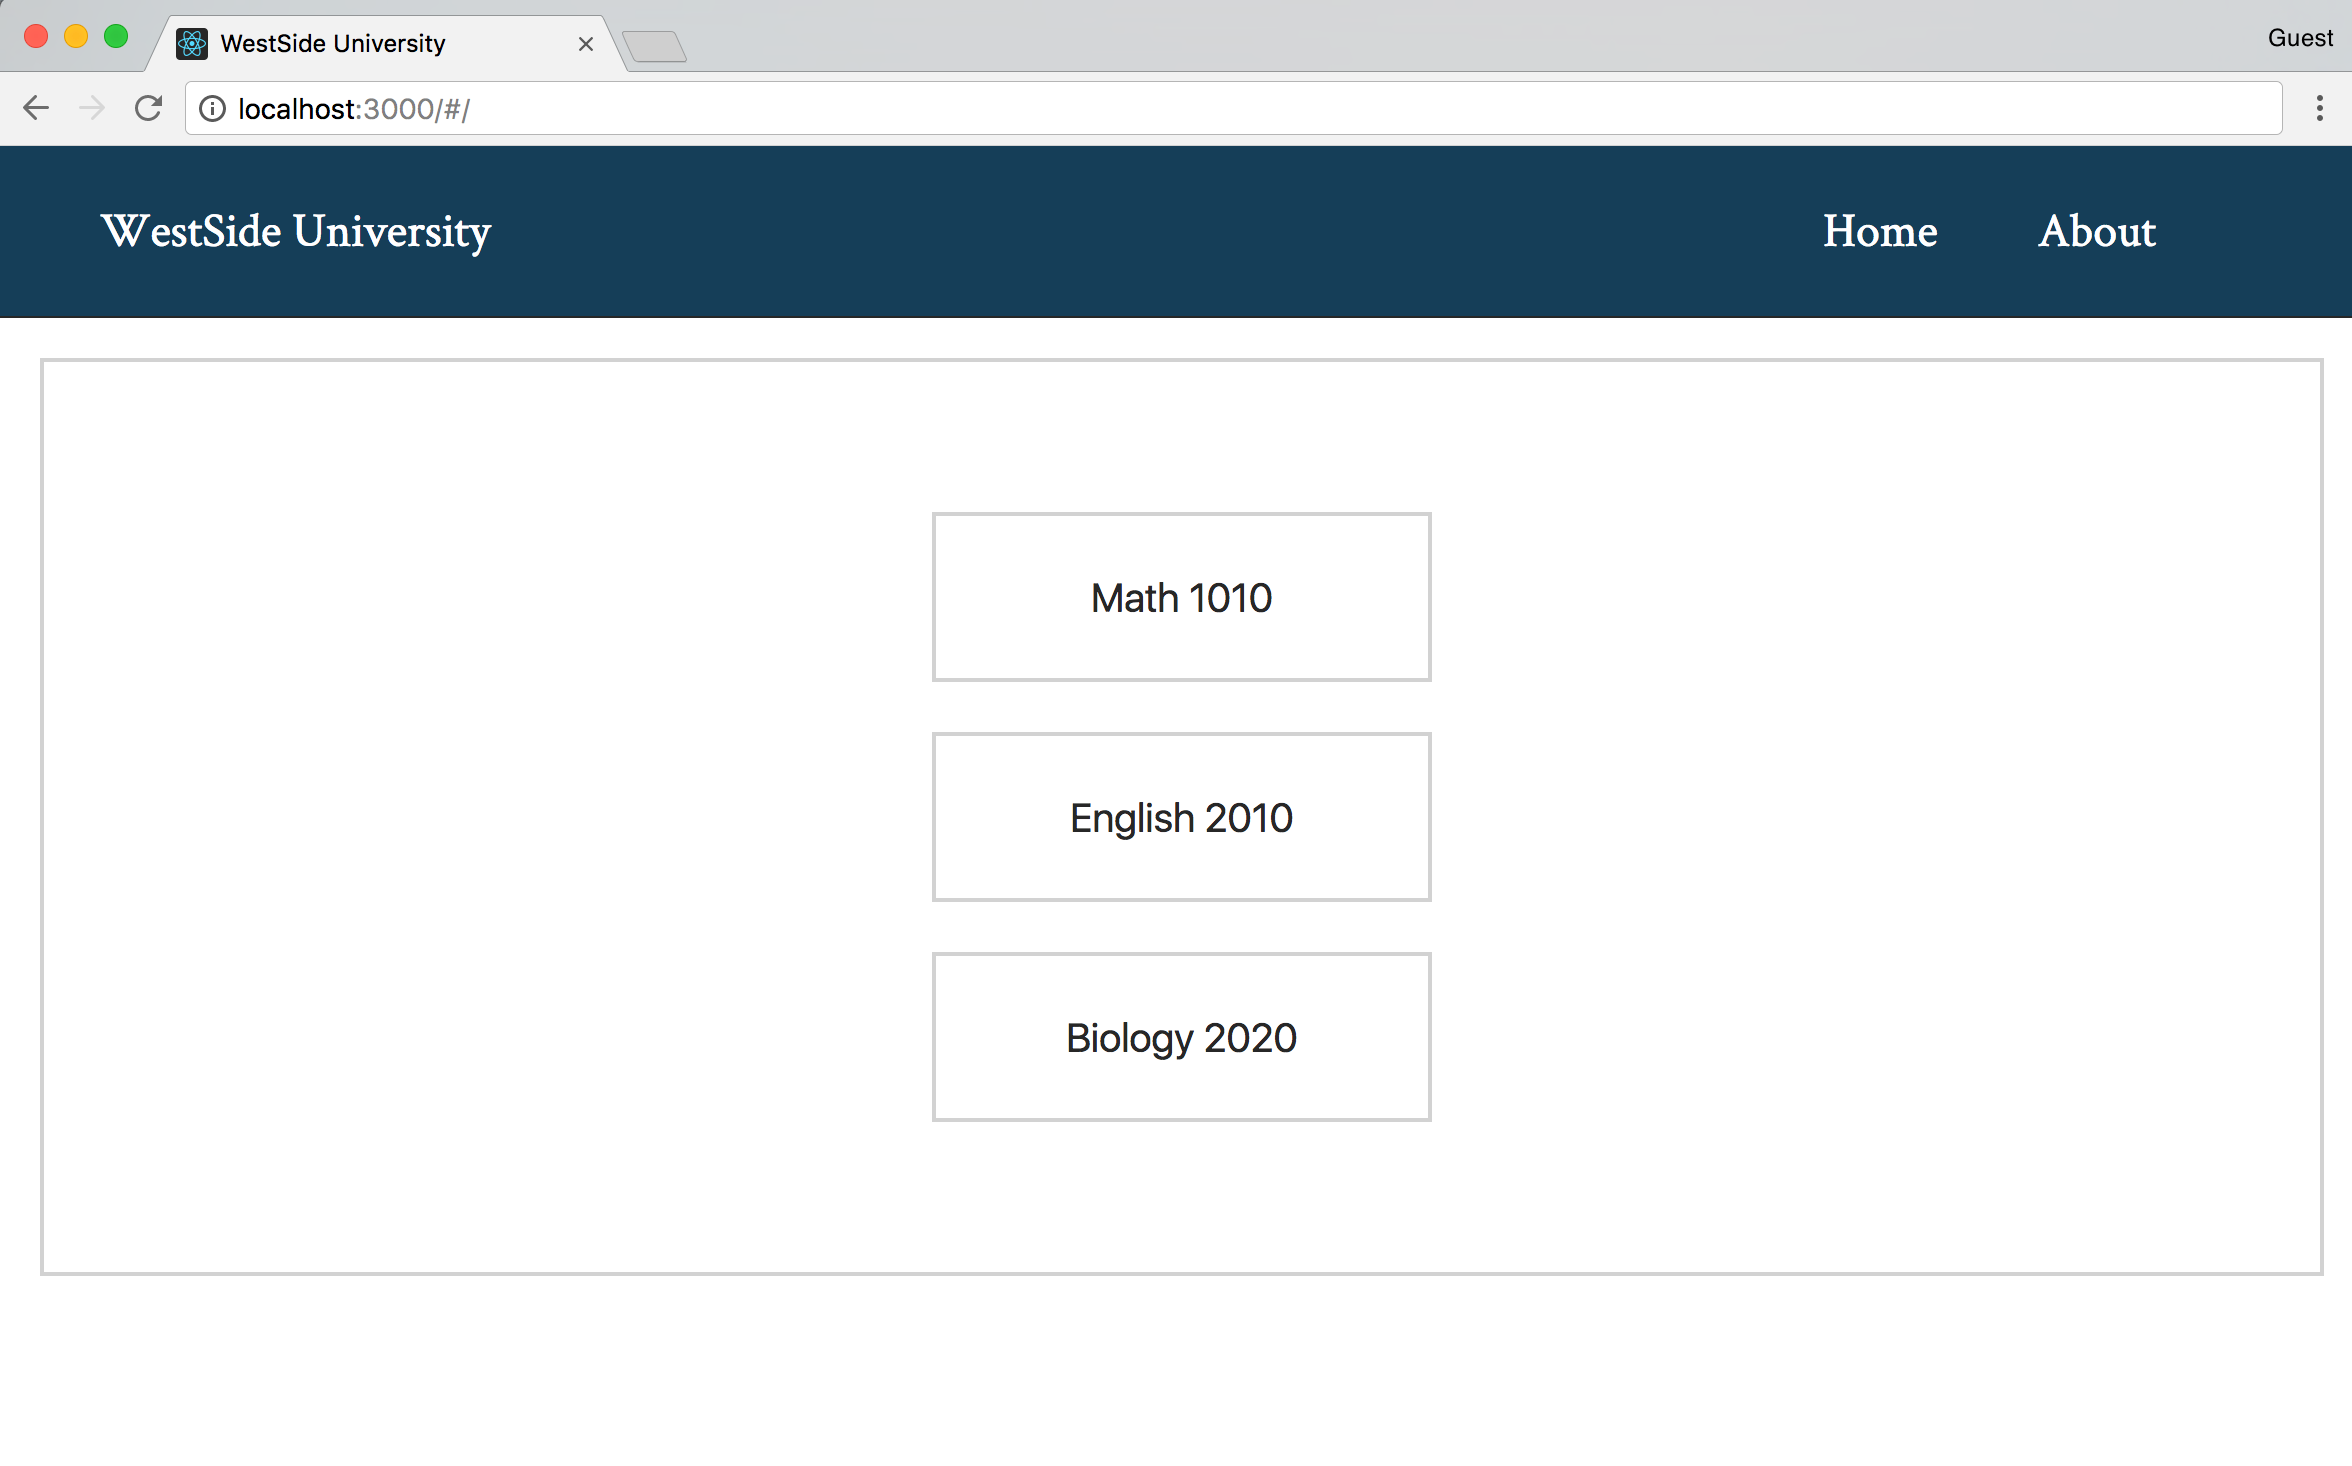
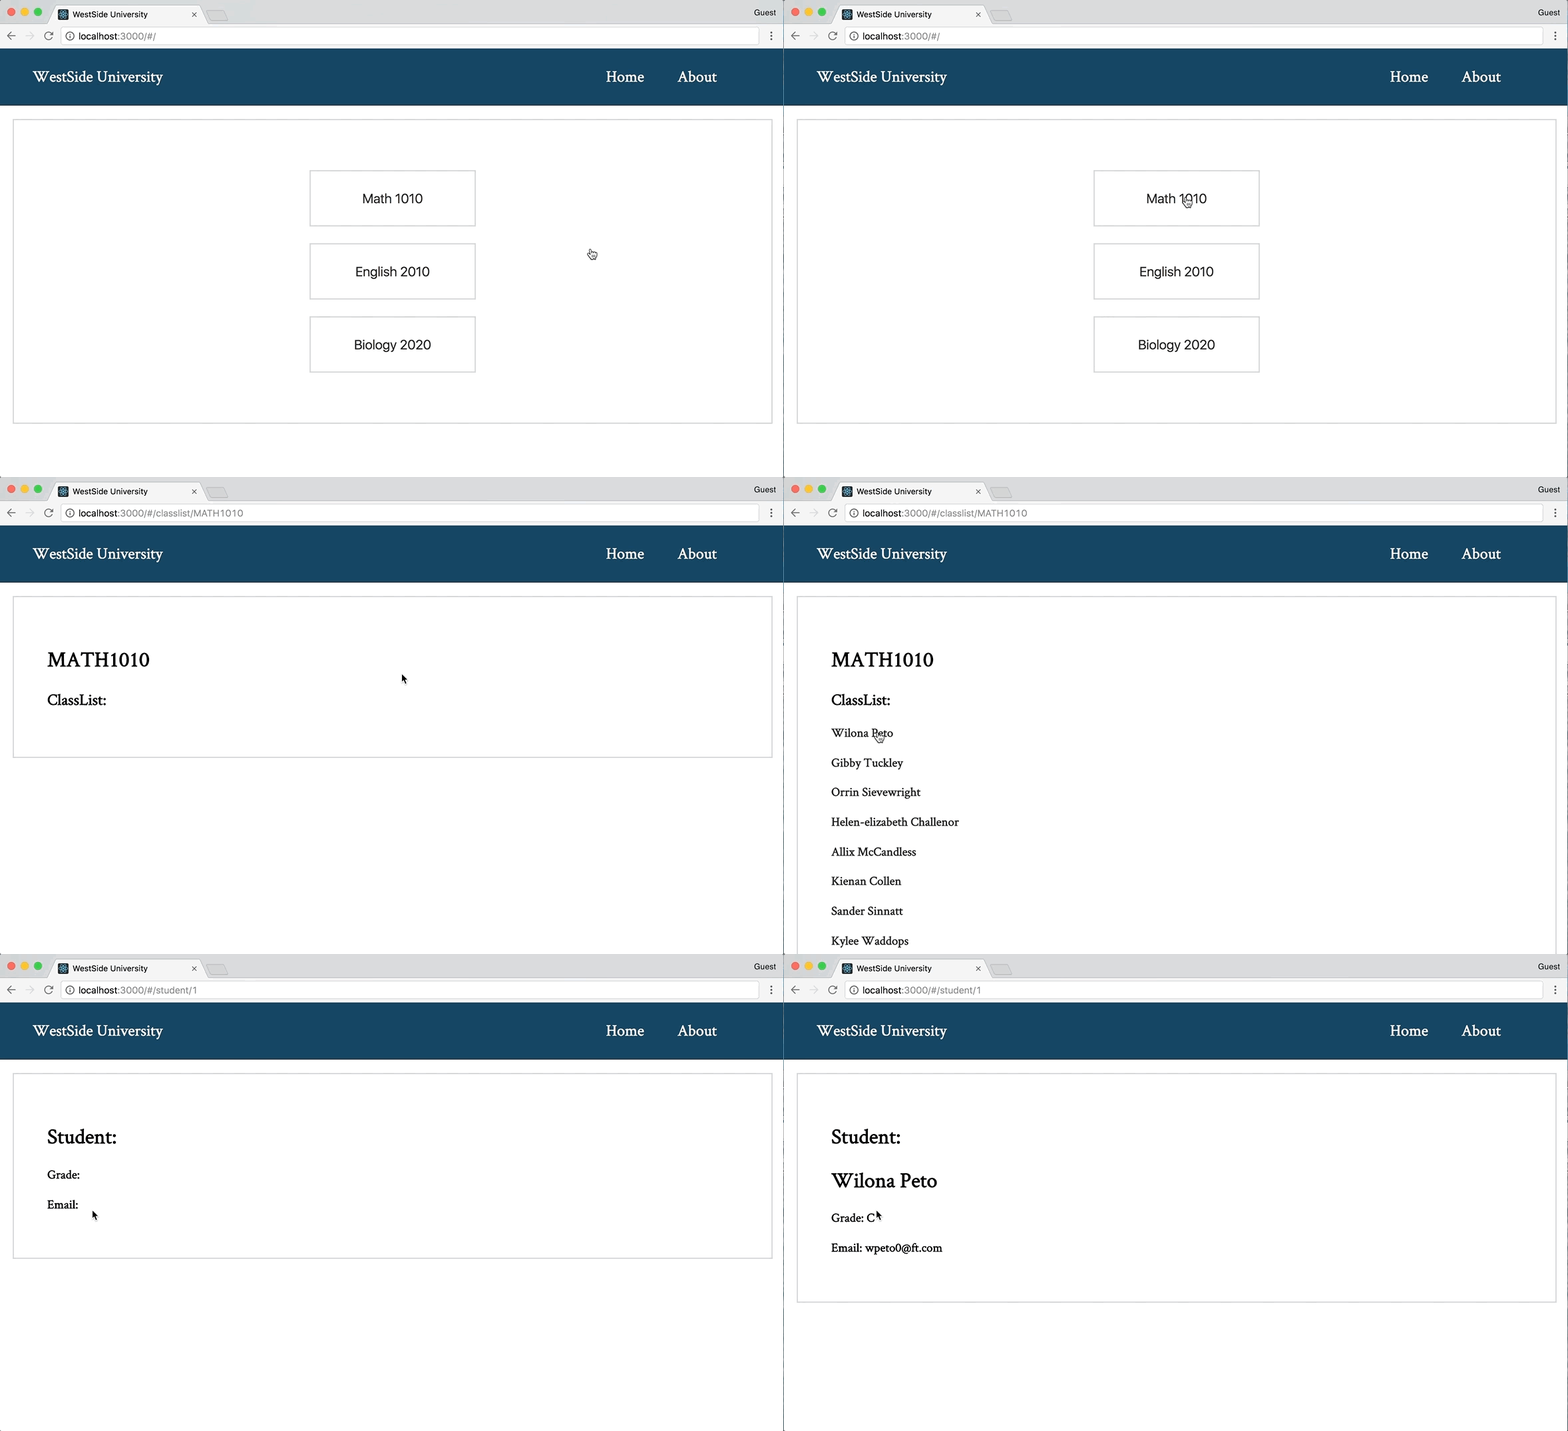
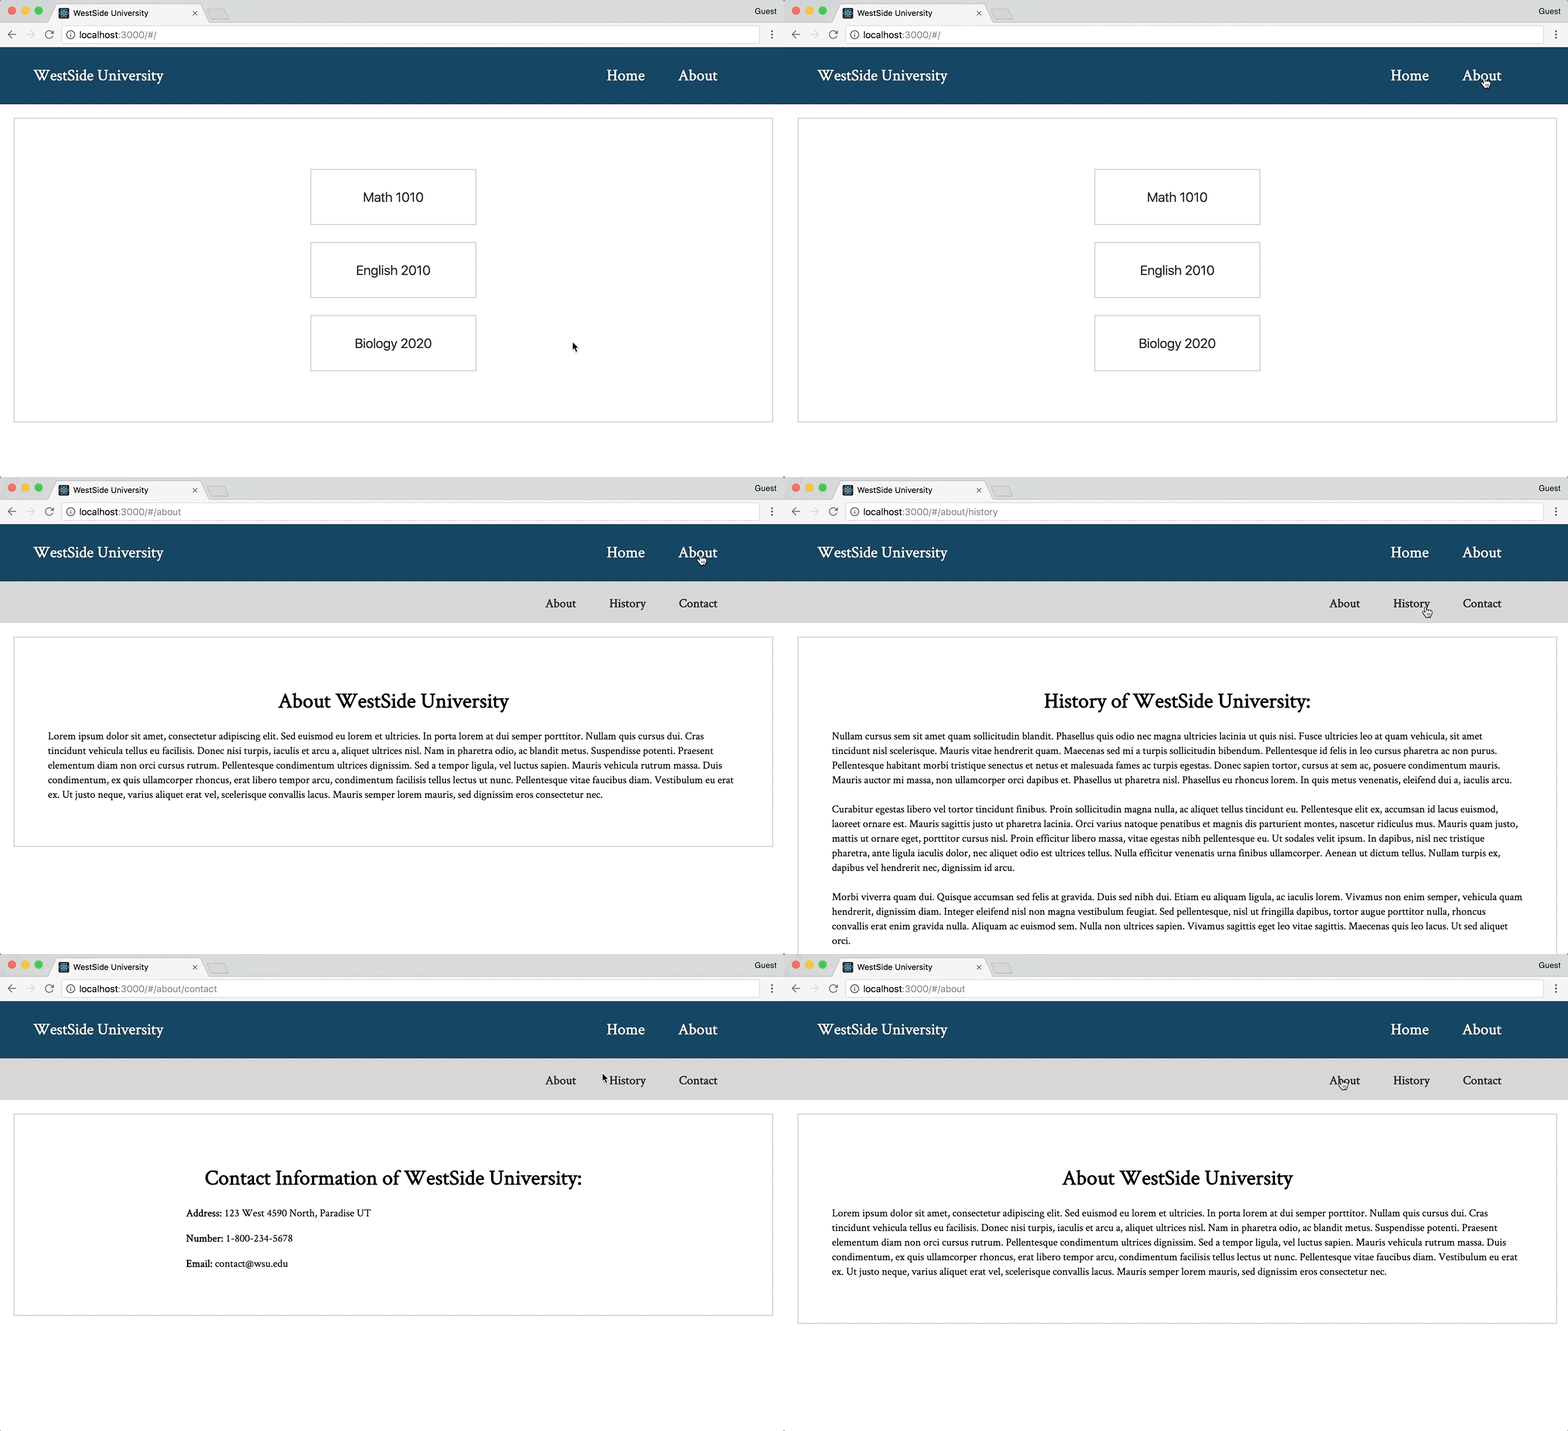
In this project we will be building a site for a University to keep track of student information and class enrollment. We will be using React Router to navigate between the various views required. Take some time to familiarize yourself with the provided components.
Appwill be the top level component for our application.Homewill be the home page displayed when the application first loads. It will also display the available classes.Aboutwill be the about page displaying information about the University.Historywill be a nested view with the about page and will display the history of the university.Contactwill be a nested view with the about page and will display the University's contact information.
ClassListwill display all the enrolled students for that specific class.Studentwill be the detail view for a particular student.
forkandclonethis repository.cdinto the project.- Run
npm install.- One of the packages that was installed was
json-server. This library will mimic a ReST api and allow you to make HTTP requests for the student data that is stored indb.json.
- One of the packages that was installed was
- Run
npm startto spin up the development server - In a separate terminal, run
npm run apito start the json-server. This step is important, you won't be able to get data through HTTP requests if this is not running.
To begin our project, we will be installing additional dependencies required for configuring the router.
- Install React Router (
npm install --save react-router-dom). - Create a new file in
src/namedroutes.js. - Configure your routes in
src/routes.js:- Import React from
react. - Import
SwitchandRoutefromreact-router-dom. - Import the following components to use as routes:
src/components/Home/Home.jssrc/components/About/About.js
- Create an empty
export default ()statement. - Use the following combinations of paths and components for your routes within the export default parentheses:
- Path: "/" - Component:
Home- This path should be exact. - Path: "/about" - Component:
About.
- Path: "/" - Component:
- Import React from
src/routes.js
import React from 'react';
import { Switch, Route } from 'react-router-dom';
import Home from './components/Home/Home';
import About from './components/About/About';

export default (
  <Switch>
    <Route component={ Home } exact path="/" />
    <Route component={ About } path="/about" />
  </Switch>
)In this step, we will take the routes we just configured in src/routes.js and add it to our application in src/index.js.
- Open
src/index.js. - Import
HashRouterfromreact-router-dom. - Wrap the
Appcomponent in aHashRoutercomponent. - Open
src/App.js. - Import
routesfrom./routes.js. - Underneath the
navelement render theroutesJSX.
src/index.js
import React from 'react';
import ReactDOM from 'react-dom';
import { HashRouter } from 'react-router-dom';
import './main.css';
import App from './App';

ReactDOM.render(
    <HashRouter>
      <App />
    </HashRouter>
, document.getElementById('root'));
src/App.js
import React, { Component } from 'react';
import routes from './routes';

export default class App extends Component {

    render() {
        return (
           <div>
               <nav className='nav'>
                   <div>WestSide University</div>
                   <div className='link-wrap'>
                        <div className='links'>Home</div>
                        <div className='links'>About</div>
                   </div>
               </nav>
            { routes }
           </div>
        )
    }

}In this step, we will be adding links to render our home and about views.
- Open
src/App.js. - Import
Linkfromreact-router-dom. - Locate the
divelements with className of links.- Replace the
divelements to beLinkcomponents. - The Home link should be sent to
/. - The About link should be sent to
/about.
- Replace the
src/App.js
import React, { Component } from 'react';
import { Link } from 'react-router-dom';
import routes from './routes';

export default class App extends Component {

    render() {
        return (
           <div>
               <nav className='nav'>
                   <div>WestSide University</div>
                   <div className='link-wrap'>
                        <Link to="/" className='links'>Home</Link>
                        <Link to="/about" className='links'>About</Link>
                   </div>
               </nav>
            { routes }
           </div>
        )
    }

}In this step, we will be adding a new route for our ClassList component. We will also be adding Link components in the Home component to link to the ClassList route for each of the listed classes.
- Open
src/routes.js. - Import the
ClassListcomponent to use as a route. - The
ClassListcomponent will need to render the students for that specific class. In order to do this, we will be using params.- Create a new route with the path being
/classlist/:classand the component being theClassListcomponent you previously imported.
- Create a new route with the path being
- Open
src/Home/Home.js. - Import
Linkfromreact-router-dom. - Wrap each
buttonelement with aLinkcomponent. - Each link should direct to the path
/classlistwith the class name added to the path ending.- Math 1010 -
/classlist/MATH1010 - English 2010 -
/classlist/ENG2010 - Biology 2020 -
/classlist/BIO2020
- Math 1010 -
The ClassList component will not be rendering the student enrollment list just yet, we will be doing that in the next step.
src/routes.js
import React from 'react';
import { Switch, Route } from 'react-router-dom';
import Home from './components/Home/Home';
import About from './components/About/About';
import ClassList from './components/ClassList/ClassList';

export default (
  <Switch>
    <Route component={ Home } exact path="/" />
    <Route component={ About } path="/about" />
    <Route component={ ClassList } path="/classlist/:class" />
  </Switch>
)
src/Home/Home.js
import React, { Component } from 'react';
import { Link } from 'react-router-dom';

export default class Home extends Component {

  render() {
    return (
      <div className="box">
        <Link to='/classlist/MATH1010'><button className='btn'>Math 1010</button></Link>
        <Link to='/classlist/ENG2010'><button className='btn'>English 2010</button></Link>
        <Link to='/classlist/BIO2020'><button className='btn'>Biology 2020</button></Link>
      </div>
    );
  }
}We will now work with our ClassList component to display the students enrolled for that specific class. To get this data, we will be making an HTTP call to our json-server.
- Open
src/components/ClassList/ClassList.js. - We first need to initialize state for this component.
- Within the
constructormethod, initialize state with a property namedstudentsset to the value of an empty array.
- Within the
- Now we will be making an HTTP request to get the student enrollment data for the specific class.
- We will be using
axiosto make our HTTP request.- Install the package
axios. - Import
axiosinto theClassListcomponent.
- Install the package
- Create a
componentDidMountlifecycle hook method. - Within this method, make a get request using
axiosto the URLhttp://localhost:3005/students?class=- This URL is incomplete, we need to be getting data for the specific class which is stored in the
paramsobject. - Using the
paramsobject, add the property valueclassto the ending of the request URL so that the get request will be making a query for the specific class that was selected.
- This URL is incomplete, we need to be getting data for the specific class which is stored in the
- Once the data returns, we will need to set
studentsin state to the new data.
- We will be using
- Now that we are receiving the correct data and setting state to the newly received data, we need to display that data.
- Create a new variable named
studentswithin the render method. - Set the variable
studentsequal to the propertystudentsfrom state. - Now use a
.map()method onthis.state.students. - Within the
.map()method's callback function, return anh3tag that renders the JSX for the student'sfirst_nameandlast_name. Don't forget to give the element a uniquekeyprop. - Underneath the
h2tag withClassList:, render thestudentsvariable JSX.
- Create a new variable named
- Within the
h1tags, put the value of the property class from theparamsobject so that we can see the class name that we're looking at.
src/components/ClassList/ClassList.js
import React, { Component } from 'react';
import axios from 'axios';

export default class ClassList extends Component {
    constructor() {
        super();

        this.state = {
            students: []
        }
    }

    componentDidMount() {
        return axios.get(`http://localhost:3005/students?class=${this.props.match.params.class}`).then(res => {
            this.setState({
                students: res.data
            })
        })
    }

    render() {
        const students = this.state.students.map((student, i) => (
            <h3 key={i}>{ student.first_name } { student.last_name }</h3>
        ))

        return (
            <div className='box'>
                <h1>{ this.props.match.params.class }</h1>
                <h2>ClassList:</h2>
                { students }
            </div>
        )
    }

}Now that we are getting the class student enrollment list for each class, we will start setting up the Student detail view.
- Open
src/routes.js. - Import the
Studentcomponent to use as a route. - The
Studentcomponent will need to render the details for a specific student. In order to do this, we will be using params.- Create a new route with the path being
/student/:idand the component being theStudentcomponent you previously imported.
- Create a new route with the path being
- Open
src/components/ClassList/ClassList.js. - Each of the student's names will need to link to the
Studentcomponent by passing up the student's id to the URL as a parameter.- Import
Linkfromreact-router-dom. - Inside the callback function for the
.map()method, wrap theh3tag being returned with aLinkcomponent. Have thatLinkcomponent direct to/student/${student.id}. - Don't forget to move the unique
keyprop to the outer most element.
- Import
- You should now be able to navigate from the
ClassListview to theStudentdetail view (which will be empty).
src/routes.js
import React from 'react';
import { Switch, Route } from 'react-router-dom';
import Home from './components/Home/Home';
import About from './components/About/About';
import ClassList from './components/ClassList/ClassList';
import Student from './components/Student/Student';

export default (
  <Switch>
    <Route component={ Home } exact path="/" />
    <Route component={ About } path="/about" />
    <Route component={ ClassList } path='/classlist/:class' />
    <Route component={ Student } path='/student/:id' />
  </Switch>
)
src/components/ClassList/ClassList.js
import React, { Component } from 'react';
import { Link } from 'react-router-dom';
import axios from 'axios';

export default class ClassList extends Component {
    constructor() {
        super();

        this.state = {
            students: []
        }
    }

    componentDidMount() {
        return axios.get(`http://localhost:3005/students?class=${this.props.match.params.class}`).then(res => {
            this.setState({
                students: res.data
            })
        })
    }

    render() {
        const students = this.state.students.map((student, i) => (
            <Link to={`/student/${student.id}`} key={i}>
                <h3>{ student.first_name } { student.last_name }</h3>
            </Link>
        ))

        return (
            <div className='box'>
                <h1>{ this.props.match.params.class }</h1>
                <h2>ClassList:</h2>
                { students }
            </div>
        )
    }

}Using the student's id which was passed as a parameter in the url, we will make an HTTP request to our json-server for that specific student's information. We will display the specific student's information in the Student component.
- Open
src/components/Student/Student.js. - We first need to initialize state.
- In the
constructormethod, initialize state with a property namedstudentInfothat is set to the value of an empty object.
- In the
- We now need to make an HTTP request to our
json-serverto get the information for the specific student.- Import
axios. - Create a
componentDidMountlifecycle hook method. - Inside of the
componentDidMountlifecylce hook method, make a get request usingaxiostohttp://localhost:3005/students/. Using theparamsobject, add to the end of the request URL the id that was passed as a parameter. - Update state's
studentInfoto be the returning data.
- Import
- Now that we have the data for the student, we can display it on the page.
- Underneath the
h1tag, display state'sstudentInfoproperties:first_nameandlast_namewithin anh1tag.- The text
Grade:followed by thegradeproperty within anh3tag. - The text
Email:followed by theemailproperty within anh3tag.
- Underneath the
src/components/Student/Student.js
import React, { Component } from 'react';
import axios from 'axios';

export default class Student extends Component {
    constructor() {
        super();

        this.state = {
            studentInfo: {}
        }
    }

    componentDidMount() {
        return axios.get(`http://localhost:3005/students/${this.props.match.params.id}`).then(res => {
            this.setState({
                studentInfo: res.data
            })
        })
    }

    render() {

        return (
            <div className='box'>
                <h1>Student:</h1>
                <h1>{this.state.studentInfo.first_name} {this.state.studentInfo.last_name}</h1>
                <h3>Grade: {this.state.studentInfo.grade}</h3>
                <h3>Email: {this.state.studentInfo.email}</h3>
            </div>
        )
    }
}We now will add a subnav bar that will link to the soon to be nested About, History, and Contact components.
- Open
src/components/About/About.js. - Import
Linkfromreact-router-dom. - Inside the
divwith the classNamesubnav, add 3h3tags with the text:AboutHistoryContact
- Wrap each
h3tag with aLinkcomponent that links the following paths:- About -
/about - History -
/about/history - Contact -
/about/contact
- About -
- Give each of these
Linkcomponents the classNamesubnav_links.
src/components/About/About.js
import React, { Component } from 'react';
import { Link } from 'react-router-dom';

export default class About extends Component {

    render() {
        return (
            <div>
                <div className='subnav'>
                    <Link to='/about' className='subnav_links'><h3>About</h3></Link>
                    <Link to='/about/history' className='subnav_links'><h3>History</h3></Link>
                    <Link to='/about/contact' className='subnav_links'><h3>Contact</h3></Link>
                </div>
                <div className='box'>
                </div>
            </div>
        )
    }

}We will finish by nesting the routes to the About, History, and Contact components.
- Open
src/components/About/About.js. - Import
SwitchandRoutefromreact-router-dom. - Import the
HistoryandContactcomponents. - Inside the
divwith the classNamebox, add aSwitchcomponent. - Add 2 routes inside the
Switchcomponent that will render theHistoryandContactcomponents. Look to theLinkcomponents above for the correct paths. - Inside that same
Switchcomponent, create a third route.- Instead of using a component prop, this will use a
renderprop to render the JSX for theAboutpage. Insert the following JSX in the render's function:
- Instead of using a component prop, this will use a
About JSX
<div>
    <h1 className='title'>About WestSide University:</h1>
    <p>Lorem ipsum dolor sit amet, consectetur adipiscing elit. Sed euismod eu lorem et ultricies. In porta lorem at dui semper porttitor. Nullam quis cursus dui. Cras tincidunt vehicula tellus eu facilisis. Donec nisi turpis, iaculis et arcu a, aliquet ultrices nisl. Nam in pharetra odio, ac blandit metus. Suspendisse potenti. Praesent elementum diam non orci cursus rutrum. Pellentesque condimentum ultrices dignissim. Sed a tempor ligula, vel luctus sapien. Mauris vehicula rutrum massa. Duis condimentum, ex quis ullamcorper rhoncus, erat libero tempor arcu, condimentum facilisis tellus lectus ut nunc. Pellentesque vitae faucibus diam. Vestibulum eu erat ex. Ut justo neque, varius aliquet erat vel, scelerisque convallis lacus. Mauris semper lorem mauris, sed dignissim eros consectetur nec.</p>
</div>- Make sure to add this route after the History and Contact routes otherwise only the About route will be loaded.
- You should now be able to navigate between each of the
About,History, andContactviews from the sub nav.
src/components/About/About.js
import React, { Component } from 'react';
import { Switch, Route, Link } from 'react-router-dom';
import History from '../History/History';
import Contact from '../Contact/Contact';

export default class About extends Component {

    render() {
        return (
            <div>
                <div className='subnav'>
                    <Link to='/about' className='subnav_links'><h3>About</h3></Link>
                    <Link to='/about/history' className='subnav_links'><h3>History</h3></Link>
                    <Link to='/about/contact' className='subnav_links'><h3>Contact</h3></Link>
                </div>
                <div className='box'>
                    <Switch>
                        <Route path='/about/history' component={ History }/>
                        <Route path='/about/contact' component={ Contact }/>
                        <Route path='/about' render={() => (
                            <div>
                                <h1>About the University</h1>
                                <p>Lorem ipsum dolor sit amet, consectetur adipiscing elit. Sed euismod eu lorem et ultricies. In porta lorem at dui semper porttitor. Nullam quis cursus dui. Cras tincidunt vehicula tellus eu facilisis. Donec nisi turpis, iaculis et arcu a, aliquet ultrices nisl. Nam in pharetra odio, ac blandit metus. Suspendisse potenti. Praesent elementum diam non orci cursus rutrum. Pellentesque condimentum ultrices dignissim. Sed a tempor ligula, vel luctus sapien. Mauris vehicula rutrum massa. Duis condimentum, ex quis ullamcorper rhoncus, erat libero tempor arcu, condimentum facilisis tellus lectus ut nunc. Pellentesque vitae faucibus diam. Vestibulum eu erat ex. Ut justo neque, varius aliquet erat vel, scelerisque convallis lacus. Mauris semper lorem mauris, sed dignissim eros consectetur nec.</p>
                            </div>
                        )}/>
                    </Switch>
                </div>
            </div>
        )
    }

}Try adding a back button on the Student detail view that will route back to the ClassList view. You can also add a back button to the ClassList view that will route back to the Home view.
If you see a problem or a typo, please fork, make the necessary changes, and create a pull request so we can review your changes and merge them into the master repo and branch.
© DevMountain LLC, 2017. Unauthorized use and/or duplication of this material without express and written permission from DevMountain, LLC is strictly prohibited. Excerpts and links may be used, provided that full and clear credit is given to DevMountain with appropriate and specific direction to the original content.


