The Hetzner cloud plugin enables Jenkins CI to schedule builds on dynamically provisioned VMs in Hetzner Cloud. Servers in Hetzner cloud are provisioned as they are needed, based on labels assigned to them. Jobs must have same label specified in their configuration in order to be scheduled on provisioned servers.
- Open your Jenkins instance in browser (as Jenkins administrator)
- Go to
Manage Jenkins - Go to
Manage Plugins - Search for Hetzner Cloud under
Availabletab - Click
Install - Jenkins server might require restart after plugin is installed
- Clone this git repository
- Build with maven
mvn clean package - Open your Jenkins instance in browser (as Jenkins administrator)
- Go to
Manage Jenkins - Go to
Manage Plugins - Click on
Advancedtab - Under
Upload Pluginsection, click onChoose filebutton and selecttarget/hetzner-cloud.hpifile - Jenkins server might require restart after plugin is installed
Regardless of configuration method, you will need API token to access your Hetzner Cloud project. You can read more about creating API token in official documentation.
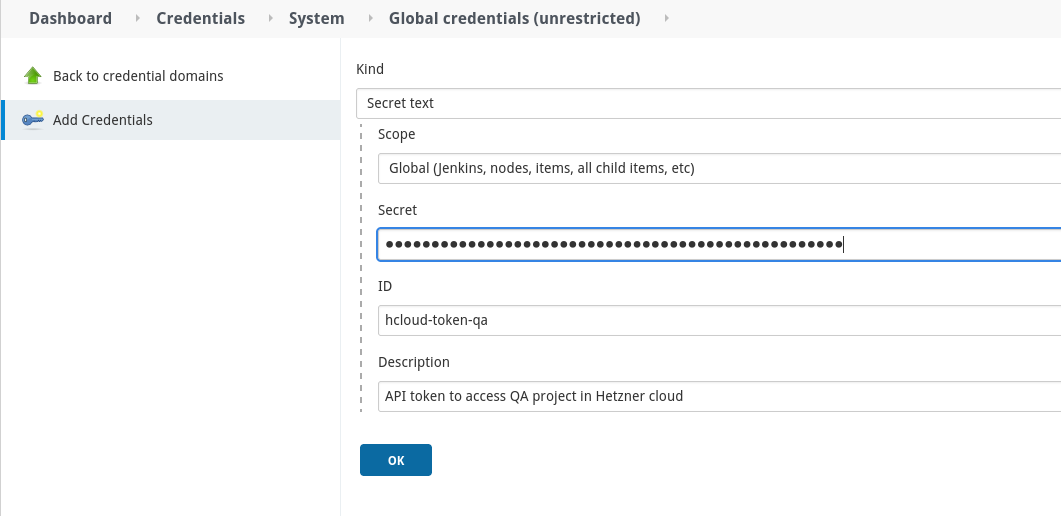
Go to Dashboard => Manage Jenkins => Manage credentials => Global => Add credentials, choose Secret text as a credentials kind:
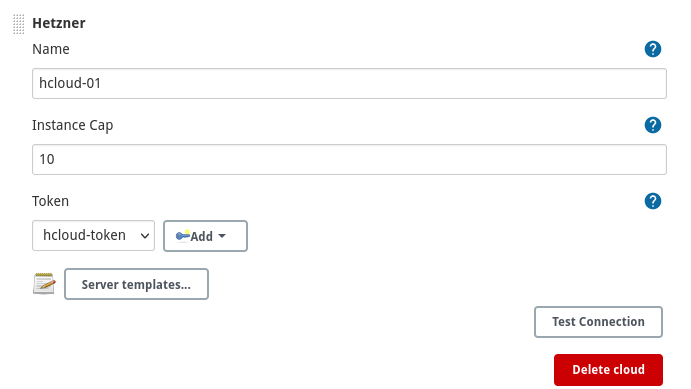
Go to Dashboard => Manage Jenkins => Manage Nodes and Clouds => Configure Clouds => Add a new cloud and choose Hetzner from dropdown menu:
Name of cloud should match pattern [a-zA-Z0-9][a-zA-Z\-_0-9].
You can use Test Connection button to verify that token is valid and that plugin can use Hetzner API.
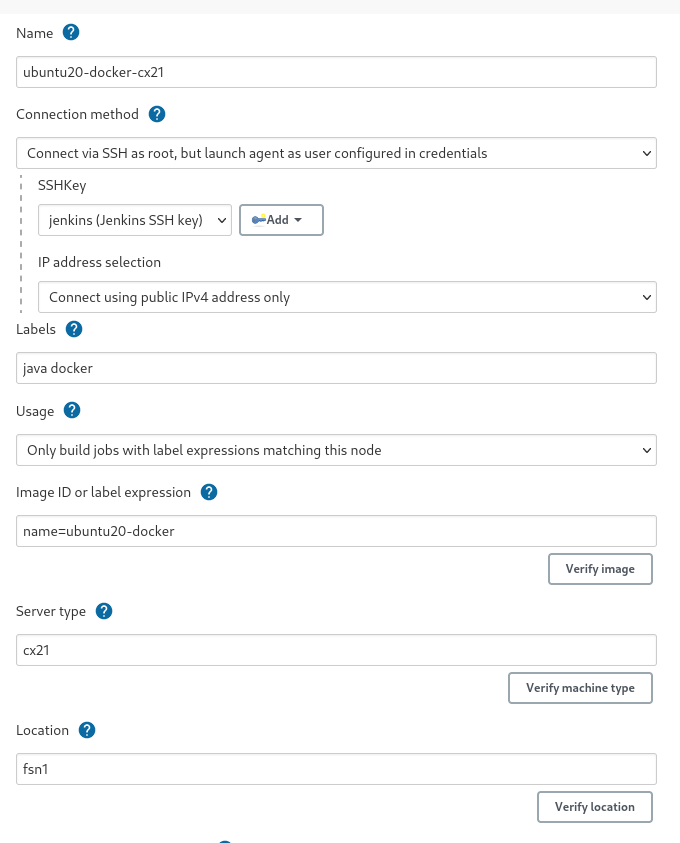
Following attributes are required for each server template:
-
Name- name of template, should match regex[a-zA-Z0-9][a-zA-Z\-_0-9] -
Connection methodthis attribute specifies how Jenkins controller will connect to newly provisioned agent. These methods are supported:Connect as root- SSH connection to provisioned server will be done asrootuser. This is convenient method due to fact, that Hetzner cloud allows us to specify SSH key forrootuser during server creation. Once connection is established, Jenkins agent will be launched by non-root user specified in chosen credentials. User must already exist.Connect as user specified in credentials- again, that user must already be known to server and its~/.ssh/authorized_keysmust contain public key counterpart of chosen SSH credentials. See bellow how server image can pre created using Hashicorp packer, which also can be used to populate public SSH key.
In both cases, selection of IP address can be specified as one of
Connect using private IPv4 address if available, otherwise using public IPv4 addressConnect using private IPv4 address if available, otherwise using public IPv6 addressConnect using public IPv4 address onlyConnect using public IPv6 address only
-
Labels- Labels that identifies jobs that could run on node created from this template. Multiple values can be specified when separated by space. When no labels are specified and usage mode is set to Use this node as much as possible, then no restrictions will apply and node will be eligible to execute any job. -
Usage- Controls how Jenkins schedules builds on this node.Use this node as much as possible- In this mode, Jenkins uses this node freely. Whenever there is a build that can be done by using this node, Jenkins will use it.Only build jobs with label expressions matching this node- In this mode, Jenkins will only build a project on this node when that project is restricted to certain nodes using a label expression, and that expression matches this node's name and/or labels. This allows a node to be reserved for certain kinds of jobs. For example, if you have jobs that run performance tests, you may want them to only run on a specially configured machine, while preventing all other jobs from using that machine. To do so, you would restrict where the test jobs may run by giving them a label expression matching that machine. Furthermore, if you set the # of executors value to 1, you can ensure that only one performance test will execute at any given time on that machine; no other builds will interfere.
-
Image ID or label expression- identifier of server image. It could be ID of image (integer) or label expression. In case of label expression, it is assumed that expression resolve into exactly one result. Either case, image must have JRE already installed. -
Server type- type of server -
Location- this could be either datacenter name or location name. Distinction is made using presence of character-in value, which is meant for datacenter.
These additional attributes can be specified, but are not required:
-
Network- Network ID (integer) or label expression that resolves into single network. When specified, private IP address will be used instead of public, so Jenkins controller must be part of same network (or have other means) to communicate with newly created server -
Remote directory- agent working directory. When omitted, default value of/home/jenkinswill be used. This path must exist on agent node prior to launch. -
Agent JVM options- Additional JVM options for Jenkins agent -
Boot deadline minutes- Maximum amount of time (in minutes) to wait for newly created server to be inrunningstate. -
Number of Executors -
Shutdown policy- Defines how agent will be shut down after it becomes idleRemoves server after it's idle for period of time- you can define how many minutes will idle agent kept aroundRemoves idle server just before current hour of billing cycle completes
-
Primary IP- Defines how Primary IP is allocated to the serverUse default behavior- use Hetzner cloud's default behaviorAllocate primary IPv4 using label selector, fail if none is available- Primary IP is searched using provided label selector in same location as server. If no address is available or any error occurs, problem is propagated and provisioning of agent will fail.Allocate primary IPv4 using label selector, ignore any error- Primary IP is searched using provided label selector in same location as server. If no address is available or any error occurs, problem is logged, but provisioning of agent will continue without Primary IP being allocated.
-
Connectivity- defines how network connectivity will be configured on newly created serverOnly private networking will be used- network ID or labels expression must be providedOnly public networking will be allocated- public IPv4/IPv6 addresses will be allocated to the serverOnly public IPv6 networking will be allocated- public IPv6 address will be allocated to the serverConfigure both private and public networking- public IPv4/IPv6 addresses will be allocated. Network ID or labels expression must be provided.Configure both private and public IPv6 networking- public IPv6 address will be allocated. Network ID or labels expression must be provided.
Make sure this field is aligned with
Connection method. -
Automount volumes- Auto-mount volumes after attach. -
Volume IDs to attach- Volume IDs which should be attached to the Server at the creation time. Volumes must be in the same Location. Note that volumes can be mounted into single server at the time.
import cloud.dnation.jenkins.plugins.hetzner.*
import cloud.dnation.jenkins.plugins.hetzner.launcher.*

def cloudName = "hcloud-01"

def templates = [
        new HetznerServerTemplate("ubuntu20-cx21", "java", "name=ubuntu20-docker", "fsn1", "cx21"),
        new HetznerServerTemplate("ubuntu20-cx31", "java", "name=ubuntu20-docker", "fsn1", "cx31")
]

templates.each { it -> it.setConnector(new SshConnectorAsRoot("my-private-ssh-key")) }

def cloud = new HetznerCloud(cloudName, "hcloud-token", "10", templates)

def jenkins = Jenkins.get()

jenkins.clouds.remove(jenkins.clouds.getByName(cloudName))
jenkins.clouds.add(cloud)
jenkins.save()Here is sample of CasC file
---
jenkins:
  clouds:
    - hetzner:
        name: "hcloud-01"
        credentialsId: "hcloud-api-token"
        instanceCapStr: "10"
        serverTemplates:
          - name: ubuntu2-cx21
            serverType: cx21
            remoteFs: /var/lib/jenkins
            location: fsn1
            image: name=jenkins
            mode: NORMAL
            numExecutors: 1
            placementGroup: "key1=value1&key2=value2"
            connector:
              root:
                sshCredentialsId: 'ssh-private-key'
                connectionMethod: "default"
            shutdownPolicy: "hour-wrap"
          - name: ubuntu2-cx31
            serverType: cx31
            remoteFs: /var/lib/jenkins
            location: fsn1
            image: name=jenkins
            mode: EXCLUSIVE
            network: subsystem=cd
            labelStr: java
            numExecutors: 3
            placementGroup: "1000656"
            connectivity: "public-only"
            automountVolumes: true
            volumeIds:
              - 12345678
            connector:
              root:
                sshCredentialsId: 'ssh-private-key'
                connectionMethod: "public"
            shutdownPolicy:
              idle:
                idleMinutes: 10
credentials:
  system:
    domainCredentials:
      - credentials:
          - string:
              scope: SYSTEM
              id: "hcloud-api-token"
              description: "Hetzner cloud API token"
              secret: "abcdefg12345678909876543212345678909876543234567"
          - basicSSHUserPrivateKey:
              scope: SYSTEM
              id: "ssh-private-key"
              username: "jenkins"
              privateKeySource:
                directEntry:
                  privateKey: |
                    -----BEGIN OPENSSH PRIVATE KEY-----
                    b3BlbnNzaC1rZXktdjEAAAAABG5vbmUAAAAEbm9uZQAAAAAAAAABAAABFwAAAAdzc2gtcn
                      ... truncated ...
                    baewZMKBL1QECTolAAAADHJrb3NlZ2lAbDQ4MAECAwQFBg==
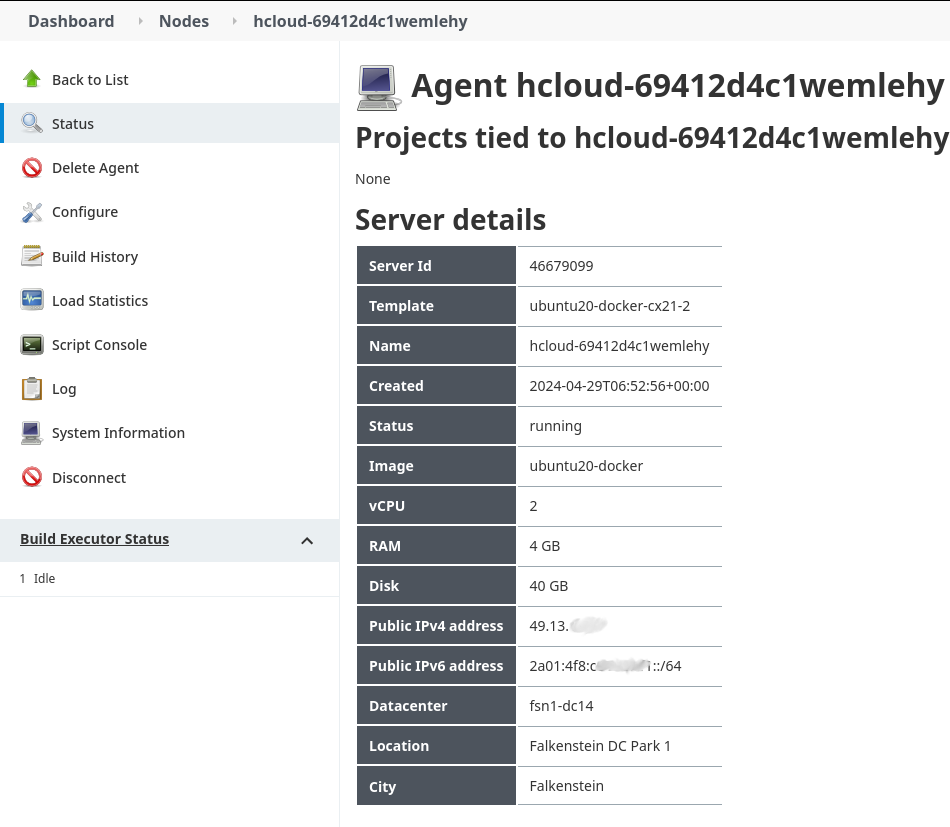
-----END OPENSSH PRIVATE KEY-----Plugin is able to report server details for any provisioned node
It's possible to create images in Hetzner Cloud using Packer.
-
Get Hashicorp Packer
-
Create image template, see an example
-
Build using
packer build -force template.pkr.hclYou should see output similar to this (truncated):==> Builds finished. The artifacts of successful builds are: --> hcloud.jenkins: A snapshot was created: 'ubuntu20-docker' (ID: 537465784)
- there is no known way of verifying SSH host keys on newly provisioned VMs
- modification of SSH credentials used to connect to VMs require manual removal of key from project's security settings. Plugin will automatically create new SSH key in project after it's removed.
- JRE must already be installed on image that is used to create new server instance.
- Working directory of agent on newly provisioned server must already exist and must be accessible by user used to launch agent
- There is possibility of race condition when build executors are demanded in burst, resulting in creation of more VMs than configured cap allows. No known fix exist at this time, but there is possible workaround mentioned in comment in reported issue
-
Symptom : Jenkins failed to create new server in cloud because of
Invalid API response : 409Cause : SSH key with same signature already exists in project's security settings.
Remedy : Remove offending key from project security settings, it will be automatically created using correct labels.
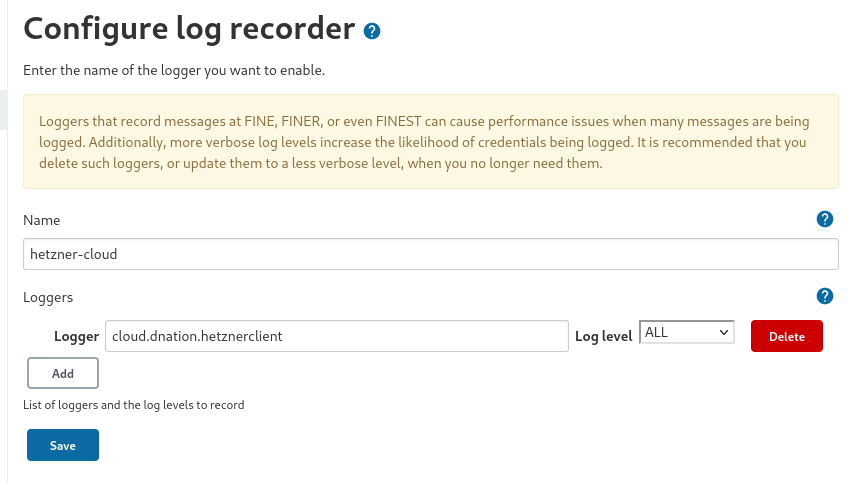
To enable debug logging for API calls, configure log recorder for logger cloud.dnation.hetznerclient.
- Go to
Manage Jenkins=>Log Recorders - Click on
Add new log recorder - choose any name that make sense for you, like
hetzner-cloud - Add logger with name
cloud.dnation.hetznerclient - save
- now any headers, request and response body will be logged
