This is the code that was used to reproduce the BBR results described in our blog post. Specifically, we target the BBR result that BBR significantly outperforms CUBIC over networks with non-negligable loss rates, summarized in Figure 8 of the original paper.
In order to reproduce our results, you can follow the step by step instructions that follow. As an overview, we will be creating a virtual machine, installing a Linux kernel that includes BBR congestion control, installing Mahimahi (a network emulator), and using it to run a series of experiments. This whole process to replicate our results should take about 8.5 hours.
We provide instructions for running this experiment on Google Cloud, but you could follow the same instructions on any Ubuntu 16.04 machine, on a local VM for instance.
To perform these steps, you will need a Google Cloud account with Billing enabled. Visit http://cloud.google.com and create a new project to run the experiment in.
- Go to your Google Cloud Console and click on
Compute Engine > Images. - Select the
ubuntu-1604image, and select it by ticking the checkbox next to the image. - Click on
Create Instancein the toolbar at the top of the screen. - Select an instance name (e.g.
rebbr). - Choose which zone you want to launch the instance in (e.g.
us-west1-c). - Select
2 vCPUsas the machine type (specifically, then1-standard-2). - Check the
Allow HTTP trafficcheckbox under the Firewall settings. This will be used to view the results of the experiments. - Click
Createto create your instance. All other settings can be left at their default values.
Now, you will be brought back to the Google Cloud Console, and can connect to your VM using SSH.
Next, we will install the necessary dependencies and prerequisites on our VM.
- SSH into the VM using the method of your choice (e.g. through the Google Cloud Console)
- Clone the repository into the
~/bbrfolder.git clone https://github.com/jervisfm/rebbr.git bbr
- Upgrade the Linux kernel to v4.11.1
cd bbr && ./vm_upgrade_kernel.sh
- Restart the VM by using the commandline by running:
sudo reboot
- Wait for the instance to restart, and reconnect to it via SSH.
- Verify that the kernel upgrade worked by running
uname -sr. This should outputLinux 4.11.1-041101-generic. If not, the kernel was not updated. You may need to rerun step 3 and reboot again. - To install all dependencies and run all experiments, run
cd bbr && ./run_all.sh. This will take approximately 8.5 hours. During this run, you will see some logging output printed to the console, which allows you to monitor which experiment is being run. - Finally, to view the experiment results, identify your VM-instance's external IP address in the Google Cloud Console (e.g. 104.199.120.104). You will be able to browse the figures by opening your browers and navigating to
http://<external-ip>/figures/. Note that this external ip is not static, so if you run the experiments again later, you will need to check for the current external ip address.
You can also identify your VM public IP address by running:
$ dig +short myip.opendns.com @resolver1.opendns.com
Don't forget to shut down your Google Cloud instance when you are done!
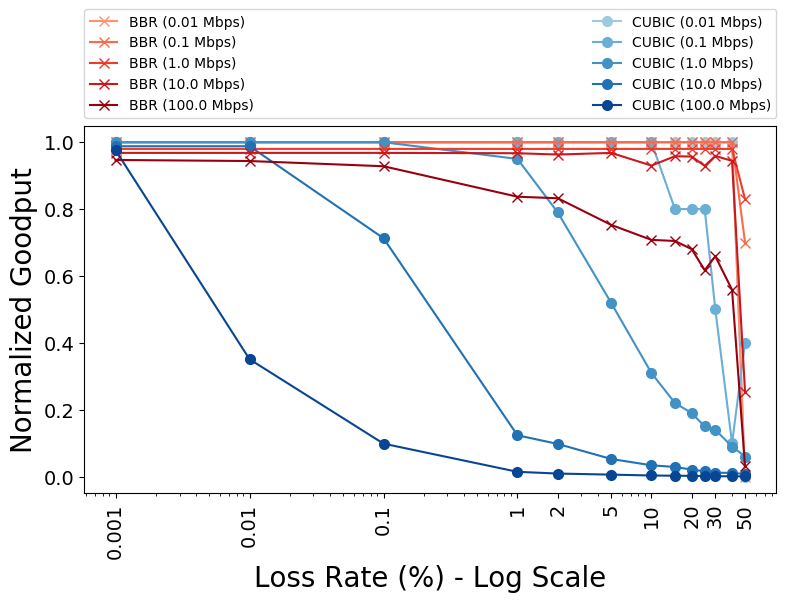
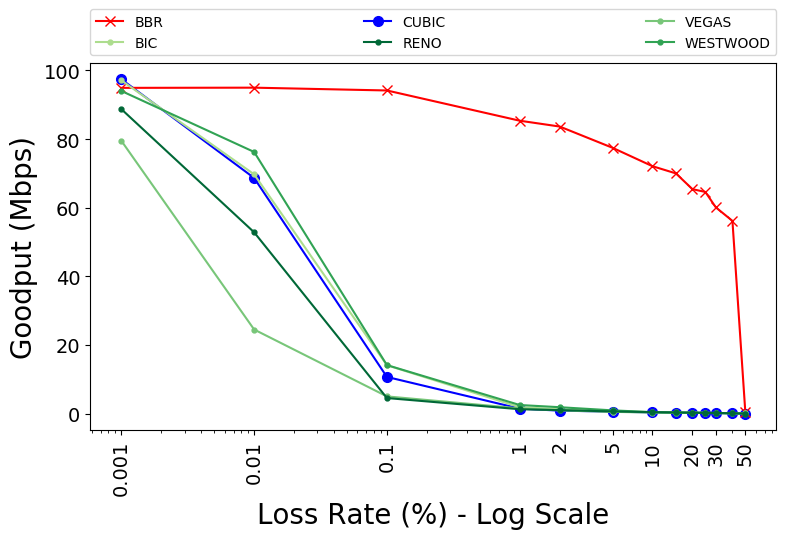
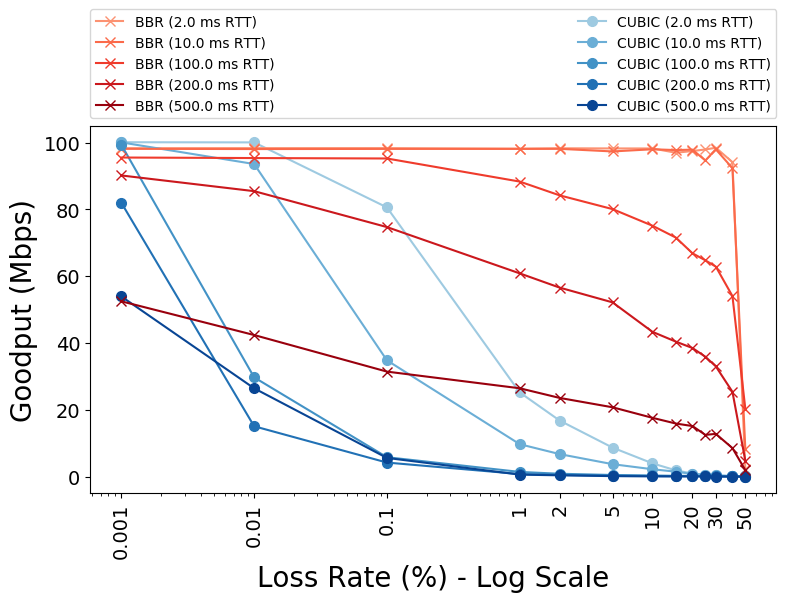
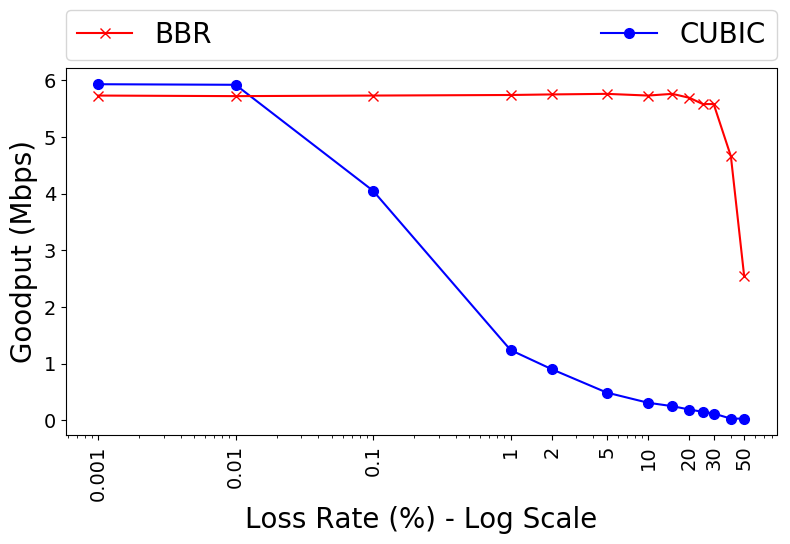
This is our reproduction of figure 8 from original paper that looks at how CUBIC and BBR perform at varying loss rates.
Experiment 1 looks at BBR and CUBIC performance over loss links acrossing various link speeds.
Experiment 2 looks at how various Congestion Control Algorithms found in linux kernel behave over various loss rates.
Experiment 3 looks at impact of RTT on performance of CUBIC and BBR over various loss rates.
Experiment 4 compares BBR and CUBIC performance over a cellular link trace with varying RTT and bandwidth captured from the Verizon network.


