You are providing a chat experience for your customers, but could you improve the experience? What's a great way to know if you could do better? Ask your customers. Integrating your Stream Chat with your favorite Survey tool is a relatively painless endeavor. This post demonstrates how to launch a survey at the conclusion of a Chat session. We integrate with SurveyLegend, but many of the major survey tools provide the same integration option that are demonstrated here.
This app presents a simple landing page and on the lower right corner of the page there is a button to initiate a chat session.
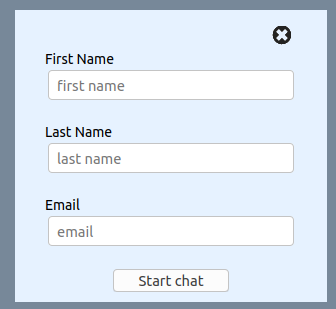
When this button is clicked, the user is presented with a form to enter some contact details, and then they start the Chat session by submitting the form.
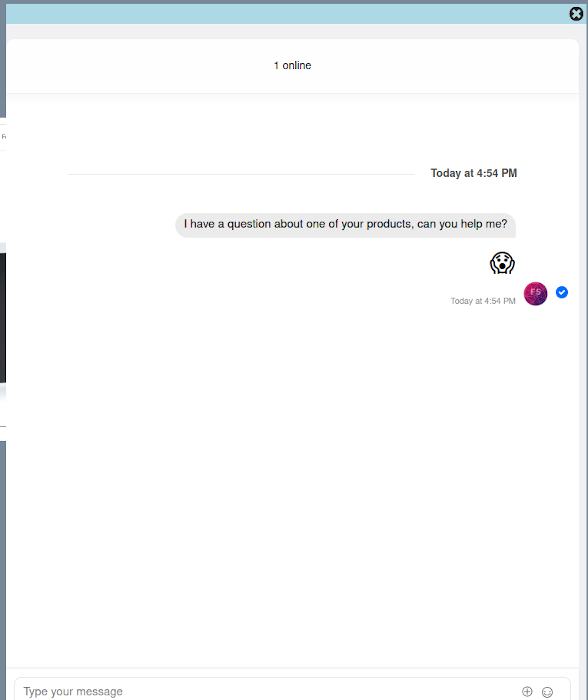
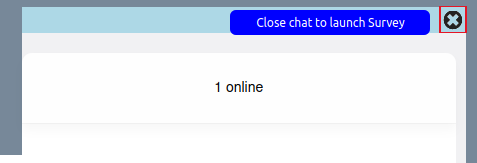
Once the chat is completed, the user simply closes the chat session by clicking on the large X in the upper right of the screen, which will then lauch the survey. (Note: in a production app, you may want to add some confirmation dialog boxes between closing the chat and launching the survey; we have kept things simple for the purposes of this post.)
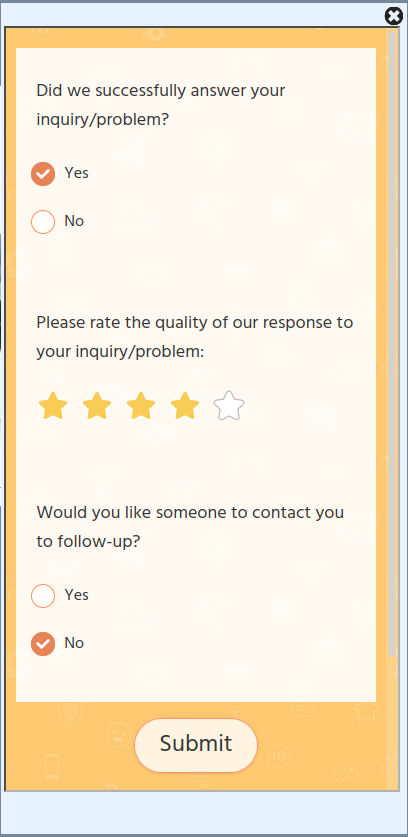
The app then launches the survey as an iframe, and submits it by clicking on Submit. After submission of the survey, clicking the close X in the upper right corner, returns to the initial starting point.
The app in this post is composed of a React frontend and a nodejs backend. The frontend was bootstrapped using create-react-app, and the backend server was bootstrapped using express-generator. Both frontend and backend leverage Stream's JavaScript library.
For SurveyLegend, we created a free account and then a simple survey. SurveyLegend automatically provides and iframe code that is used to launch the survey. This is explained below.
All the code required for this tutorial is available in GitHub GitHub/stream-chat-survey. You will find instructions for bootstrapping your own backend and frontend servers in the respective README.md files of these two folders, backend, and frontend
To run the app in this post or build it out yourself, you will need a free Stream account (get it here) and an account with a Survey tool (to try a free SurveyLegend account, sign up here).
The code in this post is intended to run locally, and assumes a basic knowledge of React Hooks, Express, and Node.js.
For the backend, please ensure that you have the following dependencies in your package.json file.
// backend/package.json:18-24
  "dependencies": {
    "cookie-parser": "^1.4.5",
    "dotenv": "^8.2.0",
    "express": "^4.17.1",
    "morgan": "^1.10.0",
    "stream-chat": "^2.1.0"
  }
Once the changes in the package.json file are made, run the following command to install the npm dependencies in your backend.
npm install
The first step to configure the backend, is to set the two application backend environment variables:
- STREAM_API_KEY
- STREAM_API_SECRET
You will find a file in the Backend folder, .env.example, that you can rename to create a .env file.
To lookup your Stream credentials, navigate to your Stream.io Dashboard
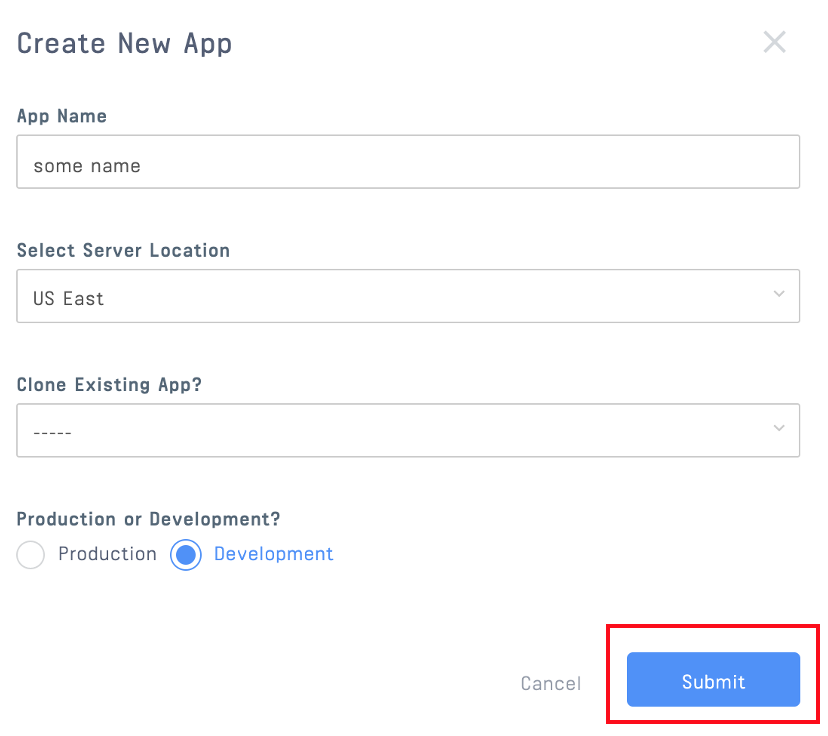
Then click on "Create App"
Give your app a name and select Development and click Submit
Stream will generate a Key and Secret for your app. Copy these and update the corresponding environment variables.
Ok, now let's build out the frontend app. We will return to the backend later to explore the function that communicates with Stream.
One of the files in the backend is routes/index.js. This is where you will find the code which establishes a chat session with Stream. The code snippet for this is shown below for your information
// backend/routes/index.js:1-35
const streamChat = require('stream-chat');
const express = require('express');
const router = express.Router();

router.post('/registrations', async (req, res, next) => {
    try {
        const client = new streamChat.StreamChat(
            process.env.STREAM_API_KEY,
            process.env.STREAM_API_SECRET
        );
        const user = {
            id: `${req.body.firstName}-${req.body.lastName}`.toLowerCase(),
            role: 'user',
            image: `https://robohash.org/${req.body.email}`
        };
        await client.upsertUsers([user, { id: 'sales-admin', role: 'admin' }]);
        const channel = client.channel('messaging', user.id, {
            members: [user.id, 'sales-admin'],
        });
        const token = client.createToken(user.id);
        res.status(200).json({
            userId: user.id,
            token,
            channelId: channel.id,
            apiKey: process.env.STREAM_API_KEY
        });
    } catch (error) {
        console.log(error, data.errors);
        res.status(500).json({
            error: error.message
        });
    }
});

module.exports = router;
This registration router/post defined above, takes the firstName, lastName, and email from the frontend app and uses these values to establish a Chat Session. This is explained below.
Ok, so now let's look at how the frontend app works.
Before you build the frontend, ensure that the following dependencies are found in your frontend/package.json file:
// frontend/package.json:5-10
"dependencies": {
    "cors": "^2.8.5",
    "react": "^16.13.1",
    "react-dom": "^16.13.1",
    "react-scripts": "3.4.3",
    "stream-chat-react": "^2.2.2"
}
And as with the backend, run npm install to ensure the dependencies are present in your application.
Update the standard src/App.js file with the following code to setup a simple landing page.
// frontend/src/App.js:1-20
import React from "react";
import "./App.css";
import ChatWidget from "./chatWidget.js";
import landimage from "./stream_and_surveylegend.png";

function App() {

  return (
      <div className="App">
        <div className="App-header">
          <p>Stream and SurveyLegend Integration</p>
            <div><img src={landimage} alt="shows integration between Stream and SurveyLegend"></img></div>
          <p>(This is an example landing page)</p>
          <ChatWidget></ChatWidget>
        </div>
      </div>
  );
}

export default App;The chat session and survey functionality is contained within the file, ChatWidget.js, let's break down what goes on here.
Stream's convenient libraries power the front-end. Here is the list of libraries loaded (which includes some image references):
// frontend/src/chatWidget.js:1-15
import React, { useState } from "react";
import { StreamChat } from "stream-chat";
import {
    Chat,
    Channel,
    ChannelHeader,
    MessageInput,
    MessageList,
    Thread,
    Window,
} from "stream-chat-react";
import "stream-chat-react/dist/css/index.css";
import "./App.css";
import chaticon from "./chat-icon-white.png"
import closeicon from "./close-icon.png"
The application code is contained a single function, ChatWidget. As you can see from the following code snippet (not the entire function, which is broken down into snippets below) the function works with six React Hooks.
chatState: will be used to manage the flow between the four different interface components that make up our widget (WAIT, JOIN, CHAT, and SURVEY).firstName,lastName,email: are used to store the user input values which are used to initiate thechat session.chatClientandchannel: used to start a chat session and the corresponding channel.
// frontend/src/chatWidget.js:17-198
function ChatWidget() {
    const [chatState, setChatState] = useState("WAIT"); // WAIT, JOIN, CHAT, SURVEY
    const [email, setEmail] = useState("");
    const [firstName, setFirstName] = useState("");
    const [lastName, setLastName] = useState("");

    const [chatClient, setChatClient] = useState(null);
    const [channel, setChannel] = useState(null);

    //...lines 26-180

    if (chatState === "WAIT") {
        return wait();
    }

    if (chatState === "JOIN") {
        return join();
    }

    if (chatState === "CHAT") {
        return chat();
    }

    if (chatState === "SURVEY") {
        return survey();
    }
}

export default ChatWidget;
As mentioned above, the chat widget has four different display or interface states: WAIT, JOIN, CHAT, and SURVEY. The screenshots of these four interfaces were shown at the beginning of the post. Let's take a look at the functions that generate each of these.
// frontend/src/chatWidget.js:60-67
function wait() {
    return (
        <div className="wait" onClick={() => setChatState("JOIN")}>
            <img src={chaticon} alt="start a chat"></img>
            <span className="tooltiptext">Click to chat</span>
        </div>
    );
};
The WAIT interface isn't much, just a little button that floats on the lower right side of the screen. The user clicks here to initiate a chat, and change the ChatState to JOIN, the function that follows:
// frontend/src/chatWidget.js:69-119
function join() {
    return (
        <div className="join">
            <div className="join-header" onClick={() => setChatState("WAIT")}>
                <img src={closeicon} alt="X"></img>
                <span className="tooltiptext">Click to cancel chat</span>
            </div>
            <div className="join-content">
                <form className="card">
                    <label>First Name</label>
                    <p>
                        <input
                            type="text"
                            value={firstName}
                            onChange={(e) => setFirstName(e.target.value)}
                            placeholder="first name"
                            required
                        />
                    </p>
                    <label>Last Name</label>
                    <p>
                        <input
                            type="text"
                            value={lastName}
                            onChange={(e) => setLastName(e.target.value)}
                            placeholder="last name"
                            required
                        />
                    </p>
                    <label>Email</label>
                    <p>
                        <input
                            type="email"
                            value={email}
                            onChange={(e) => setEmail(e.target.value)}
                            placeholder="email"
                            required
                        />
                    </p>
                </form>
            </div>
            <div className="join-footer" onClick={register}>
                <button className="close" type="submit">
                    Start chat
            </button>
                <span className="tooltiptext">Click to Submit</span>
            </div>

        </div>
    );
};
This code creates an input form to collect the three fields that are passed on submission to the backend to establish a chat session via the register function described below. Closing this form returns the ChatState to WAIT, and submitting the form calls the register function which also sets the ChatState to CHAT.
The is an async call to the backend to establish the chat session happens in the register function, which first passes the three user input values (email, firstName, lastName - in a production application more information might be required). The function then stores the response from the backend, and starts the chat with the setUser method.
The function ends with a reset of the Join form input Hooks and lastly setChatState changes the ChatState to 'WAIT'.
// frontend/src/chatWidget.js:26-58
async function register(event) {
    event.preventDefault(); // stop processing of form submission
    const response = await fetch("http://localhost:8080/registrations", {
        method: "POST",
        headers: {
            Accept: "application/json",
            "Content-Type": "application/json",
        },
        body: JSON.stringify({
            firstName,
            lastName,
            email,
        }),
    });
    const { userId, token, channelId, apiKey } = await response.json();
    const chatClient = new StreamChat(apiKey);
    await chatClient.setUser(
        {
            id: userId,
            name: email,
            image: `https://getstream.io/random_svg/?id=${userId}`,
        },
        token
    );

    const channel = chatClient.channel("messaging", channelId);
    setChatClient(chatClient);
    setChannel(channel);
    setFirstName(""); //reset FirstName input
    setLastName(""); //reset LastName input
    setEmail(""); //reset Email input
    setChatState("CHAT"); //show the Chat window
}
The function for the ChatState of CHAT follows:
// frontend/src/chatWidget.js:121-151
function chat() {
    function startSurvey() {
        //this function resets the Chat when initiating Survey
        setChatState("SURVEY");
        setChannel(null); //reset Chat for another user if need be
        setChatClient(null); //reset Chat for another user if need be
    }

    return (
        <div id="myChat" class="chat">
            <div className="chat-header">
                <img src={closeicon} alt="X" onClick={startSurvey}></img>
                <span className="tooltiptext">Close chat to launch Survey</span>
            </div>
            <div className="chat-content">
                <div>
                    <Chat client={chatClient} theme={"messaging light"}>
                        <Channel channel={channel}>
                            <Window>
                                <ChannelHeader />
                                <MessageList />
                                <MessageInput />
                            </Window>
                            <Thread />
                        </Channel>
                    </Chat>
                </div>
            </div>
        </div>
    );
};
This code displays the Chat components that were initialized by the register function. Closing this form will kick off a user survey by setting the ChatState to SURVEY. At this point, it is a good idea to kill the chat session, so you will notice towards the top of the chat function we set the Channel and ChatClient to null.
And now the grand finale, to integrate the Survey! Before you look at the code to call a survey, you have to have a survey to call!
We don't describe how to set up a new account with SurveyLegend, as we are confident that you can cover that on your own. You can also create a sample survey, but feel free to model it on the one used in this post!
(Note: This post uses SurveyLegend, but most Survey tools, such as Survey Monkey, provide an iframe to embed the survey in a web page.)
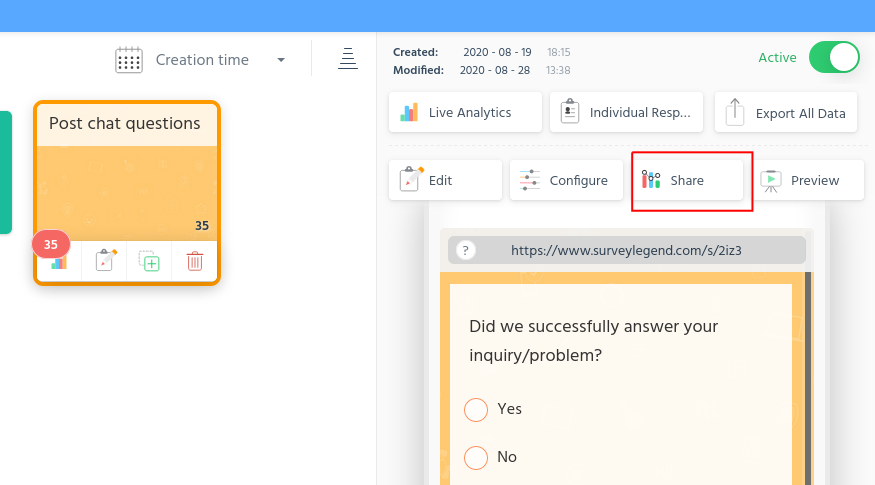
Once you have created a survey, follow the following instructions to grab the iframe code that you will need for the SURVEY widget just described. After you have created your survey, when you login to SurveyLegend, it will look something like below.
Once you click on the survey that you created for this exercise, Post chat questions, in my example, you will see an option to Share.
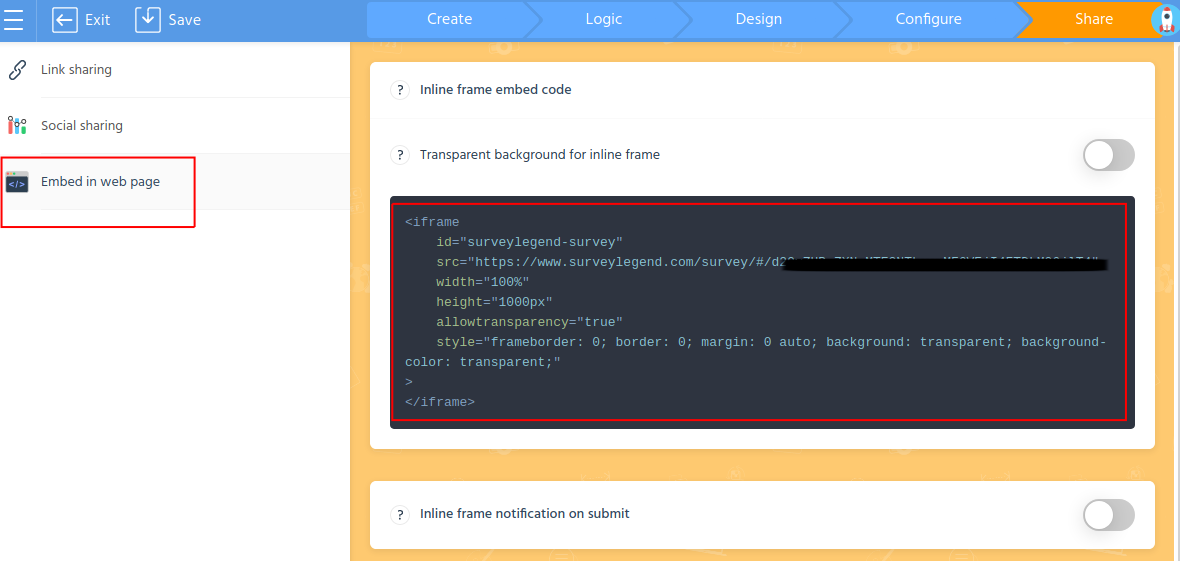
Once you select Share, you then select the Embed in web page option and then copy the iframe. Not too hard, eh?
Once you have an iframe let's integrate it into our application.
We use the iframe code that SurveyLegend provided without any modification - it just works, which is cool! By the way, note that closing the Survey widget returns the ChatState to WAIT.
One last point about the survey. To avoid that my survey isn't called by hundreds of random software enthusiasts around the internet, we have masked the URL for my survey in an env variable in the file ...frontend/env.development. You will find a file called env.development.example, that you can rename and paste in the URL of your survey. Alternatively, you can also just paste the URL into the src element of the iframe at line 161. The survey function follows:
// frontend/src/chatWidget.js:153-179
function survey() {
    return (
        <div className="survey">
            <div className="survey-header">
                <img src={closeicon} alt="X" onClick={() => setChatState("WAIT")}></img>
                <span className="tooltiptext">Click to return to Wait</span>
            </div>
            <div className="survey-content">
                <iframe
                    id="surveylegend-survey"
                    title="my survey"
                    src={process.env.REACT_APP_SURVEY_SRC}
                    width="98%"
                    height="95%"
                    allowtransparency="true"
                    style={{
                        background: "transparent",
                        backgroundColor: "transparent",
                    }}
                ></iframe>
            </div>
            <div className="survey-footer">
            </div>

        </div>
    );
};
And that does it! You now understand how to integrate Stream Chat with your Survey tool. Good luck learning this solution and then implementing it into your chat application.


