In this Houston Data Science meetup we will introduce our members to data science using the Python programming language.
- Install Python 3 and set up on your computer via the Anaconda distribution
- Install Git locally and create a Github account
- Develop Python programs in a text editor, IDE and Jupyter Notebook
- Use the command line to execute a program and run Python interactively
- Use Jupyter Notebook to explore the most popular data science libraries
- Have a huge list of resources to help you continue your data science journey
- Create a Github Account
- Install Git locally
- Fork and clone this respository
- Install Python 3 with Anaconda
- Run Python interactively
- Install Sublime Text 3 along with packages for enhancing development
- Install PyCharm EDU
- Execute basic programs from command line
- NumPy
- pandas
- statsmodels
- matplotlib
- seaborn
- scikit-learn
The page is currently being hosted on Github, a site that hosts remote Git repositories. Github is a popular place to share and collaborate on software projects. The most popular data science libraries are all hosted on Github. On Github, you can find the latest developments, track bugs and join the conversation with fellow developers.
- If you have not already done so, create a Github account now.
Git is a popular version control system used to keep track of file changes during software development. Github is a private company independent from Git. Git is free software that tracks your file changes on your local machine.
Let's install Git on your local machine
- Visit the Git downloads page and download Git for your operating system.
- After installing Git you will need to run a couple commands to link it to your github profile.
- Run the commands in the Your Identity in this link. The same commands are copied below.
git config --global user.name "John Doe"
git config --global user.email johndoe@example.com
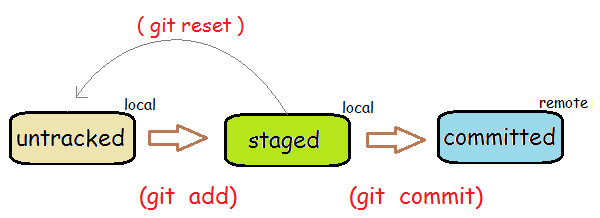
Whenever you are in position to make changes to someone elses project on Github you will need to fork the repository and then clone it to your local machine. After making changes you will commit your work locally and then push those changes back to Github where you will finally make a pull request so that the new changes may be incorporated into the project.
Let's go through this process now.
- At the very top of this repository, you will see a
Forkbutton. Click it and fork the repository. This makes an exact replica of the repository under your user profile.- Under your Github profile (not mine), again go the top of the page and look for the green
Clone or downloadbutton. Click it and copy the url.- On your local machine, create a new folder somewhere in your file system. Title it something like
Github Repos- Open up a terminal (Windows users open the program Git Bash)
cdinto the new directory you created abovegg- Run the command
git clone https://github.com/tdpetrou/Intro-to-Data-Science-with-Python.gitbut replace this URL with the one you copied from step 2.- You now have a replica of the repository on your local machine and are ready to make changes
- Staying in the terminal run the command
cd Intro-to-Data-Science-with-Python- Open up the README.md file in a text editor. That is this current file.
- Make a single edit to the file and save it. Add your name or something personal on the very top line.
- Go back to the terminal and run the command
git add README.md. Git is now tracking this file and it is in the staging area.- Run the command
git commit -m "your message here". Replace 'your message here' with something that describes the changes you made. All commits must have a message about what has changed.- The last command just took a snapshot of your repository and you can revert back to it now at any point in the future.
- Run the command
git push origin master. This will align your remote repository with your local repository.- Go back to your github profile and verify the changes.
- Towards the top of the page click the
New pull requestbutton.- Now I will get a notification that you are wanting to modify a file of mine. I can review the revisions and accept/reject your pull request.
Anaconda is by far the most popular distribution of the Python programming language for data scientists. Anaconda packages together all the popular data science libraries along with the package manager conda.
Anaconda is not a necessity. Python may be installed independently from source from Python.org along with its own package manager pip. But for begninners it is highly suggested to begin with the Anaconda distribution and conda command line tool. You can read more about the differences between Anaconda with conda and pip here.
Visit the Anaconda downloads page and download Anaconda with Python 3.6 for your operating system. Use the graphical installer. Anaconda comes packaged with a graphical user interface for beginning projects as well as the popular IDE Spyder.
Now that we have Anaconda installed we can begin to use Python.
- Open up a terminal
- Type in
pythonand press enter- This should open an interactive Python command prompt directly in the terminal.
- In the first line, you should see that you are running Python 3.6.1 via Anaconda. It should look like this
Python 3.6.1 |Anaconda custom (x86_64)- This command prompt is also widely known in computing as a REPL (Read-Evaluate-Print-Loop) - "also known as an interactive toplevel or language shell, is a simple, interactive computer programming environment that takes single user inputs (i.e. single expressions), evaluates them, and returns the result to the user" - from wiki
- Let's write a few Python commands now
Interactive programming using the Python REPL is nice to immediately get results together but when building larger programs its likely that you will need a more formidable programming environment such as a text editor. There are dozens and dozens of text editors. This tutorial covers the popular Sublime Text 3 editor which may be used for any programming language.
There are many ways to run and write Python. Python can be written in any text editor, even the basic ones that come preinstalled with all operating systems. Sublime Text 3 is an enhanced text editor that is highly customizable to help make programming in Python easier.
Download and install Sublime Text 3 and open it.
To enhance the editing experience of sublime specifically for Python we first need to install the package control manager. This is the package control manager for Sublime and has nothing to do with conda or pip. There are 1000's of third party packages written for Sublime.
- Visit the Package Control website. All Sublime packages can be found here.
- Click the
install nowbutton and follow the instructions to install the package manager.
Now that you have the package manager, you may begin to install packages. We will install the Anaconda Sublime package. This has nothing to do with the Anaconda distribution, it just happens to share the same name. It adds code completion, linting, inline documentation and more. Visit the Anacond Sublime package home page for more info.
- To access the package manager, you must first open up the
command palettewithcmd + shift + P. It is also found under Tools -> Command Palette.- In the text box that pops up, begin typing in the word
install. Click onPackage Control: Install Package- A new text box will open up with a huge list of available packages
- Type in 'Anaconda'. It should be the first option damnwidget.github.io/anaconda
Open up the program guess_number.py in Sublime. This is a small game that attempts to guess your number within a few step. Before we play or analyze the game, take a look at the bottom right hand corner of Sublime. You should see some text that reads Tab Size: 4. There is nothing inherrently wrong with this except that Python's style guide PEP 8 suggests using 4 spaces over tabs. To change the default settings do the following:
- While in
guess_number.pyclick onSublime Text -> Preferences -> Settings - Syntax Specific- This will open up a file titled
Python.sublime_settings.- Append to the end of this JSON file:
"translate_tabs_to_spaces": true- This defaults all tabs to spaces for only your Python files. You might need to close and reopen sublime to see the effects take place.
Now lets take a look at the contents of guess_number.py. Comments may be made with the hash symbol or between triple quotes. The top of the file has comments with the author's name and purpose. All functions have triple quotes immediately after their definition. These quotes have a special name and purpose. They are called docstrings and magically appear whenever you attempt to get help on this function in the future.
You should also see different lines of text outlined and some gray circles to the left of the line numbers. This indicates that there might be some linting or style issues with the current code. You can customize the appearance of all your downloaded sublime packages. Go the menu Sublime Text -> Preferences -> Package Settings -> Anaconda -> Settings - Default. This is a JSON file that has easy to read documentation.
Let's change one of the settings in this file.
- Scroll down to around line 286
- Find the line with the
anaconda_linter_mark_stylesetting. It should currently be mapped tooutline.- Look at the comments above and change the setting to something else
- Go back to the
guess_number.pyfile and notice the changes.
The most straightforward way to execute this program is to do the following:
- Open a terminal
cdinto the directory whereguess_number.pyexits- Run the command
python guess_number.py- Play the game a few times
Some programs may be run directly in Sublime. Unfortunately, guess_number.py does not work since it takes user input. We will download an additional package later that will allows us to run it.
For now we will run a different program by using the build system.
- Open th file
rain.py. This program may be found at matplotlib's site.- Go to Tools -> Build to make it rain
- Exit out of program and press
escto remove the bottom window.
Sublime comes with its own Python interpretter that is separate from the one that you downloaded with the Anaconda distribution.
- Go to View -> Show Console
- Type in some basic Python commands
This is not meant for serious development. There is a much better console that you can add to Sublime.
We will now download another very useful package called SublimeREPL.
- Open the command pallete with
cmd + shift + p- Begin typing in
installand open thePackage Control: Install Package- You will see a very long list of available packages
- Type in
SublimeREPLand install it.- Open up the command pallete again and type in
SublimeREPL: Pythonand press enter- This runs the REPL directly in Sublime
- Run a few Python commands
Remember how I mentioned above that guess_number.py does not run well by using Build? You can however, run the program with SublimeREPL.
- Go to the
guess_number.pyfile- Go to Tools -> SublimeREPL -> Python - Run Current File
- This exacat option is also available via the command palette.
- Play the game in the REPL
You may also use the REPL to run code interactively.
- Start SublimeREPL and run some lines of code
- Watch this video to get more in-depth tutorial on Sublime packages for Python.
- Sublime has a very detailed documentation page where you can learn everything about it.
- There is also a package called Sublime Tutor you can install and learn through practice.
IPython is an enhanced command line REPL with much more functionality than the default one shipped with Python. IPython stands for interactive Python and has grown extremely popular in recent years.
Let's see some of the extra features it provides
- Launch IPython by opening up a terminal and running the command
ipython- Enter
?and press enter. This will give you a quick overview of IPython- For a more complete reference of its capabilities run
%quickref
Get help with any object by placing a question mark after it.
   import pandas as pd
   pd?
Get nice tab completion with pd.<press tab>
Run shell comands with ! like !ls
IPython comes equipped with a few dozen magic commands that conveniently do things that are not so easy using native Python interactively. Take for instance the %timeit magic which is the one I most often use. Let's time the difference between adding a one to each element in a list vs adding one to each element of a NumPy array.
In [1]: n = 10000000
In [2]: some_list = list(range(n))
In [3]: import numpy as np
In [4]: some_array = np.arange(n)
In [5]: %timeit [x+1 for x in some_list]
809 ms ± 19.1 ms per loop (mean ± std. dev. of 7 runs, 1 loop each)
In [6]: %timeit some_array + 1
27.9 ms ± 720 µs per loop (mean ± std. dev. of 7 runs, 10 loops each)PyCharm is an excellent IDE (integrated development environment) made specifically for Python. It provides lots of graphical tools to help developers produce code. There is a free community edition a paid enterprise edition and an education edition with lots of exercises to get you started using it.
Let's download and install PyCharm Edu
- Visit PyCharm Edu and download and install.
- A new project title Introduction to Python should start up.
- If it does not navigate to file -> new project -> educational
- Before beginning on the 50 exercises you will want to ensure that PyCharm is using a Python 3 interpretter
- Go to Preferences -> Project -> Project Interpreter and choose the Python 3 interpreter than comes with Anaconda
- Complete the exercises by reading the task description and editing the code.
- Press the run button to execute the code and then mark the code as complete.
PyCharm offers a lot more and is excellent for large and complex projects. Watch this series of YouTube videos to learn more.
Anaconda ships with its own IDE called Spyder which is similar to R-Studio the main development environment for R users. Rodeo is a product from Yhat that has gained lots of momentum recently and is similar to Spyder.
Some developers like to keep their hands on the keyboard at all times and prefer minimal text editors like VIM or Emacs. Visit this page to see a longer list of editors for Python.
We have finally arrived at my personal favorite environment for doing data science. Jupyter Notebooks provide a web-based interface to a number of different programming languages. The project was originally titled "iPython notebook" and was specifically built for just iPython as a backend. It turned out that notebooks are a very popular way to develop. To accomodate other languages that project was retitled Jupyter for the languages JUlia, PYthon and R. The Jupyter project now works with over 50 different language "kernels" of which IPython is just one.
The rest of this tutorial will take place in Jupyter Notebooks.
- Open a terminal and run
jupyter notebook- Open up the first notebook
0 Jupyter Intro