RFID LLRP Inventory Application Service
Overview
RFID LLRP Inventory - Edgex application service for processing tag reads,
producing events [Arrived, Moved, Departed], configure and manage the LLRP readers via commands
Build Native
make buildBuild Docker
make dockerBuild with NATS Messaging
Currently, the NATS Messaging capability (NATS MessageBus) is opt-in at build time. This means that the published Docker image and Snaps do not include the NATS messaging capability.
The following make commands will build the local binary or local Docker image with NATS messaging capability included.
make build-nats
make docker-nats
The locally built Docker image can then be used in place of the published Docker image in your compose file.
See Compose Builder nat-bus option to generate compose file for NATS and local dev images.
Packaging
This component is packaged as docker image and snap.
For docker, please refer to the Dockerfile and Docker Compose Builder scripts.
For the snap, refer to the snap directory.
Inventory Events
There are 3 basic inventory events that are generated and sent to EdgeX's core-data.
Here are some example EdgeX Events with accompanying EdgeX Readings.
InventoryEventArrived
{
  "apiVersion": "v2",
  "id": "6def8859-5a12-4c83-b68c-256303146682",
  "deviceName": "app-rfid-llrp-inventory",
  "profileName": "app-rfid-llrp-inventory",
  "sourceName" : "app-rfid-llrp-inventory",
  "origin": 1598043284109799400,
  "readings": [
    {
      "apiVersion": "v2",
      "id": "8d15d035-402f-4abc-85fc-a7ed7213122a",
      "origin": 1598043284109799400,
      "deviceName": "app-rfid-llrp-inventory",
      "resourceName": "InventoryEventArrived",
      "profileName": "app-rfid-llrp-inventory",
      "valueType": "String",
      "value": "{\"epc\":\"30340bb6884cb101a13bc744\",\"tid\":\"\",\"timestamp\":1598043284104,\"location\":\"SpeedwayR-10-EF-25_1\"}"
    }
  ]
}
InventoryEventMoved
{
  "apiVersion": "v2",
  "id": "c78c304e-1906-4d17-bf26-5075756a231f",
  "deviceName": "app-rfid-llrp-inventory",
  "profileName": "app-rfid-llrp-inventory",
  "sourceName" : "app-rfid-llrp-inventory",
  "origin": 1598401259697580500,
  "readings": [
    {
      "apiVersion": "v2",
      "id": "323694d9-1a48-417a-9f43-25998536ae8f",
      "origin": 1598401259697580500,
      "deviceName": "app-rfid-llrp-inventory",
      "resourceName": "InventoryEventMoved",
      "profileName": "app-rfid-llrp-inventory",
      "valueType": "String",
      "value": "{\"epc\":\"30340bb6884cb101a13bc744\",\"tid\":\"\",\"timestamp\":1598401259691,\"old_location\":\"Freezer\",\"new_location\":\"Kitchen\"}"
    }
  ]
}
InventoryEventDeparted
{
  "apiVersion": "v2",
  "id": "4d042708-c5de-41fa-827a-3f24b364c6de",
  "deviceName": "app-rfid-llrp-inventory",
  "profileName": "app-rfid-llrp-inventory",
  "sourceName" : "app-rfid-llrp-inventory",
  "origin": 1598062424894043600,
  "readings": [
    {
      "apiVersion": "v2",
      "id": "928ff90d-02d1-43be-81a6-a0d75886b0e4",
      "origin": 1598062424894043600,
      "deviceName": "app-rfid-llrp-inventory",
      "resourceName": "InventoryEventDeparted",
      "profileName": "app-rfid-llrp-inventory",
      "valueType": "String",
      "value": "{\"epc\":\"30340bb6884cb101a13bc744\",\"tid\":\"\",\"timestamp\":1598062424893,\"last_read\":1598062392524,\"last_known_location\":\"SpeedwayR-10-EF-25_1\"}"
    },
    {
      "apiVersion": "v2",
      "id": "abfff90d-02d1-43be-81a6-a0d75886cdaf",
      "origin": 1598062424894043600,
      "deviceName": "rfid-llrp-inventory",
      "resourceName": "InventoryEventDeparted",
      "profileName": "rfid-llrp-inventory",
      "valueType": "String",
      "value": "{\"epc\":\"30340bb6884cb101a13bc688\",\"tid\":\"\",\"timestamp\":1598062424893,\"last_read\":1598062392512,\"last_known_location\":\"POS Terminals\"}"
    }
  ]
}
Note: The
readingsfield of theEdgeX Eventis an array and multiple Inventory Events may be sent via a singleEdgeX Event. EachEdgeX Readingcorresponds to a single Inventory Event.
Arrived
Arrived events are generated when ANY of the following conditions are met:
- A tag is read that has never been read before
- A tag is read that is currently in the Departed state
- A tag aged-out of the inventory and has been read again
Moved
Moved events are generated when ALL of the following conditions are met:
- A tag is read by an Antenna (
Incoming Antenna) that is not the current Location - The
Incoming Antenna's Alias does not match the current Location's Alias - The
Incoming Antennahas read that tag at least2times total (including this one) - The moving average of RSSI values from the
Incoming Antennaare greater than the current Location's adjusted moving average (See: Mobility Profile)
Departed
Departed events are generated when:
- A tag is in the
Presentstate and has not been read in more than the configuredDepartedThresholdSeconds
NOTE: Departed tags have their tag statistics cleared, essentially resetting any values used by the tag algorithm. So if this tag is seen again, the Location will be set to the first Antenna that reads the tag again.
Tag State Machine
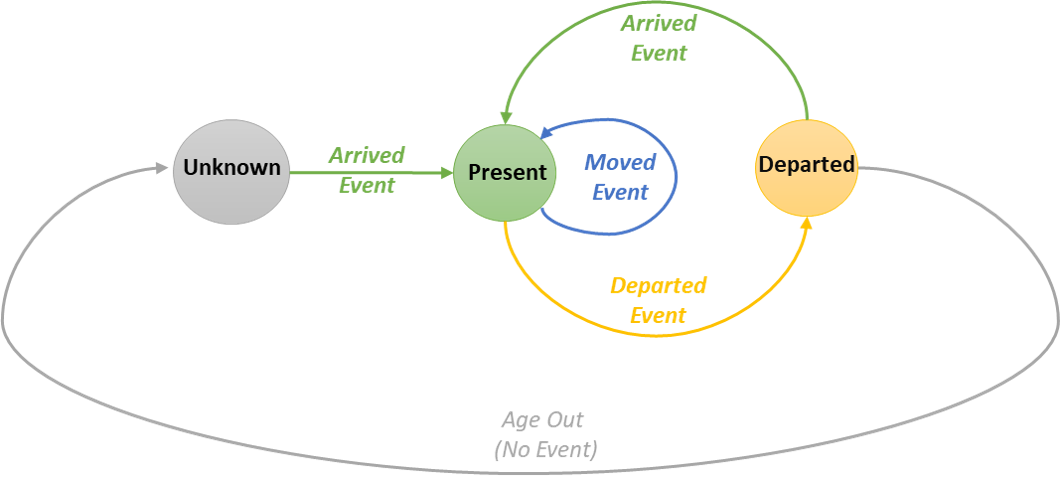
Here is a diagram of the internal tag state machine. Every tag starts in the Unknown state (more precisely does not exist at all in memory).
Throughout the lifecycle of the tag, events will be generated that will cause it to move between
Present and Departed. Eventually once a tag has been in the Departed state for long enough
it will "Age Out" which removes it from memory, effectively putting it back into the Unknown state.
Tag Location Algorithm
Every tag is associated with a single Location which is the best estimation of the Reader and Antenna
that this tag is closest to.
The location algorithm is based upon comparing moving averages of various RSSI values from each RFID Antenna. Over time these values will be decayed based on the configurable Mobility Profile. Once the algorithm computes a higher adjusted value for a new location, a Moved event is generated.
RSSI stands for Received Signal Strength Indicator. It is an estimated measure of power (in dBm) that the RFID reader receives from the RFID tag's backscatter.
In a perfect world as a tag gets closer to an antenna the RSSI would increase and vice-versa. In reality there are a lot of physics involved which make this a less than accurate representation, which is why we apply algorithms to the raw RSSI values.
Note: Locations are actually based on Aliases and multiple antennas may be mapped to the
same Alias, which will cause them to be treated as the same within the tag algorithm. This can be
especially useful when using a dual-linear antenna and mapping both polarities to the same Alias.
Configuration
The following configuration options in the [ApplicationSettings] section affect how the tag location algorithm works under the hood.
-
AdjustLastReadOnByOrigin[bool]: Iftrue, this will override the tag read timestamps sent from the sensor with an adjusted one based on the UTC time theLLRP Device Servicereceived the message from the device (akaOrigin). Essentially all timestamps will be shifted by the difference in time from when the sensor says it was read versus when it was actually received. This option attempts to account for message latency and time drift between sensors by standardizing all timestamps. Iffalse, timestamps will retain their original values sent from the sensor.- default:
true - computation:
readOn = (Origin - sentOn) + readOn
- default:
-
DepartedThresholdSeconds[int]: How long in seconds a tag should not be read before it will generate aDepartedevent.- default:
600
- default:
-
DepartedCheckIntervalSeconds[int]: How often to run the background task that checks if a Tag needs to be markedDeparted. Smaller intervals will cause more frequent checks and less variability at the expense of CPU utilization and lock contention. Larger intervals on the other hand may cause greater latency between when a tag passes theDepartedThresholdSecondsand when theDepartedevent is actually generated (waiting for the next check to occur).- default:
30
- default:
-
AgeOutHours[int]: How long in hours to keepDepartedtags in our in-memory inventory before they are aged-out (purged). This is done for CPU and RAM conservation in deployments with a large turnover of unique tags. An aged-out tag will be purged from memory and if it is read again it will be treated as the first time seeing that tag.- default:
336(aka: 2 weeks)
- default:
Mobility Profile
The following configuration options define the Mobility Profile values.
These values are used in the Location algorithm as an adjustment function which
will decay RSSI values over time. This offset value is then applied to the existing Tag's Location
and compared to the non-adjusted average. Positive offset values will increase the likelihood of a tag
staying in the same location, whereas negative offset values will increase the likelihood that the tag
will move to the new location it was just read at.
The main goal of the Mobility Profile is to provide a way to customize the various tradeoffs when dealing with erratic data such as RSSI values. In general there is a tradeoff between responsiveness (how quickly tag movement is detected) and stability (preventing sporadic readings from generating erroneous events). By tweaking these values you will be able to find the balance that is right for your specific use-case.
Suppose the following variables:
incomingRSSIMean RSSI of lastwindowSizereads by incoming read's locationexistingRSSIMean RSSI of lastwindowSizereads by tag's existing locationoffsetResult of Mobility Profile's computations
The location will change when the following equation is true:
incomingRSSI > (existingRSSI + offset)
Configure Mobility Profile
_Note: All values can be modified via the [ApplicationSettings] section.
-
MobilityProfileSlope[float]: Used to determine the offset applied to older RSSI values (aka rate of decay)- units:
dBm per millisecond
- units:
-
MobilityProfileThreshold[float]: RSSI threshold that must be exceeded for the tag to move from the previous sensor- units:
dBm
- units:
-
MobilityProfileHoldoffMillis[float]: Amount of time in which the offset used is equal to the threshold, effectively the slope is not used- units:
milliseconds
- units:
Example Mobility Profile Values
Here are some example mobility profile values based on our previous experience. These values can be used as a reference when creating your own Mobility Profile.
| Asset Tracking * | |
|---|---|
| Slope | -0.008 |
| Threshold | 6.0 |
| Holdoff Millis | 500.0 |
* These are the default mobility profile values.
| Retail Garment | |
|---|---|
| Slope | -0.0005 |
| Threshold | 6.0 |
| Holdoff Millis | 60000.0 |
Setting the Aliases
Every device(reader) + antenna port represents a tag location and can be assigned an alias
such as Freezer, Backroom etc. to give more meaning to the data. The default alias set by the
application has a format of <deviceName>_<antennaId> e.g.
Reader-10-EF-25_1 where Reader-10-EF-25 is the deviceName and 1 is the antennaId.
To get the list of LLRP devices or readers connected,
GET to the /api/v2/readers endpoint:
curl -o- localhost:59711/api/v2/readers
{
  "Readers": [
    "SpeedwayR-10-EF-25"
  ]
}
Via configuration.toml (before deployment)
If you already know the alias values you would like to use before deployment, they can be defined in your
configuration.toml file. There is a section called [Aliases] under the [AppCustom] section that is defaulted to empty.
In order to override an alias, set the default alias as the key, and the new alias as the value you want, such as:
[AppCustom.Aliases]
Reader-10-EF-25_1 = "Freezer"
Reader-10-EF-25_2 = "Backroom"
Configuration for Normal Service Startup
If an existing Aliases folder key (even if empty) is found in Consul, nothing is done. Data in Consul
will be left as-is.
If no existing Aliases folder key is found in Consul:
- If an
[Aliases]section is not present or is empty in the user's TOML file, nothing will be done or added to Consul. - If an
[Aliases]section is present and contains data, this data will be uploaded to Consul.
Overwrite Config in Consul (During Development)
During development, the user also has the option to pass the -o/--overwrite command line flag
to the service. In addition to what EdgeX normally does when this is passed, the Aliases are read
from the TOML file and uploaded to Consul, overwriting existing Aliases with the same key.
One thing to be aware of however is that the Aliases are treated as Key/Value pairs so any Alias key in Consul that is not present in the TOML file will not be deleted from Consul. Read below for an example scenario.
Scenario
Consul already contains the following key/values:
app-rfid-llrp-inventory/AppCustom/Aliases/Reader-10-EF-25_1=POSapp-rfid-llrp-inventory/AppCustom/Aliases/Reader-20-20-20_1=Store
The user passes -o/--overwrite flag, with the following TOML file:
[Aliases]
Reader-10-EF-25_1 = "Freezer"
Reader-10-EF-25_2 = "Backroom"
Reader-10-EF-25_1already exists with a value ofPOSand will be overwritten toFreezer.Reader-10-EF-25_2is new and will be added as expected with valueBackroom.Reader-20-20-20_1is not present in the TOML file, but was pre-existing in Consul. This value will be left alone.
Outcome
The following key/value pairs will exist in Consul:
app-rfid-llrp-inventory/AppCustom/Aliases/Reader-10-EF-25_1=Freezerapp-rfid-llrp-inventory/AppCustom/Aliases/Reader-10-EF-25_2=Backroomapp-rfid-llrp-inventory/AppCustom/Aliases/Reader-20-20-20_1=Store
Note that there is a config watcher for the
[AppCustom]section that notifies the app of changes. This config watcher will load all the aliases from Consul on startup.
Via Consul (after deployment)
Users can also configure the aliases using Consul. This can be achieved via Consul’s UI or CLI. This
can be done regardless of whether configuration.toml specified initial aliases or not.
Setting Alias via Consul UI
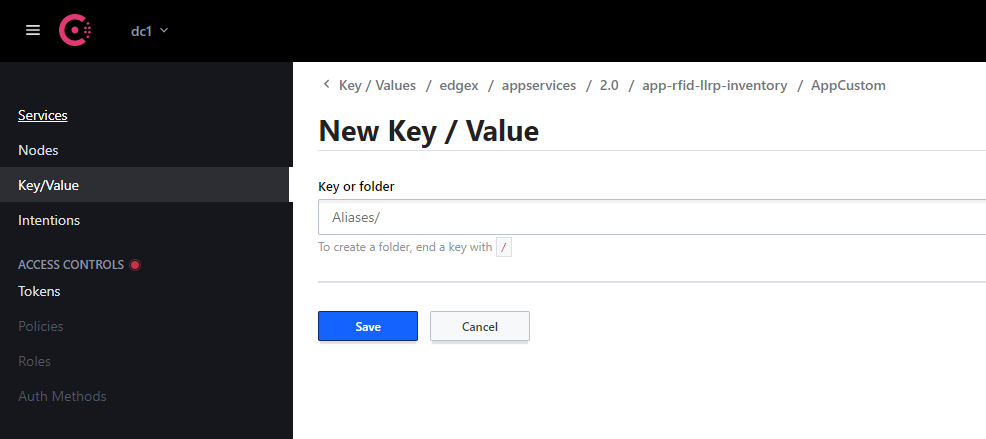
- If one does not exist, create a folder named
Aliasesunder Edgex Consul. A folder is created by ending the key with a/like so:Aliases/
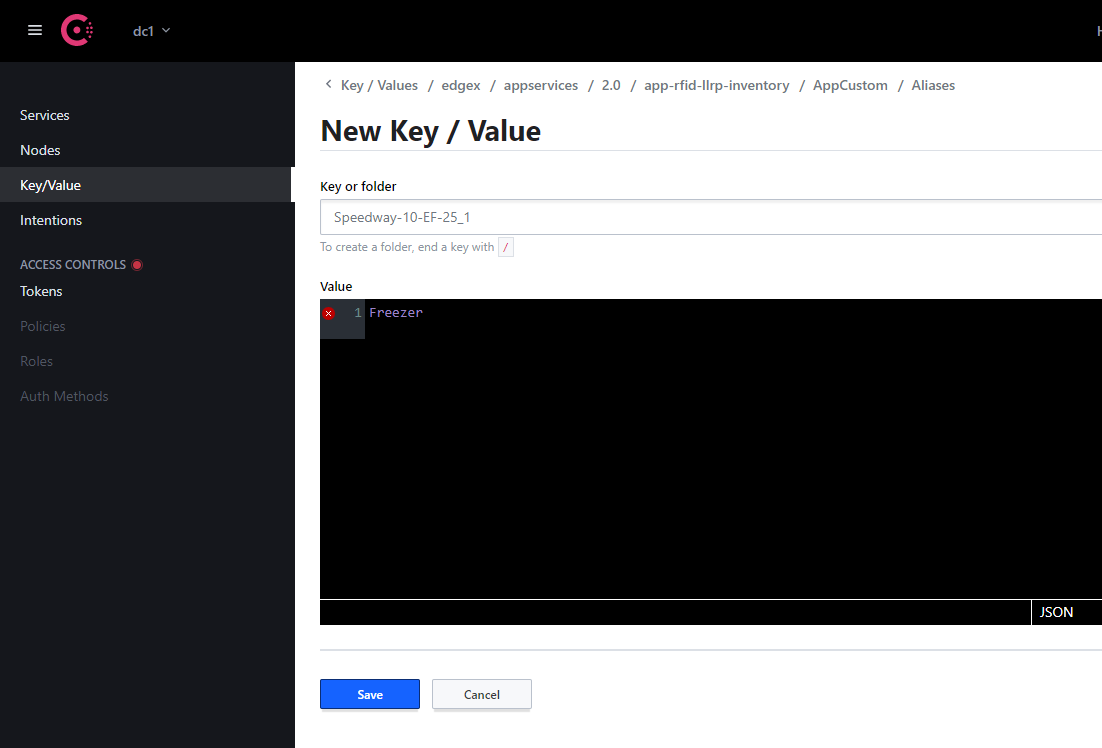
- Add Key Value pairs. Key is the default alias which is
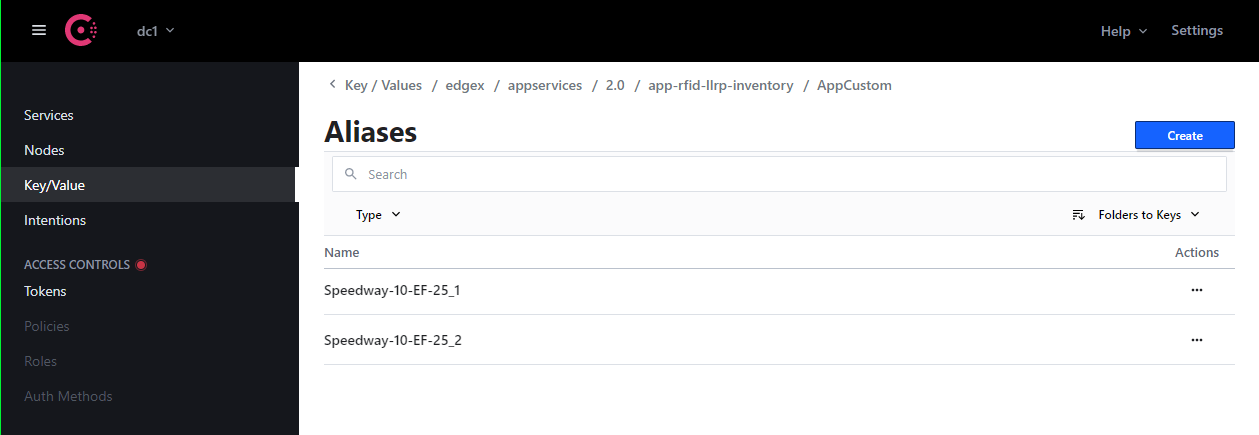
<deviceName>_<antennaId>. The value must be the alias value. Examples of KV pairs:- Speedway-10-EF-25_1: Freezer
- Speedway-10-EF-25_2: Backstock
Everytime the user creates/updates the Aliases folder, the configuration changes apply to the application dynamically, and the updated alias can be seen under tag location (location_alias)
GET to the /api/v2/inventory/snapshot endpoint:
curl -o- localhost:59711/api/v2/inventory/snapshot
 [
   {
     "epc": "30143639f8419145db602154",
     "tid": "",
     "location": {
       "device_name": "SpeedwayR-10-EF-25",
       "antenna_id": 1
     },
     "location_alias": "Freezer",
     "last_read": 1601441311411,
     "last_arrived": 1601441265669,
     "last_departed": 0,
     "state": "Present",
     "stats_map": {
       "SpeedwayR-10-EF-25_1": {
         "last_read": 1601441311411,
         "mean_rssi": -54.25
       }
     }
   }
 ]
Setting Alias via Consul CLI
Aliases can also be set via Consul's API. Ex:
curl \
  --request PUT \
  --data "Freezer" \
  http://localhost:8500/v1/kv/edgex/appservices/2.0/app-rfid-llrp-inventory/AppCustom/Aliases/SpeedwayR-10-EF-25_1
Behaviors
The code processes ROAccessReports coming from the LLRP Device Service, and so you can direct those Readers through that service. Alternatively, this code includes a "Behaviors" concept, which abstracts and simplifies LLRP Reader configuration at the expense of configuration expressiveness.
A Behavior provides a limited set of options applicable to inventory applications. This service determines and applies the LLRP options that best match the desired Behavior using information about the current environment and Readers' capabilities.
Here's how the service works with Behaviors:
- On startup, it retrieves the current device list from EdgeX's Metadata service.
- It uses the LLRP device service to reset those Readers to their factory default configs and deletes any ROSpecs they currently have.
- Next, it generates an ROSpec per Reader based on its device capabilities, the current desired behavior, and certain environmental factors.
- It sends those ROSpecs to each Reader.
- When directed to start reading, it enables and/or starts the ROSpecs on each device.
- If the desired behavior has an infinite duration, they start automatically.
- If the behavior has a GPI trigger, it waits til that trigger starts it.
- If the behavior has a finite duration (i.e., is a one-off), the service sends it a Start command.
- When it gets a stop request, it stops and/or disables ROSpecs, as necessary.
Important Limitations
- Since this code makes use of various commands on the device service,
your devices must be registered with the LLRP device service
using device profiles with names matching
the
deviceCommandsanddeviceResourcesit needs. The full list can be found below. - In particular, Impinj devices must be registered with the device service
using a profile that has an
enableImpinjExtdeviceCommand, tosetto adeviceResourcerepresenting aCustomMessagethat enables Impinj's custom extensions. An example profile that meets these conditions is available in the LLRP Device Service. - You can modify a Behavior at any time, but doing so resets managed Readers' configurations, and thus if they were reading, they will stop.
- The current code uses only a single
defaultBehavior that applies to all Readers, and currently isn't persisted between restarts. The code is written in a way to support multiple Behaviors, but since there are many ways one can reasonably relate behaviors and devices, extending this is left for future development or as an exercise for the user.
Working with Behaviors
To start all Readers reading with the current behavior,
POST to the /command/reading/start endpoint:
curl -o- -X POST localhost:59711/api/v2/command/reading/start
To stop reading,
POST to the /command/reading/stop endpoint:
curl -o- -X POST localhost:59711/api/v2/command/reading/stop
To view the default Behavior:
curl -o- localhost:59711/api/v2/behaviors/default
{
    "impinjOptions": {
        "suppressMonza": false
    },
    "scanType": "Normal",
    "duration": 0,
    "power": {
        "max": 3000
    }
}
To modify the default Behavior, PUT a new one at that endpoint.
The new behavior completely replaces the old one.
The following example uses jq to generate the JSON Behavior structure,
the details of which are explained below.
This particular Behavior enables a Fast scan at 30 dBm:
curl -o- localhost:59711/api/v2/behaviors/default -XPUT \
    --data @<(jq -n '{ScanType: "Fast", Power: {Max: 3000}}')
If you attempt to set the Behavior to something that can't be supported all the Readers to which it should apply, you'll receive an error response, and the Behavior won't change:
curl -o- -XPUT localhost:59711/api/v2/behaviors/default \
    --data @<(jq -n '{ScanType: "Fast"}')

new behavior is invalid for "Speedway": target power (0.00 dBm)
is lower than the lowest supported (10.00 dBm): behavior cannot be satisfied
Supported Behavior Options
ScanTypeis a string which should be set to one of the following:Fastsingulates tags as often as possible, with little regard for duplicates. This mode makes sense when tags are likely to "move fast" through antennas' Fields of View (FoV), or when the tag population is small and you want to detect as soon as possible when a tag is no longer present. For large, static tag populations, this mode is likely to repeatedly inventory only the strongest tags.Normalmode reads tags in a way that keeps them quiet for a short while, but allow that to "timeout" so you'll see it multiple times as long as it's still in the Reader's antenna's Field of View (FoV). This mode is better thanFastat finding weaker tags, but as the popluation size grows, it'll become more difficult for the Reader to outpace tag timeouts.Deepmode, likeNormal, suppresses responses to find weaker tags, but does so in a way that makes it more likely to find even the weakest tags. It attempts to keep tags quiet until it has read every tag. If it reaches a point that it can no longer find tags, it changes strategies to attempt to re-inventory the population. It can take longer for this mode to notice a tag has entered or exited its FoV.
Durationis a number of milliseconds between 0 and 4,294,967,295 (2^32-1) that determines how long the Behavior should run. If the value is zero, the Behavior applies until the service receives astopcommand.Poweris an object, though the current version accepts only one key:Maxis the 100x the maximum desired dBm output from the Reader to its antennas; actual radiated power depends on the gains and losses associated with the antenna and cabling. The service accepts values between -32,768 and 32,767 (the space of an int16), but it configures the Reader with its highest available power less than or equal to the given target. The service rejects the Behavior if itsPower.Maxis less than the lowest value supported by the Readers to which the Behavior should apply.
Frequenciesis a list of frequencies, in kHz, for which thePower.Maxis legal. In non-frequency Hopping regulatory regions, this element is required, while in frequency Hopping regions, this element is ignored. In the first case, the service must tell the Reader what frequency to operate, but some regions allow different power levels at different frequencies. For these Readers, the service will only choose a Frequency from this list, or will reject the Behavior if the Reader lacks any matching frequencies. The US is a Hopping region, so this value is ignored for a Reader legal to operate in the US.GPITriggeris an optional object that configures a GPI trigger. When the service receives astartcommand, rather than starting the Behavior right away, the service tells the Reader to read whenever a GPI pin switches to a certain state. Likewise, the service handlesstopby disabling the config on the Reader. The required elements match that of the LLRP structure:Portis a uint16 port number.Eventis a bool with meaning for the GPITimeoutis a uint32 number of milliseconds after which the trigger times out; if it's 0, it never times out.
ImpinjOptionsis an optional object with values that only apply if the target Reader supports them:-
SuppressMonzais a boolean that, if true, enables Impinj's "TagFocus" feature. When an Impinj reader uses this mode and singulates tags in "Session 1" (a concept that applies to the EPCGlobal Gen2 standard), it refreshes Monza tags' S1 flag to the "B state", so those tags are inventoried only once when they enter the antenna's FoV. When this option is enabled on a Behavior, the service changes itsFastandNormalscans to use this. Since aDeepscan already attempts to keep all tags quiet until it inventories the full tag population, this option doesn't have an effect when theScanTypeisDeep.Note that this feature only works on Impinj Monza tags when they're being read by an Impinj Reader; other readers are not configured with this option, and other tag types will act as they do under a
Normalscan.
-
Device Profile Requirements
As mentioned above, this service calls the Device Service
with specific deviceCommands and expects specific deviceResources.
Thus, those deviceCommands and deviceResources
must be defined in the deviceProfiles
for which devices are registered with the LLRP Device Service.
All Devices
All devices must be registered with a deviceProfile that provides the following:
- The following
deviceResourcesmust be available:- EdgeX
"String"types, the values of which encode json-representations of LLRP messages and/or parameters that can be marshaled by Go's standardjsonpackage into the Go structs defined in the LLRP package:ReaderCapabilitieswith areadWriteof"R"or"RW"encoding an LLRPGetReaderCapabilitiesResponsemessage.ReaderConfigwith areadWriteof"W"or"RW"encoding an LLRPGetReaderConfigResponsemessage.ROSpecwith areadWriteof"W"or"RW"encoding an LLRPROSpecparameter.
- An EdgeX
"uint32"type withreadWriteof"W"or"RW"namedROSpecID, the string value of which encodes an LLRPROSpecIDas a base-10 unsigned integer. - An EdgeX
"String"type withreadWriteof"W"or"RW"named"Action", which the device service uses to determine whichdeviceCommandwas called.
- EdgeX
- The following
deviceCommandsmust be available:capabilitiesmust have agetforReaderCapabilities.configmust have asetthat acceptsReaderConfig.roSpecmust have asetthat acceptsROSpec.- The following
deviceCommandsmust have twosets -- the first must acceptROSpecIDand the second mustsetActionwith the appropriateparametervalue:enableROSpecmustsetActionwith theparametervalue"Enable"startROSpecmustsetActionwith theparametervalue"Start"stopROSpecmustsetActionwith theparametervalue"Stop"disableROSpecmustsetActionwith theparametervalue"Disable"deleteROSpecmustsetActionwith theparametervalue"Delete"
Impinj Devices
In addition to the above,
Impinj Readers must be registered with a profile
that has a deviceResource named ImpinjCustomExtensionMessage
with the attributes vendor: "25882" and subtype: "21"
and a deviceCommand named enableImpinjExt
with a set that targets that deviceResource.
When this service sees an Impinj device,
it sends a PUT request with {"ImpinjCustomExtensionMessage": "AAAAAA=="}
to {deviceService}/api/v2/commands/{deviceName}/enableImpinjExt;
if that deviceCommand and deviceResource exist,
the Device Service will send a CustomMessage to the reader,
enabling this service to send Impinj's CustomParameters.
This is required because Impinj Readers reject LLRP CustomParameters
unless a Client sends the afore-described CustomMessage
at some earlier point in their communication.
If that resource or command doesn't exist for the device,
this service will receive a 404 from the Device Service,
preventing it from operating as designed.


