https://github.com/yxdragon/imagepy.git
**Introduction:**ImagePy is an image processing software developed in Python, supporting bmp, rgb, png and other commonly used image formats. It can handle grayscale images and multi-channel (color) images, and supports image stack (sequence) operations. It supports a variety of selection operations (point, line, surface, multi-line, multi-face, hollow polygon). It can carry out a variety of commonly used mathematical operations, commonly used filter operation, image measurements, as well as pixel statistics. It can carry on dem surface reconstruction and three-dimensional reconstruction of image sequences. And the framework is based around Python development. The image data is represented by numpy. And thus it can easily access scikit-image, opencv, itk, mayavi and other third-party mature image processing libraries.
The main interface consists of four parts, from top to bottom: the title bar, menu bar, toolbar, and status bar.
Here are a few examples to illustrate what ImagePy can do.
Selection Introduction: Selection refers to processing the image only in the the specific identification areas on the image. ImagePy supports single point, multi-point, single line, multi-line, rectangular, circular, arbitrary polygon and free curve selection. It can superimpose something using Shift key, hollow out something using Ctrl key. In addition, all the selection objects can carry out expansion, shrink, convex hull and other geometric operations.
**Geometric Transformation:**ImagePy supports geometric transformations. It can carry out rotation, translation and other conventional matrix transformations. What’s more, these rotations are interactive and support selection.
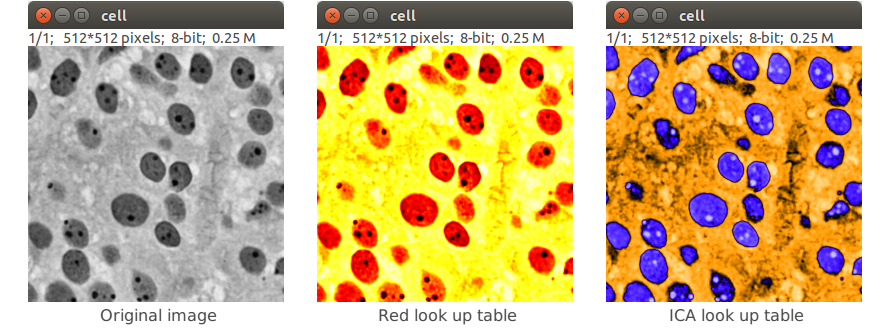
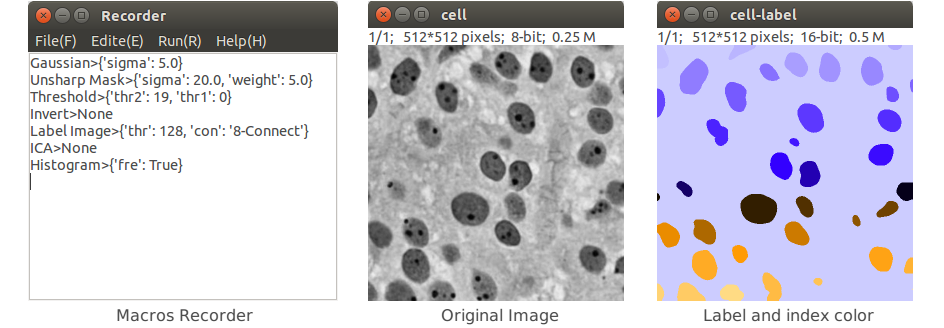
Index color is also called false color. The essence of it is to map the gray color to a predefined spectrum. The index color does not increase the amount of information in the image, but does enhance the visual contrast.
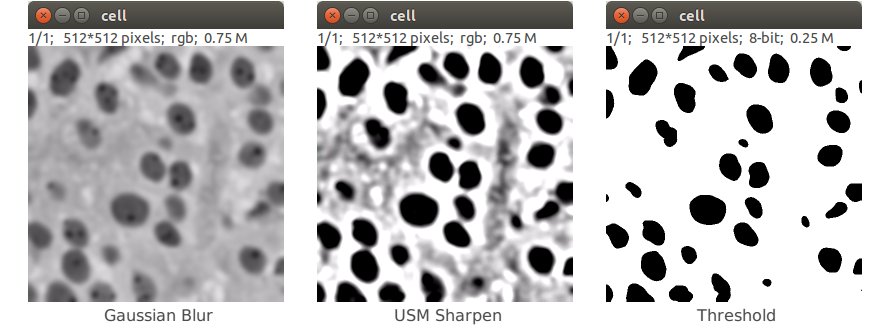
Here, for a cell under a microscope, we organize the image and compute statistics.
- Open the original image and go on Gaussian blur to anti-noise.
- In order to highlight the cells, a large-scale USM mask treatment was performed.
- After processing the picture, it is easy to use the threshold function to carry on binarization.
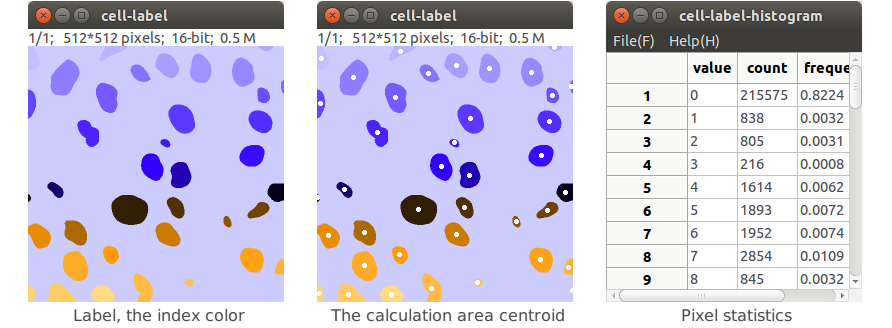
- Label the binary image, mark unicom area.
- Calculate the centroid of each Unicom area
- Calculate the area occupied by each cell
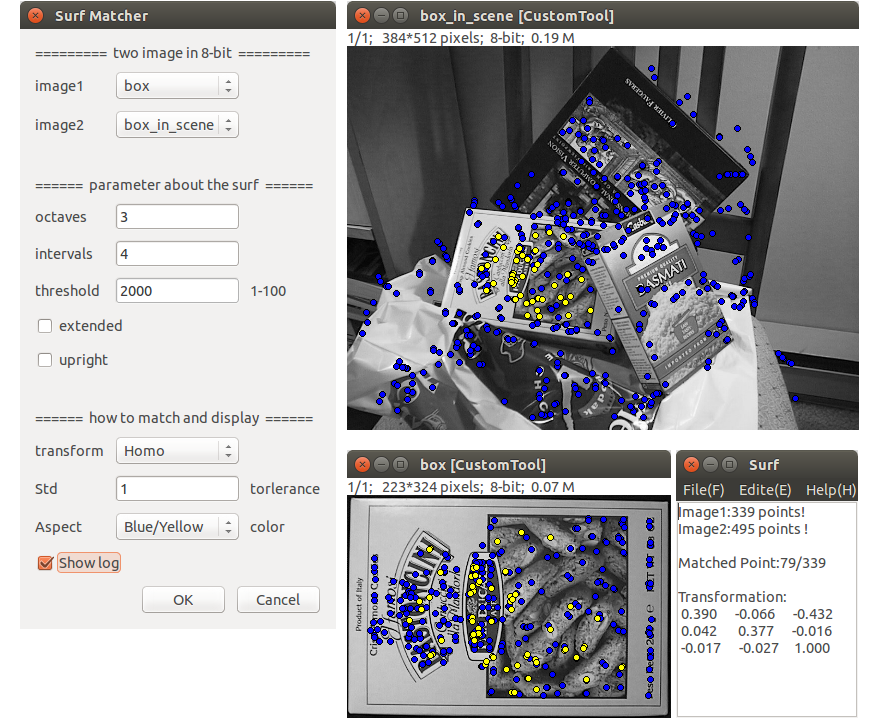
Use the Surf feature matching algorithm implemented in OpenCV.
- The two graphs are covered by points, that is, Surf feature points, where the correct match is shown in yellow.
- Also output a log of the opations. Identify the feature points of the two graphs, the correct number of matches, and the rotation matrix between the two graphs.
- When a point is clicked with the mouse, the dot will be red with the corresponding match point of the other picture at the same time.
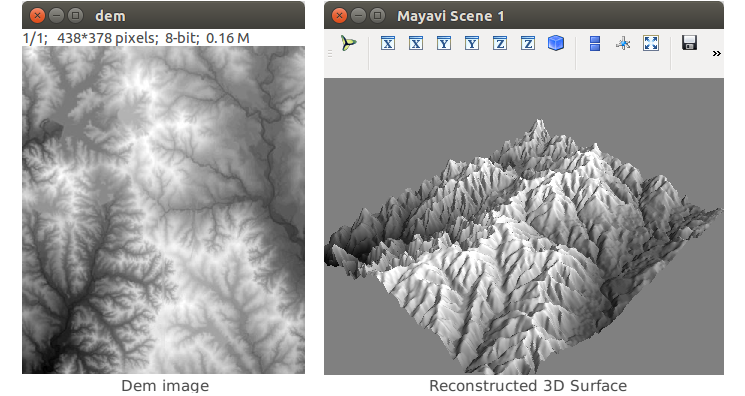
Use the mayavi library, to perform a large number of three-dimensional reconstructions and three-dimensional visualization functions.
Dem is the digital elevation model, which means that the brightness of the image represents the elevation. Through the Dem data, you can calculate the height, slope. You can draw contours, and perform surface reconstruction.
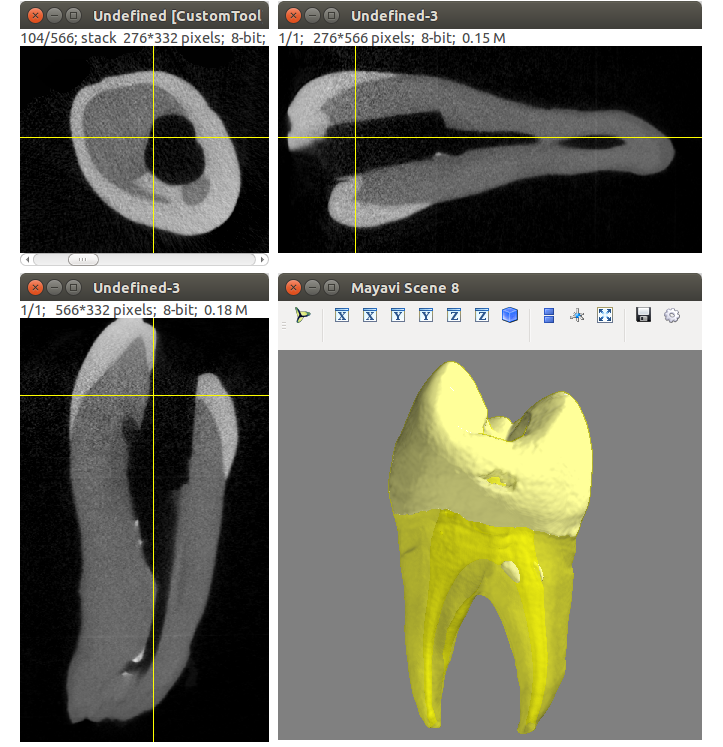
The following image represents dental MicroCT data. The data were filtered, segmented and three-dimensional reconstructed, as well as visually manipulated.
The figure above is a tooth CT data. Importing the image sequence, you can view the three views, and then go on its three-dimensional reconstruction.
Image Stack: ImagePy supports image stack processing, it has the following two characteristics:
- Images in the image stack have the same format and the same size.
- They will act on each image in the stack when processed.
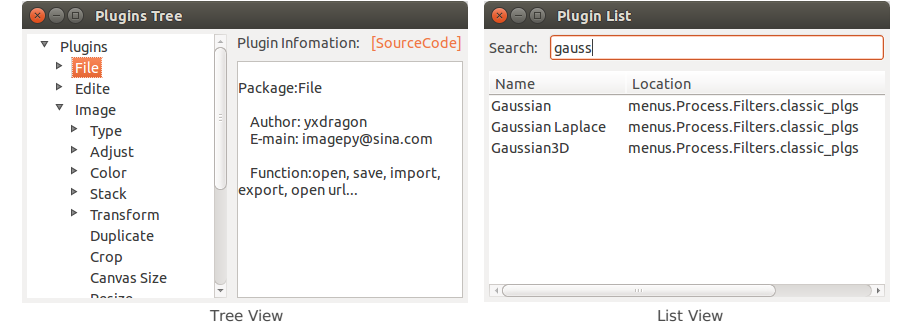
In ImagePy itself, each functional component is plug-in (all menus, tools). The implementation of each function, in essence, is through interaction to get a group of parameters and then act on the current image. We can view the plug-in's organizational structure in Plugin Tree View, find plug-ins quickly in Plugin List View, record macros in Macros Recorder, and batch process when needed to do series of related functions and improve work efficiency.
Macro Recording of Cell Count Example:
We open the Plugins -> Macros -> Macros Recorder plug-in, and then re-operate the cell counting process...
After each step, Macros Recorder will add a log. When all is completed, you can get the following log:
These logs, each line essentially records “plug-in name> {parameter}”. Click “Run> Run Macros (F5)” to perform each action of the record in turn. You can also use the mouse to select a line or a few lines. Click “Run> Run Line (F6)” to implement the selected line. In addition macros have the following characteristics.
- You can save a file where the suffix of macro is (.mc). You can run the specified macro file via Plugins -> Macros -> Run Macros.
- Put the macro file on the menus directory or any of its subdirectories in the project. Starting once again, the macro will be loaded as a menu item. The title is the file name. In fact, some project function are in series by the macro.
The examples above only list some of the functionality of the ImagePy. However, ImagePy is not only an image processing program, but a highly scalable framework. Any numpy-based processing function can be easily incorporated. For example, to make a Gaussian blur filter, we only need:
# -*- coding: utf-8 -*
import scipy.ndimage as nimg
from core.engines import Filter

class Gaussian(Filter):
    title = 'Gaussian'
    note = ['all', 'auto_msk', 'auto_snap','preview']

    #parameter
    para = {'sigma':2}
    view = [(float, (0,30), 1,  'sigma', 'sigma', 'pix')]

    #process
    def run(self, ips, snap, img, para = None):
        nimg.gaussian_filter(snap, para['sigma'], output=img)
Create a Filter:
- Import related class library. It can be third-party or implemented in C.
- Create a class that subclasses
Filter. title, this line is the name of the plug-in and will also serve as the title of the menu.noteindicates how the plug-in works and the associated preprocessing and post-processing work. This includes which types of images can be processed, whether selections are supported or not, and so on.parais the parameter the kernel function needs.viewandparaare corresponding. They inform how the various parameters of the framework plug-in interact (the framework will generate your interactive interface automatically).runis the core function, if conditional, givenimgto the results of the process (save memory), or return out (the framework will help you give img).- Place the file in any subdirectory of menus in the project, and it will be loaded as a menu item at startup.
What has the framework helped us do?
They framework enables complex tasks in a uniform way. Simply, you do not need to determine for yourself whether the image type is legitimate. You do not need to make your own image cache to support undo. You do not need to support the selection by yourself. Do not need to monitor the interface by yourself to achieve real-time preview. You do not need to write any interface code after you have defined the required parameters, the type and the range of values for each parameter. When a color image is encountered, the each channel of the image is processed sequentially. When the image stack is encountered, each frame is automatically traversed. You are free to work on either the task of image analysis, or creating new plugins for the framework.
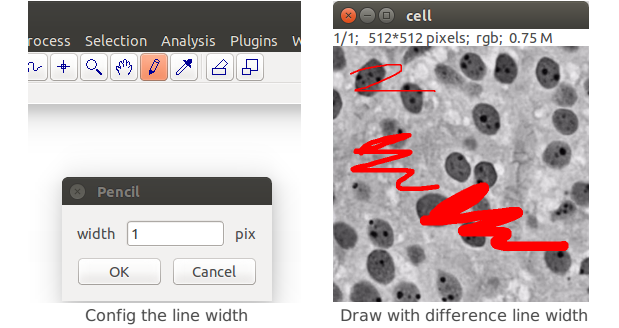
Another scenario is to interact on the canvas through the mouse, like the selection operations mentioned above. Here is an example of a brush:
from core.draw import paint
from core.engines import Tool
import wx

class Plugin(Tool):
  title = 'Pencil'
  para = {'width':1}
  view = [(int, (0,30), 0, 'width', 'width', 'pix')]

  def __init__(self):
    self.sta = 0
    self.paint = paint.Paint()
    self.cursor = wx.CURSOR_CROSS

  def mouse_down(self, ips, x, y, btn, **key):
    self.sta = 1
    self.paint.set_curpt(x,y)
    ips.snapshot()

  def mouse_up(self, ips, x, y, btn, **key):
    self.sta = 0

  def mouse_move(self, ips, x, y, btn, **key):
    if self.sta==0:return
    self.paint.lineto(ips.get_img(),x,y, self.para['width'])
    ips.update = True

  def mouse_wheel(self, ips, x, y, d, **key):pass
Create Tool:
- Inherited from
Toolin theengines. - Specify the
title, which will be the tool name, and the message of the status bar. - Adds several methods to achieve mouse_down, mouse_up, mouse_move, mouse_wheel.
- If the tool requires parameters (for example, pen width), use the dictionary to assign to
para. Similarly,viewspecifies its interactive interface. When the tool is double-clicked, the dialog box will pop-up in accordance with the specified interface. - Files are stored in the sub-folder of tools, with a generated 16 * 16 thumbnail icon. The icon and the tool are stored in the same name as the gif file.
The above only lists some features of ImagePy, covering the basic mathematical operations, filters, pixel statistics, a slightly complex feature extraction, 3D reconstruction and other functions. It gives a brief introduction to macros , how to write new filters, tools and integrate them like ImagePy. Stay tuned for more detail in the coming manual and development documents.
I (yxdragon) have used ImageJ for a long time and also used to use Python for scientific computing. ImageJ's outstanding plug-in design philosophy allows it to absorb the contributions of industry professionals quickly. However, Python has an advantage over Java in image processing.
- Java is a system language, the relative threshold of it is relatively high.
- The related open source libraries under Java are not as rich as C / C++.
- Python has simple grammar so it is easy to learn. It is a good choice for non-computer professionals.
- Python has a wealth of third-party extensions, such as Scikit-image, OpenCV, Matplotlib, Mayavi, etc.
- Almost all scientific computing class libraries are based on Numpy! so the framework can be built up easily.
- Python can be extended by C/C++ with ctypes/cython.
Because of busy work, I wrote ImagePy in my spare time. All of the development work lasted about two months. Personally I think that this efficiency is mainly due to a large number of third-party libraries of Python as well as the project’s "borrowlism" design ideas. The project uses wxpython as the interface library, Numpy as the base data type. Because the time is short, many interactive details of the plug-in will show problems, you please give a positive feedback to me. I will do my best to safeguard the healthy growth of this project.
https://github.com/yxdragon/imagepy.git
It is me, yxdragon.
Email:imagepy@sina.com


