文章目录
GitHub:https://github.com/AnJiaoDe/OpenCVAndroidNiubility
CSDN:https://blog.csdn.net/confusing_awakening/article/details/113355609
使用方法
详细使用如下
自己写C/C++调用OpenCV实现
依赖轮子之后,so库何在?
欢迎联系、指正、批评
注意:该轮子只包含了arm64-v8a架构的so库,因为目前的手机,基本上都支持到了arm64-v8a,再适配到armeabi-v7a意义不大了
1.工程目录下的build.gradle中添加代码:
注意:如果轮子死活下载不下来,说明maven地址有毛病,你需要找到jitpack的官网首页,查看最新的官网地址
allprojects {
		repositories {
			        maven { url 'https://www.jitpack.io' }
		}
}2.直接在需要使用的模块的build.gradle中添加代码:
dependencies {
    api 'com.github.AnJiaoDe:OpenCVAndroidNiubility:V5.0.0'//基于OpenCV4.5.1
}
3.混淆已配置到库内部,无需做混淆配置
注意:记得去gayhub查看最新版本,最新版本最niubility
初始化
在Application初始化
public class MyApplication extends Application {
    @Override
    public void onCreate() {
        super.onCreate();
        OpenCVUtils.init();
    }
}
或者在使用之前init即可
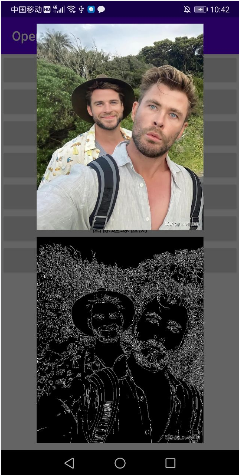
Mat mat_src = new Mat();
Mat mat_blur = new Mat();
Mat mat_dst = new Mat();
Bitmap bitmap = BitmapFactory.decodeResource(getResources(), R.drawable.man_ls);
iv_normal.setImageBitmap(bitmap);

Bitmap bitmap_deal = bitmap.copy(Bitmap.Config.RGB_565, true);
Utils.bitmapToMat(bitmap_deal, mat_src);
Imgproc.blur(mat_src, mat_blur, new Size(3, 3));
Imgproc.Canny(mat_blur, mat_dst, 30, 30 * 3, 3);

Utils.matToBitmap(mat_dst, bitmap_deal);
iv_deal.setImageBitmap(bitmap_deal); Mat mat_src = new Mat();
Mat mat_dst = new Mat();
Bitmap bitmap = BitmapFactory.decodeResource(getResources(), R.drawable.gou_1);
iv_normal.setImageBitmap(bitmap);
Bitmap bitmap_deal = bitmap.copy(Bitmap.Config.RGB_565, true);
Utils.bitmapToMat(bitmap_deal, mat_src);
Imgproc.cvtColor(mat_src, mat_dst, Imgproc.COLOR_BGR2GRAY);
Utils.matToBitmap(mat_dst, bitmap_deal);
iv_deal.setImageBitmap(bitmap_deal);Mat mat_src = new Mat();
Mat mat_dst = new Mat();
Bitmap bitmap = BitmapFactory.decodeResource(getResources(), R.drawable.gou_2);
iv_normal.setImageBitmap(bitmap);
Bitmap bitmap_deal = bitmap.copy(Bitmap.Config.RGB_565, true);
Utils.bitmapToMat(bitmap_deal, mat_src);
Mat mat_deal = Imgproc.getStructuringElement(Imgproc.MORPH_RECT, new Size(15, 15));
Imgproc.erode(mat_src, mat_dst, mat_deal);
Utils.matToBitmap(mat_dst, bitmap_deal);
iv_deal.setImageBitmap(bitmap_deal);如果实现功能的时候不知道用什么API,往往需要去看OpenCV JAVA函数的注释 但是如果实在不知道用什么函数的时候,但是又知道C/C++函数怎么用的时候,我们可以通过JNI
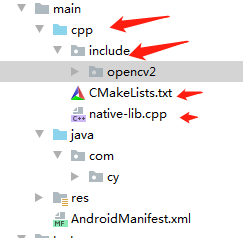
引入OpenCV C/C++的头文件
头文件可以从我的gayhub上下载demo即可获取

关联libc++_shared.so和libopencv_java4.so
找到你的工程目录中的External Libraries

OpengCVAndroidNiubility aar

classes.jar 点击show in explorer,可以看到gayhub上的轮子被下载到了电脑C盘

so库


so库的路径
set(path_so C:\Users\Administrator\.gradle\caches\transforms-2\files-2.1\60c200c3babcd2085e13876e25905724
\jetified-OpenCVAndroidNiubility-V1.0.0\jni\arm64-v8a)cmake_minimum_required(VERSION 3.4.1)
#配置路径
set(path_so C:\Users\Administrator\.gradle\caches\transforms-2\files-2.1\60c200c3babcd2085e13876e25905724
\jetified-OpenCVAndroidNiubility-V1.0.0\jni\arm64-v8a)
# 设置cpp目录路径
include_directories(include)
add_library( # Sets the name of the library.
native-lib
# Sets the library as a shared library.
SHARED
native-lib.cpp)
find_library( # Sets the name of the path variable.
log-lib
# Specifies the name of the NDK library that
# you want CMake to locate.
log)
target_link_libraries( # Specifies the target library.
native-lib
# Links the target library to the log library
# included in the NDK.
${log-lib} )
add_library(c++_shared
SHARED
IMPORTED)
set_target_properties(c++_shared
PROPERTIES
IMPORTED_LOCATION
${path_so}/libc++_shared.so)
add_library(opencv_java4
SHARED
IMPORTED)
set_target_properties(opencv_java4
PROPERTIES
IMPORTED_LOCATION
${path_so}/libopencv_java4.so)
target_link_libraries( # Specifies the target library.
native-lib
c++_shared
opencv_java4
# Links the target library to the log library
# included in the NDK.
${log-lib}
#操作bitmap需要
# -ljnigraphics
)或者你可以直接从gayhub将工程clone到本地,自行操作
如果你需要用JNI操作bitmap相关,可以关联-ljnigraphics
定义Native方法
public class JniUtils {
    static {
        System.loadLibrary("native-lib");
    }
    public static  native  void gray(long mat_addr_src,long mat_addr_dst);
}
CPP实现JNI方法
#include <jni.h>
#include <opencv2/opencv.hpp>
using namespace cv;

extern "C"
JNIEXPORT void JNICALL
Java_com_cy_opencvandroidniubility_JniUtils_gray(JNIEnv *env, jclass clazz, jlong mat_addr_src,
                                                 jlong mat_addr_dst) {
    Mat *mat_src = (Mat *) mat_addr_src;
    Mat *mat_dst = (Mat *) mat_addr_dst;
    cvtColor(*mat_src, *mat_dst, COLOR_BGR2GRAY);

//    Mat &mat_src = *(Mat *) mat_addr_src;
//    Mat &mat_dst = *(Mat *) mat_addr_dst;
//    cvtColor(mat_src, mat_dst, COLOR_BGR2GRAY);
}
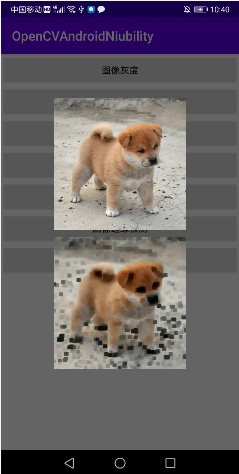
举例图像变灰
 Mat mat_src = new Mat();
 Mat mat_dst = new Mat();
 Bitmap bitmap = BitmapFactory.decodeResource(getResources(), R.drawable.gou_1);
 iv_normal.setImageBitmap(bitmap);

 Bitmap bitmap_deal = bitmap.copy(Bitmap.Config.RGB_565, true);
 Utils.bitmapToMat(bitmap_deal, mat_src);
 //Imgproc.cvtColor(mat_src, mat_dst, Imgproc.COLOR_BGR2GRAY);
 //自定义JNI方法调用
 JniUtils.gray(mat_src.nativeObj,mat_dst.nativeObj);
 Utils.matToBitmap(mat_dst, bitmap_deal);
iv_deal.setImageBitmap(bitmap_deal);因为JAVA中的Mat类,提供了nativeObj,也就是对象的地址,这样,我们就可以很方便地从JAVA传递Mat对象给C/C++
Github:https://github.com/AnJiaoDe
CSDN:https://blog.csdn.net/confusing_awakening
OpenCV入门教程:https://blog.csdn.net/confusing_awakening/article/details/113372425
ffmpeg入门教程:https://blog.csdn.net/confusing_awakening/article/details/102007792
QQ群


