


Automated API testing was never so easy before.
Zerocode makes it easy to create and maintain automated tests with absolute minimum overhead for REST,SOAP, Kafka, DB services and more. Jump to the quick-start section or HelloWorld section to explore more.
Zerocode is used by many companies such as Vocalink, HSBC, HomeOffice(Gov) and others to achieve zero-defect production drop of their micro-services.
It is a light-weight, simple and extensible open-source framework for writing test intentions in simple JSON format that facilitates both declarative configuration and automation. The framework manages the step-chaining, request payload handling and response assertions at the same time, same place using JSON Path.
For example, if our REST API returns the following from URL "https://localhost:8080/api/customers/123" with status 200,
{
    "id": 123,
    "type": "Premium High Value",
    "addresses": [
        {
            "type":"holiday",
            "line1":"Mars"
        }
    ]
}
then, we can easily validate the above API using Zerocode like below.
The beauty here is, we can use the JSON payload structure as it is without any manipulation.
{
    "url": "api/customers/123",
    "operation": "GET",
    "request": {},
    "verifications": {
        "status": 200,
        "body": {
            "id": 123,
            "type": "Premium High Value",
            "addresses": [
                {
                    "type":"holiday",
                    "line1":"Mars"
                }
            ]
        }
    }
}
Or
{
    ...
    "verifications": {
        "body": {
            "id": "$NOT.NULL",  // A not-null indeterministic value
            "addresses.SIZE": "$GT.0"  // Only the length validation(not the contents) - Greater Than 0.
        }
    }
}
Or
{
    ...
    "verifications": {
        "body": {
            "type": "$CONTAINS.STRING:Premium High"  // Matches only part of the value
        }
    }
}
Or
{
    ...
    "verifications": {
        "body": {
	    "addresses[?(@.type=='Holiday')].line1.SIZE": 1  // Indeterministic element position in an array
        }
    }
}
and run it simply by pointing to the above JSON file from a "JUnit" @Test method.
   @Test
   @Scenario("test_customer_get_api.json")
   public void getCustomerHappy(){
        // No code goes here. This remains empty.
   }
Looks simple n easy? Why not give a try? See the quick-start section or HelloWorld section.
@UseHttpClient enables us to use any project specific custom Http client. See an example here.
e.g.
@UseHttpClient(CustomHttpClient.class)
public class GitHubSecurityHeaderTokenTest {
}
But this feature is optional and the framework defaults to use Apache HttpClients for both http and https connections.
ZeroCodeUnitRunner is the JUnit runner which enables us to run a single or more test-cases from a JUnit test-class.
e.g.
@TargetEnv("app_sit1.properties")
@RunWith(ZeroCodeUnitRunner.class)
public class GitHubHelloWorldTest {

   @Test
   @Scenario("screening_tests/test_happy_flow.json")
   public void testHappyFlow(){
   }

   @Test
   @Scenario("screening_tests/test_negative_flow.json")
   public void testNegativeFlow(){
   }

}- Selecting all tests as usual
JUnit Suite
@RunWith(Suite.class)
@Suite.SuiteClasses({
  HelloWorldSimpleTest.class,
  HelloWorldMoreTest.class,
})

public class HelloWorldJunitSuite {
    // This class remains empty
}
Or
- Selecting tests by cherry-picking from test resources
@TargetEnv("app_dev1.properties")
@UseHttpClient(CustomHttpClient.class)
@RunWith(ZeroCodePackageRunner.class)
@Scenarios({
        @Scenario("path1/test_case_scenario_1.json"),
        @Scenario("path2/test_case_scenario_2.json"),
})
public class HelloWorldSelectedGitHubSuite {
    // This space remains empty
}If you are looking for simillar REST API testing DSL in Python(YAML), Then visit this open-source pyresttest lib in the GitHub.
In the below example -
nameis equivalent toscenarioNamemethodis equivalent tooperationvalidatorsis equivalent toverificationsorassertionsof Zerocode
- test: # create entity by PUT
    - name: "Create or update a person"
    - url: "/api/person/1/"
    - method: "PUT"
    - body: '{"first_name": "Gaius","id": 1,"last_name": "Baltar","login": "gbaltar"}'
    - headers: {'Content-Type': 'application/json'}
    - validators:  # This is how we do more complex testing!
        - compare: {header: content-type, comparator: contains, expected:'json'}
        - compare: {jsonpath_mini: 'login', expected: 'gbaltar'}  # JSON extraction
        - compare: {raw_body:"", comparator:contains, expected: 'Baltar' }  # Tests on raw response
The Quick-Start guide explains how to bring up a REST end point and run the tests.
Use Zerocode declarative parallel load generation on the target system.

It eliminates the repetitive code such as Java step definitions, test assertions, payload parsing, API calls such as Http, Kafka, DB Services and much more. See an example how. It's powerful JSON comparison and assertions make the testing cycle a lot easy and clean.
It has got best of best ideas and practices from the community to keep it super simple and the adoption is rapidly growing among the developer/tester community. It alleviates pain and brings the simplicity in validating the APIs.
It also helps in mocking/stubbing interfacing APIs during the testing cycle in a declarative-fashion as a test-step as well as standalone mock-server deployed locally or into cloud. Its approach to IDE based performance testing to generate load/stress on the target application is quite simple, flexible and efficient - enabling us to simply reuse the test(s) from our regression pack.
Here the host and port are maintained in a properties file to enable easy environment-switching.
host_env1.properties
--------------------
web.application.endpoint.host=https://api.github.com
web.application.endpoint.port=443
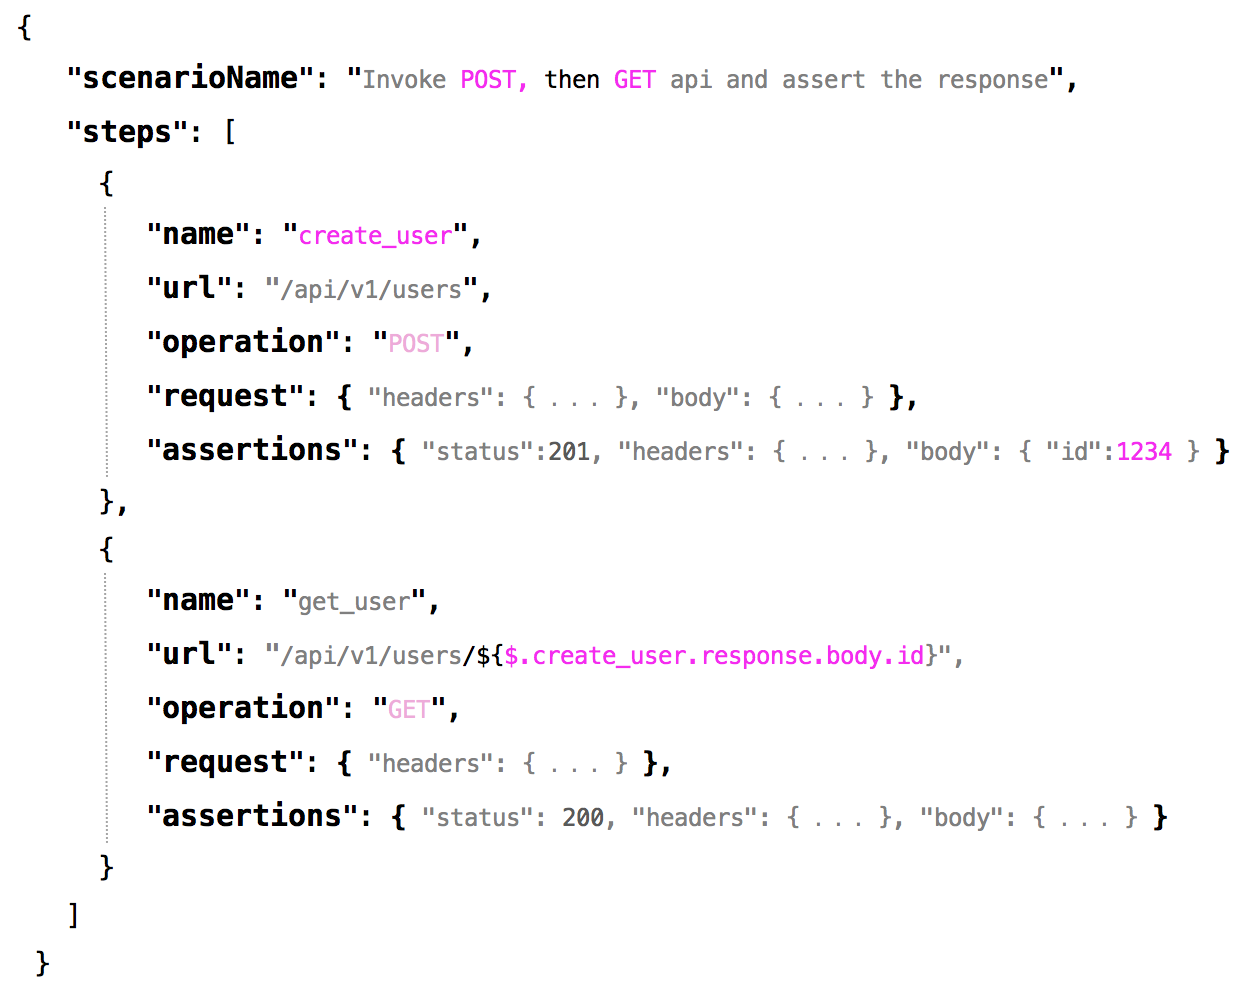
e.g. Our below User-Journey or AC(Acceptance Criteria) or a Scenario,
AC1:
GIVEN- the POST api end point '/api/v1/users' to create an user,
WHEN- I invoke the API,
THEN- I will receive the 201 response status with the a {created-User-Id}
AND- I will validate the response

AC2:
GIVEN- the REST api GET end point '/api/v1/users/${id}',
WHEN- I invoke the API,
THEN- I will receive the 200(Ok) response status with body(user details) and headers
AND- I will validate the response
translates to the below executable JSON steps in Zerocode - Simple and clean !
(See here a full blown CRUD operation scenario with POST, PUT, GET, DELETE example.)
That's it, the simple JSON steps. No other step definition coding needed.
No feature files, no extra plugins, no assertThat(...), no statements or grammar syntax overhead.
And it is declarative JSON DSL, with the request/response fields available for the step chaining via the JSON Path.
See the Table Of Contents for usages and examples.
Latest release: 1.3.x 🏹
Continuous Integration:
HelloWorld: Calling a GitHub api step and executing Test code.
Help and Usage: Table of Contents
Wiki: About Zerocode
License: Apache 2.0
Mailing List: Mailing List
Chat Room: Gitter Chat
The purpose of Zerocode lib is to make our API tests easy to write, easy to change, easy to share.
Maven dependency xml:
<dependency>
    <groupId>org.jsmart</groupId>
    <artifactId>zerocode-tdd</artifactId>
    <version>1.3.x</version>
</dependency>
Jump to Getting Started
In a typical TDD approach, Zerocode is used in various phases of a project to pass though various quality gates. This makes the TDD cycle very very easy, clean and efficient. e.g.
- NFR - Performance Testing
- NFR - Security Testing
- DEV - Integration Testing
- DEV - Dev Build/In-Memory Testing
- CI - End to End Testing Build
- CI - SIT(System Integration Testing) Build
- CI - Contract Test Build
- CI - DataBase Integrity Testing
- MANUAL - Manual Testing like usual REST clients(Postman or Insomnia etc)
- MOCK - API Mocking/Service Virtualization
Clone or download the below quick-start repos to run these from your local IDE or maven.
-
Quick start - Hello World examples
-
Quick start - Hello World Kafka Testing examples
-
Quick start - API Contracts testing - Interfacing applications
-
Quick start - Performance testing - Varying Load/Stress generation
-
Quick start - Spring Boot application - Integration testing - In-Memory
-
Quick start - Performance testing - Resusing Spring JUnit tests(
less common) - JUnit-Spring-Zerocode -
Quick start - Kotlin Integration - A Simple Kotlin Application - Dev and Test Best Practice
To build any of the above projects, we can use the following command
mvn clean install -DskipTests
For selected module build
mvn clean install -pl core,http-testing
- Kafka - Testing Distributed Data Stream application (Easy and fun) 🔜
- Multi Topic
produceandconsume🔜 - KSQL Integration 🔜
produceandconsumeJSON messages- Test
avroschema registry along with REST Proxy
- Multi Topic
- WebHook and WebSocket HelloWord Examples
Testing no more a harder, slower and sleepless task
See the HelloWorldTest and more
Visit the page Kafka Testing Introduction for step-by-step approach.
- Kafka - Testing Distributed Data Stream application (Easy and fun)
- Simple
produceandconsume produceandconsumeRAW messagesproduceandconsumeJSON messages- Test
avroschema registry along with REST Proxy
- Simple
- Kafka - HelloWorld examples and Wiki on dockerized testinng
Visit the page Database Validation for step-by-step approach.
Search in the Maven Portal or View in Maven repo
- Vocalink (A Mastercard company) - REST API testing for virtualization software
- HSBC Bank - MuleSoft application REST API Contract testing, E2E Integration Testing, Oracle DB API testing, SOAP testing and Load/Stress aka Performance testing
- Barclays Bank - Micro-Services API Contract Validation for System APIs build using Spring Boot
- Home Office(GOV.UK) - Micro-Services REST API Contract testing, HDFS/Hbase REST end point testing, Kafka Data-pipeline testing, Authentication testing.
Follow us(Twitter)

Add these two maven dependencies:
<dependency>
    <groupId>org.jsmart</groupId>
    <artifactId>zerocode-tdd</artifactId>
    <version>1.3.x</version>
    <scope>test</scope>
</dependency>

<dependency>
    <groupId>junit</groupId>
    <artifactId>junit</artifactId>
    <version>4.12</version>
    <scope>test</scope>
</dependency>
Then annotate our JUnit test method pointing to the JSON file as below and run as a unit test.
That's it. Done.
@TargetEnv("github_host.properties")
@RunWith(ZeroCodeUnitRunner.class)
public class JustHelloWorldTest {

    @Test
    @Scenario("helloworld/hello_world_status_ok_assertions.json")
    public void testGet() throws Exception {

    }
}
Where, We just need the below hello_world_status_ok_assertions.json.
{
    "scenarioName": "Invoke the GET api and assert the response",
    "steps": [
        {
            "name": "get_user_details",
            "url": "/users/octocat",
            "operation": "GET",
            "request": {
            },
            "assertions": {
                "status": 200,
                "body": {
                    "login" : "octocat",
                    "id" : 33847731,
                    "type" : "User"
                }
            }
        }
    ]
}
the github_host.properties looks as below:
web.application.endpoint.host=https://api.github.com
web.application.endpoint.port=443
web.application.endpoint.context=
And the assertThat(...), GIVEN-WHEN-THEN steps become implicit. We don't have to deal with them explicitly as the framework handles these complexities and makes the testing very very easy
GIVEN- the GitHub REST api GET end point,
WHEN- I invoke the API,
THEN- I will receive 200(OK) status with body and assert the response
or
GIVEN- the GitHub REST url and the method GET,
WHEN- I invoke the API,
THEN- I will receive 200(OK) status with body
AND assert the response
or
GIVEN- the GET methos
AND the http url of GitHub api
WHEN- I invoke the API using a HTTP client,
THEN- I will receive 200(OK) status with body
AND assert the response
or
HttpResponse response =
aHttpClient.get("https://<host_post_externalized>/users/octocat")
.header("accept", "application/json")
.execute();
User user = response.getUser();
assertThat(response.getStatusCode(), is(200))
assertThat(user.getId(), is(33847731))
assertThat(user.getLogin(), is("octocat"))
assertThat(user.getType(), is("user"))
See more usages and examples below.
- Help and usage
- Overriding with Custom HttpClient with Project demand, See also SSL Trusted Http Client
- Externalize host and port to properties files
- Using any properties file key-value in the steps
- Single Scenario with single step
- Generating Load or stress for performance testing
- Step with more assertions
- Running with step loop
- Running with scenario loop
- Generated reports and charts
- More assertion with handy place holders
- General Place holders
- Chaining multiple steps for a scenario
- Enabling ignoreStepFailures for executing all steps in a scenario
- Generating random strings, random numbers and static strings
- Asserting general and exception messages
- Asserting with LT(lesser than) and GT(greater than)
- Dealing with arrays
- Asserting an empty array
- Asserting an array SIZE
- Calling java methods(apis) for specific tasks)
- Generating IDs and sharing across steps
- Bare JSON String without curly braces, still a valid JSON
- Passing Headers to the REST API
- Passing "Content-Type": "application/x-www-form-urlencoded" header
- Handling Content-Type with charset-16 or charset-32
- Setting Jenkins env propperty and picking environment specific properties file
- LocalDate and LocalDateTime format example
- SOAP method invocation example using xml input
- SOAP method invocation where Corporate Proxy enabled
- MIME Type Converters- XML to JSON, prettyfy XML etc
- Using WireMock for mocking dependent end points
- Basic http authentication step using zerocode
- Sending query params in URL or separately
- General place holders and assertion place holder table
- References and Dicussions
Download this help and usage project to try it yourself.
-
HelloWorld project: https://github.com/authorjapps/zerocode-hello-world
-
Simple steps to run: https://github.com/authorjapps/zerocode-hello-world#zerocode-hello-world
-
Git Clone or Download the zip file(contains a maven project) to run locally
A scenario might consists of one or more steps. Let's start with single step Test Case:
{
  "scenarioName": "Vanilla - Will Get Google Employee Details",
  "steps": [
    {
      "name": "step1_get_google_emp_details",
      "url": "http://localhost:9998/google-emp-services/home/employees/999",
      "operation": "GET",
      "request": {
      },
      "assertions": {
        "status": 200
      }
    }
  ]
}
Note: The above JSON block is a test case where we asked the test framework to hit the
REST end point : http://localhost:9998/google-emp-services/home/employees/999
with method: GET
and asserting the REST response with an
expected status: 200
where, step "name" is a meaningful step name, which is significant when multiple steps are run. See a multi-step example.
Note:
scenarioname : is free text
step name: free text without any space
The above test case will PASS as the end point actually responds as below. Look at the "response" section below.
        {
          "name": "Sample_Get_Employee_by_Id",
          "operation": "GET",
          "url": "/google-emp-services/home/employees/999",
          "response": {
            "status": 200,
            "body": {
              "id": 999,
              "name": "Larry P",
              "availability": true,
              "addresses":[
                {
                  "gpsLocation": "x3000-y5000z-70000"
                },
                {
                  "gpsLocation": "x3000-y5000z-70000S"
                }
              ]
            }
          }
        }
The following Test Case will fail. Why?
Because you are asserting with an expected status as 500, but the end point actually returns 200.
{
  "scenarioName": "Vanilla - Will Get Google Employee Details",
  "steps": [
    {
      "name": "step1_get_google_emp_details",
      "url": "http://localhost:9998/google-emp-services/home/employees/999",
      "operation": "GET",
      "request": {
      },
      "assertions": {
        "status": 500
      }
    }
  ]
}- Browse or clone this sample performance-tests repo with examples.
- Take advantage of the following two extended Junit load runners from the lib-
@RunWith(ZeroCodeLoadRunner.class)
and
@RunWith(ZeroCodeMultiLoadRunner.class)
- Load a single scenario using
ZeroCodeLoadRunner(See example of ZeroCodeMultiLoadRunner here)
@LoadWith("load_config_sample.properties")
@TestMapping(testClass = TestGitGubEndPoint.class, testMethod = "testGitHubGET_load")
@RunWith(ZeroCodeLoadRunner.class)
public class LoadGetEndPointTest {
}- The load generation properties are set here
load_config_sample.properties. Learn more >>
number.of.threads=2
ramp.up.period.in.seconds=10
loop.count=1
abort.after.time.lapsed.in.seconds=600- The test case for GET api is mapped or fed into the load runner as below:
@TestMapping(testClass = TestGitGubEndPoint.class, testMethod = "testGitHubGET_load")
which verifies the response in the assertions section -
{
    "scenarioName": "Load testing- Git Hub GET API",
    "steps": [
        {
            "name": "get_user_details",
            "url": "/users/octocat",
            "operation": "GET",
            "request": {
            },
            "assertions": {
                "status": 200,
                "body": {
                    "login" : "octocat",
                    "id" : 583231,
                    "avatar_url" : "https://avatars3.githubusercontent.com/u/583231?v=4",
                    "type" : "User",
                    "name" : "The Octocat",
                    "company" : "GitHub"
                }
            }
        }
    ]
}- In one of the response during the load, if the
actual responsedoes not match theexpected responsei.e. in theassertionssection above, then the test will fail. - Browse the above example in GitHub. or
- Download as zip the above maven project to run from your IDE.
More (Learn advantages of load testing using your IDE(Eclipse or Intellij etc)) >>
{
  "scenarioName": "Vanilla - Will Get Google Employee Details",
  "steps": [
    {
      "name": "step1_get_google_emp_details",
      "url": "http://localhost:9998/google-emp-services/home/employees/999",
      "operation": "GET",
      "request": {
      },
      "assertions": {
        "status": 200,
        "body": {
          "id": 999,
          "name": "Larry P",
          "availability": true,
          "addresses":[
            {
              "gpsLocation": "x3000-y5000z-70000"
            },
            {
              "gpsLocation": "x3000-y5000z-70000S"
            }
          ]
        }
      }
    }
  ]
}
The above Test Case will PASS as the assertions section has all expected values matching the end point's response.
-
Usage: See here: Step loop
-
loop field in a step will execute the step that many number of time.
{
  "scenarioName": "Vanilla - Execute multiple times - Step",
  "steps": [
    {
      "loop": 2,
      "name": "get_room_details",
      "url": "http://localhost:9998/google-emp-services/home/employees/101",
      "operation": "GET",
      "request": {
      },
      "assertions": {
        "status": 200,
        "body": {
          "id": 101
        }
      }
    }
  ]
}- Usage: See here: Scenario loop Runs the entire scenario two times i.e. executing both the steps once for each time.
{
  "scenarioName": "Vanilla - Execute multiple times - Scenario",
  "loop": 2,
  "steps": [
    {
      "name": "get_room_details",
      "url": "http://localhost:9998/google-emp-services/home/employees/101",
      "operation": "GET",
      "request": {
      },
      "assertions": {
        "status": 200,
        "body": {
          "id": 101
        }
      }
    },
    {
      "name": "get_another_room_details",
      "url": "http://localhost:9998/google-emp-services/home/employees/102",
      "operation": "GET",
      "request": {
      },
      "assertions": {
        "status": 200,
        "body": {
          "id": 102
        }
      }
    }
  ]
}(For Gradle build setup - See here - Wiki)
Generated test statistics reports. See the '/target' folder after every run. e.g. Look for-
target/zerocode-junit-granular-report.csv
target/zerocode-junit-interactive-fuzzy-search.html
See some sample reports below:
- See here : Full coverage CSV report
If target folder has permission issue, the library alerts with-
----------------------------------------------------------------------------------------
Somehow the 'target/zerocode-test-reports' is not present or has no report JSON files.
Possible reasons-
   1) No tests were activated or made to run via ZeroCode runner. -or-
   2) You have simply used @RunWith(...) and ignored all tests -or-
   3) Permission issue to create/write folder/files
   4) Please fix it by adding/activating at least one test case or fix the file permission issue
----------------------------------------------------------------------------------------
- Link: See test cases folder
- Link: See test cases folder
- Link: See test cases folder
e.g. your actual response is like below,
Your use-case is, Dan and Mike might not be returned in the same order always, but they appear only once in the array.
Url: "/api/v1/screening/persons",
Operation: "GET",
Response:
{
                "status": 200,
                "body": {
                    "type" : "HIGH-VALUE",
                    "persons":[
                        {
                            "id": "120.100.80.03",
                            "name": "Dan"
                        },
                        {
                            "id": "120.100.80.11",
                            "name": "Mike"
                        }
                    ]
                }
}
To assert the above situation, you can find the element using JSON path as below and verify 'Dan' was returned only once in the array and 'Emma' was present in the 'persons' array.
(See more JSON paths here)
{
    "scenarioName": "Scenario- Get all person details",
    "steps": [
        {
            "name": "get_screening_details",
            "url": "/api/v1/screening/persons",
            "operation": "GET",
            "request": {
            },
            "assertions": {
                "status": 200,
                "body": {
                    "type": "HIGH-VALUE",
                    "persons.SIZE": 2,
                    "persons[?(@.name=='Dan')].id.SIZE": 1,
                    "persons[?(@.name=='Mike')].id.SIZE": 1,
                    "persons[?(@.name=='Emma')].id.SIZE": 0
                }
            }
        }
    ]
}
What persons[?(@.name=='Dan')].id.SIZE means is-
In the
personsarray check every element with the nameDan, if found pick theidof element and return all of theids as an array, then do.SIZEon theids array and return a count.
Note-
Even if a single matching element is found, the return is always an array type. Also if you do a .length() on the returned ids e.g. persons[?(@.name=='Dan')].id.length(), that's also an array i.e. [2] instead of simple 2. That's how JSON path behaves. Hence .SIZE helps to achieve this.
Run the above test case from here - testFindElementInArray().
Chaining steps: Multi-Step REST calls with earlier response(IDs etc) as input to next step
{
    "scenarioName": "12_chaining_multiple_steps_using_previous_response",
    "steps": [
        {
            "name": "create_new_employee",
            "url": "http://localhost:9998/google-emp-services/home/employees",
            "operation": "POST",
            "request": {},
            "assertions": {
                "status": 201,
                "body": {
                    "id": 1000
                }
            }
        },
        {
            "name": "get_and_verify_created_employee",
            "url": "http://localhost:9998/google-emp-services/home/employees/${$.create_new_employee.response.body.id}", //<--- ID from previous response //
            "operation": "GET",
            "request": {},
            "assertions": {
                "status": 200,
                "body": {
                    "id": 1000,
                    "name": "${$.create_new_employee.response.body.name}",
                    "addresses": [
                        {
                            "gpsLocation": "${$.create_new_employee.response.body.addresses[0].gpsLocation}"
                        },
                        {
                            "gpsLocation": "${$.create_new_employee.response.body.addresses[1].gpsLocation}"
                        }
                    ]
                }
            }
        }
    ]
}Setting "ignoreStepFailures": true will allow to execute the next step even if the earlier step failed.
e.g.
{
    "scenarioName": "Multi step - ignoreStepFailures",
    "ignoreStepFailures": true,
    "steps": [
See HelloWorld repo for a running example.
Random UUID-
{
  "scenarioName": "random_UUID",
  "steps": [
    {
      "name": "create_new_employee",
      "url": "http://localhost:9998/google-emp-services/home/employees",
      "operation": "POST",
      "request": {
        "body": {
          "id": "${RANDOM.UUID}", //<-- Everytime it creates unique uuid. See below example.
          "name": "Elen M"
        }
      },
      "assertions": {
        "status": 201
      }
    }
  ]
}

Resolves to-
{
  "scenarioName": "random_UUID",
  "steps": [
    {
      "name": "create_new_employee",
      "url": "http://localhost:9998/google-emp-services/home/employees",
      "operation": "POST",
      "request": {
        "body": {
          "id": "94397df8-0e9e-4479-a2f9-9af509fb5998", //<-- Every time it runs, it creates an unique uuid
          "name": "Elen M"
        }
      },
      "assertions": {
        "status": 201
      }
    }
  ]
}
Random String of specific length-
{
  "scenarioName": "13_random_and_static_string_number_place_holders",
  "steps": [
    {
      "name": "create_new_employee",
      "url": "http://localhost:9998/google-emp-services/home/employees",
      "operation": "POST",
      "request": {
        "body": {
          "id": 1000,
          "name": "Larry ${RANDOM.STRING:5}",   //<-- Random number of length 5 chars
          "password": "${RANDOM.STRING:10}"     //<-- Random number of length 10 chars
        }
      },
      "assertions": {
        "status": 201
      }
    }
  ]
}
resolves to the below POST request to the end point:
step:create_new_employee
url:http://localhost:9998/google-emp-services/home/employees
method:POST
request:
{
  "body" : {
    "id" : 1000,
    "name" : "Larry tzezq",
    "password" : "czljtmzotu"
  }
}
See full log in the log file, looks like this:
requestTimeStamp:2016-08-01T15:37:20.555
step:create_new_employee
url:http://localhost:9998/google-emp-services/home/employees
method:POST
request:
{
  "body" : {
    "id" : 1000,
    "name" : "Larry tzezq",
    "password" : "czljtmzotu"
  }
}

Response:
{
  "status" : 201,
  ...
}
*responseTimeStamp:2016-08-01T15:37:20.707
*Response delay:152.0 milli-secs
---------> Assertion: <----------
{
  "status" : 201
}
-done-

--------- RELATIONSHIP-ID: 4cfd3bfb-a537-49a2-84a2-0457c4e65803 ---------
requestTimeStamp:2016-08-01T15:37:20.714
step:again_try_to_create_employee_with_same_name_n_password
url:http://localhost:9998/google-emp-services/home/employees
method:POST
request:
{
  "body" : {
    "id" : 1000,
    "name" : "Larry tzezq",
    "password" : "czljtmzotu"
  }
}
--------- RELATIONSHIP-ID: 4cfd3bfb-a537-49a2-84a2-0457c4e65803 ---------
Response:
{
  "status" : 201,
  ...
}
*responseTimeStamp:2016-08-01T15:37:20.721
*Response delay:7.0 milli-secs
---------> Assertion: <----------
{
  "status" : 201
}
-done-- Link: See test cases folder
Asserting with $CONTAINS.STRING:
{
      ...
      ...
      "assertions": {
        "status": 200,
        "body": {
          "name": "$CONTAINS.STRING:Larry"   //<-- PASS: If the "name" field in the response contains "Larry".
        }
      }
}-
Similar way exception messages can be asserted for part or full message.
-
Link: See test cases folder
$GT.<any_number>
{
  ...
  ...
  "assertions": {
    "status": "$GT.198"   //<--- PASS: 200 is greater than 198
  }
}
$LT.<any_number>
{
  ...
  ...
  "assertions": {
      "status": "$LT.500"   //<--- PASS: 200 is lesser than 500
  }
}- Link: See full examples
    {
      ...
      ...
      "assertions": {
        "status": 200,
        "body": {
          "id": "$NOT.NULL",
          "vehicles": "$[]"         //<--- PASS: if the response has empty "vehicles"
        }
      }
}- Link: See full examples
If your response contains the below:
e.g. http response body:
{
                "results": [
                    {
                        "id": 1,
                        "name": "Elon Musk"
                    },
                    {
                        "id": 2,
                        "name": "Jeff Bezos"
                    }
                ]
}
Then you can assert many ways for the desired result-
        {
	    ...
            "assertions": {
                "results.SIZE": 2
            }
        }

-or-
        {
	    ...
            "assertions": {
                "results.SIZE": "$GT.1"
            }
        }
-or-
        {
	    ...
            "assertions": {
                "results.SIZE": "$LT.3"
            }
        }
etc
See more SIZE examples here in the hello-world repo.
- Sample tests are here
- Example of request response as JSON - See here
- Example of passing a simple string e.g. DB SQL query for Postgres, MySql, Oracle etc - See step-by-step details Wiki
- You can clone and execute from this repo here
In case of - Java method request, response as JSON:
{
    "scenarioName": "Java method request, response as JSON",
    "steps": [
        {
            "name": "execute_java_method",
            "url": "org.jsmart.zerocode.zerocodejavaexec.OrderCreator",
            "operation": "createOrder",
            "request": {
                "itemName" : "Mango",
                "quantity" : 15000
            },
            "assertions": {
                "orderId" : 1020301,
                "itemName" : "Mango",
                "quantity" : 15000
            }
        }
    ]
}
Sample Java class and method used in the above step-
public class OrderCreator {

    public Order createOrder(Order order){
        /**
         * TODO- Suppose you process the "order" received, and finally return the "orderProcessed".
         * Here it is hardcoded for simplicity and understanding purpose only
         */

        Order orderProcessed = new Order(1020301, order.getItemName(), order.getQuantity());

        return orderProcessed;
    }
}
Order pojo looks like below, full pojo src here-
public class Order {
    private Integer orderId;
    private String itemName;
    private Long quantity;

    @JsonCreator
    public Order(
            @JsonProperty("orderId")Integer orderId,
            @JsonProperty("itemName")String itemName,
            @JsonProperty("quantity")Long quantity) {
        this.orderId = orderId;
        this.itemName = itemName;
        this.quantity = quantity;
    }

    public Integer getOrderId() {
        return orderId;
    }

    public String getItemName() {
        return itemName;
    }

    public Long getQuantity() {
        return quantity;
    }
More examples here-
-
Multiple host in a properties file See here an example test
-
More examples here
See here how to pass custom headers in the HttpClient : See usage of @UseHttpClient
See here custom one : See usage of @UseHttpClient
e.g.
@TargetEnv("github_host.properties")
@UseHttpClient(CustomHttpClient.class)
@RunWith(ZeroCodePackageRunner.class)
@TestPackageRoot("helloworld_github_REST_api") //<--- Root of the folder in test/resources to pick all tests
public class HelloWorldCustomHttpClientSuite {
}Note: Each runner is capable of running with a properties file which can have host and port for specific to this runner.
- So one can have a single properties file per runner which means you can run the tests against multiple environments -OR-
- can have a single properties file shared across all the runners means all tests run against the same environment.
** Note - As per Latest config update, we have updated endpoint configuration fields.
From the release 1.2.8 onwards we will be allowing web. and deprecating restful. in endpoint configurations.
We will take away support for restful. from endpoint configuration in the future releases.
Version 1.2.8 will work for both as we have made the framework backward compatible.
e.g.
"config_hosts_sample.properties"
web.application.endpoint.host=http://{host-name-or-ip}

web.application.endpoint.port=9998

web.application.endpoint.context=/google-emp-services
The runner looks like this:
@TargetEnv("config_hosts_sample.properties")
@RunWith(ZeroCodeUnitRunner.class)
public class ScreeningServiceContractTest {

    @Test
    @Scenario("contract_tests/screeningservice/get_screening_details_by_custid.json")
    public void testScreeningLocalAndGlobal() throws Exception {
    }
}
- See example here of a test scenario: hello-world test scenario
{
    "scenarioName": "GIVEN- the GitHub REST api, WHEN- I invoke GET, THEN- I will receive the 200 status with body",
    "steps": [
        {
            "name": "get_user_details",
            "url": "/users/octocat",
            "operation": "GET",
            "request": {
            },
            "assertions": {
                "status": 200,
                "body": {
                    "login" : "octocat",
                    "type" : "User"
                }
            }
        }
    ]
}
- See tests here using
ZeroCodeUnitRunner.class: hello-world via JUnit @Test
@TargetEnv("github_host.properties")
@RunWith(ZeroCodeUnitRunner.class)
public class JustHelloWorldTest {

    @Test
    @Scenario("helloworld/hello_world_status_ok_assertions.json")
    public void testGet() throws Exception {

    }
}
- See tests here using
ZeroCodePackageRunner.class: hello-world suite
@TargetEnv("github_host.properties")
@UseHttpClient(SslTrustHttpClient.class) //<--- Optional, Needed for https/ssl connections.
@RunWith(ZeroCodePackageRunner.class)
@TestPackageRoot("helloworld_github_REST_api") //<--- Root of the package to pick all tests including sub-folders
public class HelloWorldGitHubSuite {

}
- See tests here using
@RunWith(Suite.class): Contract-test suite
@Suite.SuiteClasses({
        RegulatoryServiceContractTest.class,
        IdCheckServiceContractTest.class,
        CorpLoanServiceContractTest.class,
        ScreeningServiceContractTest.class
})
@RunWith(Suite.class)
public class ContractTestSuite {

}
You can directly use the existing properties or introduce new common properties to be used in the test steps.
Usage: ${my_new_url}, ${web.application.endpoint.host}, ${X-APP-SAML-TOKEN} etc
This is particularly useful when you want to introduce one or more common properties to use across the test suite. 👍 (Clone HelloWorld repo to run this from your IDE)
e.g.
"config_hosts_sample.properties"
web.application.endpoint.host=http://{host-name-or-ip}
web.application.endpoint.port=9998
web.application.endpoint.context=/google-emp-services
# or e.g. some new properties you introduced
my_new_url=http://localhost:9998
X-APP-SAML-TOKEN=<SAML>token-xyz</SAML>
Then, you can simply use the properties as below.
{
    "scenarioName": "New property keys from host config file",
    "steps": [
        {
            "name": "get_api_call",
            "url": "${web.application.endpoint.host}:${web.application.endpoint.port}/home/bathroom/1",
            "operation": "GET",
            "request": {
            },
            "assertions": {
                "status": 200
            }
        },
        {
            "name": "get_call_via_new_url",
            "url": "${my_new_url}/home/bathroom/1",
            "operation": "GET",
            "request": {
            },
            "assertions": {
                "status": 200
            }
        }

    ]
}It is very easy to send this content-type in the header and assert the response.
When you use this header, then you just need to put the Key-Value or Name-Value content under request body or request queryParams section. That's it.
e.g.
         "request": {
            "headers": {
               "Content-Type": "application/x-www-form-urlencoded"
            },
            "body": {
               "unit-no": "12-07",
               "block-number": 33,
               "state/region": "Singapore North",
               "country": "Singapore",
               "pin": "87654321",
            }
}- What happens if my Key contains a
spaceor front slash/etc?
This is automatically taken care by Apache Http Client. That means it gets converted to the equivalent encoded char which is understood by the server(e.g. Spring boot or Jersey or Tomcat etc ).
e.g. The above name-value pair behind the scene is sent to the server as below:
unit-no=12-07&country=Singapore&block-number=33&pin=87654321&state%2Fregion=Singapore+North
See more examples and usages in the Wiki >>
When the http server sends response with charset other than utf-8 i.e. utf-16 or utf-32 etc, then the Zerocode framework automatically handles it correctly. See Wiki - Charset in response for details on how it handles.
Also the framework enables you to override this behaviour/handling by overriding method createCharsetResponse in the class BasicHttpClient.java. See an example in the working code example of HelloWorld repo.
Passing environment param via Jenkins and dynamically picking environment specific properties file in CI
package org.jsmart.zerocode.testhelp.tests;

import org.jsmart.zerocode.core.domain.EnvProperty;
import org.jsmart.zerocode.core.domain.Scenario;
import org.jsmart.zerocode.core.domain.TargetEnv;
import org.jsmart.zerocode.core.runner.ZeroCodeUnitRunner;
import org.junit.Test;
import org.junit.runner.RunWith;

@EnvProperty("_${env}") //any meaningful string e.g. `env.name` or `envName` or `app.env` etc
@TargetEnv("hello_world_host.properties")
@RunWith(ZeroCodeUnitRunner.class)
public class EnvPropertyHelloWorldTest {

    @Test
    @Scenario("hello_world/hello_world_get.json")
    public void testRunAgainstConfigPropertySetViaJenkins() throws Exception {

    }
}

/**
 Set "env=ci" in Jenkins (or via .profile in a Unix machine, System/User properties in Windows)
 then the runner picks "hello_world_host_ci.properties" and runs.
 if -Denv=sit, then runner looks for and picks "hello_world_host_sit.properties" and runs.

If `env` not supplied, then defaults to "hello_world_host.properties" which by default mentioned mentioned via @TargetEnv

 -or-

 Configure the below `mvn goal` when you run via Jenkins goal in the specific environment e.g. -

 For CI :
 mvn clean install -Denv=ci

 For SIT:
 mvn clean install -Denv=sit

 and make sure:
 hello_world_host_ci.properties and hello_world_host_sit.properties etc are available in the resources folder or class path.
*/{
"id": 1000,
"createdDay": "${LOCAL.DATE.TODAY:yyyy-MM-dd}",
"createdDayTimeStamp": "${LOCAL.DATETIME.NOW:yyyy-MM-dd'T'HH:mm:ss.nnnnnnnnn}",
"randomUniqueValue": "${LOCAL.DATETIME.NOW:yyyyMMdd'T'HHmmssnnnnnnnnn}"
}
resolved to ===> below date and datetime
{
"id": 1000,
"createdDay": "2018-02-14",
"createdDayTimeStamp": "2018-02-14T21:52:45.180000000",
"randomUniqueValue": "20180214T215245180000000"
}e.g formats:
output: 2018-02-11  // "uuuu-MM-dd"
output: 2018 02 11  // "uuuu MM dd"
output: 2018        // "yyyy"
output: 2018-Feb-11 // "uuuu-MMM-dd"
output: 2018-02-11  // "uuuu-LL-dd"
Default: date.toString(): 2018-02-11
Note:
uuuu prints same as yyyy
output: 2018-02-11T21:31:21.041000000    // "uuuu-MM-dd'T'HH:mm:ss.SSSSSSSSS"
output: 2018-02-11T21:31:21.41000000     // "uuuu-MM-dd'T'HH:mm:ss.n"
output: 2018-02-11T21:31:21.041000000    // "uuuu-MM-dd'T'HH:mm:ss.nnnnnnnnn"
output: 2018-02-11T21:31:21.77481041     // "uuuu-MM-dd'T'HH:mm:ss.A"
output: 2018-02-14                       // "uuuu-MM-dd" or "yyyy-MM-dd"
Default: date.toString(): 2018-02-11T21:31:20.989          // .toString()
https://docs.oracle.com/javase/8/docs/api/java/time/format/DateTimeFormatter.html
     H       hour-of-day (0-23)          number            0
     m       minute-of-hour              number            30
     s       second-of-minute            number            55
     S       fraction-of-second          fraction          978
     A       milli-of-day                number            1234
     n       nano-of-second              number            987654321
     N       nano-of-day                 number            1234000000
All letters 'A' to 'Z' and 'a' to 'z' are reserved as pattern letters. The following pattern letters are defined:
 Symbol  Meaning                     Presentation      Examples
 ------  -------                     ------------      -------
 G       era                         text              AD; Anno Domini; A
 u       year                        year              2004; 04
 y       year-of-era                 year              2004; 04
 D       day-of-year                 number            189
 M/L     month-of-year               number/text       7; 07; Jul; July; J
 d       day-of-month                number            10
You can invoke SOAP as below which is already supported by zerocode lib, or you can write your own SOAP executor using Java(if you want to, but you don't have to). (If you want- Then, in the README file go to section -> "Calling java methods(apis) for specific tasks" )
{
    "scenarioName": "GIVEN a SOAP end poinr WHEN I invoke a method with a request XML, THEN I will ge the SOAP response in XML",
    "steps": [
        {
            "name": "invoke_currency_conversion",
            "url": "http://<target-domain.com>/<path etc>",
            "operation": "POST",
            "request": {
                "headers": {
                    "Content-Type": "text/xml; charset=utf-8",
                    "SOAPAction": "<get this from WSDL file, this has the port or method or action name in the url>"
                    //"SOAPAction": "\"<or wrap it in double quotes as some SOAP servers understand it>\""
                },
                "body": "escaped request XML message ie the soap:Envelope message"
                -or- // pick from- src/test/resources/soap_requests/xml_files/soap_request.xml
                "body": "${XML.FILE:soap_requests/xml_files/soap_request.xml}"
            },
            "assertions": {
                "status": 200
            }
        }
    ]
}
e.g. below- This example invokes a free SOAP service over internet. Note: If this service is down, the invocation might fail. So better to test against an available SOAP service to you or a local stub service.
{
    "scenarioName": "GIVEN a SOAP end point WHEN I invoke a method with a request XML, THEN I will get response in XML",
    "steps": [
        {
            "name": "invoke_currency_conversion",
            "url": "http://www.webservicex.net/CurrencyConvertor.asmx",
            "operation": "POST",
            "request": {
                "headers": {
                    "Content-Type": "text/xml; charset=utf-8",
                    "SOAPAction": "http://www.webserviceX.NET/ConversionRate"
                    //"SOAPAction": "\"http://www.webserviceX.NET/ConversionRate\""
                },
                "body": "<?xml version=\"1.0\" encoding=\"utf-8\"?>\n<soap:Envelope xmlns:xsi=\"http://www.w3.org/2001/XMLSchema-instance\" xmlns:xsd=\"http://www.w3.org/2001/XMLSchema\" xmlns:soap=\"http://schemas.xmlsoap.org/soap/envelope/\">\n  <soap:Body>\n    <ConversionRate xmlns=\"http://www.webserviceX.NET/\">\n      <FromCurrency>AFA</FromCurrency>\n      <ToCurrency>GBP</ToCurrency>\n    </ConversionRate>\n  </soap:Body>\n</soap:Envelope>"
                // -or-
                // "body": "${XML.FILE:soap_requests/xml_files/soap_request.xml}"
            },
            "assertions": {
                "status": 200
            }
        }
    ]
}
You should received the below-
Response:
{
  "status" : 200,
  "headers" : {
    "Date" : [ "Fri, 16 Feb 2018 05:38:27 GMT" ],
    "Server" : [ "Microsoft-IIS/7.0" ]
  },

  "rawBody" : "<?xml version=\"1.0\" encoding=\"utf-8\"?><soap:Envelope xmlns:soap=\"http://schemas.xmlsoap.org/soap/envelope/\" xmlns:xsi=\"http://www.w3.org/2001/XMLSchema-instance\" xmlns:xsd=\"http://www.w3.org/2001/XMLSchema\"><soap:Body><ConversionRateResponse xmlns=\"http://www.webserviceX.NET/\"><ConversionRateResult>-1</ConversionRateResult></ConversionRateResponse></soap:Body></soap:Envelope>"
}
*responseTimeStamp:2018-02-16T05:38:35.254
*Response delay:653.0 milli-secs
You need to use a HttpClient ie override the BasicHttpClient and set proxies to it as below-
        Step-1)
        CredentialsProvider credsProvider = createProxyCredentialsProvider(proxyHost, proxyPort, proxyUserName, proxyPassword);

        Step-2)
        HttpHost proxy = new HttpHost(proxyHost, proxyPort);

        Step-3) method Step-1
        private CredentialsProvider createProxyCredentialsProvider(String proxyHost, int proxyPort, String proxyUserName, String proxyPassword) {

                CredentialsProvider credsProvider = new BasicCredentialsProvider();

                credsProvider.setCredentials(

                        new AuthScope(proxyHost, proxyPort),

                        new UsernamePasswordCredentials(proxyUserName, proxyPassword));

                return credsProvider;
        }

        Step-4)
        Set the values from Step-1 and Step-2

        HttpClients.custom()

                .setSSLContext(sslContext)

                .setSSLHostnameVerifier(new NoopHostnameVerifier())

                .setDefaultCookieStore(cookieStore)

                .setDefaultCredentialsProvider(credsProvider)    //<------------- From Step-1

                .setProxy(proxy)                                 //<------------- From Step-2

                .build();
You can inject the Corporate Proxy details to the custom {{HttpClient}} li below from a config file simply by annotating the key names from the host config file which is used by the runner for mentioning host and port. e.g. below: See an example here- https://github.com/authorjapps/zerocode/blob/master/src/main/java/org/jsmart/zerocode/core/httpclient/soap/SoapCorporateProxySslHttpClient.java
Usage example here: https://github.com/authorjapps/zerocode/blob/master/src/test/java/org/jsmart/zerocode/core/soap/SoapCorpProxySslHttpClientTest.java
How to use?
@UseHttpClient(SoapCorporateProxySslHttpClient.class)
@TargetEnv("soap_host_with_corp_proxy.properties")
@RunWith(ZeroCodeUnitRunner.class)
public class SoapCorpProxySslHttpClientTest {

    @Ignore
    @Test
    @Scenario("foo/bar/soap_test_case_file.json")
    public void testSoapWithCorpProxyEnabled() throws Exception {

    }
}
Explanation below-
@TargetEnv("hello_world_host.properties")
@RunWith(ZeroCodeUnitRunner.class)
public class HelloWorldTest {
     // @Test
     // tests here
}

soap_host_with_corp_proxy.properties
---------------------------
# Web Server host and port
web.application.endpoint.host=https://soap-server-host/ServiceName
web.application.endpoint.port=443

# Web Service context; Leave it blank in case you do not have a common context
web.application.endpoint.context=

#sample test purpose - if you remove this from ehre, then make sure to remove from Java file
corporate.proxy.host=http://exam.corporate-proxy-host.co.uk
corporate.proxy.port=80
corporate.proxy.username=HAVYSTARUSER
corporate.proxy.password=i#am#here#for#soap#


Your HttpClient:
----------------
See-
https://hc.apache.org/httpcomponents-client-ga/httpclient/examples/org/apache/http/examples/client/ClientProxyAuthentication.java

public class YourHttpClient {

    @Inject
    @Named("corporate.proxy.host")
    private String proxyHost;

    @Inject
    @Named("corporate.proxy.port")
    private String proxyPort;

    @Inject
    @Named("corporate.proxy.username")
    private String proxyUserName;

    @Inject
    @Named("corporate.proxy.password")
    private String proxyPassword;

    // Build the client using these.
}e.g.
{
            "name": "xml_to_json",
            "url": "org.jsmart.zerocode.converter.MimeTypeConverter",
            "operation": "xmlToJson",
            "request": "<?xml version=\"1.0\" encoding=\"utf-8\"?>\n<soap:Envelope xmlns:xsi=\"http://www.w3.org/2001/XMLSchema-instance\" xmlns:xsd=\"http://www.w3.org/2001/XMLSchema\" xmlns:soap=\"http://schemas.xmlsoap.org/soap/envelope/\">\n  <soap:Body>\n    <ConversionRate xmlns=\"http://www.webserviceX.NET/\">\n      <FromCurrency>AFA</FromCurrency>\n      <ToCurrency>GBP</ToCurrency>\n    </ConversionRate>\n  </soap:Body>\n</soap:Envelope>",
            "assertions": {
                "soap:Envelope": {
                    "xmlns:xsd": "http://www.w3.org/2001/XMLSchema",
                    "xmlns:soap": "http://schemas.xmlsoap.org/soap/envelope/",
                    "xmlns:xsi": "http://www.w3.org/2001/XMLSchema-instance",
                    "soap:Body": {
                        "ConversionRate": {
                            "xmlns": "http://www.webserviceX.NET/",
                            "FromCurrency": "AFA",
                            "ToCurrency": "GBP"
                        }
                    }
                }
            }
}Various input and output. Depending upon the usecase, you can use that method.
{
    "scenarioName": "Given a json string or json block, convert to equivalent json block",
    "steps": [
        {
            "name": "json_block_to_json",
            "url": "org.jsmart.zerocode.converter.MimeTypeConverter",
            "operation": "jsonBlockToJson",
            "request": {
                "headers": {
                    "hdrX": "valueX"
                },
                "body": {
                    "id": 1001,
                    "addresses": [
                        {
                            "postCode": "PXY"
                        },
                        {
                            "postCode": "LMZ DDD"
                        }
                    ]
                }
            },
            "assertions": {
                "headers": {
                    "hdrX": "valueX"
                },
                "body": {
                    "id": 1001,
                    "addresses": [
                        {
                            "postCode": "PXY"
                        },
                        {
                            "postCode": "${$.json_block_to_json.request.body.addresses[1].postCode}"
                        }
                    ]
                }
            }
        },
        {
            "name": "json_to_json",
            "url": "org.jsmart.zerocode.converter.MimeTypeConverter",
            "operation": "jsonToJson",
            "request": "${$.json_block_to_json.request.headers}",
            "assertions": {
                "hdrX": "valueX"
            }
        },
        {
            "name": "body_json_to_json",
            "url": "org.jsmart.zerocode.converter.MimeTypeConverter",
            "operation": "jsonToJson",
            "request": "${$.json_block_to_json.request.body}",
            "assertions": {
                "id": 1001,
                "addresses": [
                    {
                        "postCode": "PXY"
                    },
                    {
                        "postCode": "LMZ DDD"
                    }
                ]
            }
        },
        {
            "name": "json_node_to_json",
            "url": "org.jsmart.zerocode.converter.MimeTypeConverter",
            "operation": "jsonBlockToJson",
            "request": {
                "headers": {
                    "hdrX": "valueX"
                },
                "body": {
                    "id": 1001,
                    "addresses": [
                        {
                            "postCode": "PXY"
                        }
                    ]
                }
            },
            "assertions": {
                "headers": {
                    "hdrX": "valueX"
                },
                "body": {
                    "id": 1001,
                    "addresses": [
                        {
                            "postCode": "${$.json_block_to_json.request.body.addresses[0].postCode}"
                        }
                    ]
                }
            }
        }
    ]
}
Available methods are-
- xmlToJson
- jsonToJson
- jsonBlockToJson
- jsonNodeToJson
- prettyXml
See Issue #47 for the scenarios when WireMock becomes handy. See examples here- https://github.com/authorjapps/zerocode-hello-world/blob/master/src/test/resources/wiremock_tests/mock_via_wiremock_then_test_the_end_point.json
The below JSON block step will mock two end points using WireMock.
- GET: /api/v1/amazon/customers/UK001 (no headers)
- GET: /api/v1/amazon/customers/cust-007 (with headers)
        {
            "name": "setup_mocks",
            "url": "/$MOCK",
            "operation": "$USE.WIREMOCK",
            "request": {
                "mocks": [
                    {
                        "name": "mocking_a_GET_endpoint",
                        "operation": "GET",
                        "url": "/api/v1/amazon/customers/UK001",
                        "response": {
                            "status": 200,
                            "headers": {
                                "Accept": "application/json"
                            },
                            "body": {
                                "id": "UK001",
                                "name": "Adam Smith",
                                "Age": "33"
                            }
                        }
                    },
                    {
                        "name": "mocking_a_GET_endpoint_with_headers",
                        "operation": "GET",
                        "url": "/api/v1/amazon/customers/cust-007",
                        "request": {
                            "headers": {
                                "api_key": "key-01-01",
                                "api_secret": "secret-01-01"
                            }
                        },
                        "response": {
                            "status": 200,
                            "body": {
                                "id": "cust-007",
                                "type": "Premium"
                            }
                        }
                    }
                ]
            },
            "assertions": {
                "status": 200
            }
}- How can I do basic http authentication in ZeroCode ?
- Ans: You can do this in so many ways, it depends on your project requirement. Most simplest one is to pass the base64 basicAuth in the request headers as below - e.g.
USERNAME/PASSWORDascharaanuser/passtwitter
- Ans: You can do this in so many ways, it depends on your project requirement. Most simplest one is to pass the base64 basicAuth in the request headers as below - e.g.
Note-
Zerocode framework helps you to achieve this, but has nothing to do with Basic-Auth. It uses Apache Http Client behind the scenes, this means whatever you can do using Apache Http Client, you can do it simply using Zerocode.
- Positive scenario
{
    "name": "get_book_using_basic_auth",
    "url": "http://localhost:8088/api/v1/white-papers/WP-001",
    "operation": "GET",
    "request": {
        "headers": {
            "Authorization": "Basic Y2hhcmFhbnVzZXI6cGFzc3R3aXR0ZXI=" // You can generate this using Postman or java code
        }
    },
    "assertions": {
        "status": 200, // 401 - if unauthorised. See negatibe test below
        "body": {
            "id": "WP-001",
            "type": "pdf",
            "category": "Mule System API"
        }
    }
} - Negative scenario
{
    "name": "get_book_using_wrong_auth",
    "url": "http://localhost:8088/api/v1/white-papers/WP-001",
    "operation": "GET",
    "request": {
        "headers": {
            "Authorization": "Basic aWRONG-PASSWORD"
        }
    },
    "assertions": {
        "status": 401 //401(or simillar code whatever the server responds), you can assert here.
        "body": {
            "message": "Unauthorised"
        }
    }
}
-
If your requirement is to put basic auth for all the API tests e.g. GET, POST, PUT, DELETE etc commonly in the regression suite, then you can put this
"Authorization"header into your SSL client code. You can refer to an example test here. -
In your custom http client, you add the header to the request at one place, which is common to all the API tests. See:
org.jsmart.zerocode.httpclient.CorpBankApcheHttpClient#addBasicAuthHeaderin the http-client code it uses.
You can pass query params in the usual way in the URL e.g. ?page=1&page_size=5 -or-
You can pass them in the request as below.
...
            "request": {
                "queryParams":{
                    "page":1,
                    "per_page":6
                }
            }
...
See below both the examples( See this in the hello-world repo in action i.e. the Test-Case and the JUnit Test )
{
    "scenarioName": "Git Hub GET API - Fetch by queryParams",
    "steps": [
        {
            "name": "get_repos_by_query",
            "url": "https://api.github.com/users/octocat/repos?page=1&per_page=6",
            "operation": "GET",
            "request": {
            },
            "assertions": {
                "status": 200,
                "body.SIZE": 6
            }
        },
        {
            "name": "get_repos_by_query_params",
            "url": "https://api.github.com/users/octocat/repos",
            "operation": "GET",
            "request": {
                "queryParams":{
                    "page":1,
                    "per_page":6
                }
            },
            "assertions": {
                "status": 200,
                "body.SIZE": 6
            }
        },
        {
            "name": "get_all_reposs_without_query", // without the query params, which fetches everything.
            "url": "https://api.github.com/users/octocat/repos",
            "operation": "GET",
            "request": {
            },
            "assertions": {
                "status": 200,
                "body.SIZE": 8
            }
        }
    ]
}
| Place Holder | Output | More |
|---|---|---|
| /$MOCK | Signifies that this step will be used for mocking end points | Start with a front slash |
| $USE.WIREMOCK | Framework will use wiremock APIs to mock the end points defined in "mocks" section | Can use other mechanisms e.g. local REST api simulators |
| Place Holder | Output | More |
|---|---|---|
| ${RANDOM.NUMBER} | Replaces with a random number | Random number is generated using current timestamp in milli-sec |
| ${RANDOM.UUID} | Replaces with a random UUID | Random number is generated using java.util.UUID e.g. 077e6162-3b6f-4ae2-a371-2470b63dgg00 |
| ${RANDOM.STRING:10} | Replaces a random string consists of ten english alpphabets | The length can be dynamic |
| ${RANDOM.STRING:4} | Replaces with a random string consists of four english alpphabets | The length can be dynamic |
| ${STATIC.ALPHABET:5} | Replaces with abcde ie Static string of length 5 | String starts from "a" and continues, repeats after "z" |
| ${STATIC.ALPHABET:7} | Replaces with abcdefg ie Static string of length 7 | String starts from a"" and continues, repeats after "z" |
| ${LOCAL.DATE.TODAY:yyyy-MM-dd} | Resolves this today's date in the format yyyy-MM-dd or any suppliedformat | See format examples here https://github.com/authorjapps/helpme/blob/master/zerocode-rest-help/src/test/resources/tests/00_sample_test_scenarios/18_date_and_datetime_today_generator.json |
| ${LOCAL.DATETIME.NOW:yyyy-MM-dd'T'HH:mm:ss.nnnnnnnnn} | Resolves this today's datetime stamp in any supplied format | See format examples here https://github.com/authorjapps/helpme/blob/master/zerocode-rest-help/src/test/resources/tests/00_sample_test_scenarios/18_date_and_datetime_today_generator.json |
| Place Holder | Output | More |
|---|---|---|
| $NOT.NULL | Assertion passes if a not null value was present in the response | Otherwise fails |
| $NULL | Assertion passes if a null value was present in the response | Otherwise fails |
| $[] | Assertion passes if an empty array was present in the response | Otherwise fails |
| $EQ.99 | Assertion passes if a numeric value equals to 99 was present in the response | Can be any int, long, float etc |
| $NOT.EQ.99 | Assertion passes if a numeric value is not equals to 99 was present in the response | Can be any int, long, float etc |
| $GT.99 | Assertion passes if a value greater than 99 was present in the response | Can be any int, long, float etc |
| $LT.99 | Assertion passes if a value lesser than 99 was present in the response | Can be any int, long, float etc |
| $CONTAINS.STRING:id was cust-001 | Assertion passes if the node response contains string "id was cust-001" | Otherwise fails |
| $CONTAINS.STRING.IGNORECASE:id WaS CuSt-001 | Assertion passes if the response value contains string "id was cust-001" with case insensitive | Otherwise fails |
$MATCHES.STRING:\\d{4}-\\d{2}-\\d{2} |
Assertion passes if the response value contains e.g. "1989-07-09" matching regex \\d{4}-\\d{2}-\\d{2} |
Otherwise fails |
| $LOCAL.DATETIME.BEFORE:2017-09-14T09:49:34.000Z | Assertion passes if the actual date is earlier than this date | Otherwise fails |
| $LOCAL.DATETIME.AFTER:2016-09-14T09:49:34.000Z | Assertion passes if the actual date is later than this date | Otherwise fails |
| $ONE.OF:[First Val, Second Val, Nth Val] | Assertion passes if currentStatus actual value is one of the expected values supplied in the array |
Otherwise fails. E.g. "currentStatus": "$ONE.OF:[Found, Searching, Not Found]" |
| Place Holder | Output | More |
|---|---|---|
"<path.to.array>.SIZE":"$GT.2" |
e.g. "persons.SIZE" : "$GT.2" - Assertion passes if the array contains more than 2 elements |
Search for dealing with arrays in this README for more usages |
"<path.to.array>.SIZE":"$LT.4" |
e.g. "persons.SIZE" : "$LT.4" - Assertion passes if the array contains less than 4 elements |
Search for dealing with arrays in this README for more usages |
"<path.to.array>.SIZE":3 |
e.g. "persons.SIZE" : 3 - Assertion passes if the array has exactly 3 elements |
Search for dealing with arrays in this README for more usages |
- Exapnd, Collapse, Remove Node and Traverse etc
- Tree structure viewing - Good for array traversing
- Remove a node -> Click on left arrow
- Beautify, Minify, Copy Jayway JSON Pth
- JSON Path Evaluator
- RESTful testing with test cases in JSON - YouTube
- Zerocode - Simple and powerful testing library - HelloWorld - YouTube
- Zerocode Query Params Demo - YouTube
- Performance testing using JUnit and maven - Codeproject
- REST API or SOAP End Point Testing - Codeproject
- DZone- MuleSoft API Testing With Zerocode Test Framework - DZone
- Testing need not be harder or slower, it should be easier and faster - DZone
- Kafka - Quick and Practical Testing With Zerocode - DZone
- Kotlin Apps Testing With Zerocode - DZone