Ferocious File Converter is a graphical front-end for ReSampler, and potentially any number of other command-line audio conversion tools.
It provides a convenient and easy-to-use method for converting audio files between a number of formats.
Ferocious File Converter is written in C++ using Qt. It was originally developed for Windows, but also runs just fine on Linux and macOS.
I wanted a tool to quickly and reliably convert music files between one format and another whenever the need arises.
Having written a command-line sample rate converter, I needed a user-friendly GUI for it, with a close coupling between the features of the GUI and commandline.
For Windows, the binaries are included in two zip files in this repository, one for 32-bit and the other for 64-bit. Each of the zip files contains a recent build of ReSampler.exe for convenience. Download the zip file of your choice (note: the only difference is the version of ReSampler.exe and associated dlls; one is 32-bit, the other is 64-bit), and unpack the entire folder structure to somewhere on your PC. Then, simply run ferocious.exe.
Note: although a standard version of ReSampler.exe is included in this distribution, there are other builds available which were created with different compilers / options, and one of those builds may suit your needs better. (For example, if your CPU supports AVX instructions, you may want to get the AVX version for extra speed)
All of the relevant dlls and other dependencies are included in the distribution.
- Run the program.
- Choose an input file (or files)
- Hit "Convert" button
converter will automatically create an output filename, based on input filename, in the same path as input file.
- Run the Program
- Choose an input file (or files)
- Choose (or type the name of) an output file
- (optional) Select output bit-format (sub format) from drop-down list
- (optional) Select "Normalize" and choose a normalization amount between 0.0 and 1.0 (with 1.0 representing maximum possible volume)
- (optional) Select "Double Precision" to force calculations to be done using 64-bit double precision arithmetic
converter will automatically infer the output file format (and subformat) based on the file extension you choose for the output file. The converter's output messages are always displayed in the "Converter Output" box.
Note: when you choose a new output file type, ferocious will run ReSampler.exe with the --listformats command to retrieve a list of valid sub-formats and automatically populate the bit format dropdown box with the valid sub-formats for the chosen file type.
When opening files for conversion, multiple files may be selected (by holding down 'ctrl' while clicking on filenames in the open files dialog, or entering ctrl+A to select all files).
In multi-file mode, the output filenames are automatically generated according to the rules you set in "Output File Options"
Wildcards (using '*') in filenames (but not directory paths) are also recognized. For details on wildcard processing rules, please refer to this document
Note: all items configured in the Options menu are persistent (ie they will be remembered next time you run the program) unless otherwise indicated.
Options/Output File Options ... This allows you to control the settings that govern the generation of automatically-generated output file names
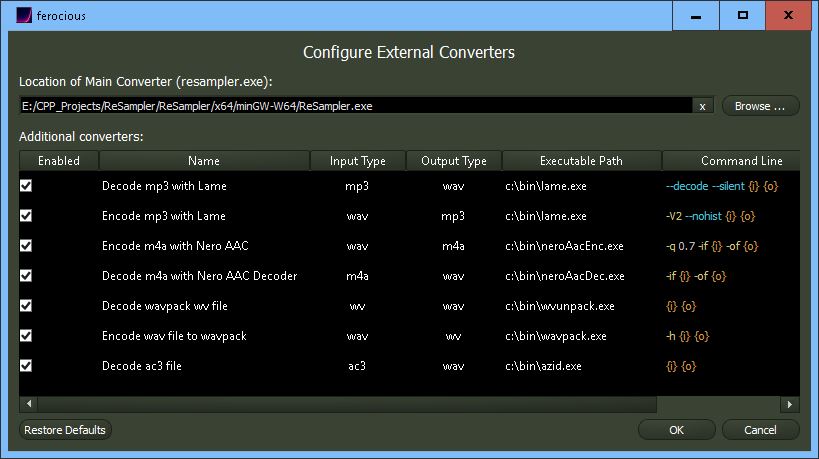
Options/Converter Configuration ... Use this to specify the location of ReSampler (ReSampler.exe for Windows, ReSampler for Linux), and to configure additional converters.
Additional converters open up the possibility of convertering to / from file formats which ReSampler does not understand. This allows conversions between a potentially unlimited number of file formats, provided suitable command-line converters are available for those formats.
Above : Converter Configuration Dialog
Note: The settings in the Converter Configuration dialog are stored in the converters.json file, which may also be edited by hand using a text editor, if desired.
Append this suffix To Output File name:
When enabled, this will add the text you specify to the automatically-generated output filename. For example, you could add something like "Converted-to-44k" to distinguish the output file from the original.
Use this output directory:
When enabled, the automatically-generated output filename will use the directory path you specify.
Default to same file type as Input File
Don't change the file type
Default to this File Type:
Make the format of the automatically-generated output file be the format you specify.
Options/Compression Levels/flac ...
Allows you to set the compression level to be used when saving files in the flac format. The level setting is an integer between 0 and 8 inclusive, and corresponds to the compression levels of the official flac command-line tool from xiph.org
Options/Compression Levels/Ogg Vorbis ...
Allows you to set the quality level to be used when saving files in the ogg vorbis format. The quality level corresponds to the quality level used for the official ogg vorbis command-line tool, and ranges from -1.0 to 10.0. Non-integer values are allowed.
Options/Lowpass filter allows you to select the filter characteristics for the anti-aliasing filter.
-
Relaxed: wide transition band, late (higher) transition frequency - has good frequency response, low ringing, but may allow a small amount of aliasing.
-
Standard: wide transition band, earlier (lower) transition frequency - no aliasing, low ringing, but frequency response suffers a little (drops a few dB around 20k for 44.1k sample rate).
-
Steep: narrow transition band, late (higher) transition frequency - no aliasing, good frequency response, but potentially more ringing.
-
Custom allows you to set your own cutoff frequency and transition width
note: for downsampling to 44.1k, Steep or Relaxed is recommended (although standard is also fine). For lower rates (eg 22.05), use steep. For higher target rates, use standard.
Options/Dither Options
- Noise Shaping: Select a noise-shaping profile. For information on the various profiles, click here
- RNG Seed: allows you to set a fixed seed for the Random Number Generator used for dithering.
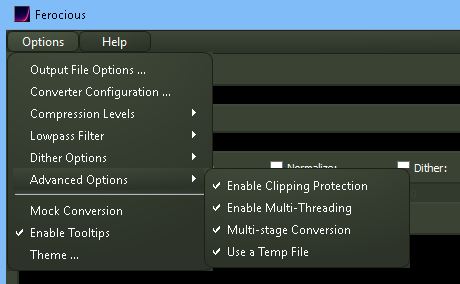
Note: it is recommended to leave all of the advanced options checked, unless you have a specific reason not to
Options/Advanced Options/Enable clipping protection
When clipping protection is enabled, the converter will repeat the conversion process with an adjusted (ie decreased) gain level whenever it detects clipping in the initial conversion.
With clipping protection switched off, the converter will still warn you when clipping has occured, but will not attempt to fix it.
In the conversion process, all signal levels are represented internally as floating point numbers within the range +/- 1.0 (regardless of the file formats involved). Whenever the signal peak exceeds +/- 1.0 it is considered clipping. If clipping occurs, the peak level is remembered, and the gain for the second pass is adjusted down by an amount corresponding to how far the signal peak exceeded +/- 1.0 by.
If normalization is activated, then clipping protection will ensure that the signal peak always aquals the normalization factor (instead of the default +/- 1.0)
Deactivating clipping protection actually sends the --noClippingProtection switch to the ReSampler.exe converter (the default bahaviour in ReSampler.exe is to have clipping protection on).
The main cause of clipping during sample rate conversion is overshoot effects from the FIR filter when a sharp transient is present in the input signal. (Unfortunately, this is an inevitable consequence of using digital filters, and although the effect can be reduced somewhat through good filter design, it can never be completely eliminated)
Options/Advanced Options/Enable Multi-Threading uses the --mt option in ReSampler to enable multi-threading. This will result in a significant speed improvement on multi-CPU systems. !
Options/Advanced Options/Multi-Stage Conversion - Perform conversion in multiple stages (only available with ReSampler 2.0.2 or higher). Performing the conversion in multiple stages (usually 3) is more efficient, and will result in significantly faster conversions.
Options/Advanced Options/Use a Temp File - Use a temp file to avoid repetition of conversion when clipping is detected. In older versions of ReSampler, when clipping was detected, the entire conversion was repeated with the appropriate gain decrease. In order to avoid this unnecessary waste of time and CPU, ReSampler can now store its intermediate results in a temp file to facilitate fast gain adjustment.
Options/Mock Conversion - this allows you to do a trial run of a conversion before actually committing anything to disk. Commands that would normally be issued to the converter are instead shown in the Converter Output Window. If desired, these commands may also be copied to the clipboard and pasted into a batch file.
Options/Enable tooltips - Allows you to switch-off the tooltips after you have become familiar with the controls, or switch them back on again as desired.
Options/Theme - Allows a theme to be selected, which affects the appearance of the user interface. Themes are stored in .qss files, which are based on css, but use some non-standard properties which are specific to Qt. Themes are potentially highly customisable. Some sample themes are included in the distribution.
Help/about ...
Display the version of Ferocious and the version of ReSampler.
Help/about Qt ...
Display information about Qt, the Toolkit used to develop Ferocious.
Input File Browse + Right-Click
- Select Files ... : Select multiple files for conversion (Same as left-click on Browse ... button)
- Select Entire Directory ... : Select a folder for conversion
Convert + Right-Click
- Convert : Same as left-click on Convert Button
- Copy Command Line to Clipboard : Instead of doing the conversion, copy all the conversion commands to the clipboard
Converter Output Area + Right-Click
- Select All (Ctrl+A) : select all text in the converter output area
- Copy (Ctrl+C) : copy converter output text to clipboard
- Clear : clear converter output text
Bit Format: specify the bit depth / output subformat of the output file. The items available in the dropdown will vary dynamically, depending on the output file type you specify
Normalize: set the maximum peak level of the output file to be what you specify (1.0 is maximum)
Dither: Activates dithering. Specify amount of bits of dither to add.
Autoblank (only active when dithering is activated). Causes dither to be switched-off whenever digital silence is encountered in the source material.
Converter Type: Linear Phase, or Minimum Phase
A whole book could be written about this, but to keep it short:
Linear phase:
- Symmetrical impulse response
- No phase distortion
- Higher Latency (delay)
- Creates Pre- and Post- ringing
Minimum phase:
- Asymmetrical impulse response
- Introduces phase distortion
- Minimal latency (delay)
- Creates Post-ringing only
Linear Phase filters are the more common type of Finite Impulse Response filter. If you are in doubt about which one to use, then it is advisable to stay with linear phase.
Here are some actual examples of impulse responses, showing the difference between Linear Phase and Minimum Phase. These are the the impulse responses for resampling from 96kHz down to 44.1kHz:
Double-Precision Causes all processing calculations to be performed in 64-bit double-precision. (By default, 32-bit single precision is used). Please note that double-precision may decrease processing speed slightly.


