docker version
shows both docker client and server info
docker info
lists all configurations
docker container run --publish 80:80 --name [containername] [imagename]
runs a container and binds port 80 on base to the container
docker container run --publish 80:80 --name [containername] --detach [imagename]
runs in the background
docker container ls -a
lists all containers
docker container top [contianer name]
lists processes in thhe container
docker container rm 345
using 3 characters it's possible to select a container
docker container rm -f 345
force removal of containers that are even running
What happens when docker container run --publish 80:80 nginx
- looks for a image locally in image cache
- if missing defaults to image repository (Docker hub)
- donwloads latest version by default
- starts a container based on that image and prepares to start (no new image is created)
- gives it a virtual IP on a private network inside docker engine
- opens up port 80 on host and forwards to port 80 in container
- starts container by using the CMD in the image Dockerfile
What are containers?
- just a process running on host operating system
- limited to what resources they can access
- exit when process stops
Can be verified by running and comparing docker top and ps aux
- notice that it runs like a regular process but with a very different process id compared to other processes running on base
Docker container:
-
Containers are nothing but processes running on host operating system.
-
A restricted process running within the host operating system.
docker container start [container name]
Just starts a container. Note that port or image is not specified
docker container exec -it [running container name] bash
attaches a shell for you
if you do docker container top [running container name] you will notice that it displays a process for bash.
(base) INLM-JohnE:~ johne$ docker container top proxy
PID                 USER                TIME                COMMAND
2181                root                0:00                nginx: master process nginx -g daemon off;
2230                101                 0:00                nginx: worker process
2248                root                0:00                bash
docker container run -it --name ubuntu ubuntu
creates a container from ubuntu and opens up the interactive shell.
yes. Even if it is stopped and started - it is available.
container is identified by a process - if there is no running process than that container stops. Container is bound to the process.
Create adds a writeable container on top of your image and sets it up for running whatever command you specified in your CMD. The container ID is reported back but it’s not started.
Start will start any stopped containers. This includes freshly created containers.
Run is a combination of create and start. It creates the container and starts it.
Alpine is a small linux distribution of 5MB in size. It doesn't even have bash.
So when starting make sure to use sh
docker container run -it alphine sh
It comes with it's own package manager called apk.
docker container stop [first few numbers of container id]
stops a container
docker container logs [container name or id]
gets the logs of the process running withing the container
docker top [container]
to list the processess running within a container.
docker container rm [cont1]
to remove; needs to be stopped (there is a force option)
docker container inspect [cont1]
for all metadata related to the container
docker container stats
live details about running containers: mem, network, drive, cpu.
docker container start -ai [cont]
to start a stopped container and attach to an interactive shell
Stop and Prune
When you stop a container, it is not automatically removed unless you started it with the --rm flag.
To see all containers on the Docker host, including stopped containers, use docker container ls -a.
You may be surprised how many containers exist, especially on a development system! A stopped container’s writable layers still take up disk space. To clean this up, you can use
docker container prune
Remove all images. docker rmi $(docker images -q)
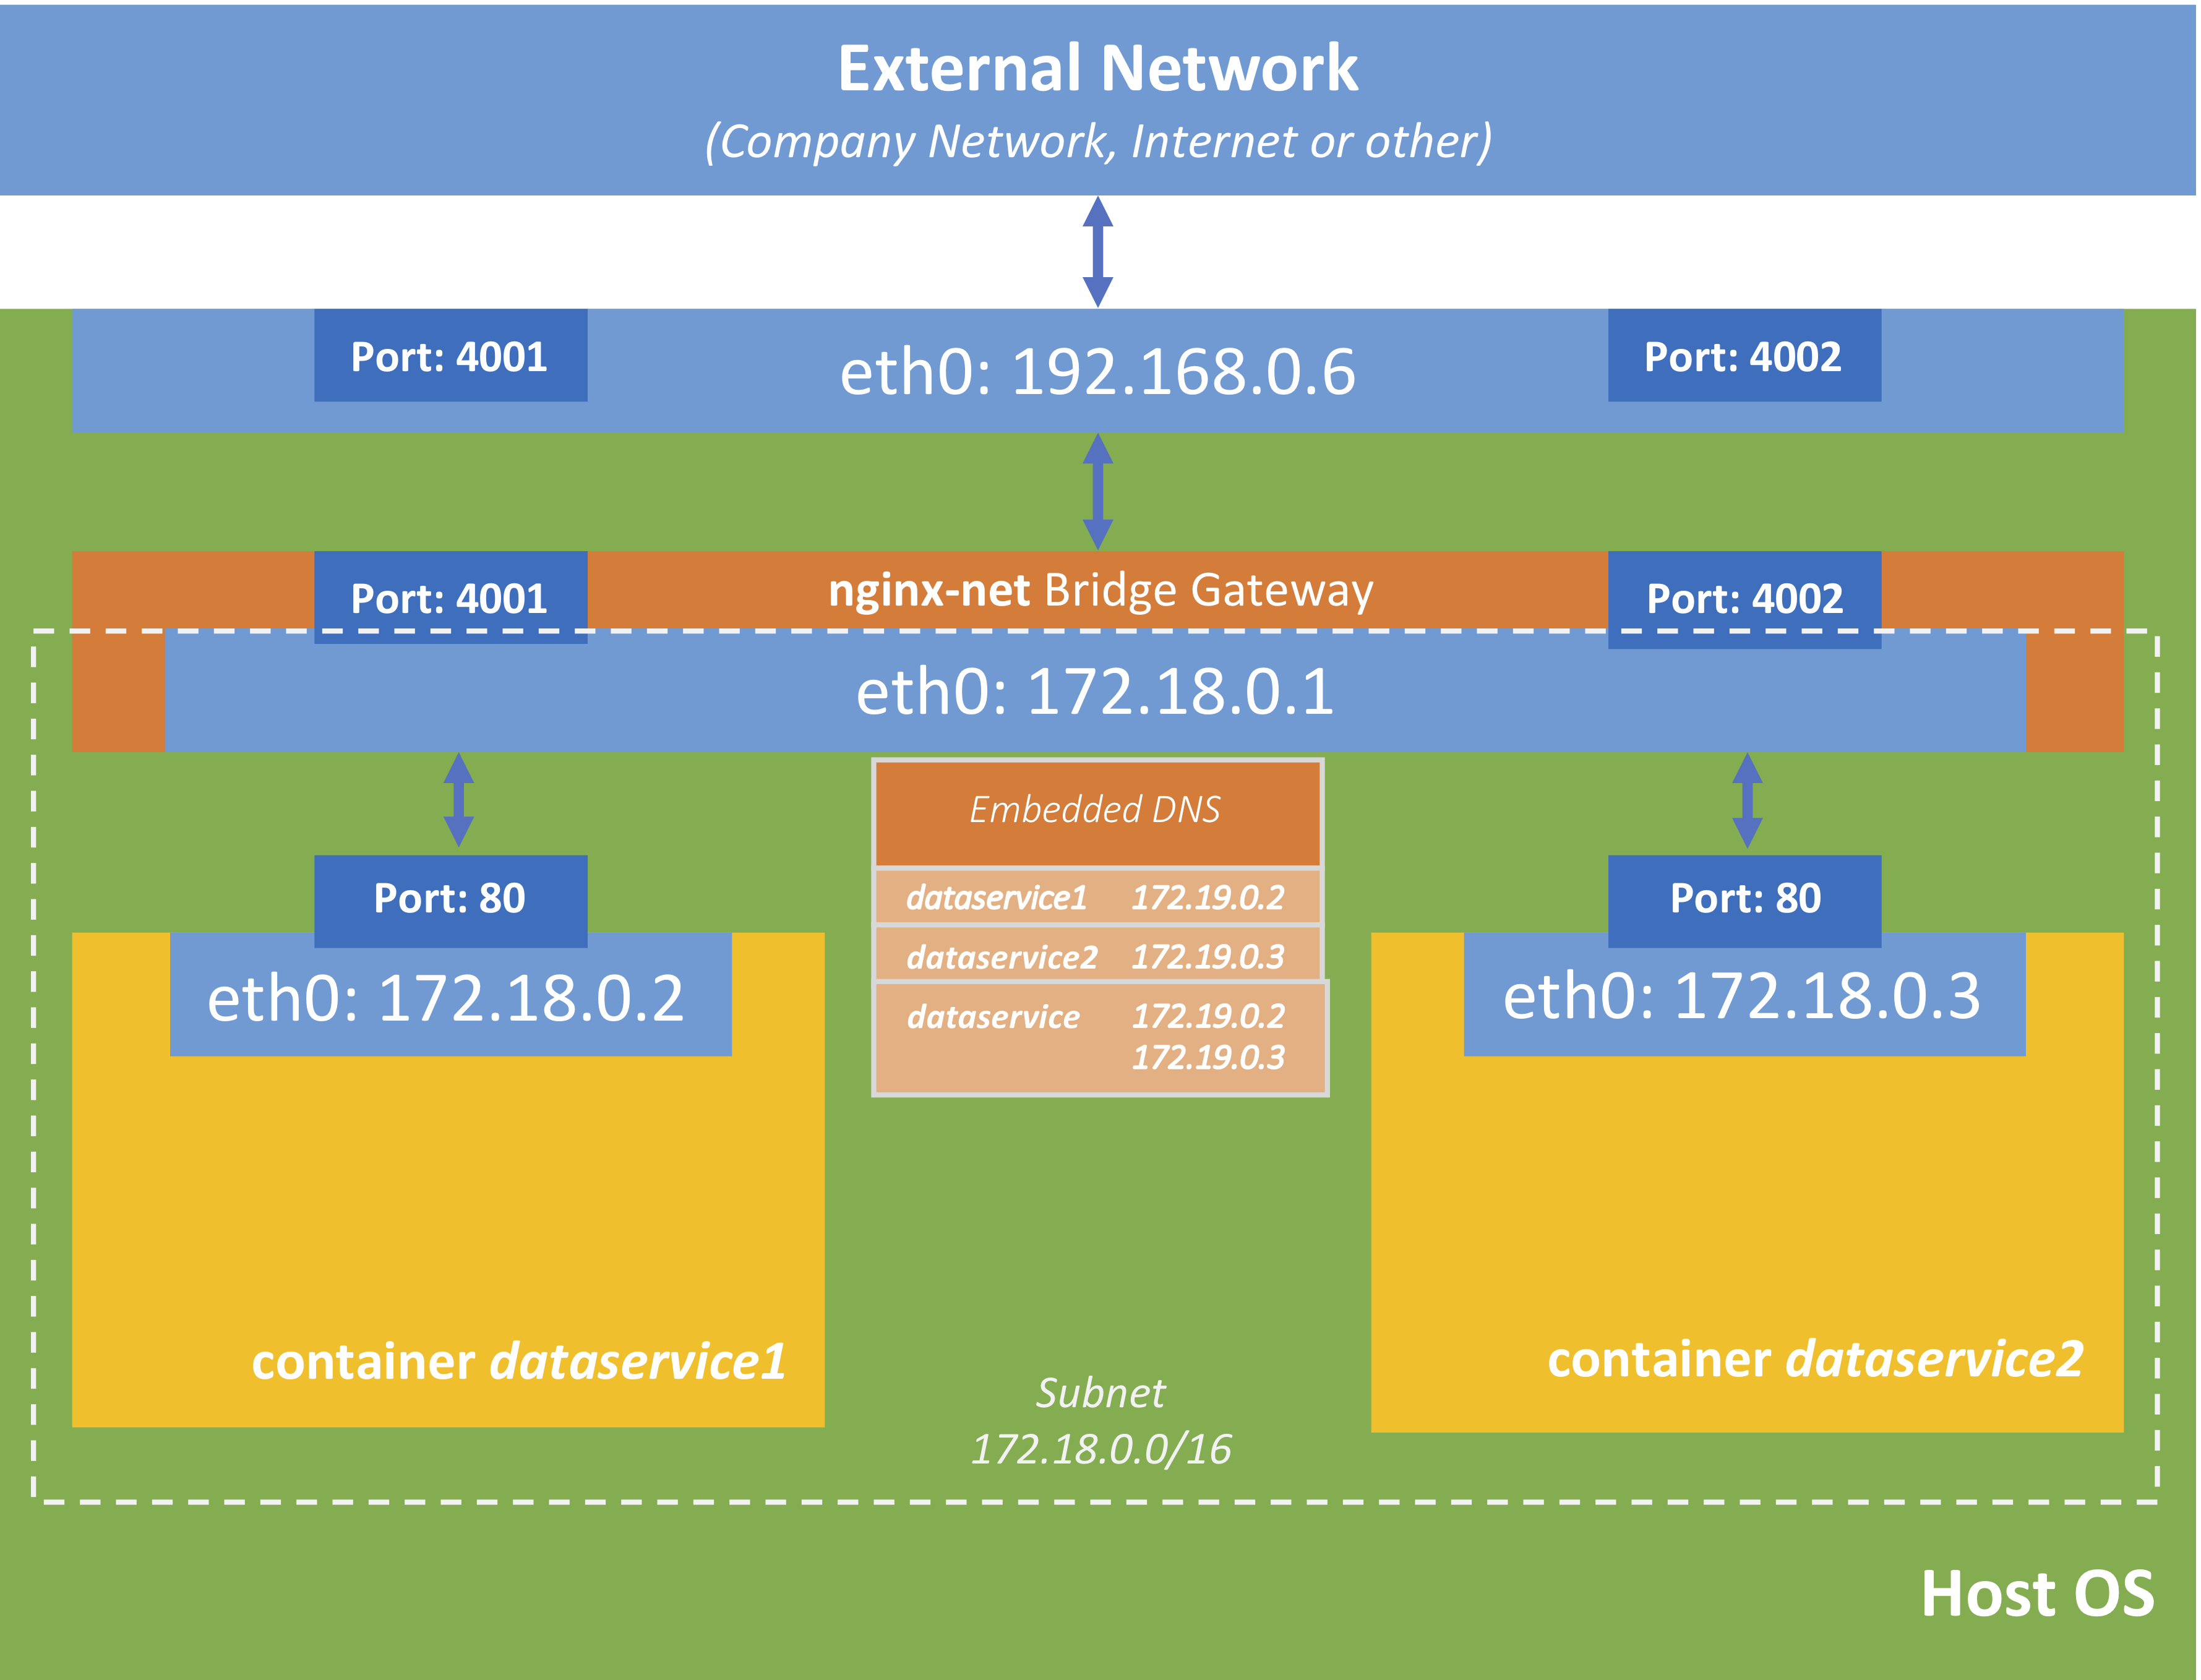
- Each container connected to a private virtual network "bridge"
- Each virtual network routes through NAT firewall on host IP (this helps to connect to outside world)
- All containers on a virtual network can talk to each other without -p
- Best practice is to create a new virtual network for each app:
- network "my_web_app" for mysql and apache containers
- network "my_api" for mongo and nodejs containers
- Its possible to connect containers tomore than one virtual network or none
- skip virtual networks and use host IP (--net=host) but you might lose some containerization benefits
- Use different Docker network drivers to gain new abilities
docker container inspect --format {{.NetworkSettings.IPAddress}} [container name]
displays the IP address
docker container port [container name]
displays the port mapping
docker network ls
shows all networks configured. Sample output:
NETWORK ID          NAME                             DRIVER              SCOPE
0527ce7eace5        bridge                           bridge              local
e61b86319ba6        decentralized_commerce_default   bridge              local
ed9584f8111c        docker_default                   bridge              local
b18e0262ed7a        host                             host                local
7c6268c65e4d        none                             null                local
d83f0d171f56        ssl_default                      bridge              local
docker network inspect [network id]
inspect a network
docker network create --driver
create a network
docker network connect and disconnect
attach a network to/from container
Network named bridge is thhe default network that bridges through the NAT firewall to the physical network that the host is attached to.
host network is the one that attaches the container to the host directly.
none network is equivalent to having it connected no where. only loopback.
$docker network inspect 0527ce7eace5
[
    {
        "Name": "bridge",
        "Id": "0527ce7eace59ad2326be29786745f5d03aea3ba7c13c6697f078747dc433873",
        "Created": "2020-07-25T08:40:40.665540337Z",
        "Scope": "local",
        "Driver": "bridge",
        "EnableIPv6": false,
        "IPAM": {
            "Driver": "default",
            "Options": null,
            "Config": [
                {
                    "Subnet": "172.17.0.0/16",
                    "Gateway": "172.17.0.1"
                }
            ]
        },
        "Internal": false,
        "Attachable": false,
        "Ingress": false,
        "ConfigFrom": {
            "Network": ""
        },
        "ConfigOnly": false,
        "Containers": {
            "ae3a0686c51ea26ca4ace270dcd87dd0a09664b837b4fadd53ac9869f0f148b9": {
                "Name": "proxy",
                "EndpointID": "4ff23c79085419653eb4897d2a9c9088aac0516219932e013f2883b279dcd2c7",
                "MacAddress": "02:42:ac:11:00:02",
                "IPv4Address": "172.17.0.2/16",
                "IPv6Address": ""
            }
        },
        "Options": {
            "com.docker.network.bridge.default_bridge": "true",
            "com.docker.network.bridge.enable_icc": "true",
            "com.docker.network.bridge.enable_ip_masquerade": "true",
            "com.docker.network.bridge.host_binding_ipv4": "0.0.0.0",
            "com.docker.network.bridge.name": "docker0",
            "com.docker.network.driver.mtu": "1500"
        },
        "Labels": {}
    }
]
docker network create my_app_net
will create a network of type bridge.
docker container run -d --name new_nginx --network my_app_net nginx
creates a new container from nginx image and attaches it to the named network created called my_app_net
Below explanation from stack overflow
Docker by default supports 3 networks:
1) None:
This mode will not configure any IP for the container and doesn’t have any access to the external network as well as for other containers. It does have the loopback address and can be used for running batch jobs.
# docker run -it --network=none ubuntu:14.04 /bin/bash
root@66308c6686be:/# ifconfig
lo        Link encap:Local Loopback
          inet addr:127.0.0.1  Mask:255.0.0.0
          UP LOOPBACK RUNNING  MTU:65536  Metric:1
          RX packets:0 errors:0 dropped:0 overruns:0 frame:0
          TX packets:0 errors:0 dropped:0 overruns:0 carrier:0
          collisions:0 txqueuelen:0
          RX bytes:0 (0.0 B)  TX bytes:0 (0.0 B)

#
# docker inspect 66308c6686be | grep -i ipaddr
            "SecondaryIPAddresses": null,
            "IPAddress": "",
                    "IPAddress": "",
2) Host
In this mode container will share the host’s network stack and all interfaces from the host will be available to the container. The container’s host name will match the host name on the host system
# docker run -it --net=host ubuntu:14.04 /bin/bash
root@labadmin-VirtualBox:/# hostname
labadmin-VirtualBox
Even the IP configuration is same as the host system's IP configuration
root@labadmin-VirtualBox:/# ip addr | grep -A 2 eth0
2: eth0: <BROADCAST,MULTICAST,UP,LOWER_UP> mtu 1500 qdisc pfifo_fast state UP group default qlen 1000
    link/ether 08:00:27:b5:82:2f brd ff:ff:ff:ff:ff:ff
    inet 10.0.2.15/24 brd 10.0.2.255 scope global eth0
       valid_lft forever preferred_lft forever
3: lxcbr0: <BROADCAST,MULTICAST,UP,LOWER_UP> mtu 1500 qdisc noqueue state UNKNOWN group default
root@labadmin-VirtualBox:/# exit
exit

HOST SYSTEM IP CONFIGURATION

# ip addr | grep -A 2 eth0
2: eth0: <BROADCAST,MULTICAST,UP,LOWER_UP> mtu 1500 qdisc pfifo_fast state UP group default qlen 1000
    link/ether 08:00:27:b5:82:2f brd ff:ff:ff:ff:ff:ff
    inet 10.0.2.15/24 brd 10.0.2.255 scope global eth0
       valid_lft forever preferred_lft forever
3: lxcbr0: <BROADCAST,MULTICAST,UP,LOWER_UP> mtu 1500 qdisc noqueue state UNKNOWN group default
In host and none mode are not configured directly but default bridge network can be configured as well as create your own user-defined bridge networks.
3) Bridge Mode
It is the Docker default networking mode which will enable the connectivity to the other interfaces of the host machine as well as among containers.
# docker run -it --network=bridge ubuntu:14.04 /bin/bash
root@58b0b1f18b2e:/# ifconfig
eth0      Link encap:Ethernet  HWaddr 02:42:ac:11:00:0c
          inet addr:172.17.0.12  Bcast:0.0.0.0  Mask:255.255.0.0
          UP BROADCAST RUNNING MULTICAST  MTU:1500  Metric:1
          RX packets:16 errors:0 dropped:0 overruns:0 frame:0
          TX packets:0 errors:0 dropped:0 overruns:0 carrier:0
          collisions:0 txqueuelen:0
          RX bytes:2668 (2.6 KB)  TX bytes:0 (0.0 B)

lo        Link encap:Local Loopback
          inet addr:127.0.0.1  Mask:255.0.0.0
          UP LOOPBACK RUNNING  MTU:65536  Metric:1
          RX packets:0 errors:0 dropped:0 overruns:0 frame:0
          TX packets:0 errors:0 dropped:0 overruns:0 carrier:0
          collisions:0 txqueuelen:0
          RX bytes:0 (0.0 B)  TX bytes:0 (0.0 B)
Accessibility to other containers is possible in bridge mode.
root@58b0b1f18b2e:/# ping 172.17.0.11
PING 172.17.0.11 (172.17.0.11) 56(84) bytes of data.
64 bytes from 172.17.0.11: icmp_seq=1 ttl=64 time=0.143 ms
64 bytes from 172.17.0.11: icmp_seq=2 ttl=64 time=0.050 ms
Connectivity to external network.
root@58b0b1f18b2e:/# ping google.com
PING google.com (216.58.197.46) 56(84) bytes of data.
64 bytes from maa03s20-in-f46.1e100.net (216.58.197.46): icmp_seq=1 ttl=51 time=16.9 ms
Connectivity to host machine
root@labadmin-VirtualBox:~# ip a | grep eth0
2: eth0: <BROADCAST,MULTICAST,UP,LOWER_UP> mtu 1500 qdisc pfifo_fast state UP group default qlen 1000
    inet 10.0.2.15/24 brd 10.0.2.255 scope global eth0

root@58b0b1f18b2e:/# ping 10.0.2.15
PING 10.0.2.15 (10.0.2.15) 56(84) bytes of data.
64 bytes from 10.0.2.15: icmp_seq=1 ttl=64 time=0.113 ms-
DNS needs to be configured correctly and is important to use it since we cannot rely on IP addresses of containers since it is so dynamic.
-
Docker uses the container names as hostnames to talk to each other by default if they are connected on custom created bridge network.
-
Default bridge network doesn't come with DNS.
-
One option would be to use
--linkto link containers to each other while creating them but a best practice is to create bridge networks for each usecase or software stack you are building.
This is not a very efficient way and not true round-robin or any other distribution but kind of random.
- Create a network
docker network create es_network - Create 2 containers by running the command twice
docker container run -d --network es_network --network-alias search elasticsearch:2 - Note that we are not opening ports from base to container but ports will be exposed from the container (9200 & 9300). This means any container on the network will be able to communicate but not from outside
- Try running
docker container run --rm --network es-network centos curl -s search:9000
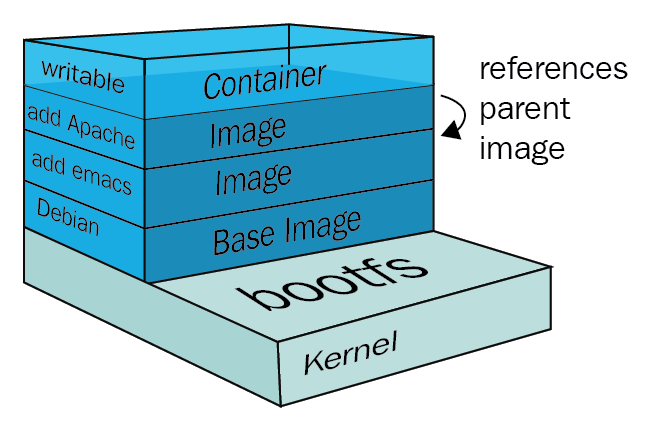
Images are designed using the union file system concept of making layers about the changes.
A Docker image is a read-only template used to build containers. An image consists of a number of layers that are combined into a single virtual filesystem accessible for Docker applications. This is achieved by using a special technique which combines multiple layers into a single view
docker history nginx:latest
Lists the different layers that built this image. An history of the image layers.
Note:
-
every image starts from the very beginning with a black layer called as scratch
-
every set of changes that you do to the file system on the image is a change - a layer
-
every layer gets its own unique SHA that helps the system identify if that layer is indeed the same as the other layer
-
since each layer is unique with a SHA identification, docker can cache these and hence if you are donwloading a image from hub
say MySQL 5.6 that is built on [ubuntu base sha: #123] + [mysq dependencies ... sha: #124] + [mysql binary... sha: #134] + [start mysql sha: #144]
but you already have MySQL 5.5 image in your local [ubuntu base sha: #123] + [mysq dependencies ... sha: #124]+ [mysql binary... sha: #132] + [start mysql sha: #144]
-
it's clever to know that it can reuse the respective layers which is already in your local. It doesn't download neither does it create a copy/duplicate on your local.
-
only one copy of a layer is stored in our file system
-
The layers (also called intermediate images) are generated when commands are executed during the Docker image build process. Usually, Docker images are created using a Dockerfile, the syntax of which will be described later. Each layer represents an instruction in the image's Dockerfile.
-
Images are not named like containers. To uniquely identify an image we can use either use the Image ID or Repository + Tag
-
Repository names are [org name]/[image name]. For offical images, org name is skipped.
-
A image gets a Image ID but can get multiple tags
-
We can tag any image with any new tags
All the changes to the filesystem of a running container are done to the top level image layer of a container. This layer is called a Container layer. What it basically means is that several containers may share access to the same underlying level of a Docker image, but write the changes locally and uniquely to each other. This process is shown in the following diagram:
A Docker storage driver is the main component to enable and manage container images. Two main technologies are used for that—copy-on-write and stackable image layers. The storage driver is designed to handle the details of these layers so that they interact with each other. There are several drivers available. They do pretty much the same job, but each and every one of them does it differently. The most common storage drivers are AUFS, Overlay/Overlay2, Devicemapper, Btrfs, and ZFS. All storage drivers can be categorized into three different types:
| Storage driver category | Storage drivers |
|---|---|
| Union filesystems | AUFS, Overlay, Overlay2 |
| Snapshotting filesystems | Btrfs, ZFS |
| Copy-on-write block devices | Devicemapper |
Here is a sample
# NOTE: this example is taken from the default Dockerfile for the official nginx Docker Hub Repo
# https://hub.docker.com/_/nginx/
# NOTE: This file is slightly different than the video, because nginx versions have been updated
#       to match the latest standards from docker hub... but it's doing the same thing as the video
#       describes
FROM debian:stretch-slim
# all images must have a FROM
# usually from a minimal Linux distribution like debian or (even better) alpine
# if you truly want to start with an empty container, use FROM scratch

ENV NGINX_VERSION 1.13.6-1~stretch
ENV NJS_VERSION   1.13.6.0.1.14-1~stretch
# optional environment variable that's used in later lines and set as envvar when container is running

RUN apt-get update \
	&& apt-get install --no-install-recommends --no-install-suggests -y gnupg1 \
	&& \
	NGINX_GPGKEY=573BFD6B3D8FBC641079A6ABABF5BD827BD9BF62; \
	found=''; \
	for server in \
		ha.pool.sks-keyservers.net \
		hkp://keyserver.ubuntu.com:80 \
		hkp://p80.pool.sks-keyservers.net:80 \
		pgp.mit.edu \
	; do \
		echo "Fetching GPG key $NGINX_GPGKEY from $server"; \
		apt-key adv --keyserver "$server" --keyserver-options timeout=10 --recv-keys "$NGINX_GPGKEY" && found=yes && break; \
	done; \
	test -z "$found" && echo >&2 "error: failed to fetch GPG key $NGINX_GPGKEY" && exit 1; \
	apt-get remove --purge -y gnupg1 && apt-get -y --purge autoremove && rm -rf /var/lib/apt/lists/* \
	&& echo "deb http://nginx.org/packages/mainline/debian/ stretch nginx" >> /etc/apt/sources.list \
	&& apt-get update \
	&& apt-get install --no-install-recommends --no-install-suggests -y \
						nginx=${NGINX_VERSION} \
						nginx-module-xslt=${NGINX_VERSION} \
						nginx-module-geoip=${NGINX_VERSION} \
						nginx-module-image-filter=${NGINX_VERSION} \
						nginx-module-njs=${NJS_VERSION} \
						gettext-base \
	&& rm -rf /var/lib/apt/lists/*
# optional commands to run at shell inside container at build time
# this one adds package repo for nginx from nginx.org and installs it

RUN ln -sf /dev/stdout /var/log/nginx/access.log \
	&& ln -sf /dev/stderr /var/log/nginx/error.log
# forward request and error logs to docker log collector

EXPOSE 80 443
# expose these ports on the docker virtual network
# you still need to use -p or -P to open/forward these ports on host

CMD ["nginx", "-g", "daemon off;"]
# required: run this command when container is launched
# only one CMD allowed, so if there are multiple, last one wins
Another tiny example
FROM alpine

# the executable
ENTRYPOINT ["sleep"]

# the default arguments
CMD ["10000"]
Docker CLI uses your authentication keys in ~/.docker/config.json
docker login to login to Docker Hub
docker logout to logout from Docker Hub
docker image tag [exisiting name] [new name]to create a new tag
The new name could be of the form john77eipe/nginx or john77eipe/mynginx:mylatest. What goes before : is taken as repository name and what comes after as tag name, the default being "latest".
docker image push [qualified image name]to push to Docker Hub
docker build will build images from Dockerfile.
docker build -f some-other-file will build images from the file specified.
2 options: Data Volumes and Bind Mounting
-
you can configure a volume in Dockerfile
VOLUME /var/lib/mysql(default in mysql image) -
any files we put in there are not cleaned by default when container is removed
-
it automatically gets mounted
-
the actual location will be on the base machine somewhere (inspect a container like mysql and look under mounts) but note that from the containers point of view it says and sees
/var/lib/mysql -
if you are on a base linux machine you could actually go to that actual location. it's not that straight forward on Windows and Mac.
-
Every volume mounted gets a unique volume ID
-
docker volume lswill show all volumes -
you can inspect a volume by providing first few charaters of volume ID
docker volume inspect [volume id] -
it's hard to say which volumne is used by which container even if we inspect by volume ID hence use Named volumes
-
Using named volumes helps to easily map from volumes to containers are vice-versa.
-
Note that Data Volumes can be specified during the build (in Dockerfile) or at runtime while running a container
-
Volumes created when running a container can be (unanmed) volumes or named volumes
docker container run -d -v webfiles:/var/lib/mysql nginxthis creates a named volume referenced by the namewebfiles -
Data Volumes needs to be pruned when not used.
docker volume prune
-
mapping of host files from local directory to container directory
-
basically the same locations pointing to the same physical location
-
any files are not cleaned when container is removed
-
host specific (shared local directories with container)
-
think this from the perspective of host
-
cannot be specified in Dockerfile only at runtime
-
run -v /Users/eipej/stuff:/path/containerlooks very similar to named volumes only difference is it starts with a / -
a common approach for devs will be to keep source code in a shared volume (bind mount)
eg:
docker container run -d --name nginix -p 80:80 -v $(pwd):/usr/share/nginx/html nginxthis shares the correct workspace as a mounted volume in container
You cannot move a running docker container from one host to another.
- stop the container
docker stop x; - commit ur changes
docker commit -p x x; - save the container to image
docker save -o x x; - move the x file to the new host and in the new host load the new image
docker load -i x(if u started the container with-voption, u'll have to move these files to new host too); - run this image with
docker run (-v is required to mount these files if needed)This will preserve any data that your application has created inside the container.
Note: It does not preserve data that is stored inside volumes; you need to move data volumes manually to new host.
Below is a script taken from (https://github.com/ricardobranco777/docker-volumes.sh) which does preserve volumes. untested.
# Stop the container
docker stop $CONTAINER

# Create a new image with the same name as the container
docker commit $CONTAINER $CONTAINER

# Save image
docker save -o $CONTAINER.tar $CONTAINER

# Save the volumes (use ".tar.gz" if you want compression)
docker-volumes.sh $CONTAINER save $CONTAINER-volumes.tar

# Copy image and volumes to another host
scp $CONTAINER.tar $CONTAINER-volumes.tar $USER@$HOST:

# On the other host:
docker load -i $CONTAINER.tar
docker create --name $CONTAINER [<PREVIOUS CONTAINER OPTIONS>] $CONTAINER

# Load the volumes
docker-volumes.sh $CONTAINER load $CONTAINER-volumes.tar

# Start container
docker start $CONTAINER- a mechanism to combine and list multiple docker configurations
docker-composecli tool can be used to run it. it can also be used from docker command line if swarm is used- don't skip the version in yml file
template.yml
version: 3.1 #don't skip this

services: #same as containers (eq. to saying docker run)
	service name: # a friendly name (this is also the DNS name inside network)
		image: #must but optional if you use build:
		command: #optional to override the default CMD in the image
		environment: #optional eq. to -e in docker run
		volumes: #optional eq. to -v
		ports: #optional eq. to -p
		depends_on: #optional (to create relationships between services)
	service name:
		...
volumes: #optional. eq. to docker volumne create

network: #optional eq. to docker network create
Note that some are plural and some singular.
For plural like volumes what follows will be lists but for singular like environment, what follows will be key: value pairs.
docker-composecli is a seperate binary fromdocker. (might have to install it seperately). use this in dev/test environmentsdocker-compose buildto build all images definitions in the folderdocker-compose up/down- to bring up all that is mentioned in your yaml file
A sample docker-compose.yml - this brings up a httpd and nginx container but uses nginx only as a proxy.
version: '3'

services:
  proxy:
    image: nginx:1.13 # this will use the latest version of 1.13.x
    ports:
      - '80:80' # expose 80 on host and sent to 80 in container
    volumes:
      - ./nginx.conf:/etc/nginx/conf.d/default.conf:ro
  web:
    image: httpd  # this will use httpd:latest
To try this have the file nginx.conf at the same location.
server {
	listen 80;
	location / {
		proxy_pass         http://web;
		proxy_redirect     off;
		proxy_set_header   Host $host;
		proxy_set_header   X-Real-IP $remote_addr;
		proxy_set_header   X-Forwarded-For $proxy_add_x_forwarded_for;
		proxy_set_header   X-Forwarded-Host $server_name;
	}
}
The same example as above but if we need to build from a custom image.
version: '2'

# based off compose-sample-2, only we build nginx.conf into image
# uses sample site from https://startbootstrap.com/template-overviews/agency/

services:
  proxy:
    image: mynginx_img #this is optional (friendly names will be given automatically)
    build:
      context: .
      dockerfile: nginx.Dockerfile
    ports:
      - '80:80'
  web:
    image: httpd
    volumes:
      - ./html:/usr/local/apache2/htdocs/
//nginx.Dockerfile
FROM nginx:1.13

COPY nginx.conf /etc/nginx/conf.d/default.confA concept of having multiple manager nodes (raft consensus group) to control (up/down) of containers in worker nodes.
Mangers are nothing but workers with extra powers to control workers.

A good deal of explanation is here: https://docs.docker.com/engine/swarm/how-swarm-mode-works/nodes/