A Google Cloud Build Image Factory
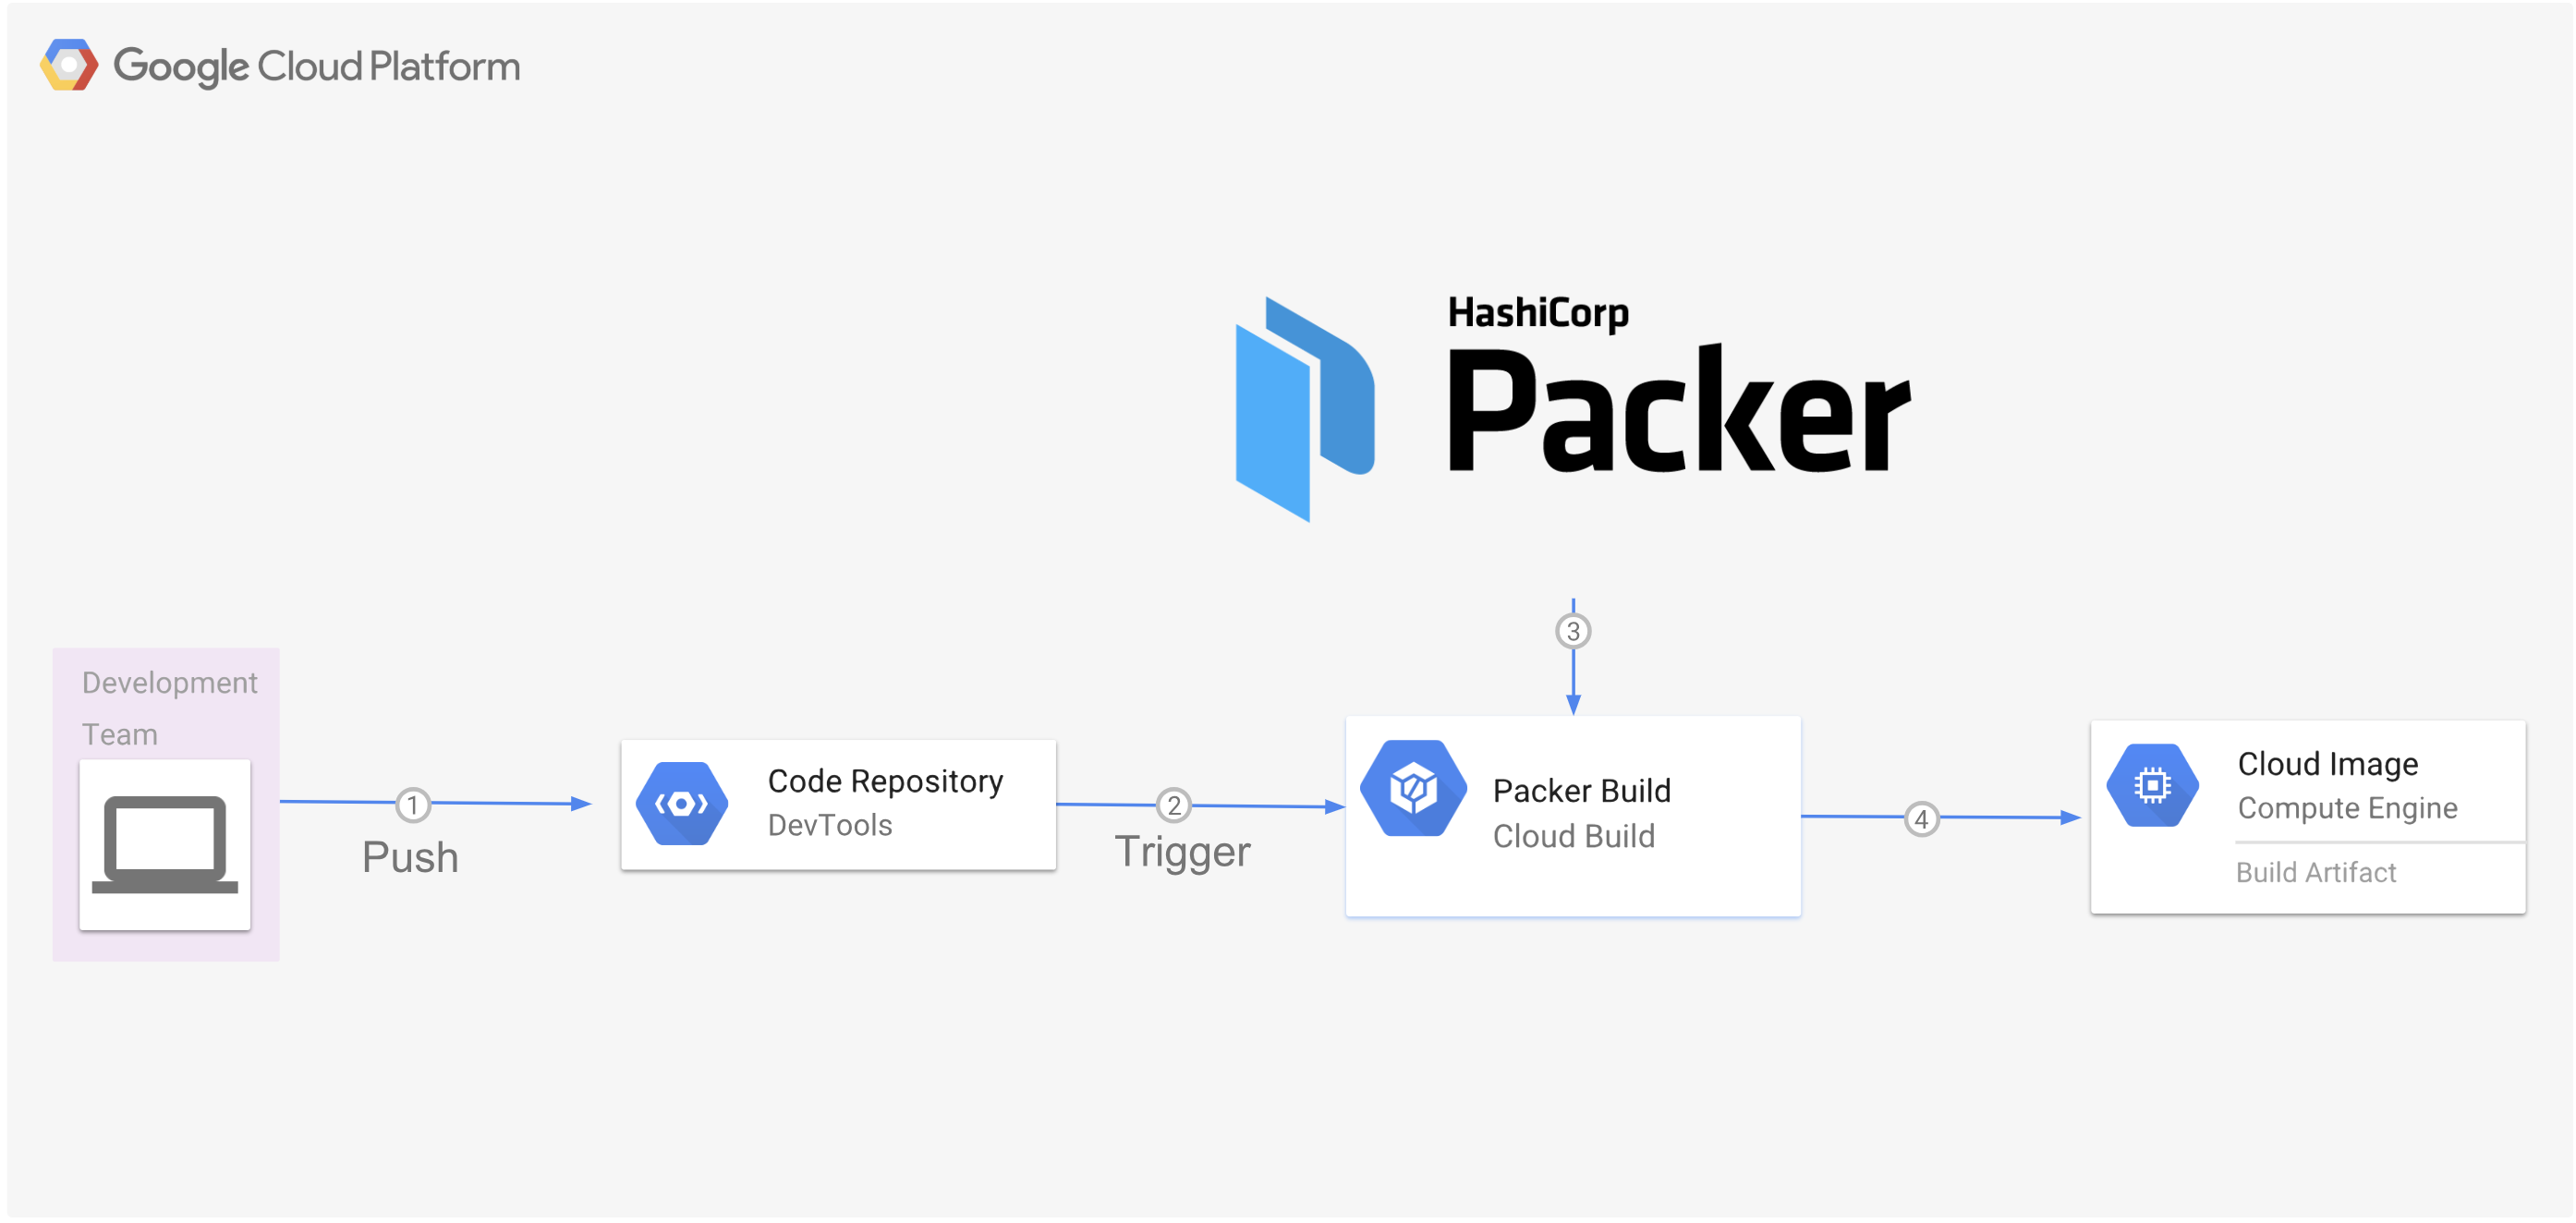
This tutorial will show you how to create an image factory using Cloud Build and Packer by Hashicorp. The image factory will automatically create new images from a Cloud Source Repository every time a new tag is pushed to that repository as in the diagram below.
Task 0 (OPTIONAL) Create a project with a billing account attached
This task will help you setup a new GCP project in which to run your packer build factory. (you can also use an existing project and skip to the next step)
PROJECT=[NEW PROJECT NAME]
ORG=[YOUR ORGANIZATION NAME]
BILLING_ACCOUNT=[YOUR_BILLING_ACCOUNT_NAME]
ZONE=[COMPUTE ZONE YOU WANT TO USE]
ACCOUNT=[GOOGLE ACCOUNT YOU WANT TO USE] or $(gcloud config get-value account)
gcloud projects create "$PROJECT" --organization=$(gcloud organizations list --format="value(name)" --filter="(displayName='$ORG')")
gcloud beta billing projects link $PROJECT --billing-account=$(gcloud alpha billing accounts list --format='value(name)' --filter="(displayName='$BILLING_ACCOUNT')")
gcloud config configurations create --activate $PROJECT
gcloud config set project $PROJECT
gcloud config set compute/zone $ZONE
gcloud config set account $ACCOUNTTask 1 Set the project variable (Skip this step if you created a new project above)
Ensure you are working with the project you want to use in gcloud.
For more information on configuraitons see (https://cloud.google.com/sdk/gcloud/reference/config/configurations/)
gcloud config configurations activate $MY_CONFIGURATION #The configuration for the project you want to use
PROJECT=$(gcloud config get-value project)
Task 2 Enable the required services
gcloud services enable sourcerepo.googleapis.com
gcloud services enable cloudapis.googleapis.com
gcloud services enable compute.googleapis.com
gcloud services enable servicemanagement.googleapis.com
gcloud services enable storage-api.googleapis.com
gcloud services enable cloudbuild.googleapis.com
Task 3 Give the Cloud Build user Project Editor permissions
CLOUD_BUILD_ACCOUNT=$(gcloud projects get-iam-policy $PROJECT --filter="(bindings.role:roles/cloudbuild)"  --flatten="bindings[].members" --format="value(bindings.members[])")

gcloud projects add-iam-policy-binding $PROJECT \
  --member $CLOUD_BUILD_ACCOUNT \
  --role roles/editor
Task 4 Create the source repository for your image creator
gcloud source repos create helloworld-image-factoryTask 5 Create the build triggers for the image creator source repository
Go to to the build triggers page and create a trigger.
- Click "Create Trigger"
- Select "Cloud Source Repository" Click "Continue".
- Select "helloworld-image-factory" anc click "Continue"
- Enter "Hello world image factory" for Name."
- Set the trigger for "Tag".
- Set the build type to "cloudbuild.yaml"
- Set the substitution,
_IMAGE_FAMILYto centos-7 - Set the substitution,
_IMAGE_ZONEto the zone you want to use the value of$ZONE. - Click "Create Trigger"
Note: To see a list of image families:
gcloud compute images list | awk '{print $3}' | awk '!a[$0]++'Task 6 Add the packer Cloud Build Image to your project
project_dir=$(pwd)
cd /tmp
git clone https://github.com/GoogleCloudPlatform/cloud-builders-community.git
cd cloud-builders-community/packer
gcloud builds submit --config cloudbuild.yaml
rm -rf /tmp/cloud-builders-community
cd $project_dir
Task 7 Add your helloworld-image-factory google repository as a remote repository with the name 'google'
- (Only if not running in Cloud Shell) setup your google credentials for git.
gcloud init && git config --global credential.https://source.developers.google.com.helper gcloud.sh- Add the google cloud repo as a remote.
git remote add google \
  https://source.developers.google.com/p/$PROJECT/r/helloworld-image-factory
Task 8 Push the repository and tags to google
- Tag the repository with a version number.
git tag v0.1- Push the branch and the tags to your google repository.
git push google master --tagsTask 9 View build progress
- Open up the Cloud Build console to show the build progress.
- Find the build that is in progress and click the link to view its progress.
Task 10 Create a compute instance for the image in your gcp project
- Once the build completes, create the instance and requisite firewall rule to test that the image works.
gcloud compute firewall-rules create http --allow=tcp:80 --target-tags=http-server --source-ranges=0.0.0.0/0
gcloud compute instances create helloworld-from-factory --image https://www.googleapis.com/compute/v1/projects/$PROJECT/global/images/helloworld-v01 --tags=http-server --zone=$ZONE
Task 11 Check the website to make sure it's up!
Wait a minute or two minutes and open the browser to the ip address of the instance to see the special message.
- To retrieve the instace ip:
gcloud compute instances list --filter="name:helloworld*" --format="value(networkInterfaces[0].accessConfigs[0].natIP)"- Open the IP in the browser and make sure you see the "Hello from the image factory!" message.
Cleaning up
- Delete the firewall rule, the instance and the image.
gcloud compute firewall-rules delete --quiet http
gcloud compute instances delete --quiet helloworld-from-factory
gcloud compute images delete --quiet helloworld-v01 - Delete the packer Cloud Build Image
gcloud container images delete --quiet gcr.io/$PROJECT/packer --force-delete-tags- Delete the source repository. (NOTE only do this if you don't want to perform the tutorial in this project again as the repo name won't be usable again for up to seven days.)
gcloud source repos delete --quiet helloworld-image-factory
