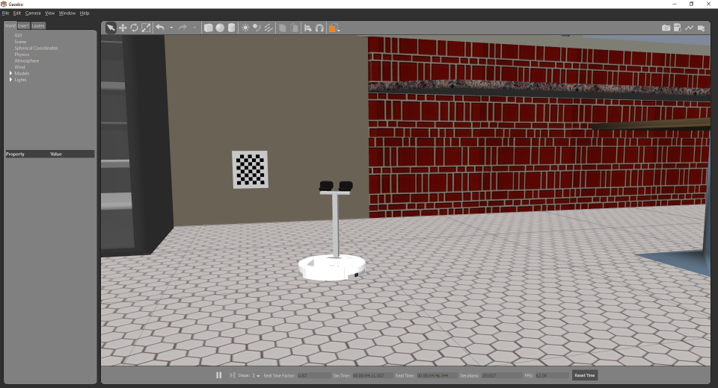
The Robot Raconteur Training Simulator is a Gazebo based simulator that contains two scenes:
Universal Robot UR5e Scene
- Two Universal Robots UR5e Robots
- Two simulated vacuum grippers
- An overhead simulated camera
iRobot Create Scene
- iRobot Create
- Stereo camera mast on robot
- "Cafe" scene from Gazebo model library
Download and install Miniconda for Python 3.8 from https://docs.conda.io/en/latest/miniconda.html . See https://conda.io/projects/conda/en/latest/user-guide/install/index.html for installation instructions.
Open the Miniconda3 prompt by clicking Start (Windows icon on left of taskbar) -> Anaconda3 (64-bit) -> Anaconda Prompt (miniconda3)
In the terminal, run the following to install the simulator:
conda install -c conda-forge mamba
 mamba create -c conda-forge -c robotraconteur -n rr_training_sim  gazebo robotraconteur robotraconteur_companion       robotraconteur_companion_python gazebo_robotraconteur_server_plugin pyyaml py-opencv  qpsolvers python=3.8
 mamba activate rr_training_sim
 mamba install -c conda-forge -c robotraconteur robotraconteur_training_sim
Download and install Miniconda for Python 3.8 from https://docs.conda.io/en/latest/miniconda.html . See https://conda.io/projects/conda/en/latest/user-guide/install/index.html for installation instructions.
The Linux installer will configure your system to start conda by default in new terminals. This can be disabled with the following command:
conda config --set auto_activate_base false
In a new terminal, run the following to install the simulator:
source ~/miniconda3/bin/activate
mamba create -c conda-forge -c robotraconteur -n rr_training_sim robotraconteur_training_sim
The iRobot Create scene only contains the simulation. The simulated drivers are contained in the Python Examples repository. See https://github.com/robotraconteur/RobotRaconteur_Python_Examples
To run the simulation, open the Anaconda prompt by clicking Start (Windows icon on left of taskbar) -> Anaconda3 (64-bit) -> Anaconda Prompt (miniconda3)
Run the following command:
conda activate rr_training_sim
cd %CONDA_PREFIX%\gz_example\create
run_sim
Open a new prompt and run the following commands to run the simulation:
source ~/miniconda3/bin/activate
conda activate rr_training_sim
cd $CONDA_PREFIX/gz_example/create
run_sim
To run the simulation, open the Anaconda prompt by clicking Start (Windows icon on left of taskbar) -> Anaconda3 (64-bit) -> Anaconda Prompt (miniconda3)
Run the following command:
conda activate rr_training_sim
run_2ur5e_sim
Open a new prompt and run the following commands to run the simulation:
source ~/miniconda3/bin/activate
conda activate rr_training_sim
run_2ur5e_sim
The simulator comes with several Robot Raconteur driver client example scripts. In a terminal with the rr_training_sim conda environment active, such as the one used to start the simulator, run the following to cd to the directory containing the scripts:
Windows:
cd %CONDA_PREFIX%\gz_example\example_scripts
Linux:
cd $CONDA_PREFIX/gz_example/example_scripts
Jog example ur5_client_jog_freespace.py - A client commanding the robot using the jog_freespace command.
python ur5_client_jog_freespace.py
Position command example ur5_client_position_command.py - A client commanding the robot using the position_command wire member.
python ur5_client_position_command.py
Trajectory command example ur5_client_trajectory.py - A client commanding the robot using the execute_trajectory member generator function.
python ur5_client_trajectory.py
Camera single frame synchronous capture camera_client_captureframe.py - An example camera client that synchronously captures a frame from the overhead camera.
python camera_client_captureframe.py
Camera streaming camera_client_image.py - An example camera client that streams a preview of the overhead camera.
The following are the Robot Racontuer connection URLs for the virtual device drivers:
UR Robot 1: rr+tcp://localhost:52511?service=robot
UR Robot 2: rr+tcp://localhost:52512?service=robot
Tool 1: rr+tcp://localhost:52521?service=gripper
Tool 2: rr+tcp://localhost:52522?service=gripper
Camera: rr+tcp://localhost:59823?service=camera
Gazebo won't start
Sometimes gzserver fails to quit properly. On Linux, run killall gzserver. On Windows, use the Task Manager -> Details tab to kill gzserver.
Gazebo or Drivers fail to start again after closing all windows
Linux sockets have a behavior called TIME_WAIT, which means the socket will remain open for a few minutes after the program has exited. This can be checked using the command netstat -an | grep TIME_WAIT. Try waiting a few minutes before restarting the simulation, or reboot the computer.
Connection Refused when trying to connect using a script
Check to make sure the drivers have all opened properly. There should be a terminal for Gazebo and 5 drivers. Check the URL of the driver. Real device drivers and the simulation typically use different ports and hostnames. The real UR robot driver defaults to rr+tcp://localhost:58652?service=robot, an the real camera driver defaults to rr+tcp://localhost/?service=camera.
The Robot Raconteur Service Browser https://github.com/robotraconteur/RobotRaconteur_ServiceBrowser can also be used to view the services running on the network. If discovery is not working on Windows, try disabling the firewall.

