twr tdm Guide
Quick Start
- Press and hold the power / sound button to power up.
- Press play to start the pattern playback.
- Press the 1-16 buttons to make sounds.
- Press the Record button then a 1-16 button to insert a sound.
The Fuction Buttons
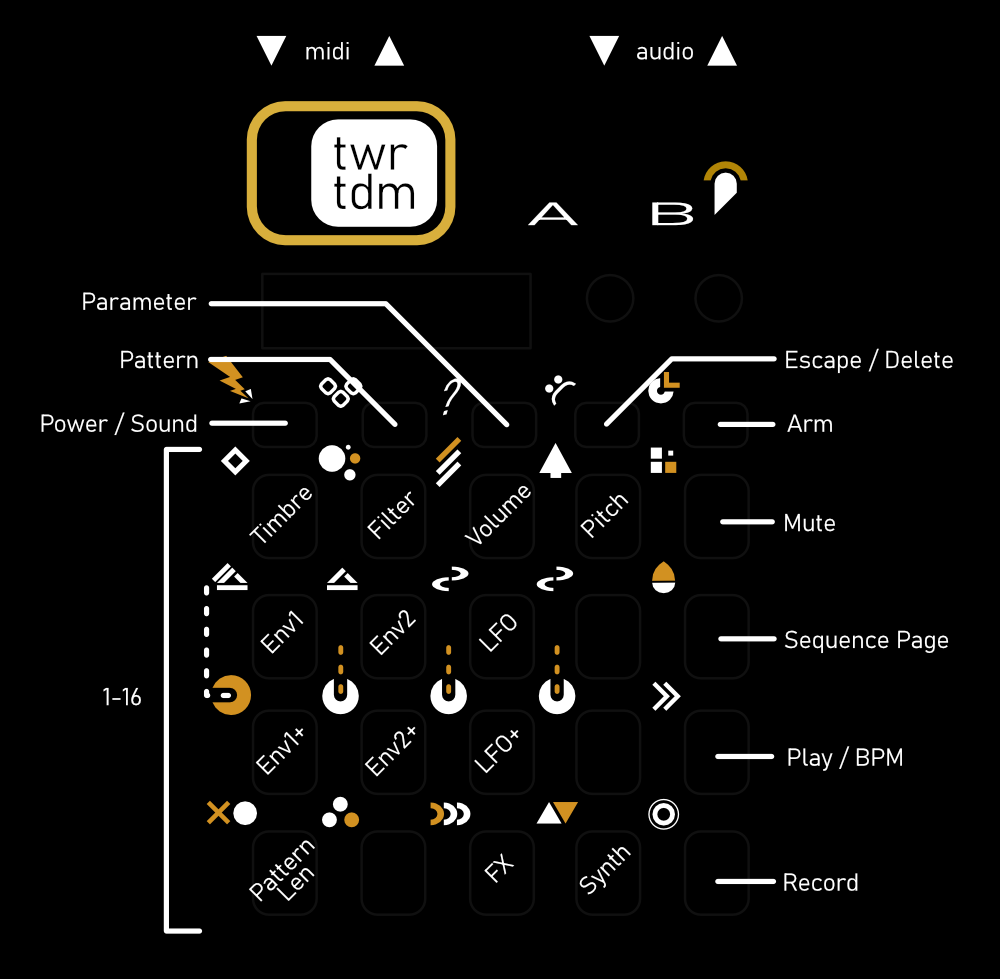
All the buttons along the top row act as shift buttons. They are as follows:
Sound
Hold Sound & Press one of the 1-16 buttons to select a sound.
Pattern
Hold Pattern & Press one of the 1-16 buttons to select a pattern. While holding, press additional pattern buttons to chain patterns together into a song.
Parameter
Hold Paramater & Press one of the 1-16 buttons to select a parameter. When a parameter is selected, it will be displayed onscreen, and using the a/b knobs will edit it. Most parameters apply to the voice accross all patterns, except as noted.
These parameters are listed on the buttons in the image above, they are as follows:
- Timbre / Color & Sample In / Out
- Filter Cutoff & Resonance
- Volume / Pan
- Not Used
- Envelope 1 Attack & Decay- This envelope is routed to volume by default, and can be routed to an additional paramater via the Env1+ (9) key.
- Envelope 2 Attack & Decay - This envelope has no routing or depth by default, and must be routed via the Env2+ (10) key
- LFO Speed & Depth. The LFO speed is derived from the current tempo, so changing the tempo will alter this speed.
- Retrigger Speed & Length
- Envelope 1 Routing & Depth - the volume envelope can be additionally routed to another parameter, and have either positive or negative depth applied
- Envelope 2 Routing & Depth - the second envelope can be routed to a parameter, and have either positive or negative depth applied.
- LFO Routing
- Retrigger Depth (controls retrigger volume modification)
- Voice Pattern Length & Speed - how many steps this voice uses on this pattern, and how fast each step is. This can be set per voice per pattern.
- Trigger conditions
- FX Delay Send & Reverb Send
- Synth Settings
- The Synt has many voices underneath it. The code for these comes from Mutable Instruments Braids, please check their manual for what the parameters refer to
- The Samp voice has a slice, pitch, and loop length sync option. In addition, you can hold the parameter key and press the following keys to access more options:
- Play: BPM & sync output settings - Sync can be set to PO (pocket operator), 24PQ (24 pulses per quarternote), Midi, or a combination of midi & one of the other two.
- Pattern: set the number of 16th notes before changing to the next pattern when a pattern change is requested.
Escape / Delete
Pressing Escape and one of the following keys provides these options:
- Sound / Power: save and shutdown
- Pattern: clear the currently selected pattern
- Arm: erase a voices sample
Arm / Record
Press Arm / Record and a voice that does not have a sample (one of the keys highlighted in red) to record a sample.
Mute
Press the Mute and a 1-16 button to mute that voice.
Recording Patterns
There are two ways to record notes into a pattern, step mode & live mode.
Step Mode
while write is not lit, choose a note by pressing a button 1-16. Then press write to enter write mode. Pressing buttons 1-16 will enter the last selected note on those steps.
Live Mode
while write is not lit, and the pattern is not playing, hold write, then press play. Once in live mode, notes played using the buttons 1-16 will be stored in the current pattern.
Parameter Lock
While in step mode, hold down a lit step and move a knob to store a parameter lock for that step. There are 128*16 parameter locks available.
While in playback, holding down record and moving a knob will store parameter locks for playing steps as it passes.
Edit Page
To change the page you are currently editing for the pattern, press the unlabeled button above play.
Copying data
Hold the Record Key and one of the following keys to copy data:
- Sound: Copy the currently selected sound to another voice.
- Pattern: Copy the currently selected pattern to another pattern.
Changing Octave, Root note and Scale
Hold the parameter key and press the record key to access the octave & root note settings. While on this parameter page, hold parameter key and press record key again to access the scale settings. Changing these values will not change the notes for steps which have already been set.
Additional Notes
The unit will shut down after 2 minutes of not pressing a key when not playing & 20 minutes after not pressing a key when playing.
Flash New Firmware
To flash new firmware, hold down the Record key while powering up & connected to usb to enter usb drive mode. At this point you can release the record & power keys. Drag the uf2 file to this drive, and the device will copy, then shutdown. Hold powerup key, and you should have the new firmware flashed.
If you have a mac on some versions of ventura, you may need to use the terminal to copy the file (cp -X tdm-v0.pre.7.uf2 /Volumes/RPI-RP2/). See this thread for notes on this bug.
Known Issues
- Midi input / live play has a tendency to get stuck notes
- When at low battery, the key colors droop, and its possible that saving will not work
- when attached to usb power, there is a tendency to have noise on the audio output
- the lfo speed is inverted (low end is fast, high end is slow)
- the vol target in the envelopes & lfo doesn't work.
- occasionally the parameter lock setting will get stuck on the display, rather than displaying the unlocked parameter. This does not affect setting the parameter or setting locks.