bundlesize - version 2 preview
Jump to:
npm install bundlesize2 --save-dev

# or

yarn add bundlesize2 --dev
Add it to your scripts in package.json
"scripts": {
  "test": "bundlesize"
}
Or you can use it with npx from NPM 5.2+.
npx bundlesize2
- Option 1: Create a
bundlesize.config.json(recommended)
Format:
{
  "files": [
    {
      "path": "./build/vendor.js",
      "maxSize": "30 kB"
    },
    {
      "path": "./build/chunk-*.js",
      "maxSize": "10 kB"
    }
  ]
}
The file is expected to be at the project root. But, you can give a different path by using the --config flag:
bundlesize --config configs/bundlesize.json
Option 2: You can also put the config in package.json
{
  "name": "your cool library",
  "version": "1.1.2",
  "bundlesize": [
    {
      "path": "./build/vendor.js",
      "maxSize": "3 kB"
    }
  ]
}
Notice that the key here is bundlesize instead of files.
-
Fuzzy matching
If the names of your build files are not predictable, you can use the glob pattern to specify files.
This is common if you append a hash to the name.
{
  "files": [
    {
      "path": "build/**/main-*.js",
      "maxSize": "5 kB"
    },
    {
      "path": "build/**/*.chunk.js",
      "maxSize": "50 kB"
    }
  ]
}
It will match multiple files if necessary and create a new row for each file.
-
Compression options
By default, bundlesize
gzipsyour build files before comparing.If you are using
brotliinstead of gzip, you can specify that with each file:{ "files": [ { "path": "./build/vendor.js", "maxSize": "5 kB", "compression": "brotli" } ] }If you do not use any compression before sending your files to the client, you can switch compression off:
{
  "files": [
    {
      "path": "./build/vendor.js",
      "maxSize": "5 kB",
      "compression": "none"
    }
  ]
}
If your repository is hosted on GitHub, you can set bundlesize up to create a "check" on every pull request.
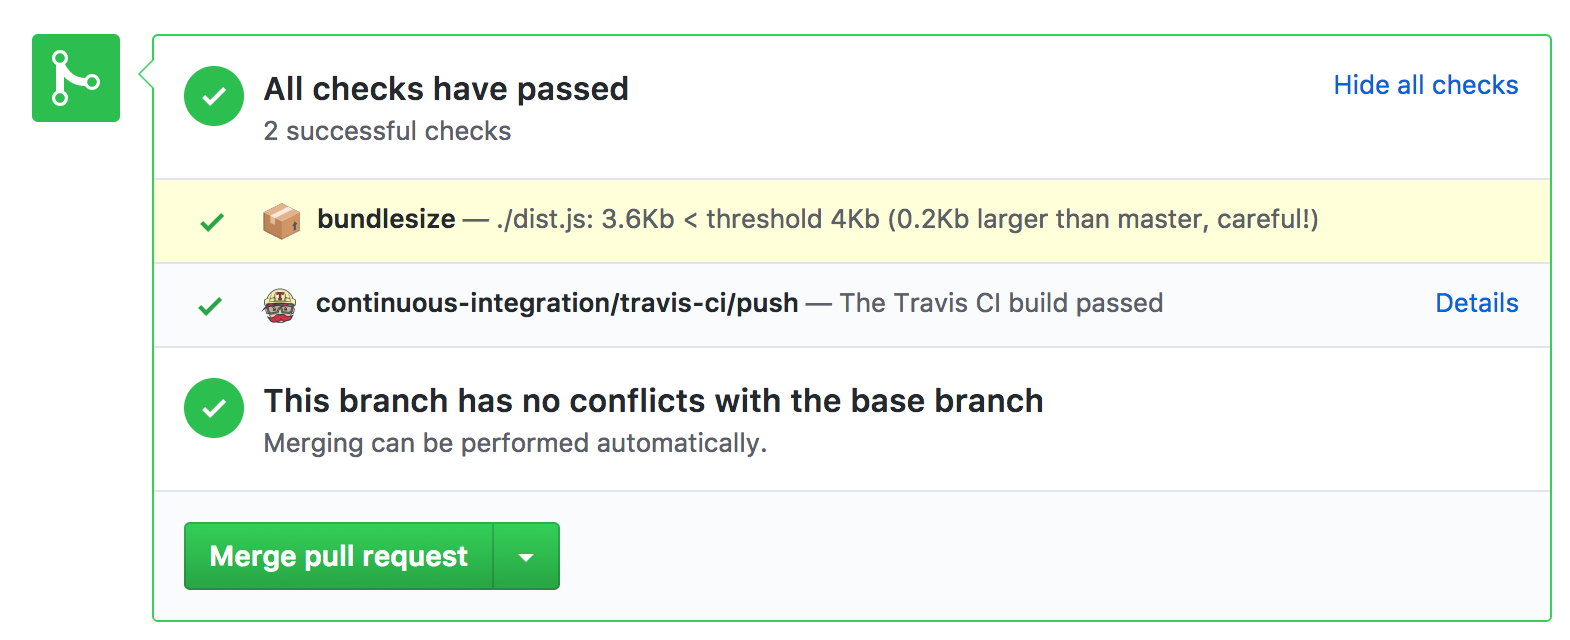
To enable checks,
- Run
bundlesizewith the flagbundlesize --enable-github-checks. - authorize
bundlesizeto add checks (Does not need access to your code)
Checks work with Travis CI, CircleCI, Wercker, and Drone.
Using a different CI? You will need to supply an additional 5 environment variables.
CI_REPO_OWNERgiven the repohttps://github.com/myusername/myrepowould bemyusernameCI_REPO_NAMEgiven the repohttps://github.com/myusername/myrepowould bemyrepoCI_COMMIT_MESSAGEthe commit messageCI_COMMIT_SHAthe SHA of the CI commit, in Jenkins you would use${env.GIT_COMMIT}CI=trueusually set automtically in CI enviroments
- Use the npm package
bundlesize2instead ofbundlesize - If you'd like status reported back to github, use the flag
--enable-github-checks+ authorize bundlesize2 app. More in the docs - Remove
BUNDLESIZE_GITHUB_TOKEN, it's not required anymore - If anything breaks, let me know :)
Note: This is only until the new version is ready and then it will be merged back in this project as a major release
MIT © siddharthkp