A super minimalistic C++ audio library built on miniaudio.
Should work on most platforms, but I've only tested it on Windows.
The Audio::Sound class can be used to play one-shot sound effects and can also be used to stream background music to minimize memory use.
The Sound class supports the following file types:
- WAV (
.wav): Waveform Audio File Format - MP3 (
.mp3): MPEG-1/2 Audio Layer III - FLAC (
.flac): Free Lossless Audio Codec - OGG (
.ogg): Free, Open Container Format (Xiph.org)
The Audio::Waveform class can be used to play waveform sounds. See MarioCoin.hpp and MarioCoin.cpp for an example of creating a complex sound effect using Waveforms.
This project comes with both a Visual Studio 2022 solution and project file and a CMakeLists.txt file for use with CMake.
Open the Audio.sln file in the root directory of this repository. You should see two projects in the solution:
- Audio (Static library): This project generates the
Audio.libfile that you must link to in your own project. - example (Executable): This is an example showing how to work with the Audio library. You can inspect the project settings of this project to see how to integrate the
Audio.libfile into your own projects.
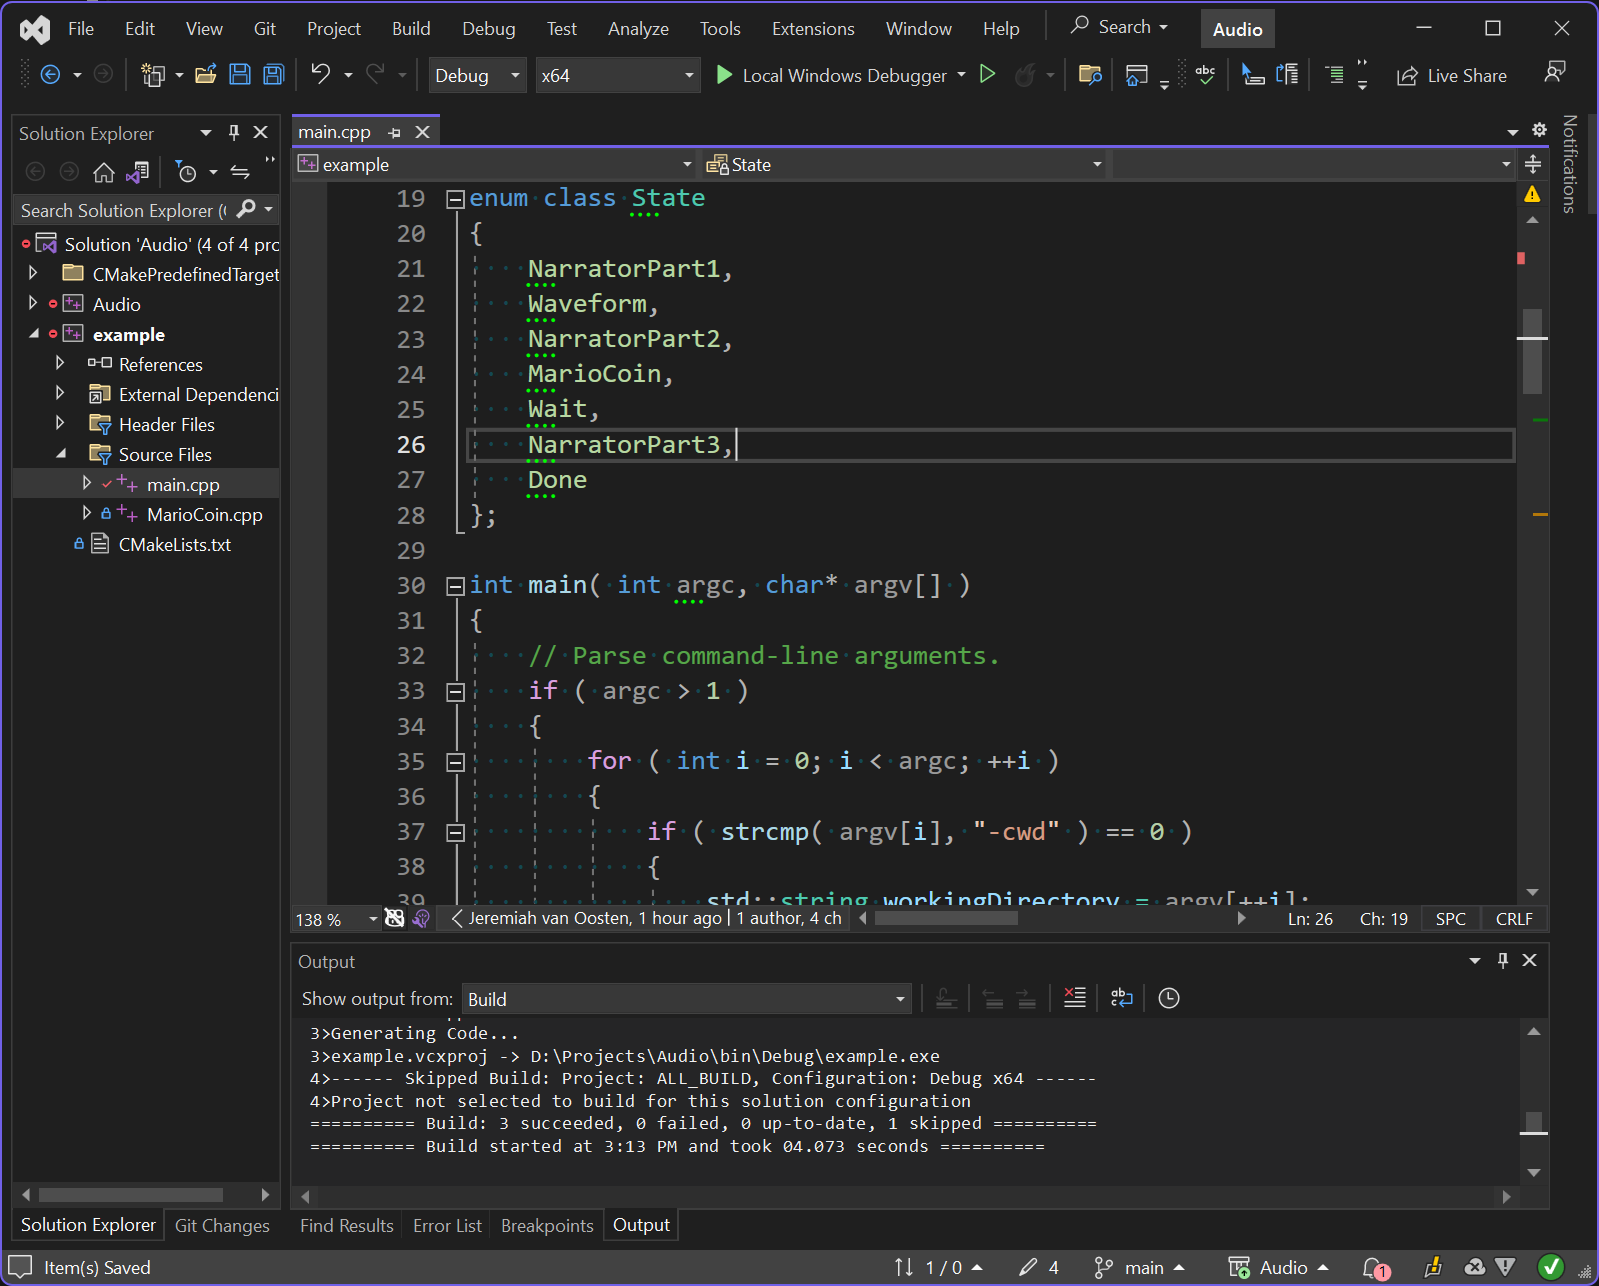
Running the example project in Visual Studio should play a narration and show a few examples of working with Waveforms.
You should have (at least) CMake 3.23.0 installed (and added to your PATH environment variable in Windows). If you don't have CMake, please download it from cmake.org. Make sure you download the installer for your platform (don't download the source distributions).
To generate the Visual Studio solution and project files, run the GenerateProjectFiles.bat batch file on Windows. This script uses vswhere to detect the latest version of Visual Studio you have installed and will generate the solution and project files for the version of Visual Studio you have installed.
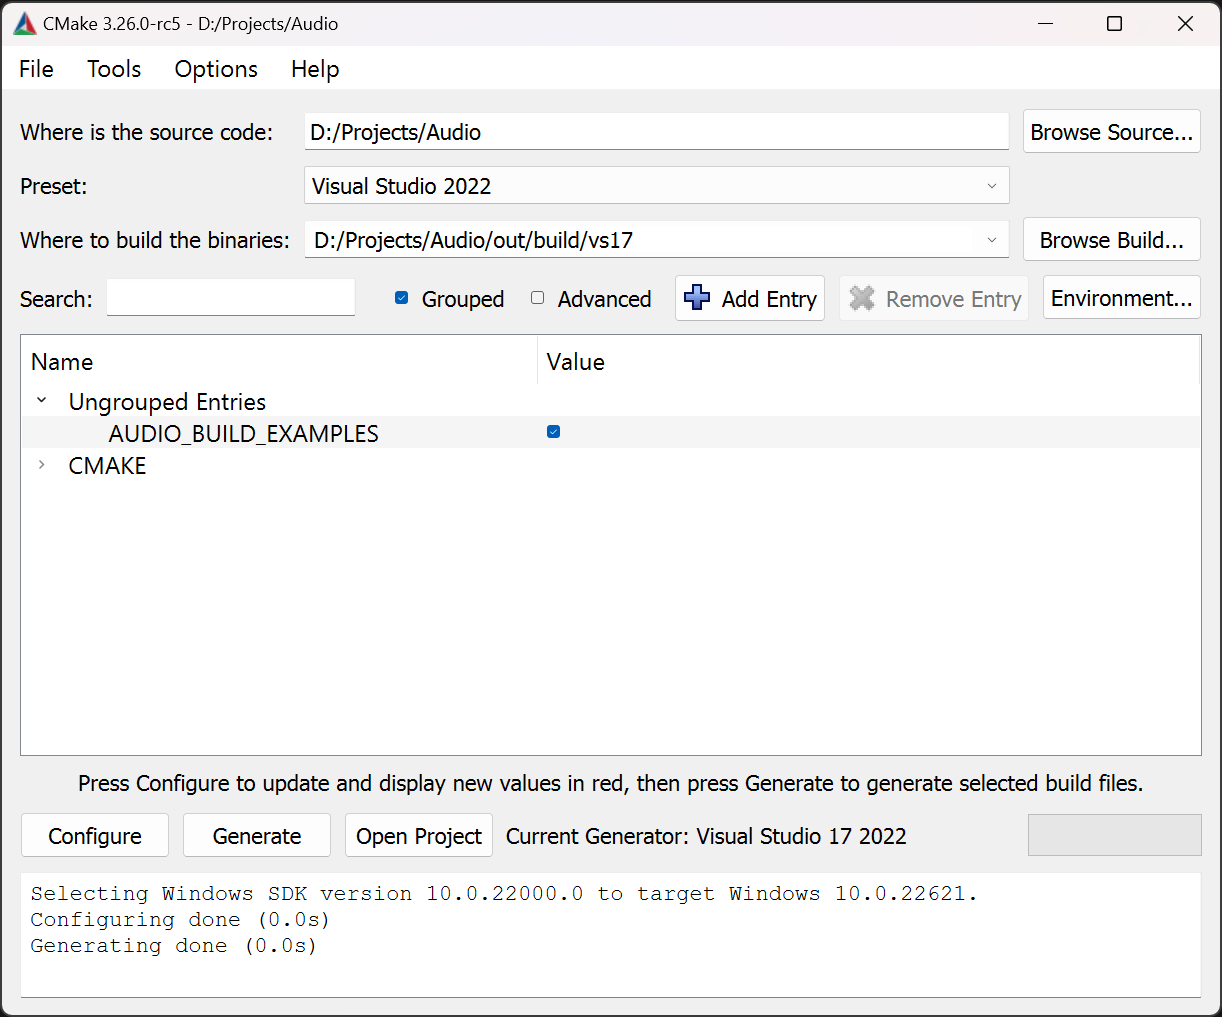
Alternatively, you can open the Audio folder directly in the CMake GUI to generate the solution and project files:
There is a preset (use the preset drop-down menu in the CMake GUI) for Visual Studio 2019 and 2022 that you can use to generate the solution and project files.
In the CMake GUI, use the Configure, Generate, and Open Project buttons (in that order) to generate and open the Visual Studio solution file.
Note: Do not distribute the CMake generated project files! These files contain absolute paths and will only work for your file structure.
Open either the existing Audio.sln file, or the CMake generated solution file in Visual Studio.
Select Build > Build Solution (Ctrl+Shift+B) from the main menu to build the Audio.lib and example.exe.
The Audio.lib file will go to the lib folder in the root of this repository depending on the current configuration.
- Debug:
lib\Debug\Audio.lib - Release:
lib\Release\Audio.lib
Note: Do not distribute the generated library file with your project or commit it to GitHub. The library file should always be compiled for the toolchain version where it will be used.
The example.exe file will be placed in the bin folder.
- Debug:
bin\Debug\example.exe - Release:
bin\Release\example.exe
The example project should run directly from Visual Studio, but the example tries to open the narrator.flac audio file in the example folder. When running the example.exe file directly from the command line, you should also specify the example folder as the current working directory when running:
.\bin\Release\example.exe -cwd ".\example"If you see Failed to initialize sound from source: narrator.flac printed to the console, then the wrong working directory is being used to run the example. In this case, you will still hear the waveforms (since they don't rely on loading any files from disk), but you won't hear the narrator audio file.
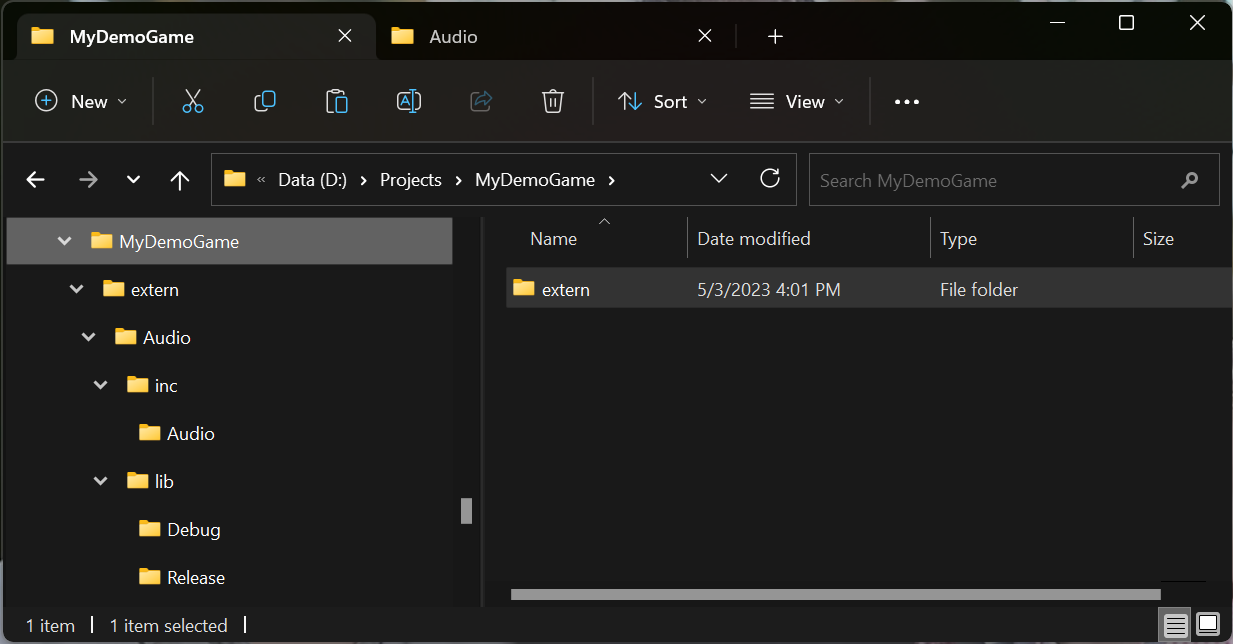
To use the Audio library in your own projects, copy the lib and inc folders to a folder in your own project. For example, suppose you keep your 3rd party files in a folder called extern or 3rdParty.
Create a subfolder called Audio and copy the contents of the lib and inc folders to the Audio subfolder. You should have a folder structure that is similar to what is shown in the screenshot below:
Or if you prefer a textual view:
├── MyDemoGame
│   ├── extern
│   │   ├── Audio
│   │   │   ├── inc
│   │   │   │   ├── Audio
│   │   │   │   │   ├── Config.hpp
│   │   │   │   │   ├── Device.hpp
│   │   │   │   │   ├── Listener.hpp
│   │   │   │   │   ├── Sound.hpp
│   │   │   │   │   ├── Vector.hpp
│   │   │   │   │   ├── Waveform.hpp
│   │   │   ├── lib
│   │   │   │   ├── Debug
│   │   │   │   │   ├── Audio.lib
│   │   │   │   │   ├── Audio.pdb
│   │   │   │   ├── Release
│   │   │   │   │   ├── Audio.lib
│   │   │   │   │   ├── Audio.pdb
Alternatively, you can just copy the contents of the src folder to where you keep your source files (.c, or .cpp files) for your game project, and the contents of the inc folder to where you keep your header files (.h or .hpp files), then add all of the .c and .cpp files directly to your game project. Doing this does not require to generate the Audio.lib file and you can skip the next section.
In order for the compiler to find the include files, you need to tell the compiler where to find the additional header files.
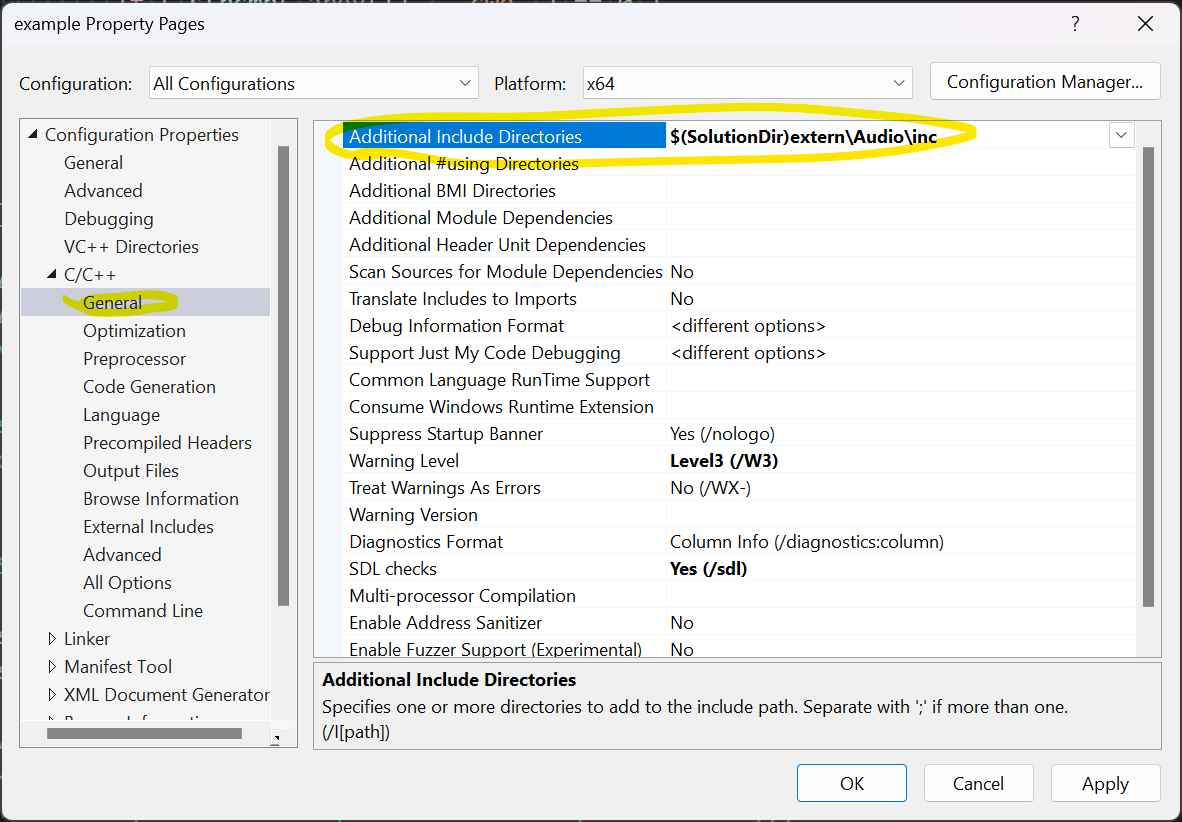
Open the project settings for your game project (either by right-clicking on the project in Visual Studio, or select Project > Properties from the main menu in Visual Studio).
Expand the C/C++ node in the Property Pages dialog box and select the General subnode.
In the Additional Include Directories, specify the folder to the Audio\inc folder you copied the header files to.
Note: Make sure you set the Configuration to All Configurations to apply the include directory to all build configurations!
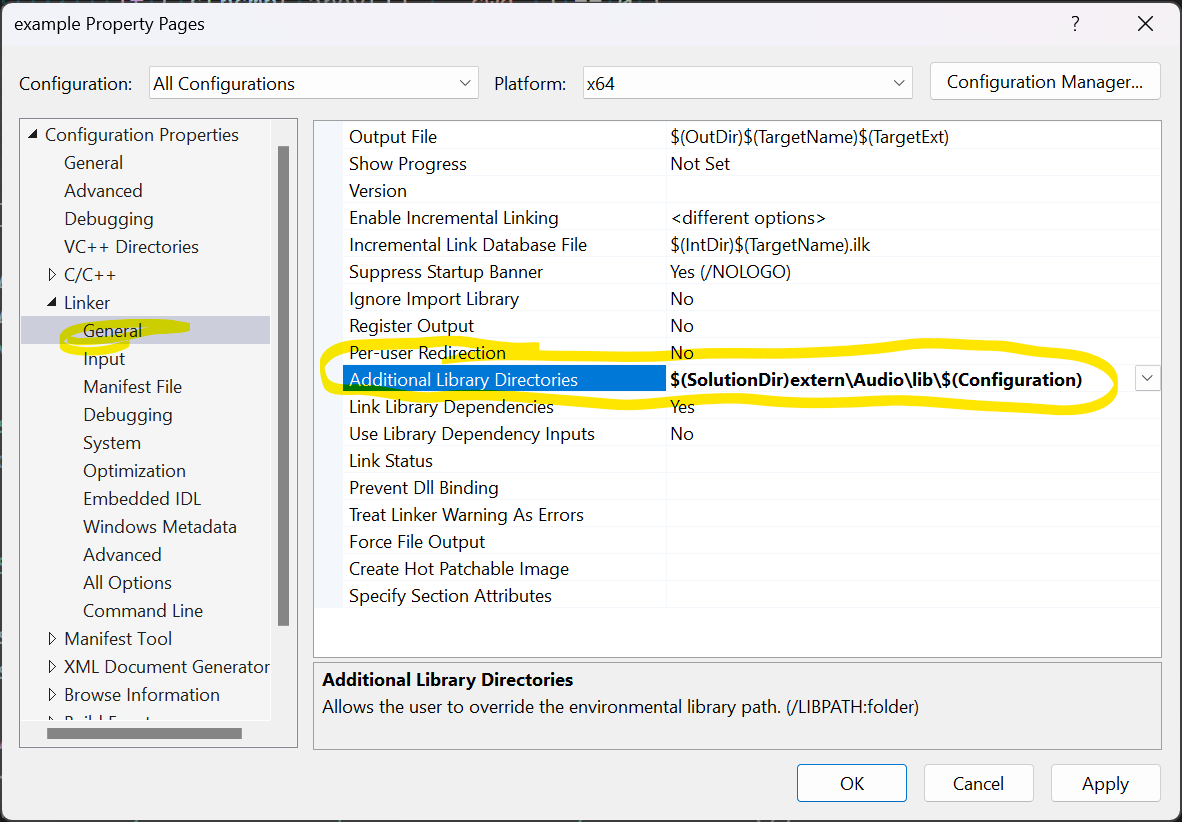
You must tell the linker where to find the Audio.lib file depending on the build configuration being used.
Open the project settings for your game project (either by right-clicking on the project in Visual Studio, or select Project > Properties from the main menu in Visual Studio).
Expand the Linker node in the Property Pages dialog box and select the General subnode.
In the Additional Library Directories setting, specify the folder to the Audio\lib folder you copied the Audio.lib files to.
Note: The
$(Configuration)macro shown in the screenshot will resolve toDebugwhen creating a debug build, andReleasewhen building a release build. This way, you can specify the same path for all configurations.
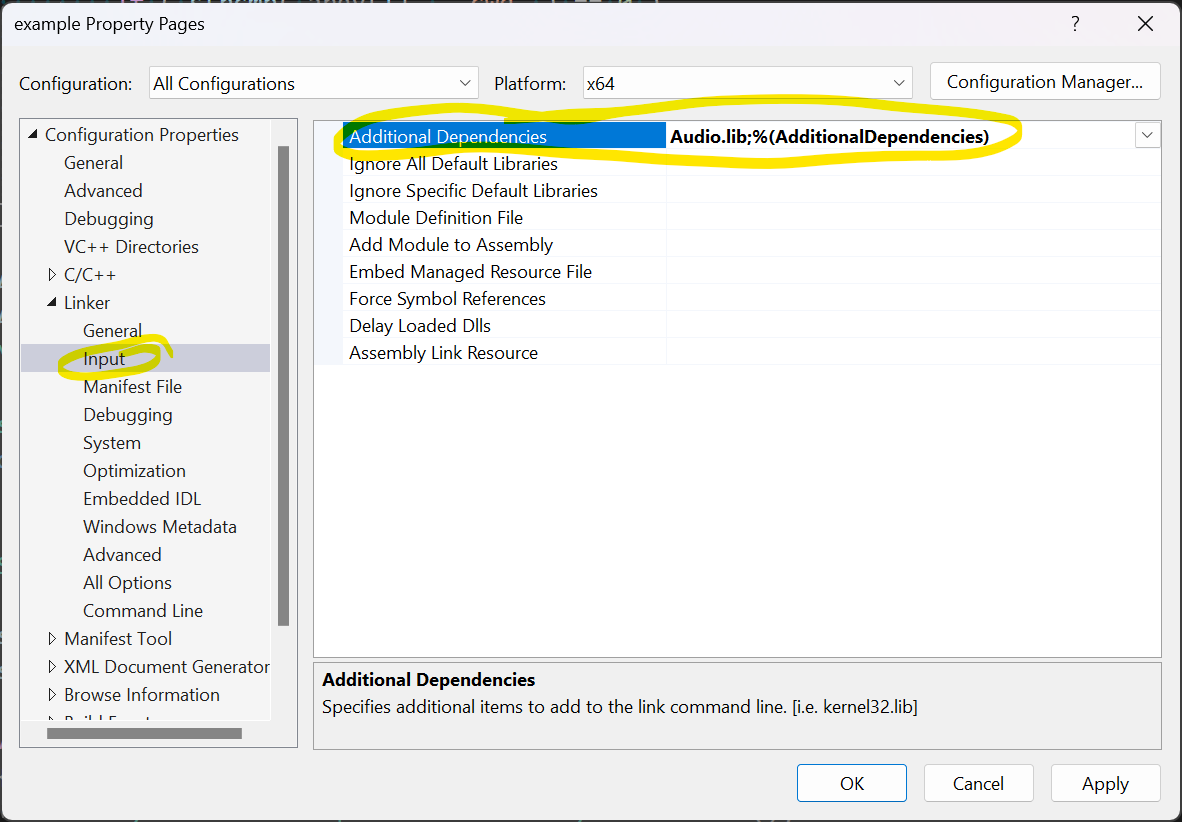
Now select the Input subnode in the project's property pages dialog:
In the Additional Dependencies settings, specify Audio.lib for both the Debug and Release configurations.
You should be able to compile your project with the Audio library. If you have any issues, please join our Discord server: 3dgep.com Discord Server
The easiest way to get a sound effect in your game, is to load a sound effect file into an Audio::Sound object and use the Sound::play or Sound::replay (the former will automatically force the sound to play from the beginning in case it is already playing).
#include <Audio/Sound.hpp>
...
// Create a Sound effect from a wav file:
Audio::Sound coin { "coin.wav" };
Later, the sound effect can be played using the Sound::play method:
// Play the coin sound effect:
coin.play();
Or, if there is a chance the sound is already playing, it will not be restarted using the Sound::play method. This can happen if you play many coin sounds in rapid succession. To force the sound effect to play from the beginning, use the Sound::replay method:
// Force the coin sound to play from the beginning:
coin.replay();
Use the Sound::stop method to force the sound effect to stop playing:
// Stop the sound effect:
coin.stop()Note: Stopping a sound effect does not automatically rewind the sound effect to the beginning of the sound. Use the
Sound::seekmethod to seek to the beginning of the sound. You can also useSound::replayto automatically rewind the sound to the beginning.
Short, one-shot sound effects are loaded into memory and decoded on creation. To minimize the impact on loading larger files, it is recommended to stream in the files and decode the audio file "on the fly" while playing. The reduces the time to load the file as well as reduced the amount of memory required to store the audio file.
#include <Audio/Sound.hpp>
...
// Create a Sound effect from a wav file:
Audio::Sound bgMusic { "Background_Music.mp3", Audio::Sound::Type::Stream };
The only difference between loading background music and one-shot sound effects is the additional Audio::Sound::Type::Stream parameter in the constructor. Playing, stopping, and restarting of streamed sounds is the same as one-shot sound effects.
An Audio::Waveform class can be used to play waveform audio. Many early video games simulated sound effects using waveforms or MIDI audio because it was much easier to store and synthesize the audio than use WAV files.
The Audio::Waveform class has two properties that can be modified at runtime to achieve the desired sound effect:
- Frequency: The "speed" of the waveform determines the apparent pitch of the sound. This value is measured in Hz.
- Amplitude: The "strength" of the sound and determines how loud it sounds. This value is a floating-point value that is measured in the range from 0 (no sound) to 1 (100% volume). Amplitude is modulated by the master volume of the
Audio::Device.
See MarioCoin.cpp for an example of how to use a Waveform.
- The destruction of the audio engine will hang when built as a shared library (DLL). This does not happen when building as a static library. The current workaround is to skip the call to
ma_engine_uninitwhen the Audio library is built as a DLL.

