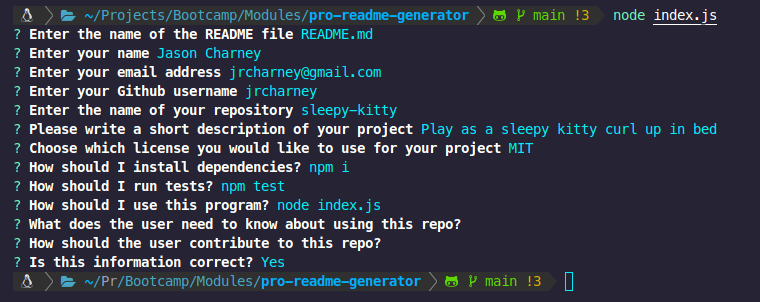
Use this program
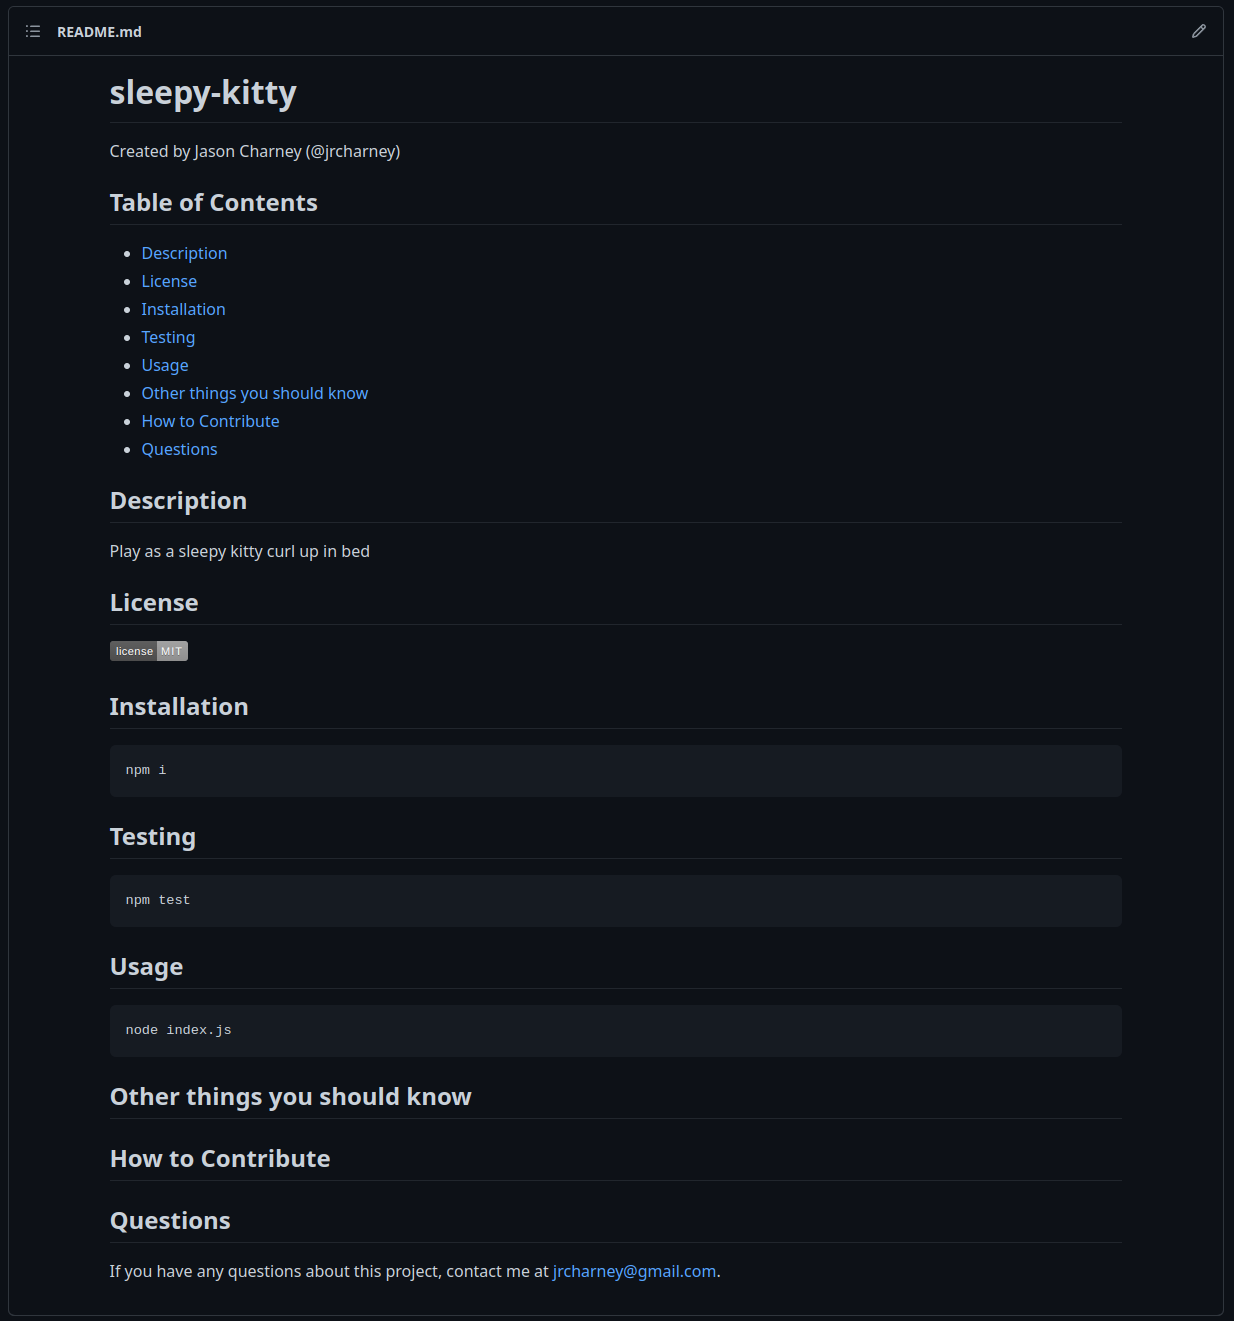
To create Readme files that look like this.
Homework Challenge 9. Due December 5, 2022.
In this assignment, we were to use Node.js to generate a README.md generator. Obviously, it was not used to create this document, but I suppose it can be used to generate the README.md file for HW 10.
This is also the first week we'll be using Node.js, which means this project might have to be hosted on Heroku rather than Github.
A few things worth noting:
licenseis a Go Language script that automatically generates licenses for projects. Node.js'snode initcommand should have this ability to do this at this point.- git-ignore should add a
git ignorecommand to build.gitignorefiles.node initshould have a similar feature. Alternately, gitignore.io (which was why the git-ignore project exists) is still around and will allow to generate a.gitignorefile in the broswer.
These are important things to know because this project does the one thing node init still doesn't do: Generate a README.md.
You need to run this first to download some of the package requirements. The project wanted users to use Node 18, but I'm using Node 16 and everything works fine. It should work for Node 18.
node inode testI wanted to set some stuff up with Jasmine. Didn't really get around to doing that. Oh well, that was optional. I wanted to dig out some old Launchcode stuff I had.
OK, the important part.
node index.jsAS A developer
I WANT a README generator
SO THAT I can quickly create a professional README for a new project
GIVEN a command-line application that accepts user input
WHEN I am prompted for information about my application repository
THEN a high-quality, professional README.md is generated with the title of my project and sections entitled Description, Table of Contents, Installation, Usage, License, Contributing, Tests, and Questions
WHEN I enter my project title
THEN this is displayed as the title of the README
WHEN I enter a description, installation instructions, usage information, contribution guidelines, and test instructions
THEN this information is added to the sections of the README entitled Description, Installation, Usage, Contributing, and Tests
WHEN I choose a license for my application from a list of options
THEN a badge for that license is added near the top of the README and a notice is added to the section of the README entitled License that explains which license the application is covered under
WHEN I enter my GitHub username
THEN this is added to the section of the README entitled Questions, with a link to my GitHub profile
WHEN I enter my email address
THEN this is added to the section of the README entitled Questions, with instructions on how to reach me with additional questions
WHEN I click on the links in the Table of Contents
THEN I am taken to the corresponding section of the README
Dear person who writes these Acceptance Criteria: Please write your instructions with clarity. The sentences shouldn't be this cryptic!
- The application should be invoked with the following command
node index.js.- Make sure the video has the invocation in it.
- Acceptance Criteria fulfilled
- Create a README file
- NOTE: It probably should be a markdown file. I though there was a way to automate a Table of Contents.
- Actually, yeah it does, it is that little hamburger menu up near the top of this section, but I think they want it to be more like this. We should do it like that. Markdown will be faster than HTML anyway.
- Add the title of the project. (Probably
<h1>so starts with#(octothorpe and space) on the first line before a string.)- QUESTION!
- This will be displayed as the title of the README.
- We need the following sections to be generated (Probably
<h2>so starts with##(two octothorpes and a space at the begining of the line beofore a string.))- Description: Enter a description for this project
- QUESTION!
- Preferably the user should fill this out outside of the script but for the requirements of this project we will ask anyway
- Table of Contents: Generate a TOC from all the other sections in this readme.
- GENERATED
- The TOC needs links to the other sections. (Basically,
[Name of section](#name-of-section))
- Installation: Enter the installation instructions
- Placeholder
-
Ask for a step. -
Keep adding steps until the prompt is empty. - Actually, the user should enter this after the file is made. This will made a placeholder for that.
- Usage: Enter usage information
- PLACEHOLDER
- Usage should probably be enclosed in
<pre>block. (Three backticks) at the start and end. - User SHOULDN'T fill this out in the script but a placeholder should be made for it.
- License: Enter the license to use and add an image from Shields.io
- NOT a placeholder
- Create a prompt to add a badge image here and a notice explaing what license the application is covered under.
- Contributing: Enter contribution guidelines
- Again, make a placeholder
- Tests: Enter test instructions
- Placeholder
- Questions: This section is actually used for how to contact the user. (It's redundant since it is on Github!)
- NOT a placeholder!
- Create a prompt for the user to enter their Github Username here.
- Create a prompt for the user to enter their Email address and instructions on how to contact the user.
- Create a README file
- Include the
inquirerpackage. (npm install inquirer) - Create a
.gitignorefile that includesnode_modulesand.DS_Storeso these things aren't tracked or uploaded by Github.- It should also have lines for
package-lock.jsonandyarn-lock.jsonso none of that gets included too.
- It should also have lines for
- Make sure your repo includes
package.jsonfile with the required dependencies. You can create one by runningnpm initwhen you first set up the project. - Include a walkthrough video of the typical user flow through your application. This includes views of the prompts and responses after their selection.
- Video must demonstrate how a user would invoke the application from command line.
- Video must demonstrate how a user would enter responses to all the prompts of the application.
- Video must demonstrate a generated README that matches the user input and has a functioning table of contents.
- Include any other screenshots you deem necessary to help someone who has never been introduced to your application understand the purpose and function of it. This is how you will communicate to potential employers or other developers in the future what you built and why, and to show how it works.
-
Refer to the video submission Guide on the Full-Stack Block for additional Guidance on creating a video.Useless considering it wanted to use Screencastify. - See if we can use some other software to record screen activity. Open Broadcast Software (OBS) can do it.
The good news is that we WON'T need to crete a project page this time around, unless someone didn't bother to list it.
Project 1 was Week 7 and 8.
Yes, but only if you allow it to. I haven't dealt with Node that much (I know, shocker!) to use it that much. Probably for the rest of this course, I will.
You shouldn't. I would recommend installing NVM in case you run into one of those projects that intentionally skip versions of node for no reason. (*cough*MDN*cough*).
The good news, having it won't hurt, and it is easy to install and switch versions. I also recommend adding the line to get nvm working with bash or zsh. It makes working with nvm and node better.
# Install version 16 (this will install version 16, if you have a different version, it will still be there)
nvm install 16
# Switch to version version 16
nvm use 16
# Switch to the system version (I was using version 17)
nvm use systemThat's a pretty good question. One that as a Linux user, I though version 18 would be in the community software repository on my Linux distribution. Unfortunately, there isn't a nodejs-lts-hydrogen in my software repository as of December 1, 2022. It is an issue that I plan on addressing immediately, and it likely has to do with the Linux distribution that I am currently using (Holo which is a fork of Arch Linux meant for the Steam Deck). There are plans this month to move back to a vanilla Arch Linux set up which should have this package.
Ironically, I installed Arch Linux on a computer on December 1, 2022 and it installed Node 19.
- Use Jasmine for unit testing. We SHOULD be using a behavior-driven development (BDD) framework to test our software!
- Aw what the heck. Let's do it! We can always fill in this stuff later. For now, I'll just generate the files.
- Use a shell script to run that command. (e.g.
make_readme.sh)- User should make this file executable using
chmod +x make_readme.shThen run it with./make_readme.sh.
- User should make this file executable using


