This plugin integrates TestFairy platform with the Gradle build system. With this plugin, you can upload signed builds directly via command line, IntelliJ, Android Studio and other IDEs.

A typical TestFairy Gradle Plugin installation takes less than 60 seconds. Installation consists of adding the following to your build.gradle file:
-
Add the TestFairy Maven repository:
maven { url 'https://www.testfairy.com/maven' } -
Add plugin dependency:
classpath 'com.testfairy.plugins.gradle:testfairy:1.+' -
Apply plugin:
apply plugin: 'testfairy' -
Configure your TestFairy API key by adding this to your "android" section: (Your TestFairy API key is in your account settings)
testfairyConfig {
    apiKey "1234567890abcdef"
}
For convenience, here is a snippet of a complete build.gradle file, including the additions above.
buildscript {
    repositories {
        mavenCentral()
        maven { url 'https://www.testfairy.com/maven' }
    }

    dependencies {
        classpath 'com.testfairy.plugins.gradle:testfairy:1.+'
    }
}

apply plugin: 'testfairy'

android {
    testfairyConfig {
        apiKey "1234567890abcdef"
    }
}
With the plugin installed, a set of new tasks, prefixed "testfairy" will be added, one for each build type.
For example: to upload a debug build, run the following from terminal:
gradlew testfairyDebug
Optionally, you can add a changelog to this build. This changelog will appear in your build notes and as a default message when inviting testers. For example:
gradlew -PtestfairyChangelog="Fixed all bugs" testfairyDebug
By default, the Gradle plugin will record all metrics, of highest quality video at 1 frames per second. However, all of these are available through build.gradle configuration. Please consider the following example:
android {
    testfairyConfig {
        metrics "cpu,memory,network,logcat"
        video "wifi"
        videoRate "0.5"
        videoQuality "low"
        maxDuration "15m"
        recordOnBackground true
        iconWatermark true
        testersGroups "dev,qa,friends"
        notify true
        maxDuration "1h"
        autoUpdate true
        uploadProguardMapping true
    }
}
The example above will make sure TestFairy records a low quality video, at a frame every 2 seconds, only if wifi is available. Max session duration for video is 15 minutes, and only cpu, memory, network and logcat metrics are recorded. And watermark will be added to the icon to distinguish TestFairy builds. Previous builds will be automatically updated to latest versions and recorded sessions are capped at 1 hour. Some testers will be invited automatically, and notifications will be sent by email.
For more details about parameter values, see this.
Behind a firewall at work? TestFairy Gradle Plugin supports HTTP proxy via "http.proxyHost" system property. Please refer to the Accessing The Web Via a Proxy section in the Gradle user guide document.
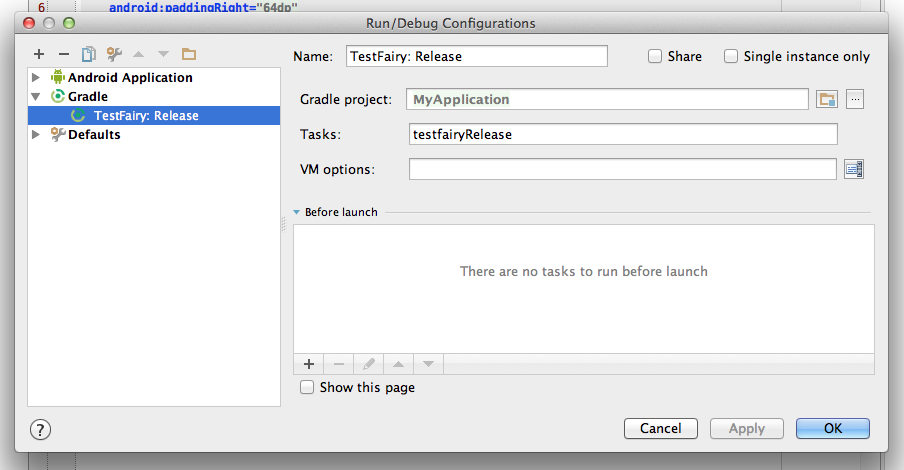
This plugin is also Android Studio and Intellij-friendly. To upload builds directly from your IDE:
- Open "Edit Configuration..." dialog
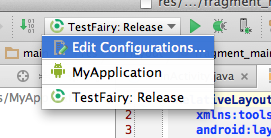
- Add a new Gradle configuration, use task "testfairyDebug" or another, depending on your build type.
1.12 (2015-02-04)
- Removed dependency for 'zip' command.
- Zipalign signed APK before uploading.
- Compatible with JDK 1.6.
Please send bug reports to support@testfairy.com