- Fork and Clone this repo.
- Protocols
- Knowing the Rules
- The Protocol of the Web
- HTTP Requests
- HTTP Responses
- How APIs Build on HTTP
- How Data Formats Are Used In HTTP
- Fetch API
- Sending a Request
- Reading the Response
- Promises
- Async await
- Destructuring
- Object Destructuring
- Array Destructuring
- Rest Operator
- Practical Uses Of Destructuring
- Default Parameters
- Pokedex Project
In JavaScript Module II, we got our bearings by forming a picture of the two sides involved in an API, the server and the client. With a solid grasp on the who, we are ready to look deeper into how these two communicate. For context, we first look at the human model of communication and compare it to computers. After that, we move on to the specifics of a common protocol used in APIs.
People create social etiquette to guide their interactions. One example is how we talk to each other on the phone. Imagine yourself chatting with a friend. While they are speaking, you know to be silent. You know to allow them brief pauses. If they ask a question and then remain quiet, you know they are expecting a response and it is now your turn to talk.
Computers have a similar etiquette, though it goes by the term "protocol". A computer protocol is an accepted set of rules that govern how two computers can speak to each other. Compared to our standards, however, a computer protocol is extremely rigid. Think for a moment of the two sentences "My favorite color is blue" and "Blue is my favorite color." People are able to break down each sentence and see that they mean the same thing, despite the words being in different orders. Unfortunately, computers are not that smart.
For two computers to communicate effectively, the server has to know exactly how the client will arrange its messages. You can think of it like a person asking for a mailing address. When you ask for the location of a place, you assume the first thing you are told is the street address, followed by the city, the state, and lastly, the zip code. You also have certain expectations about each piece of the address, like the fact that the zip code should only consist of numbers. A similar level of specificity is required for a computer protocol to work.
There is a protocol for just about everything, each one tailored to do different jobs. You may have already heard of some: Bluetooth for connecting devices, and POP or IMAP for fetching emails.
On the web, the main protocol is the Hyper-Text Transfer Protocol, better known by its acronym, HTTP. When you type an address like http://example.com into a web browser, the "http" tells the browser to use the rules of HTTP when talking with the server.
With the ubiquity of HTTP on the web, many companies choose to adopt it as the protocol underlying their APIs. One benefit of using a familiar protocol is that it lowers the learning curve for developers, which encourages usage of the API. Another benefit is that HTTP has several features useful in building a good API, as we'll see later. Right now, let's brave the water and take a look at how HTTP works!
Communication in HTTP centers around a concept called the Request-Response Cycle. The client sends the server a request to do something. The server, in turn, sends the client a response saying whether or not the server could do what the client asked.
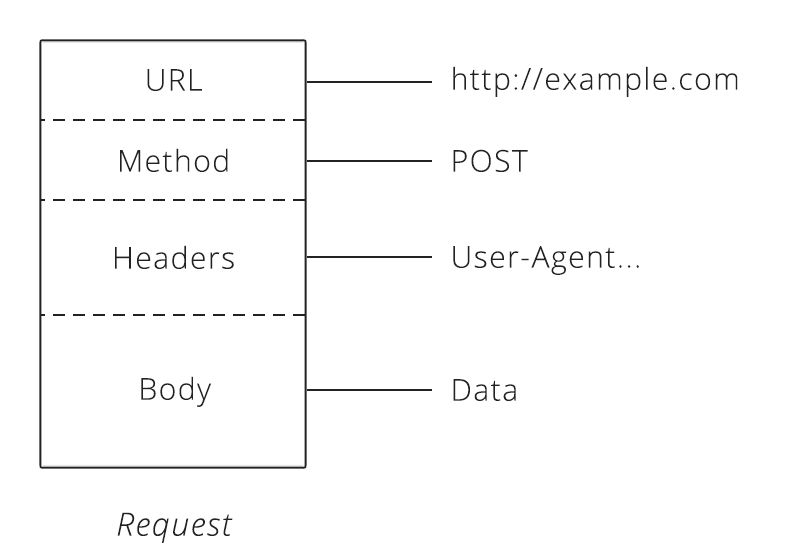
To make a valid request, the client needs to include four things:
- URL (Uniform Resource Locator) 1
- Method
- List of Headers
- Body
That may sound like a lot of details just to pass along a message, but remember, computers have to be very specific to communicate with one another.
URLs are familiar to us through our daily use of the web, but have you ever taken a moment to consider their structure? In HTTP, a URL is a unique address for a thing (a noun). Which things get addresses is entirely up to the business running the server. They can make URLs for web pages, images, or even videos of cute animals.
APIs extend this idea a bit further to include nouns like customers, products, and tweets. In doing so, URLs become an easy way for the client to tell the server which thing it wants to interact with. Of course, APIs also do not call them "things", but give them the technical name "resources."
The request method tells the server what kind of action the client wants the server to take. In fact, the method is commonly referred to as the request "verb."
The four methods most commonly seen in APIs are:
- GET - Asks the server to retrieve a resource
- POST - Asks the server to create a new resource
- PUT - Asks the server to edit/update an existing resource
- DELETE - Asks the server to delete a resource
Here's an example to help illustrate these methods. Let's say there is a pizza parlor with an API you can use to place orders. You place an order by making a POST request to the restaurant's server with your order details, asking them to create your pizza. As soon as you send the request, however, you realize you picked the wrong style crust, so you make a PUT request to change it.
While waiting on your order, you make a bunch of GET requests to check the status. After an hour of waiting, you decide you've had enough and make a DELETE request to cancel your order.
Headers provide meta-information about a request. They are a simple list of items like the time the client sent the request and the size of the request body.
Have you ever visited a website on your smartphone that was specially formatted for mobile devices? That is made possible by an HTTP header called "User-Agent." The client uses this header to tell the server what type of device you are using, and websites smart enough to detect it can send you the best format for your device.
There are quite a few HTTP headers that clients and servers deal with, so we will wait to talk about other ones until they are relevant in later sections.
The request body contains the data the client wants to send the server. Continuing our pizza ordering example above, the body is where the order details go.
A unique trait about the body is that the client has complete control over this part of the request. Unlike the method, URL, or headers, where the HTTP protocol requires a rigid structure, the body allows the client to send anything it needs.
These four pieces — URL, method, headers, and body — make up a complete HTTP request.
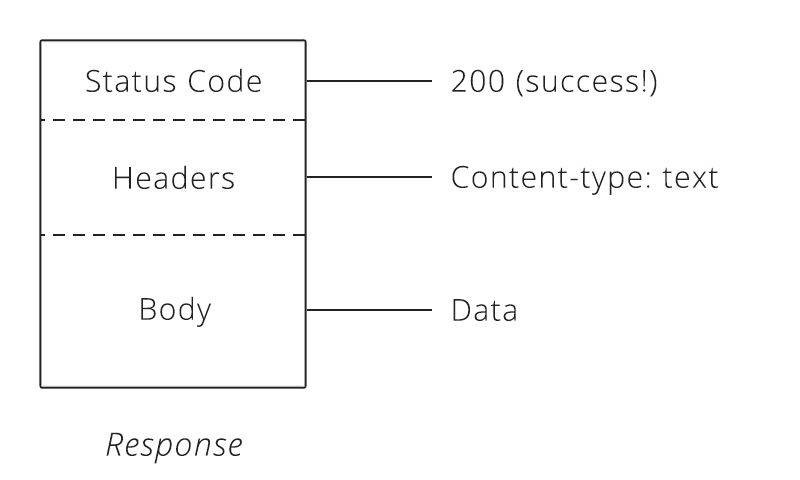
After the server receives a request from the client, it attempts to fulfill the request and send the client back a response. HTTP responses have a very similar structure to requests. The main difference is that instead of a method and a URL, the response includes a status code. Beyond that, the response headers and body follow the same format as requests.
Status codes can be grouped into categories
- 1xx: Informational
- 2xx: Success
- 3xx: Redirection
- 4xx: Client Error
- 5xx: Server Error
If you want a fun look at HTTP status codes, take a look at Status Dogs or Status Cats if you are cat person.
Status codes are three-digit numbers that each have a unique meaning. When used correctly in an API, this little number can communicate a lot of info to the client. For example, you may have seen this page during your internet wanderings:
The status code behind this response is 404, which means "Not Found." Whenever the client makes a request for a resource that does not exist, the server responds with a 404 status code to let the client know: "that resource doesn't exist, so please don't ask for it again!"
There is a slew of other statuses in the HTTP protocol, including 200 ("success! that request was good") to 503 ("our website/API is currently down.") We'll learn a few more of them as they come up in later sections.
After a response is delivered to the client, the Request-Response Cycle is completed and that round of communication over. It is now up to the client to initiate any further interactions. The server will not send the client any more data until it receives a new request.
By now, you can see that HTTP supports a wide range of permutations to help the client and server talk. So, how does this help us with APIs? The flexibility of HTTP means that APIs built on it can provide clients with a lot of business potential. We saw that potential in the pizza ordering example above. A simple tweak to the request method was the difference between telling the server to create a new order or cancel an existing one. It was easy to turn the desired business outcome into an instruction the server could understand. Very powerful!
This versatility in the HTTP protocol extends to other parts of a request, too. Some APIs require a particular header, while others require specific information inside the request body. Being able to use APIs hinges on knowing how to make the correct HTTP request to get the result you want.
As we've previously explored JSON data format, we need to know how to use it in HTTP. To do so, we will say hello again to one of the fundamentals of HTTP: headers. In previous section, we learned that headers are a list of information about a request or response. There is a header for saying what format the data is in: Content-Type.
When the client sends the Content-Type header in a request, it is telling the server that the data in the body of the request is formatted a particular way. If the client wants to send the server JSON data, it will set the Content-Type to "application/json". Upon receiving the request and seeing that Content-Type, the server will first check if it understands that format, and, if so, it will know how to read the data. Likewise, when the server sends the client a response, it will also set the Content-Type to tell the client how to read the body of the response.
Sometimes, the client can only speak one data format. If the server sends back anything other than that format, the client will fail and throw an error. Fortunately, a second HTTP header comes to the rescue. The client can set the Accept header to tell the server what data formats it is able to accept. If the client can only speak JSON, it can set the Accept header to "application/json". The server will then send back its response in JSON. If the server doesn't support the format the client requests, it can send back an error to the client to let it know the request is not going to work.
With these two headers, Content-Type and Accept, the client and server can work with the data formats they understand and need to work properly.
Common Content-Type include:
text/html- HTML web pagetext/css- CSSimage/jpeg- JPEG imageapplication/javascript- JavaScript codeapplication/json- JSON data
The Fetch API is a modern interface that allows you to make HTTP requests to servers from web browsers. In addition, the Fetch API is much simpler and cleaner. It uses the Promise (will be discussed next) to deliver more flexible features to make requests to servers from the web browsers. The fetch() method is available in the global scope that instructs the web browsers to send a request to a URL.
The fetch() requires only one parameter which is the URL of the resource that you want to fetch:
let response = fetch(url);The fetch() method returns a Promise so you can use the then() and catch() methods to handle it:
fetch(url)
    .then(response => {
        // handle the response
    })
    .catch(error => {
        // handle the error
    });
When the request completes, the resource is available. At this time, the promise will resolve into a Response object.
The Response object is the API wrapper for the fetched resource. The Response object has a number of useful properties and methods to inspect the response.
If the contents of the response are in the json format, you can use the json() method. The json() method returns a Promise that resolves with the complete contents of the fetched resource:
fetch(url)
    .then(response => response.json())
    .then(data => console.log(data));
In practice, you often use the async/await with the fetch() method like this:
async function fetchData() {
    let response = await fetch(url);
    let data = await response.json();
    console.log(data);
}fetch() is an asynchronous function. What this function returns is a Promise object. This kind of object has three possible states: pending, fullfilled and rejected. It always starts off as pending and then it either resolves or rejects. Once a promise resolves it runs the then method. This method takes a callback function as an argument and passes the resolved value to it. Take a look:
const url = 'https://randomfox.ca/floof/'

fetch(url).then(response => {
  console.log(response)
})then, just like the asynchronous function that we originally called, fetch, also returns a Promise. What it really means is that we can chain as many thens as we want. If we return a value from the callback passed to then, the Promise returned by the then method will resolve with the callback’s return value. That value will be passed to the callback function of the next then. This might sound complicated but it really isn’t:
const url = 'https://randomfox.ca/floof/'

fetch(url)
    .then(response => {
        return response.json()
    })
    .then(parsedResponse => {
        console.log(parsedResponse)
    })
We call the API and it returns a json string. When that happens, in the then callback, we pass that response to the next then, converting it to a JavaScript object, using the .json method. There we can log the returned value.
When an error occurs, Promise rejects and runs the catch method. Inside of this method we can handle the error. catch accepts a callback and passes the reason of rejection to it. We can chain a catch method with a then like this:
const url = 'https://randomfox.ca/floof/aaaa'

fetch(url)
    .then(response => {
        return response.json()
    })
    .then(parsedResponse => {
        console.log(parsedResponse.image)
    })
    .catch(reason => {
        console.log(reason.toString())
    })
We added catch at the end so that if anything goes wrong inside fetch or any of the attached thens, the catch at the end will handle it. catch returns a Promise just like then. I changed the url to an invalid one so you can see that the catch block works.
As you can see, our code grows from top to bottom instead of getting deeply nested. That way it’s more readable than nested callback functions.
We can shorten our code like this if we want:
const url = 'https://randomfox.ca/floof/aaaa'

fetch(url)
    .then(response => response.json())
    .then(parsed => console.log(parsed.image))
    .catch(reason => console.log(reason.toString()))
Note that you can also pass the error handling function as the second argument to then instead of adding a catch block:
fetch(url).then(handleSuccess, handleFailure)We can simplify our code using the ES7 async await syntax. It is simply a new way of handling Promises.
async function getFox() {
    const url = 'https://randomfox.ca/floof/'
    const res = await fetch(url)
    const jsonRes = await res.json()
    console.log(jsonRes.image)
}

getFox()
We use the async keyword in front of our function to declare an asynchronous function. In such function we can use the await keyword. We use it anytime we would use .then. Such expression pauses the execution of the function and returns the Promise’s value once it resolves.
Async functions return promises. That means we can use then on them:
async function getFox() {
    const url = 'https://randomfox.ca/floof/'
    const res = await fetch(url)
    const jsonRes = await res.json()
    return jsonRes
}

getFox().then(fox => console.log(fox.image))Just like we did with then, we can also add a catch:
async function getFox() {
    const url = 'https://aaa'
    const res = await fetch(url)
    const jsonRes = await res.json()
    return jsonRes
}

getFox()
    .then(fox => console.log(fox.image))
    .catch(reason => console.log(reason.toString()))
But we can also use try…catch:
async function getFox() {
    try {
        const url = 'https://aaa'
        const res = await fetch(url)
        const jsonRes = await res.json()
        return jsonRes
    } catch(e) {
        console.log(e.toString())
    }
}

getFox()
    .then(fox => console.log(fox.image))
If anything in the try block goes wrong, control jumps to catch and passes the reason of rejection to it. Note that it will catch errors in asynchronous actions only if the await keyword is present in front. Otherwise the error will slip by.
Destructuring is a convenient way of extracting multiple values from data stored in (possibly nested) objects and arrays.
It can be used in locations that receive data and the way to extract the values is specified via destructuring patterns.
Before ES6 we had to capture the values individually using dot notation and store them in variables.
With ES6 we can capture the values in an easier way using a destructuring pattern to save the values in variables.
const person = {
  firstName: "Jane",
  lastName: "Doe",
};

// ES5 Way
const firstName = person.firstName;
const lastName = person.lastName;

console.log(firstName); // Jane
console.log(lastName); // Doe

// ES6 Way
const { firstName, lastName } = person;

console.log(firstName); // Jane
console.log(lastName); // DoeIf the property don’t exist on the object we can provide a default value which will be used when the property is undefined.
const person = { firstName: "Jane" };

// ES5 Way
const lastName = person.lastName || "Doe";
console.log(lastName); // Doe

// ES6 Way
const { firstName, lastName = "Doe" } = person;
console.log(lastName); // DoeDestructuring can also be used to capture data from arrays and, in the same way as with objects, we can provide default values.
// we can skip elements with an empty comma
// the `last` item has a default value
let [zero, , , third, , , last = "Empty"] = [
  "Monday",
  "Tuesday",
  "Wednesday",
  "Thursday",
  "Friday",
];

console.log(zero); // Monday
console.log(third); // Thursday
console.log(last); // EmptyWe can use the ...rest operator to capture individual values in variables and all the other variables in an array.
It can also be used in functions to capture the parameters.
const [x, ...y] = ["a", "b", "c"];
console.log(x); // x = 'a';
console.log(y); // y = ['b', 'c']

// also works with function parameters
function args(a, b, ...rest) {
  console.log(a); // 1
  console.log(b); // 2
  console.log(rest); // [3, 4, 5, 6, 7]
}

args(1, 2, 3, 4, 5, 6, 7);// Destructure function parameters
function removeBreakpoint({ url, line, column }) {
console.log(url); // => "the-url"
console.log(line); // => 33
console.log(column); // => 60
}
let options = {
url: "the-url",
line: 33,
column: 60,
};
removeBreakpoint(options);
function returnMultipleValues() {
return {
foo: 1,
bar: 2,
};
}
// Destructure the returned value of a function
const { foo, bar } = returnMultipleValues();
console.log(foo); // => 1
console.log(bar); // => 2function weekDays() {
return ["Monday", "Tuesday", "Wednesday"];
}
// Destructure the returned value of a function
const [monday, ...otherDays] = weekDays();
console.log(monday); // => Monday
console.log(otherDays); // => ["Tuesday", "Wednesday"]Pre ES6, setting a default value to one of the parameters of a function was pretty verbose and long to write.
function compute(num, times) {
  if (num === undefined) {
    num = 1;
  }
  if (times === undefined) {
    times = 1;
  }

  return num * times;
}

let num1 = compute();
console.log(num1); // => 1

let num2 = compute(2);
console.log(num2); // => 2

let num3 = compute(2, 2);
console.log(num3); // => 4
In ES6, now it is much easier to set a default value to the parameters of a function if we don’t provide an argument for each parameter.
// Now it is much easier to set a default value
function compute(num = 1, times = 1) {
  return num * times;
}

let num1 = compute();
console.log(num1); // => 1

let num2 = compute(2);
console.log(num2); // => 2

let num3 = compute(2, 2);
console.log(num3); // => 4
Passing undefined as an argument will trigger the parameter to take the default value.
function compute(num = 1, times = 1) {
  return num * times;
}

let num1 = compute(undefined, 20);
console.log(num1); // => 20

let num2 = compute(undefined, undefined);
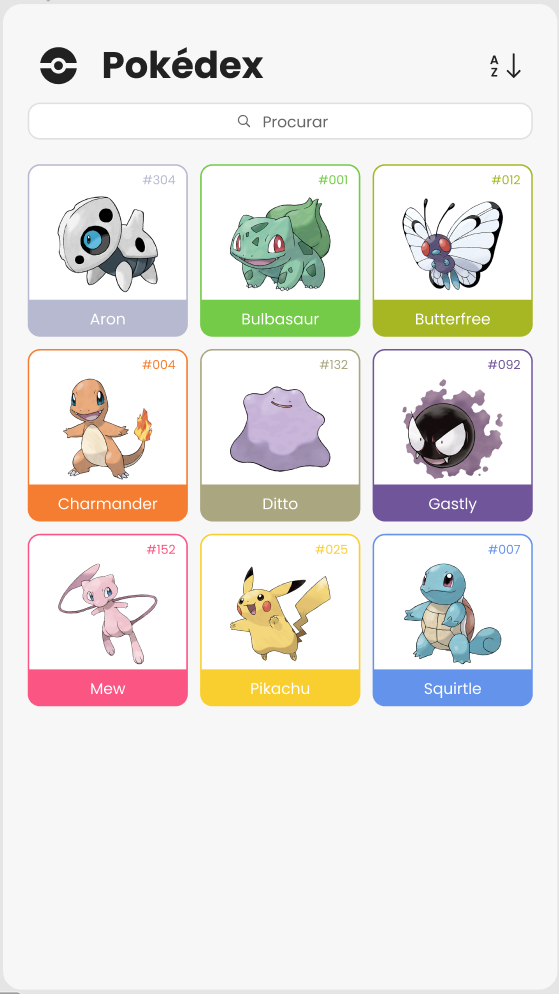
console.log(num2); // => 1In Pokemon lore, the Pokedex is a Pokemon dictionary that the characters carry with them. In this device, they can query the Pokemons and learn details about them, such as, abilities, type of Pokemon, strengths and weaknesses. The different designs of the Pokedex can be found online. Students are encouraged to take examples online and implement them. Here is a sample UI of Pokedex.
Click here -> API Docs
- Develop a search field where users will search for Pokemon’s name or id.
- Create a field and button.
- Add a callback to the button event listener.
- Make a request by Pokemon ID or name. PokeApi already can handle both.
- There are some Pokemons that don’t exist but should, 999 doesn’t exist but 1000 does.
- This is a perfect example of interacting with the response’s status code and adjusting their app to it.
- The default param of the fetch function is a GET method.
- Display important information on the Pokemons. All this information is available on the first REST call to the API.
- Name (Bulbasaur, Charizard, Pikachu)
- Skills (Lighting-rod, static)
- Type of Pokemon (Ghost, Poison, Fire)
- Pokemon Sprites


