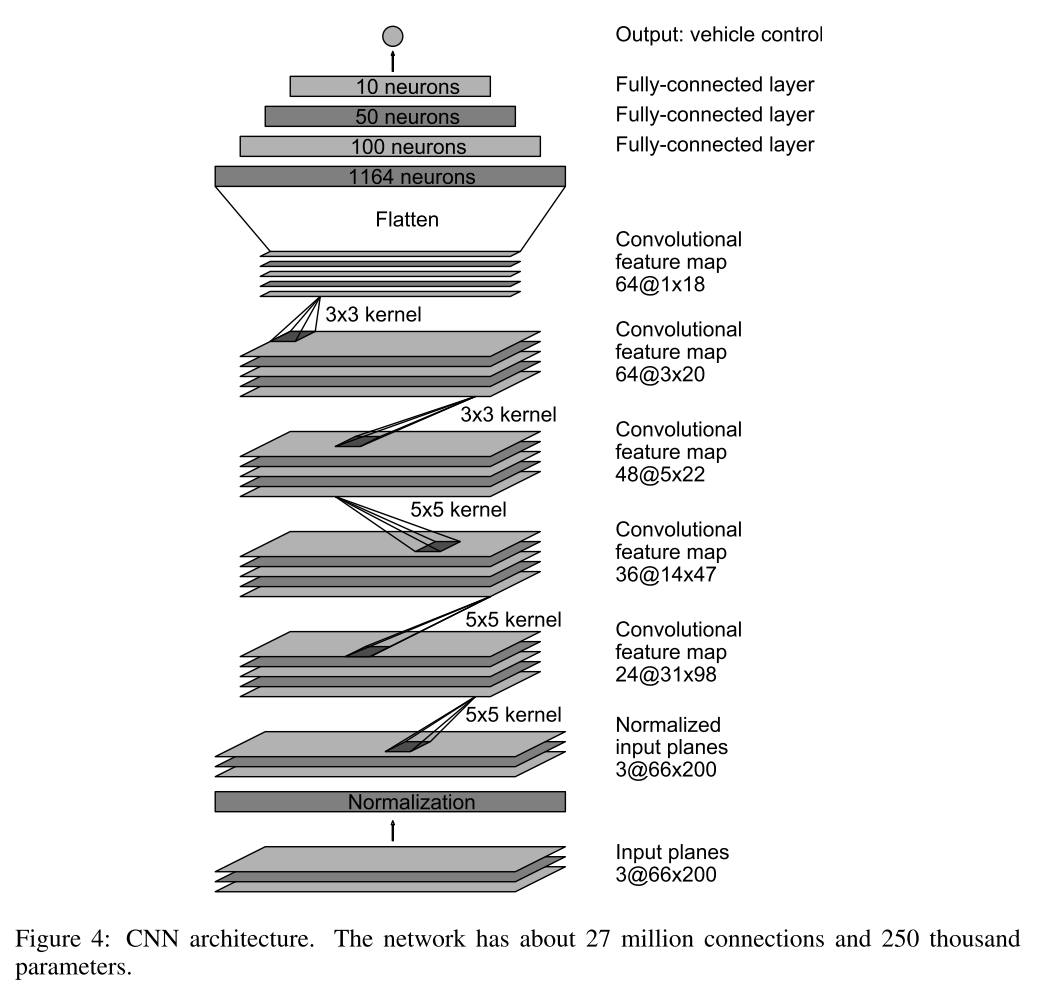
In this project for the Udacity Self-Driving Car Nanodegree a deep CNN is developed that can steer a car in a simulator provided by Udacity. The CNN drives the car autonomously around a track. The network is trained on images from a video stream that was recorded while a human was steering the car. The CNN thus clones the human driving behavior.
The goals / steps of this project are the following:
- Use the simulator to collect data of good driving behavior
- Build, a convolution neural network in Keras that predicts steering angles from images
- Train and validate the model with a training and validation set
- Test that the model successfully drives around track one without leaving the road
- Summarize the results with a written report
Please see the rubric points for this project.
The project includes the following files:
- model.py containing the script to create and train the model
- drive.py for driving the car in autonomous mode
- video.py generates video from images in a directory
The simulated car is equipped with three cameras, one to the left, one in the center and one to the right of the driver that provide images from these different view points. The training track has sharp corners, exits, entries and bridges. The model developed here was trained exclusively on the training track and completes the test track.
The data collection was done on a Windows PC with a Racing Wheel. I drove around the track 2 times one one backwards. I had to adjust the path while importing the images because windows uses "" instead of "/".
For this project I cropped 50 pixels from the top and 20 from the bottom of the images so that the model wasn't distracted by irrelevant information.
Also, to make sure that I had enough information to make the right turn I augmented the data by flipping the image horizontally.
From the beginning I decided to use CNN architecture of NVIDIA

- I shuffled the samples.
- For validation purposes 20% of the training data was held back.
- After few epochs (15) the validation and training loss settle.
- I used an Adam optimizer for training. All training was performed at the fastest graphics setting.
- After the first review of the project I added ModelCheckpoint() to save after each epoch only when there is progress.
- I also generated a graph to visualize the output.
The model was trained on:
Hardware: Processor: Intel i7 Graphics card: GeForce GTX 980
Input Type: Racing Wheel Connectivity: Wired Feature: With Feedback Interface: USB
Software: OS: Ubuntu 15.04 Keras Version: 2.0.3 TensorFlow version: 1.0.1
I use my own environment for testing and soon I realized that I installed Keras 2 and most of the examples were using Keras 1 so I had to update them to work on my machine.
Soon after, I rushed to implement the NVIDIA model right away. I had lot of dropouts and complexity and the car wasn't doing much. Then I started removing most of the model and after a couple it tries it looked like it was finally doing something.
However, it was not enough to complete the test track.
First I started playing with cropping and creating validation samples and adding back parts of the NVIDIA model. This helped and after tweaking epochs and cropping I was surprised when the model cheated it way to finish the track by taking a shortcut.
My next step was to include left and right images and adjust the angle by 0.15. This output a more robust model.
Finally my only problem was the right turn at the end so I tried to flip the images but this created more issues with other parts of the track so I collected more data by driving the track backwards. This really helped and I was able to finally drive the whole track without issues, even changing speed on drive.py.
My reviewer point me to a big problem where I trained the model in BGR format images and my drive.py was using RGB. Changing drive.py to use images in BGR format after reading it allowed me to play a little more with the model to make further improvement.
This made my model more robust and now I was able to use Dropout and even SpatialDropout2D also suggested by the reviewer.
After playing and fine tuning the model I was able to let the model run around the track with no issues at variable speed.
I think the most valuable lesson was to start small, make sturdy improvement, instead of trying to write the perfect model from scratch. I like the model because it keeps things simple and it is easy to work with.
python video.py run1 Creates a video based on images found in the run1 directory. The name of the video will be the name of the directory followed by '.mp4', so, in this case the video will be run1.mp4.
Optionally, one can specify the FPS (frames per second) of the video:
python video.py run1 --fps 48 The video will run at 48 FPS. The default FPS is 60.


