![]()
![]()

Now, support All Notion databases, including NotionNext and General Notion databases, and customise the database list.
现在支持所有Notion数据库,包括NotionNext和一般Notion数据库,以及自定义数据库列表。
- Modify the Edit function for the custom properties. 改进自定义属性的编辑功能
- Support sync with long notes (From
v2.4.0). 从v2.4.0开始支持长笔记同步 - Support custom properties for Notion General database. 支持自定义属性
- Support preview for database details in plugin settings. 支持预览数据库详情
- Support edit for database details in plugin settings. 支持编辑数据库详情
- Support group upload with one click 支持一键多数据库上传
If you want to use this plugin, you need to follow the following steps to set up the plugin. The steps can be divided into two parts: setting up the Notion API and setting up the plugin in Obsidian.
1). Go to Notion API to create a new integration, and copy the token.

2). Create a database in your Notion workspace.
Open Notion, click top-left Create a new page` -> You can give a title for the page and press "/" Select 'Database - Full page'.

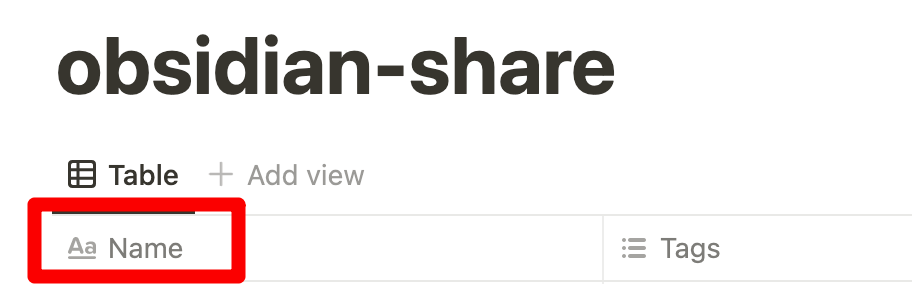
Rename the database properties to title and tags.
title is the title column! tags is lower case

3). Add the Notion API integration.
Click the right-top '...' -> connections -> connect to -> find the integration you created and connect it.

4). Publish the database to the public. Click the 'Share' -> 'Publish' -> 'Publish' -> copy the database id from the URL.

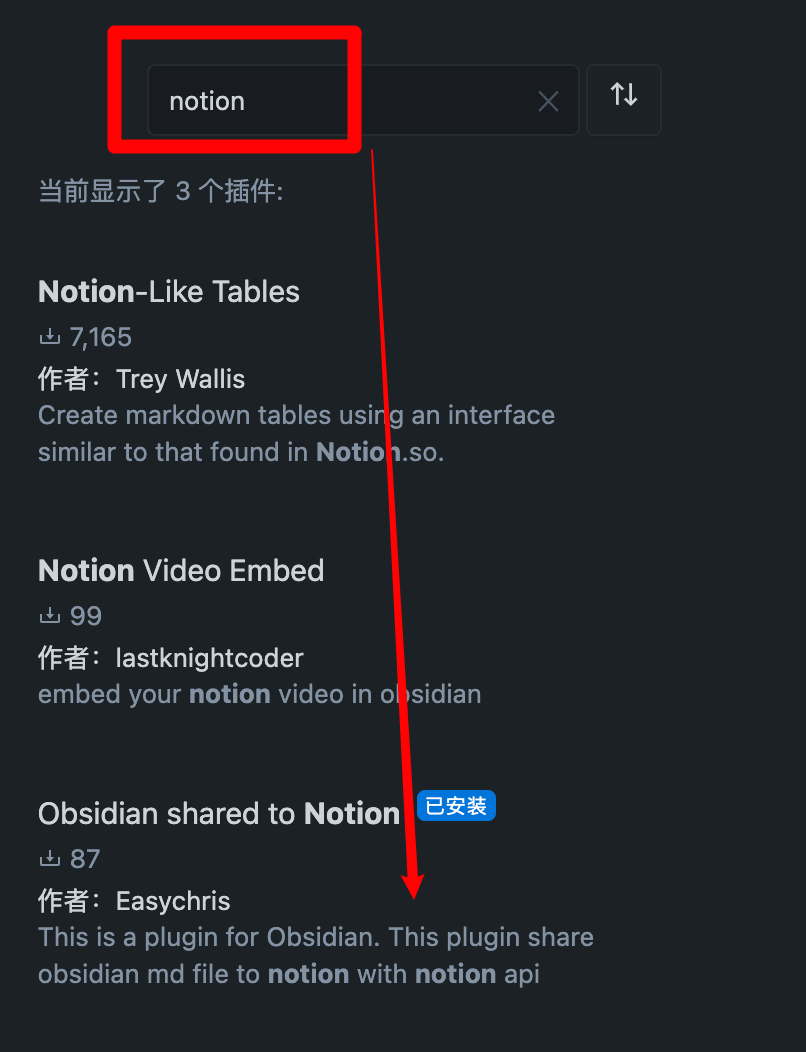
1). Go to Obsidian settings -> community plugins -> search 'NotionNext' -> install it.

2). Open the plugin settings and create a new database.

You can create three types of databases:
General database is the default database, which only has the title and tags columns. title and tags are lowercase

The general is as follows:
- Full Name: the full name that you would like to give to the database.
- Abbreviate Name: the abbreviation that you would like to give to the database.
- Notion tags sync: whether you want to sync the tags column to Notion.
- Customise title property: whether you want to change the
titleto another name (e.g.,name). - Notion API token: the token you copied from the Notion API page.
- Notion Database ID: the database ID you copied from the Notion database URL. (e.g., only copy
7158cd3f70ce4f60afd9da5bdf74fd0cbetweensite/and?.https://jxpeng.notion.site/7158cd3f70ce4f60afd9da5bdf74fd0c?v=380317ac5373sadasdas3c13e618f&pvs=4**)
After setting, it should look like this:

Once you click save, the new database will be created in the plugin settings and display in the detabase list.

If you use NotionNext to set up your website, you can use the NotionNext database. (All the properties are in lowercase, and you do not need to change the properties)

Like the general database, you need to fill in the following information:
- Full Name: the full name that you would like to give to the database.
- Abbreviate Name: the abbreviation that you would like to give to the database.
- Notion API token: the token you copied from the Notion API page.
- Notion Database ID: the database ID you copied from the Notion database URL.
The custom database is purely customised, and you can customise the properties you want to sync. (All the properties are in lowercase, and you do not need to change the properties)

The basic information is identical to the general database and NotionNext database. You need to fill in the following information:
- Full Name: the full name that you would like to give to the database.
- Abbreviate Name: the abbreviation that you would like to give to the database.
- Notion API token: the token you copied from the Notion API page.
- Notion Database ID: the database ID you copied from the Notion database URL.
After adding the information, You can click Add New Property to add the properties you want to sync. There is no limit to the number of properties you can add.

Title column is the main property in the Notion database, which has the open button to open the underlying page. You can select the type of all other properties.

According to the previously shown database, you can use title as the Title column, and Tags as the property 1.

Until now, you have set up the plugin in Obsidian. You can start syncing your notes to Notion.
Create a new note in Obsidian, and fill in the front matter with the properties you want to sync.
For example, we can create a test note with the following front matter:
---
title: test
tags: [test, web]
---

This is a test file.
After creating the note, you can click the Share to NotionNext button on the left sidebar to sync the note to Notion.

We use the following front matter for the NotionNext database:
---
title: test-notionnext
titleicon: 📎
date: 2023-07-23
coverurl: https://img.jxpeng.dev/2023/08/843e27a210847f05a0f7cfb121fec100.jpg
type: Post
slug: test
status: Draft
category: test
summary: this is a summary for test post
icon: fa-solid fa-camera
password: "1234"
tags:
  - test
  - web
NotionID-pengjiaxin: 8ba573de-8fdf-4681-b063-c39d26e7860e
---

this is a test file
Use the previously created general database and rename title to Name and tags to Tags in Notion.

The front matter for the custom database is as follows:
---
Name: test-custom
Tags:
  - test
  - web
---

This is a test file. 
Add more property to the custom database. For example, we can add a summary and date property to the custom database.
1). Click Edit in the plugin settings.

Add and add the summary and date property.

3). After adding the properties, you can see the properties in the plugin settings.

summary and date in Notion

5). Create a new note with the summary and date property.
---
Name: test-custom-more
Tags:
  - test
  - web
summary: this is a summary for test custom
date: 2022-05-03
---

This is a test file.
6). Sync the note to Notion.

Thanks to the original author for developing such a useful plugin that can synchronize Obsidian to Notion. However, the original repository can only sync Name and Tag information. For those like me who use NotionNext to set up their website, this presents some limitations. Every time I import, I need to make a lot of modifications.
Thus, based on the original author's work, I've added a feature to match the NotionNext template. This way, you can edit directly in Obsidian and publish with a single click after organizing.
Original README.md
Many Thanks for the original author's work. I've only made some changes to the original author's work. If you find this plugin useful, please give the original author a star.
![]()
![]()


Share of obsidian to Notion 中文文档
Sharing files from Obsidian to Notion with a single click, and Obsidian will automatically add the Notion share link
You are welcome to offer it a star if it can benefit you.

- support for custom page banner
- update the exsit page
- support for mult language
- support for auto copy the share link to clipboard
- support for mobile
- support tags thank for @jannikbuscha
- transfer the bi-link format like [[]] into the format that Notion supports.
Open obsidian setting -> Add plugin -> Search -> notion
Enter BRAT into the plugin market center to find it.
Add EasyChris/obsidian-to-notion to the list of BRAT plugins that have been installed.
Return to the plugin center and turn it on.
cd YOUR_OBSIDIAN_FOLDER/.obsidian/plugins/
git clone https://github.com/EasyChris/obsidian-to-notion.git
Official reference documentation: https://developers.notion.com/docs
Go to https://www.notion.com/my-integrations
Once created, copy secrets toekn
database first custom name must be "Name", otherwise sync to notion will be failed
Create a new page (with public permissions)
Create a new database in the page -> you need full page database

Add integration to your new database

https://www.notion.so/myworkspace/a8aec43384f447ed84390e8e42c2e089?v=...
                                  | --------- Database ID --------|
Fill the configuration with the NOTION_API_KEY and DATABASE_ID you got

Click the uploadCommand notion button
 A share link will be automatically generated after successful uploadCommand

Banner url must be a image url like: https://i.imgur.com/xxx.jpg If you don't want to use banner, leave it blank
Transfer the Obsidian tags to the Notion table.
It requires the column with the name 'Tags'.

Add tags to your notion page

- open plugin convert tags

- add tags in the head
---
tags: [tag1,tag2]
---

this is test tags
---
tags:
  - tag4
---

this is test tags

Thanks for @jannikbuscha contribution
Notion ID is the your notion site ID that you want to share the file to. if you don't write it, notion will share to the default link like: https://www.notion.so/myworkspace/a8aec43384f447ed84390 that visit this page need to redirect to your site url if you write the Notion ID, it will share to the page link like: https://your_user_name.notion.site/myworkspace/a8aec43384f447ed84390. The visiter don't need to redirect url.
To sync images to your oss or cos bucket, use the Obsidian Image Auto Upload Plugin.
git clone https://github.com/EasyChris/obsidian-to-notion.git
yarn install
yarn dev
node update-version.js
./release.sh
Development Process | Obsidian Plugin Development Documentation
GitHub - devbean/obsidian-wordpress: An obsidian plugin for publishing docs to WordPress.
GitHub - obsidianmd/obsidian-api
GitHub - Quorafind/Obsidian-Memos: A quick capture plugin for Obsidian, all data from your notes.
https://github.com/jannikbuscha/obsidian-to-notion
GNU GPLv3