In previous examples, we had used Relaks to facilitate the retrieval of remote data. In this example we're going to do something different. We're going to build a component that captures video through a webcam. It's meant to demonstrate that Relaks can be used to solve a broad range of problems. It'll also yield a reusable library that we can employ in future projects.
One way to think of Relaks is that it is React with time. Whereas render() produces a picture, renderAsync() produces an animation, composed of multiple pictures appearing at different points in time. When we use Relaks to render a page progressively, we're really creating an animation that looks as follows:
- Frame 1: Message indicating the page is loading
- Frame 2: Page with 60% of the data it needs
- Frame 3: Page with 85% of the data
- Frame 4: Page with 100% of the data
For our video capturing component, we'd create something like this:
- Frame 1: Placeholder graphic while waiting for the user to grant permission to use camera
- Frame 2: Input from camera 1
- Frame 3: Input from camera 2 (after the user made the switch)
- Frame 4: Changes to the UI indicating recording has commenced (after the user pressed the Start button)
- Frame 5: Duration changes to
00:01 - Frame 6: Duration changes to
00:02 - ...
- Frame 64: Duration changes to
01:00 - Frame 65: The recorded video (after the user pressed the Stop button)
This animation runs for a bit longer, naturally. It's also non-linear: The user can affect how it unfolds. Conceptually though, it's not at all different from what we've been creating so far. We're going to employ the same strategy as before: create a regular React component that handles the visual aspects and a Relaks component that handles with the temporal aspects. Meanwhile, the details concerning input devices and video compression will get shoved into a separate reusable class.
- Getting Started
- Live Demo
- Getting Started
- VideoDialogBoxAsync
- VideoDialogBox
- Relak Media Capture
- Taking Photo
- Final Thoughts
You can see the example in action here. It's little more than two lists of buttons. Those in the first list bring up the synchronous part of the video dialog in various states, with video files used as stand-in for camera input. Those in the second list activate the fully functional asynchronous components, wired up to a real camera.
Note: VideoDialogBox and AudioDialoBox will not work in Safari or Edge due to the lack of support for media recording.
To see the code running in debug mode, first clone this repository. In the working folder, run npm install. Once that's done, run npm run start to launch WebPack Dev Server. Open a browser window and enter http://localhost:8080 as the location.
Run npm run start-https if you wish to see the example in a phone or a tablet. Either Chrome or Firefox permits the use of the camera in an insecure page (unless the server is localhost). WebPack Dev Server therefore needs to use HTTPS. The browser will still regard the page as suspect. You'll need to confirm that you really want to go there.
This example was built in a somewhat backward fashion. VideoDialogBoxSync was coded first with the help of dummy props. Once the user interface was finished and the set of necessary props was established, VideoDialogBox was written, which supplies these props to its synchronous partner. The code that actually deals with video recording was written last.
Let us first examine VideoDialogBoxSync (video-dialog-box.jsx). Its propTypes are listed below:
VideoDialogBoxSync.propTypes = {
status: PropTypes.oneOf([
'acquiring',
'denied',
'initiating',
'previewing',
'capturing',
'paused',
'captured',
]),
liveVideo: PropTypes.shape({
stream: PropTypes.instanceOf(MediaStream).isRequired,
width: PropTypes.number.isRequired,
height: PropTypes.number.isRequired,
}),
capturedVideo: PropTypes.shape({
url: PropTypes.string.isRequired,
blob: PropTypes.instanceOf(Blob).isRequired,
width: PropTypes.number.isRequired,
height: PropTypes.number.isRequired,
}),
capturedImage: PropTypes.shape({
url: PropTypes.string.isRequired,
blob: PropTypes.instanceOf(Blob).isRequired,
width: PropTypes.number.isRequired,
height: PropTypes.number.isRequired,
}),
volume: PropTypes.number,
duration: PropTypes.number,
devices: PropTypes.arrayOf(PropTypes.shape({
id: PropTypes.string,
label: PropTypes.string,
})),
chosenDeviceID: PropTypes.string,
onChoose: PropTypes.func,
onCancel: PropTypes.func,
onStart: PropTypes.func,
onStop: PropTypes.func,
onPause: PropTypes.func,
onResume: PropTypes.func,
onClear: PropTypes.func,
onAccept: PropTypes.func,
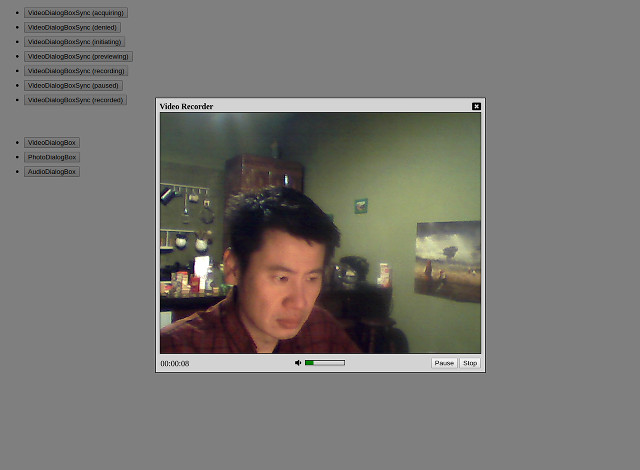
}The capturing process starts with a status of acquiring, when we ask the browser for permission to use the camera. If the user choose not to grant permission, the status changes to denied. Otherwise the status becomes initiating, which last only a brief moment before it changes to previewing. At this point the video stream is available and we can show the user what the camera is seeing.
When the user clicks the Start button, the status changes to capturing. If he clicks the Pause button at some point, the status would change to paused. A click on Resume would change it back to capturing.
When the user finally clicks the Stop button, the status becomes captured.
The prop liveVideo contains a MediaStream object. It represents the live input from the camera. When attached to a <video /> as its srcObject, the element will show the video feed. liveVideo will change when the user select a different camera. It could also change when the user rotate the device.
capturedVideo and capturedImage are the end results of the media capturing operation. The latter is used as a video element's "poster".
volume is a number between 0 and 100 indicating the strength of audio coming from the microphone. It's depicted in a gauge so the user knows his voice is being picked up.
duration is the video length in millisecond. It's available only when the status is capturing, captured, or paused.
devices is a list of cameras that the user's computer is equipped with. It can change when the user plug in a new device. chosenDeviceID is the ID of the selected device.
Let us look at the component's render() method. It's fairly simple. It delegates most of its functionalities to other methods:
render() {
    return (
        <div className="overlay">
            <div className="dialog-box video">
                {this.renderTitle()}
                {this.renderViewport()}
                {this.renderControls()}
            </div>
        </div>
    );
}
renderTitle() is fairly boring. It just draws a div with some text and an icon:
renderTitle() {
    let { onCancel } = this.props;
    return (
        <div className="title">
            Video Recorder
            <i className="fa fa-window-close" onClick={onCancel} />
        </div>
    );
}
renderViewport() is responsible for the component's main contents. It draws a container div and calls another method to render the video itself:
renderViewport() {
    let { status } = this.props;
    let { viewportWidth, viewportHeight } = this.state;
    let style = {
        width: viewportWidth,
        height: viewportHeight,
    };
    let className = `video-viewport ${status}`;
    return (
        <div className={className} style={style}>
            {this.renderVideo()}
        </div>
    );
}
What renderVideo() produces depends on the current status:
renderVideo() {
    let { status, liveVideo, capturedVideo, capturedImage } = this.props;
    let { viewportWidth, viewportHeight } = this.state;
    let videoStyle = {
        width: viewportWidth,
        height: viewportHeight,
    };
    switch (status) {
        case 'acquiring':
            return (
                <span className="fa-stack fa-lg">
                    <i className="fa fa-video fa-stack-1x" />
                </span>
            );
        case 'denied':
            return (
                <span className="fa-stack fa-lg">
                    <i className="fa fa-video fa-stack-1x" />
                    <i className="fa fa-ban fa-stack-2x" />
                </span>
            );
        case 'initiating':
            return <LiveVideo muted />;
        case 'previewing':
        case 'capturing':
        case 'paused':
            return <LiveVideo srcObject={liveVideo.stream} style={videoStyle} muted />;
        case 'captured':
            return <video src={capturedVideo.url} poster={capturedImage.url} style={videoStyle} controls />;
    }
}
We draw some placeholder graphics when we don't have yet the live video feed. Once we have it we show that until we have captured a video.
LiveVideo (live-video.jsx) doesn't do anything aside from rendering a video element. It's a workaround for React's inability to set an element's srcObject.
The live video needs to be muted to avoid audio feedback.
Because the resolution of the camera could be larger than size of the browser, we need to impose a size on the video element so the dialog box does not spill out. The calculation is done in getDerivedStateFromProps():
static getDerivedStateFromProps(props, state) {
    let { liveVideo } = props;
    if (liveVideo) {
        let html = document.body.parentNode;
        let viewportWidth = liveVideo.width;
        let viewportHeight = liveVideo.height;
        let availableWidth = html.clientWidth - 50;
        let availableHeight = html.clientHeight - 100;
        if (viewportWidth > availableWidth) {
            viewportHeight = Math.round(viewportHeight * availableWidth / viewportWidth);
            viewportWidth = availableWidth;
        }
        if (viewportHeight > availableHeight) {
            viewportWidth = Math.round(viewportWidth * availableHeight / viewportHeight);
            viewportHeight = availableHeight;
        }
        return { viewportWidth, viewportHeight };
    }
    return null;
}
The method that draws the controls aren't particularly interesting:
renderControls() {
    return (
        <div className="controls">
            {this.renderDuration() || this.renderDeviceMenu()}
            {this.renderVolume()}
            {this.renderButtons()}
        </div>
    )
}
On the left side of the dialog box we have either the duration or device selection menu. The volume indicator sits in the center, while the buttons are on the right. Methods for rendering these parts are shown below:
renderDeviceMenu() {
    let { devices, chosenDeviceID, duration } = this.props;
    if (!devices || devices.length <= 1) {
        return <div className="devices" />;
    }
    return (
        <div className="devices">
            <select onChange={this.handleDeviceChange} value={chosenDeviceID}>
            {
                devices.map((device, i) => {
                    let label = device.label.replace(/\([0-9a-f]{4}:[0-9a-f]{4}\)/, '');
                    return <option value={device.id} key={i}>{label}</option>;
                })
            }
            </select>
        </div>
    );
}

renderDuration() {
    let { duration } = this.props;
    if (duration === undefined) {
        return null;
    }
    let seconds = duration / 1000;
    let hh = Math.floor(seconds / 3600).toString().padStart(2, '0');
    let mm = Math.floor(seconds / 60 % 60).toString().padStart(2, '0');
    let ss = Math.floor(seconds % 60).toString().padStart(2, '0');
    return <div className="duration">{`${hh}:${mm}:${ss}`}</div>
}

renderVolume() {
    let { status, volume } = this.props;
    if (volume === undefined || status === 'captured') {
        return <div className="volume" />;
    }
    let iconClassName = 'fa';
    if (volume > 40) {
        iconClassName += ' fa-volume-up';
    } else if (volume > 10) {
        iconClassName += ' fa-volume-down';
    } else {
        iconClassName += ' fa-volume-off';
    }
    let barClassName = `volume-bar ${status}`;
    return (
        <div className="volume">
            <i className={iconClassName} />
            <div className="volume-bar-frame">
                <div className={barClassName} style={{ width: volume + '%' }} />
            </div>
        </div>
    );
}

renderButtons() {
    let { status } = this.props;
    let { onCancel, onStart, onPause, onResume, onStop, onClear, onAccept } = this.props;
    switch (status) {
        case 'acquiring':
        case 'denied':
        case 'initiating':
        case 'previewing':
            return (
                <div className="buttons">
                    <button onClick={onCancel}>Cancel</button>
                    <button onClick={onStart} disabled={status !== 'previewing'}>Start</button>
                </div>
            );
        case 'capturing':
            return (
                <div className="buttons">
                    <button onClick={onPause}>Pause</button>
                    <button onClick={onStop}>Stop</button>
                </div>
            );
        case 'paused':
            return (
                <div className="buttons">
                    <button onClick={onResume}>Resume</button>
                    <button onClick={onStop}>Stop</button>
                </div>
            );
        case 'captured':
            return (
                <div className="buttons">
                    <button onClick={onClear}>Retake</button>
                    <button onClick={onAccept} disabled={status !== 'captured'}>Accept</button>
                </div>
            );
    }
}
That's it. VideoDialogBoxSync is pretty much a bog standard React component. I hope you have little difficulty following the code. Now let us move onto its asynchronous partner.
VideoDialogBox video-dialog-box.jsx expects far fewer props: just two handlers:
VideoDialogBox.propTypes = {
    onClose: PropTypes.func,
    onCapture: PropTypes.func,
};
onClose is called when the dialog box should close. onCapture is called after a video is captured. Simple.
In the constructor we create an instance of RelaksMediaCapture. This object will deal with the particulars of video recording.
constructor(props) {
    super(props);
    let options = {
        video: true,
        audio: true,
        preferredDevice: 'front',
        watchVolume: true,
    };
    this.capture = new RelaksMediaCapture(options);
}
We want to record both audio and video, with the front-facing camera as the preferred source. We also want the object to monitor the audio volume.
renderAsync() is where the main action takes place:
async renderAsync(meanwhile) {
    meanwhile.delay(50, 50);
    let props = {
        onStart: this.handleStart,
        onStop: this.handleStop,
        onPause: this.handlePause,
        onResume: this.handleResume,
        onClear: this.handleClear,
        onChoose: this.handleChoose,
        onAccept: this.handleAccept,
        onCancel: this.handleCancel,
    };
    this.capture.activate();
    do {
        props.status = this.capture.status;
        props.devices = this.capture.devices;
        props.chosenDeviceID = this.capture.chosenDeviceID;
        props.liveVideo = this.capture.liveVideo;
        props.duration = this.capture.duration;
        props.volume = this.capture.volume;
        props.capturedImage = this.capture.capturedImage;
        props.capturedVideo = this.capture.capturedVideo;
        meanwhile.show(<VideoDialogBoxSync {...props} />);
        await this.capture.change();
    } while (this.capture.active);
    return <VideoDialogBoxSync {...props} />;
}
The first thing we do is set the non-empty progressive delay to 50ms. By default, this is infinity, meaning calls to meanwhile.show() will be ignored once renderAsync() has succeeded. The behavior makes sense when we're loading data for a page. It doesn't in this situation. We want meanwhile.show() to always show what it's given.
After that we call this.capture.activate() to start the capturing process. Then we enter a do-while loop, in which props for VideoDialogBoxSync are continually updated until the capture object is deactivated.
At first glance this loop might seem disconcerting. It seems like a newbie mistake to wait for change to occur in a loop. Due to JavaScript's single-threaded nature, such a loop would cause the browser to lock up--in normal synchronous code. We're dealing with asynchronous code here, however, so the loop is perfectly okay. Babel will magically transform it into proper callback-style JavaScript.
The usefulness of the loop would be more apparent if we imagine that other actions will take place after we've captured the video. Suppose we want to upload the video to the server. We would handle that in the following manner:
async renderAsync(meanwhile) {
    meanwhile.delay(50, 50);
    let props = {
        /* ... */
    };
    this.capture.activate();
    do {
        /* ... */
        meanwhile.show(<VideoDialogBoxSync {...props} />);
        await this.capture.change();
    } while (this.capture.active);

    this.uploader.queue(this.capture.capturedVideo.blob);
    this.uploader.queue(this.capture.capturedImage.blob);
    this.uploader.activate();
    do {
        props.status = this.uploader.status;
        props.uploadProgress = this.uploader.progress;
        meanwhile.show(<VideoDialogBoxSync {...props} />);
        await this.uploader.change();
    } while(this.uploader.active);
    return <VideoDialogBoxSync {...props} />;
}
Now suppose that after uploading the file, we need to wait for the video to be transcoded. Every few seconds we want to ask the server how much progress it has made. Doing so would be fairly straight forward:
async renderAsync(meanwhile) {
    meanwhile.delay(50, 50);
    let props = {
        /* ... */
    };
    this.capture.activate();
    do {
        /* ... */
        meanwhile.show(<VideoDialogBoxSync {...props} />);
        await this.capture.change();
    } while (this.capture.active);

    this.uploader.queue(this.capture.capturedVideo.blob);
    this.uploader.queue(this.capture.capturedImage.blob);
    this.uploader.activate();
    do {
        /* ... */
        meanwhile.show(<VideoDialogBoxSync {...props} />);
        await this.uploader.change();
    } while(this.uploader.active);

    let { transcodingProgressURL } = this.uploader.result;
    do {
        props.status = 'trancoding';
        props.transcodingProgress = await fetch(transcodingProgressURL);
        meanwhile.show(<VideoDialogBoxSync {...props} />);
        await delay(3000);
    } while (props.transcodingProgress < 100);
    return <VideoDialogBoxSync {...props} />;
}
As you can see, the use of loops allows us to easily slot in addition steps. The imperative coding style makes the program flow very obvious. Even a stranger should have little problem understanding how things unfold.
Anyway, back to the actual code of our example. The event handlers of VideoDialogBox are all very simple:
handleStart = (evt) => {
    this.capture.start();
    this.capture.snap();
}

handleStop = (evt) => {
    this.capture.stop();
}

handlePause = (evt) => {
    this.capture.pause();
}

handleResume = (evt) => {
    this.capture.resume();
}

handleClear = (evt) => {
    this.capture.clear();
}

handleChoose = (evt) => {
    this.capture.choose(evt.id);
}
When the user clicks Start we tell our media-capture object to start recording and take a snapshot of the video feed. When he clicks Stop, we tell it to stop. When clicks Pause, we tell it to pause. And so on.
handleAccept() has a few more lines, but isn't particular complicated:
handleAccept = (evt) => {
    let { onCapture } = this.props;
    let { capturedVideo, capturedImage } = this.capture;
    if (onCapture) {
        let evt = {
            type: 'capture',
            target: this,
            video: {
                blob: capturedVideo.blob,
                width: capturedVideo.width,
                height: capturedVideo.height,
                duration: capturedVideo.duration,
            },
            image: {
                blob: capturedImage.blob,
                width: capturedImage.width,
                height: capturedImage.height,
            },
        };
        onCapture(evt);
    }
    this.capture.deactivate();
    this.handleCancel();
}
Note the call to this.capture.deactivate(). This is what breaks the loop.
Implementation details concerning input devices and video compression are encapsulated in relaks-media-capture. Since it's supposed to be a reusable library, I'm not going to explain the code in depth. I'll simply note what browser features it relies on and point you to the relevant documentation:
- Media Stream API is used to capture video.
- MediaStream Recording API is used to encode video files.
- The toBlob() or toDataURL() method of
HTMLCanvasElementis used to save snapshots. - Web Audio API is used to monitor audio volume.
devicechangeevents of are monitored to detect change in device availability.orientationchangeevents are monitored in order to deal with rotation of a camera in a phone or tablet.endedevents are monitored in case a camera is unplugged during recording.
Letting a user take a picture of himself is probably a more common feature in web applications than video capturing. We can easily accomplish that by stripping down VideoDialogBox. PhotoDialogBox (photo-dialog-box.jsx) is the result.
I hope this example has lent you some new insights into Relaks. As was said earlier, Relaks is React wih time. It lets you tap into the power of ES7 async/await, a feature that greatly simplifies management of asynchronous operations.
Generally it's advisable to separate the visual aspects of a component from its temporal aspects. Juggling three dimensions (possibly four) at once is just too hard. Our brains will have an easier time when a regular React component handles the x, y, and z while a Relaks component manages what occur on the t axis.

In essence we're leveraging the strength of two programming models. The declarative model of React is an intuitive way of describing visual elements. Meanwhile, the imperative model enabled by ES7 async/await is an intuitive way of describing events unfolding over time.
In an future example, we're going to implement the file uploader that appeared in our hypothetical code. Stay tuned!