The Microsoft Omnichannel Add-on is transforming customer engagement through Generative AI technology across various communication channels. It serves as an AI-centric contact center solution compatible with any CRM or third-party (3P) software. This add-on enables customers to leverage Dynamics 365 Omnichannel (OC) along with AI functionalities within their preferred CRM system.
Built upon the Dynamics Contact Center Platform (DCCP) infrastructure, the Omnichannel Add-on extends its capabilities by seamlessly integrating OC and AI features with existing 3P solutions. Agents have the flexibility to utilize the add-on in either Embedded mode, where the 3P CRM serves as the primary user experience (UX) with OC/AI functionalities embedded, or Standalone mode, where Dynamics OC/AI capabilities take precedence while maintaining connectivity with 3P CRM data. You can find more details in (https://microsoft.sharepoint.com/:w:/t/Dynamics365CustomerCareApplications/Ee3vBYzRVh9OqGQgNq0ehj8BSSgmm17L1susO6wn7jKnSQ?e=sii0Le)
- Set up D365 Contact Center embedded experience
- Install Node latest version
- git clone
https://github.com/microsoft/dynamics-365-contact-center.git
The CTI driver serves as a bridge between the Microsoft Omnichannel Add-on and Salesforce CRM, allowing for the integration of telephony features into the CRM environment.
Note: These steps can be omitted if the default CTIDriver file is used.
-
Navigate to /samples/SFExampleCTIDriver
-
Run command
npm install -
Open the file /samples/SFExampleCTIDriver/src/SFExampleCTIDriver.ts
-
Implement your desired functionality within any of the methods provided by the ICTIDriver interface. Refer to the Salesforce OpenCTI Methods Documentation for available methods and their usage.
-
Run command
npm run build, dist/SFExampleCTIDriver.js file will get generated inside /SFExampleCTIDriver folder -
Host the compiled file (dist/SFExampleCTIDriver.js) on a CDN and include the CDN URL as a query parameter in the CCaaS URL.
Note: It does not need to be a CDN URL, any URL with public access will also work
The format of the URL should be:
https://<example-ccaas-domain>/widget/index.html?dynamicsUrl=https://msdynccaasdev.crm.dynamics.com&ctiDriverUrl=<CDN-url>example-ccaas-domain:
https://ccaas-embed-prod.azureedge.netReplace
<CDN-url>with the actual URL of the hosted compiled file on the CDN. -
Update the Salesforce Call center definition file (imported in prerequisite) by replacing the
<ctiDriverUrl>parameter with the URL generated in Step 6.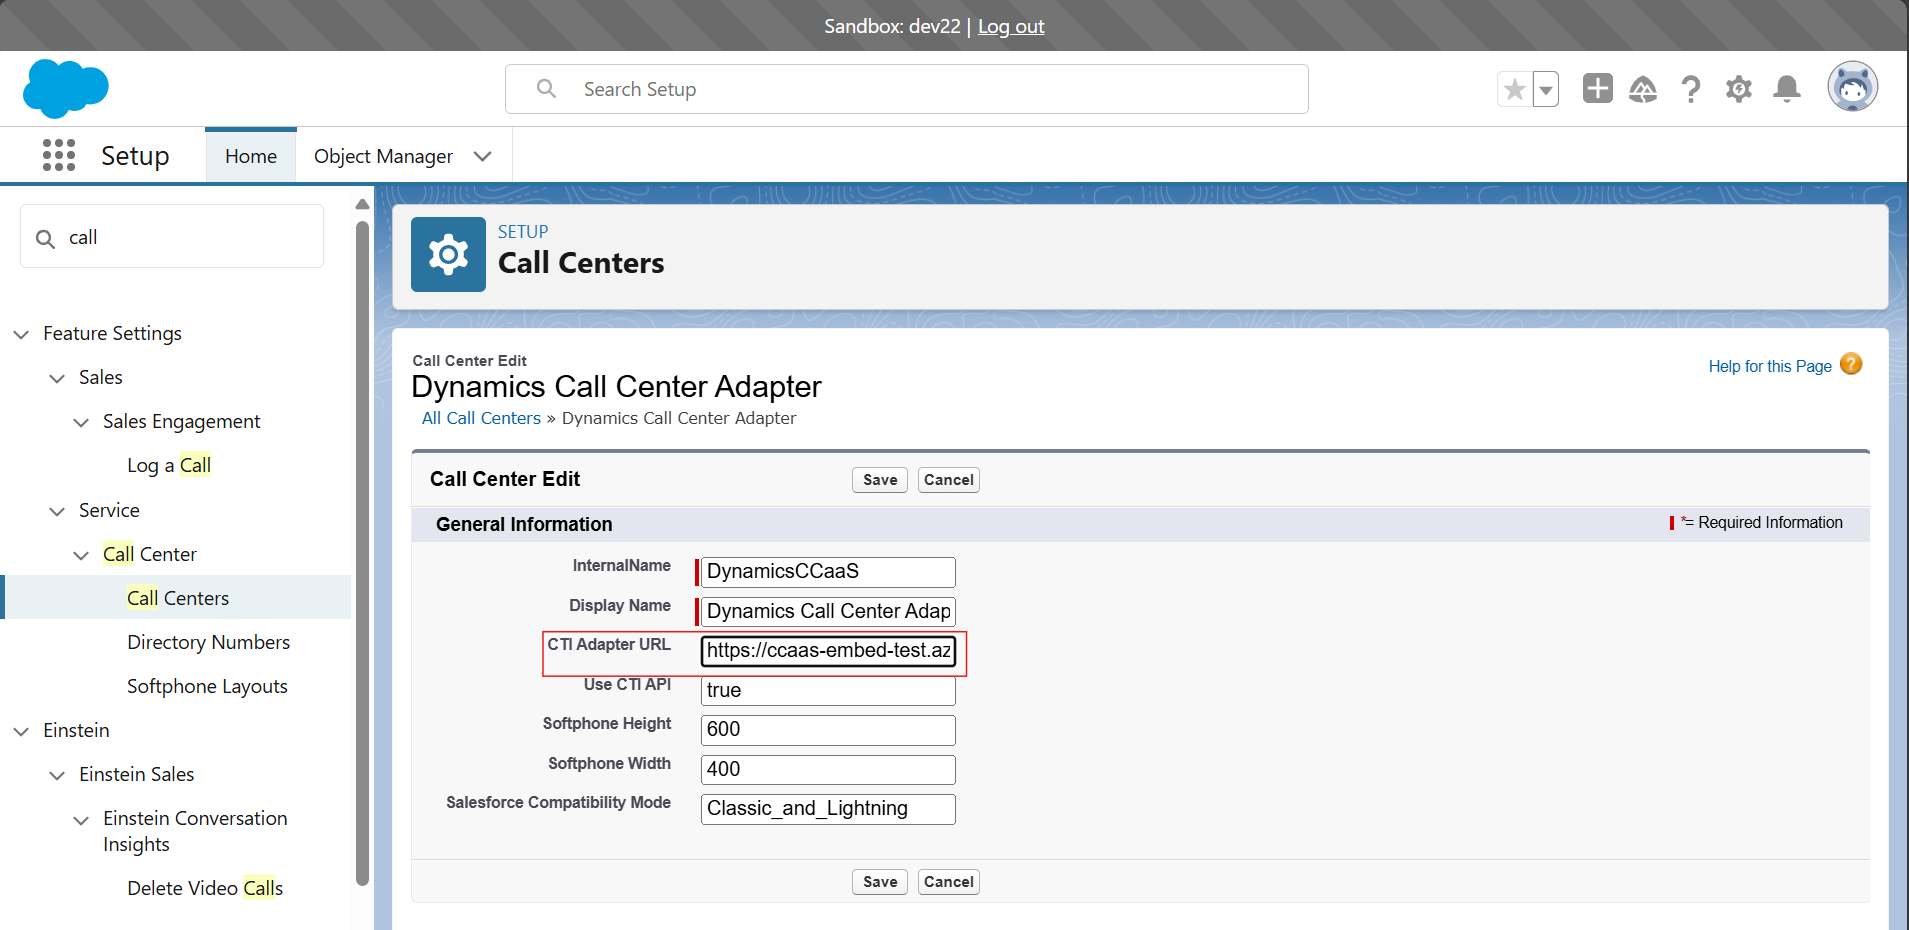
-
Your Salesforce Extension integration is now complete and ready to use.

-
Navigate to /samples/SNExampleCTIDriver
-
Run command
npm install -
Open the file /samples/SNExampleCTIDriver/src/SNExampleCTIDriver.ts
-
Implement your desired functionality within any of the methods provided by the ICTIDriver interface. Refer to the ServiceNow OpenFrame Methods Documentation for available methods and their usage.
-
Run command
npm run build, dist/SNExampleCTIDriver.js file will get generated inside /SNExampleCTIDriver folder -
Host the compiled file (dist/SNExampleCTIDriver.js) on a CDN and include the CDN URL as a query parameter in the CCaaS URL.
Note: It does not need to be a CDN URL, any URL with public access will also work
The format of the URL should be:
https://<example-ccaas-domain>/widget/index.html?dynamicsUrl=https://msdynccaasdev.crm.dynamics.com&ctiDriverUrl=<CDN-url>example-ccaas-domain:
https://ccaas-embed-prod.azureedge.netReplace
<CDN-url>with the actual URL of the hosted compiled file on the CDN. -
Add the above url in the respective OpenFrame Configuration as shown in the screenshot below:
Url to the list of OpenFrame Configuration:
https://<ServiceNow-domain>/now/nav/ui/classic/params/target/sn_openframe_configuration_list.do
-
Your ServiceNow Extension integration is now complete and ready to use.
-
Navigate to
samples/GenericExampleCTIDriver. -
Run
npm installto install the project dependencies. -
Navigate to
GenericExampleCTIDriver/src/GenericExampleCTIDriver.ts. -
Implement the methods defined in
ICTIInterfaceaccording to your CRM requirements. -
Run
npm run buildto compile the project. -
Host the compiled file on a CDN. Include the CDN URL as a query parameter in the CCaaS URL. For example, the CCaaS URL format should be:
https://<example-ccaas-domain>/widget/index.html?dynamicsUrl=https://msdynccaasdev.crm.dynamics.com&ctiDriverUrl=<CDN-url>Replace<CDN-url>with the actual URL of the hosted compiled file on the CDN.Note: It does not need to be a CDN URL, any URL with public access will also work
example-ccaas-domain:
https://ccaas-embed-prod.azureedge.net -
Incorporate this URL into the phone/softphone settings of your CRM.