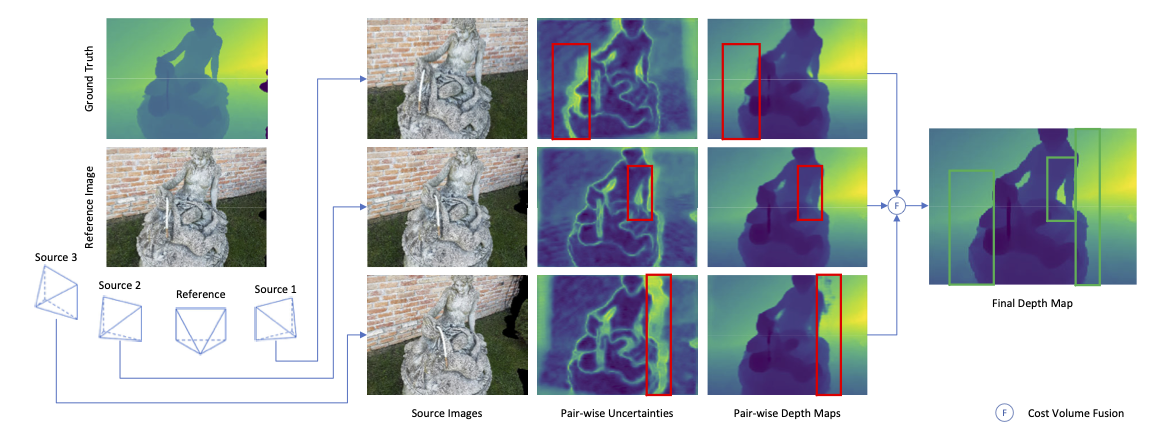
This is the official implementation for the BMVC 2020 paper Visibility-aware Multi-view Stereo Network. In this paper, we explicitly infer and integrate the pixel-wise occlusion information in the MVS network via the matching uncertainty estimation. The pair-wise uncertainty map is jointly inferred with the pair-wise depth map, which is further used as weighting guidance during the multi-view cost volume fusion. As such, the adverse influence of occluded pixels is suppressed in the cost fusion. The proposed framework Vis-MVSNet significantly improves depth accuracies in the scenes with severe occlusion.
The code is tested in the following environment. The newer version of the packages should also be fine.
python==3.7.6
apex==0.1                # only for sync batch norm
matplotlib==3.1.3        # for visualization in val.py and test.py
numpy==1.18.1
opencv-python==4.1.2.30
open3d==0.9.0.0          # for point cloud I/O
torch==1.4.0
tqdm==4.41.1             # only for the progressbar
It is highly recommended to use Anaconda.
You need to install apex manually. See https://github.com/NVIDIA/apex for more details.
Vis-MVSNet requires camera parameters and view selection file. If you do not have them, you can use Colmap to estimate cameras and convert them to MVSNet format by colmap2mvsnet.py. Please arrange your files as follows.
- <dense_folder>
    - images_col  # input images of Colmap
    - sparse_col  # SfM output from colmap in .txt format
    - cams        # output MVSNet cameras, to be generated
    - images      # output MVSNet input images, to be generated
    - pair.txt    # output view selection file, to be generated
An example of running Colmap
colmap feature_extractor \
    --database_path <dense_folder>/database.db \
    --image_path <dense_folder>/images_col

colmap exhaustive_matcher \
    --database_path <dense_folder>/database.db

colmap mapper \
    --database_path <dense_folder>/database.db \
    --image_path <dense_folder>/images_col \
    --output_path <dense_folder>/sparse_col

colmap model_converter \
    --input_path <dense_folder>/sparse_col/0 \
    --output_path <dense_folder>/sparse_col \
    --output_type TXT
Run colmap2mvsnet.py by
python colmap2mvsnet.py --dense_folder <dense_folder> --max_d 256 --convert_formatVis-MVSNet will first resize the inputs (keep aspect ratio). Please determine the target size e.g. 1280,720 for 16:9 image. Then run Vis-MVSNet by
python test.py --data_root <dense_folder> --dataset_name general --num_src 4 --max_d 256 --resize 1280,720 --crop 1280,720 --load_path pretrained_model/vis --write_result --result_dir <output_dir>For depth fusion, please refer to Post-Processing section.
Download the Blended low res set, Tanks and Temple testing set. For more information, please visit MVSNet.
For the pre-processed DTU dataset, please download the rectified images from the official website and ground truth depths and cameras: huggingface. The data should be arranged as
- <data_root>
    - Rectified
        - scan*
            - rect_*.png
    - Cameras
        - *_cam.txt
    - Depths
        - scan*
            - depth_map_*.pfm
First set the machine dependent parameters e.g. dataset dir in sh/dir.json.
Set the job name, and run python sh/bld.py local or python sh/dtu.py local to train the network on BlendedMVS/DTU.
Set the job name to load and the number of sources, and run python sh/bld_val.py local or python sh/dtu_val.py local to validate the network on BlendedMVS/DTU.
Set the dataset dir, dir of the models, job name to load and the output dir, and run sh/tnt.sh or sh/dtu.sh to generate the outputs for point cloud fusion on Tanks and Temples/DTU. (Note that the indexing of your shell should start from 0, otherwise you need to modify the scripts.)
For advanced usage, please see python train.py/val.py/test.py --help for the explanation of all the flags.
max_d and interval_scale is a standard depth sampling. Similar to MVSNet, in the preprocessing, depth_start is kept, depth_interval is scaled by interval_scale, and depth_num is set to be max_d. So if you want to keep the depth range in the cam files, to need to manually ensure max_d*interval_scale=<depth num in the cam file>
cas_depth_num and cas_interv_scale are used in the coarse-to-fine architecture. The number in cas_interv_scale is applied to the depth interval after the preprocessing. As is mentioned in the paper, the first stage consider the full depth range. So the parameters are manually set as depth_num = 256 = 64*4 = cas_depth_num*cas_interv_scale.
Use fusion.py for depth filtering and fusion.
python fusion.py --data <dir_of_depths> --pair <dir_of_pair> --vthresh 4 --pthresh .8,.7,.8where the --data is the same as the --result_dir in test.py. This script uses pytorch so can be accelerated by GPU.
Note that this depth fusion script is different from the one used in the experiments which depends on the Altizure internal library and cannot be released. The provided one is re-implemented so cannot guarantee exactly the same result. But it should still produce results with top tier quality.
- <dir_of_depth>
    - %08d.jpg             # images with the same size as depth maps
    - %08d_flow3.pfm       # depth maps
    - %08d_flow*_prob.pfm  # probability maps with the same size as depth maps
    - cam_%08d_flow3.txt   # cameras with the same size as depth maps
    - all_torch.ply        # fused point cloud
If you find our work useful in your research, please kindly cite
@article{zhang2020visibility,
	title={Visibility-aware Multi-view Stereo Network},
	author={Zhang, Jingyang and Yao, Yao and Li, Shiwei and Luo, Zixin and Fang, Tian},
	journal={British Machine Vision Conference (BMVC)},
	year={2020}
}
- Improved depth fusion
- Update README
- Add
colmap2mvsnet.py - Release high-res DTU depth ground truth
- Add pretrained model (
pretrained_model) - Add script for depth fusion
- Add README
- Add train/val/test scripts
