This tutorial shows you how to boot Linux from a SD card on the UltraZed-EG IOCC board with usage of the PL (FPGA).
- Vivado 2017.2
- Petalinux 2017.2
- UltraZed-EG IOCC (xczu3eg-sfva625-1-i)
-
source ${VIVADO_INSTALL_DIR}/settings64.sh -
Start Vivado with:
vivado -
Create a new project for the UltraZed-EG IOCC (xczu3eg-sfva625-1-i)
-
Create a new AXI4 IP by going to Tools -> Create and Package New IP...
-
Click Next >
-
Choose Create AXI4 Peripheral and click Next >
-
Choose a name (here:
axi_dummy) -
Click Next >
-
Keep the interfaces as they are and click Next >
-
Choose Edit IP and click Next >
-
In the Sources view double click on axi_test_v1_0_S00_AXI_inst ...
-
Navigate to the following section in the verilog code:
// Implement memory mapped register select and read logic generation
// Slave register read enable is asserted when valid address is available
// and the slave is ready to accept the read address.
assign slv_reg_rden = axi_arready & S_AXI_ARVALID & ~axi_rvalid;
always @(*)
begin
    // Address decoding for reading registers
    case ( axi_araddr[ADDR_LSB+OPT_MEM_ADDR_BITS:ADDR_LSB] )
        2'h0   : reg_data_out <= slv_reg0;
        2'h1   : reg_data_out <= slv_reg1;
        2'h2   : reg_data_out <= slv_reg2;
        2'h3   : reg_data_out <= slv_reg3;
        default : reg_data_out <= 0;
    endcase
end
and replace it with:
// Implement memory mapped register select and read logic generation
// Slave register read enable is asserted when valid address is available
// and the slave is ready to accept the read address.
assign slv_reg_rden = axi_arready & S_AXI_ARVALID & ~axi_rvalid;
always @(*)
begin
    // Address decoding for reading registers
    case ( axi_araddr[ADDR_LSB+OPT_MEM_ADDR_BITS:ADDR_LSB] )
        2'h0   : reg_data_out <= slv_reg0;
        2'h1   : reg_data_out <= slv_reg0;
        2'h2   : reg_data_out <= slv_reg2;
        2'h3   : reg_data_out <= 32'hdeadbeef;
        default : reg_data_out <= 0;
    endcase
end
-
Go to Package IP -> Packaging Steps -> File Groups
-
Click on Merge changes from File Groups Wizard
-
Click on Package IP -> Packaging Steps -> Review and Package
-
Click on Re-Package IP
-
Click on Yes
-
Go to Flow Navigator -> Project Manager -> IP INTEGRATOR -> Create Block Design
-
In the Diagram window click right and choose Add IP
-
Search for Zynq and double-click on Zynq UltraScale+ MPSoC
-
Above the Diagram window clock on Run Block Automation
-
Click on OK
-
Double-click on the Zynq UltraSCALE+ in the Diagram window
-
Go to Page Navigator -> I/O Configuration
-
Unfold High Speed in the I/O Configuration window
-
Uncheck Display Port
-
Click on OK
-
In the Diagram window click right and choose Add IP
-
Search for axi dummy and double-click on axi_dummy_v1.0
-
Above the Diagram window clock on Run Block Automation
-
Click on OK
-
Go to the Sources tab and right-click on design_1 (design_1.bd) and choose Create HDL Wrapper
-
Click on OK
-
Go to Flow Navigator -> Project Manager -> PROGRAM AND DEBUG and click Generate Bitstream
-
Click on OK
-
When the synthesis, implementation and writing bitstream is completed click on OK
-
Go to Files -> Export -> Export Hardware...
-
Check Include bitstream and click on OK
-
You may close Vivado now.
- Go to: http://ultrazed.org/support/design/17596/131
- Download (login required) UltraZed IO Carrier Card - PetaLinux 2017.2 Compressed BSP
- Unzip and copy to a desired location
cp uz3eg_iocc_2017_2.bsp ${BSPS}
-
Open a Terminal with
bashother shells may produce problems. -
source ${VIVADO_INSTALL_DIR}/settings64.sh -
source ${PETALINUX_INSTALL_DIR}/settings.sh -
Navigate to the directory where you would like to create your Petalinux project:
cd ${PETALINUX_PARENT_DIR} -
Create a new Petalinux project with:
petalinux-create --type project --name ${PETALINUX_PROJECT_NAME} --source ${BSPS}/uz3eg_iocc_2017_2.bsp -
Go into the Petalinux project directory:
cd ${PETALINUX_PROJECT_PARENT}/${PETALINUX_PROJECT_NAME}(PETALINUX_PROJECT_ROOT=${PETALINUX_PROJECT_PARENT}/${PETALINUX_PROJECT_NAME}) -
Add the with Vivado generated hardware description file:
petalinux-config --get-hw-description ${VIVADO_PROJECT_ROOT}/${VIVADO_PROJECT_NAME}.sdk -
In the config menu do the following (Exit a submenu or the whole configuration menu with [Esc]-[Esc]):
- Go to Subsystem AUTO Hardware Settings ---> Advanced bootable images storage Settings ---> boot image settings ---> image storage media ---> select primary sd.
- Go to Subsystem AUTO Hardware Settings ---> Advanced bootable images storage Settings ---> kernel image settings ---> image storage media ---> select primary sd.
- Go to Subsystem AUTO Hardware Settings ---> Advanced bootable images storage Settings ---> dtb image settings ---> image storage media ---> select primary sd.
- Go to Image Packaging Configuration ---> Root filesystem type ---> select SD card
- Go to Image Packaging Configuration ---> Device node of SD device ---> type
/dev/mmcblk1p2
-
Enable SSH server:
petalinux-config -c rootfsgo to Filesystem Packages ---> console ---> network ---> dropbear select dropbear ([space]). Save and Exit. -
Create an application to interface the AXI4 IP (axi_dummy) on the PL.
petalinux-create --type apps --template c --name axidummy --enable(caution: under line _ is not allowed in application names).- Navigate to:
cd ${PETALINUX_PROJECT_ROOT}/project-spec/meta-user/recipes-apps/axidummy/files/ - Add the following build rule to the
Makefile:
.PHONY clean: -rm -f $(APP) *.elf *.gdb *.o- Replace the code in
axidummy.cwith:
#include <stdio.h>
#include <stdint.h>
#include <stdlib.h>
#include <fcntl.h>
#include <sys/mman.h>

#define AXI_BASE_ADDR 0x80000000

#define SLV_REG0_OFFSET (0*4)
#define SLV_REG1_OFFSET (1*4)
#define SLV_REG2_OFFSET (2*4)
#define SLV_REG3_OFFSET (3*4)

#define MAP_SIZE 4096UL
#define MAP_MASK (MAP_SIZE - 1)

int main(int argc, char **argv)
{
    printf("== START: AXI FPGA test ==\n");

    int memfd;
    void *mapped_base, *mapped_dev_base;
    off_t dev_base = AXI_BASE_ADDR;

    memfd = open("/dev/mem", O_RDWR | O_SYNC);
        if (memfd == -1) {
        printf("Can't open /dev/mem.\n");
        exit(0);
    }

    printf("/dev/mem opened.\n");

    // Map one page of memory into user space such that the device is in that page, but it may not
    // be at the start of the page.
    mapped_base = mmap(0, MAP_SIZE, PROT_READ | PROT_WRITE, MAP_SHARED, memfd, dev_base & ~MAP_MASK);
        if (mapped_base == (void *) -1) {
        printf("Can't map the memory to user space.\n");
        exit(0);
    }
    printf("Memory mapped at address %p.\n", mapped_base);

    // get the address of the device in user space which will be an offset from the base
    // that was mapped as memory is mapped at the start of a page
    mapped_dev_base = mapped_base + (dev_base & MAP_MASK);

    // write to slv_reg0
    *((volatile uint32_t *) (mapped_dev_base + SLV_REG0_OFFSET)) = 42;
    // write to slv_reg1
    *((volatile uint32_t *) (mapped_dev_base + SLV_REG1_OFFSET)) = 23;
    // write to slv_reg2
    *((volatile uint32_t *) (mapped_dev_base + SLV_REG2_OFFSET)) = 84;
    // write to slv_reg3
    *((volatile uint32_t *) (mapped_dev_base + SLV_REG3_OFFSET)) = 46;


    // read from slv_reg0
    printf("0x%08x\n", *((volatile uint32_t *) (mapped_dev_base + SLV_REG0_OFFSET)));
    // read from slv_reg1
    printf("0x%08x\n", *((volatile uint32_t *) (mapped_dev_base + SLV_REG1_OFFSET)));
    // read from slv_reg2
    printf("0x%08x\n", *((volatile uint32_t *) (mapped_dev_base + SLV_REG2_OFFSET)));
    // read from slv_reg3
    printf("0x%08x\n", *((volatile uint32_t *) (mapped_dev_base + SLV_REG3_OFFSET)));


    // unmap the memory before exiting
    if (munmap(mapped_base, MAP_SIZE) == -1) {
        printf("Can't unmap memory from user space.\n");
        exit(0);
    }

    close(memfd);

    printf("== STOP ==\n");

    return 0;
}
- go back to project root:
cd ${PETALINUX_PROJECT_ROOT}
-
Build project for the first time:
petalinux-build -
Package the project for the first time:
petalinux-package --boot --format BIN --fsbl images/linux/zynqmp_fsbl.elf --u-boot images/linux/u-boot.elf --fpga ${VIVADO_PROJECT_ROOT}/${VIVADO_PROJECT_NAME}.runs/impl_1/design_1_wrapper.bit --force -
Convert the bitstream
.bitfile into a.binfile.- create the file
${PETALINUX_PROJECT_ROOT}/build/bootgen.own.bifwith the following content:
the_ROM_image: { [fsbl_config] a53_x64 [bootloader] ${PETALINUX_PROJECT_ROOT}/images/linux/zynqmp_fsbl.elf [pmufw_image] ${PETALINUX_PROJECT_ROOT}/images/linux/pmufw.elf [destination_device=pl] ${VIVADO_PROJECT_ROOT}/${VIVADO_PROJECT_NAME}.runs/impl_1/design_1_wrapper.bit [destination_cpu=a53-0, exception_level=el-3, trustzone] ${PETALINUX_PROJECT_ROOT}/images/linux/bl31.elf [destination_cpu=a53-0, exception_level=el-2] ${PETALINUX_PROJECT_ROOT}/images/linux/u-boot.elf }- Run from the
${PETALINUX_PROJECT_ROOT}the following:bootgen -image build/bootgen.own.bif -arch zynqmp -process_bitstream bin - This generates the
.binfile at:${VIVADO_PROJECT_ROOT}/${VIVADO_PROJECT_NAME}.runs/impl_1/design_1_wrapper.bit.bin
- create the file
-
Create an application to install the bitstream into the root filesystem.
petalinux-create --type apps --template install --name bitstream --enable- Remove the dummy file:
rm project-spec/meta-user/recipes-apps/bitstream/files/bitstream - Copy the bitstream
.binfile into the application files:cp ${VIVADO_PROJECT_ROOT}/${VIVADO_PROJECT_NAME}.runs/impl_1/design_1_wrapper.bit.bin project-spec/meta-user/recipes-apps/bitstream/files - Replace everything from
SRC_URI...inproject-spec/meta-user/recipes-apps/bitstream/bitstream.bbwith:
SRC_URI = "file://design_1_wrapper.bit.bin \ " FILES_${PN} += "/lib/*" S = "${WORKDIR}" do_install() { install -d ${D}/lib ${D}/lib/firmware install -m 0755 ${S}/design_1_wrapper.bit.bin ${D}/lib/firmware } -
Edit the device tree file
- open
project-spec/meta-user/recipes-bsp/device-tree/files/system-user.dtsi - Navigate to
&sdhci0and&sdhci1and adddisable-wp;to both sections:
/* SD0 eMMC, 8-bit wide data bus */ &sdhci0 { status = "okay"; bus-width = <8>; max-frequency = <50000000>; disable-wp; }; /* SD1 with level shifter */ &sdhci1 { status = "okay"; max-frequency = <50000000>; no-1-8-v; /* for 1.0 silicon */ disable-wp; }; - open
-
Clean up the project:
petalinux-build -x distclean -
Build the project for a second time:
petalinux-build -
Package the project for a second time:
petalinux-package --boot --format BIN --fsbl images/linux/zynqmp_fsbl.elf --u-boot images/linux/u-boot.elf --fpga ${VIVADO_PROJECT_ROOT}/${VIVADO_PROJECT_NAME}.runs/impl_1/design_1_wrapper.bit --force
-
Plug the SD card into your PC.
-
Find it with
sudo fdisk -l -
Unmount all partitions with
sudo umount /dev/sdXy -
Run
sudo fdisk /dev/sdX -
Press
dto delete and [Enter] to delete all existing partitions -
Press
pto confirm that all partitions are gone. It should look like this:Disk /dev/sdX: 7948 MB, 7948206080 bytes, 15523840 sectors Units = sectors of 1 * 512 = 512 bytes Sector size (logical/physical): 512 bytes / 512 bytes I/O size (minimum/optimal): 512 bytes / 512 bytes Disk label type: dos Disk identifier: 0x00000000 Device Boot Start End Blocks Id System -
Press
nto create a new partition -
Press
pto make the new partition primary -
Press [Enter] to accept the default (1)
-
Press [Enter] to accept the default (2048)
-
Type
+1Gto give the first partition a size of 1GB and press [Enter] -
Press
nto create a new partition -
Press
pto make the new partition primary -
Press [Enter] to accept the default (2)
-
Press [Enter] to accept the default (2099200)
-
Press [Enter] to accept the default (depends on your SD card size)
-
Press
ato make the first partition the boot partition -
Type
1to select the first partition as the boot partition and press [Enter] -
Press
pto print the new partition table. It should look like this:Disk /dev/sdX: 7948 MB, 7948206080 bytes, 15523840 sectors Units = sectors of 1 * 512 = 512 bytes Sector size (logical/physical): 512 bytes / 512 bytes I/O size (minimum/optimal): 512 bytes / 512 bytes Disk label type: dos Disk identifier: 0x00000000 Device Boot Start End Blocks Id System /dev/sdX1 * 2048 2099199 1048576 83 Linux /dev/sdX2 2099200 15523839 6712320 83 Linux -
Press
wto write the new partition table to the SD card -
Format the first partition as FAT32 with:
sudo mkfs.vfat -F 32 -n boot /dev/sdX1 -
Format the second partition as ext4 with:
sudo mkfs.ext4 -L root /dev/sdX2
- Copy
BOOT.BIN,image.ub, andsystem.dtbto BOOT partition of SD card:cp ${PETALINUX_PROJECT_ROOT}/images/linux/{BOOT.BIN,image.ub,system.dtb} ${BOOT_MOUNT_POINT} - Copy
rootfs.cpio.gzto root partition of SD card:sudo cp ${PETALINUX_PROJECT_ROOT}/images/linux/rootfs.cpio.gz ${ROOT_MOUNT_POINT} - Go to root partition of SD card:
cd ${ROOT_MOUNT_POINT} - Unpack
rootfs.cpio.gz:sudo gunzip rootfs.cpio.gz - Unpack
rootfs.cpio:sudo pax -r -c -f rootfs.cpio - Unmount the BOOT and root partition of SD card.
-
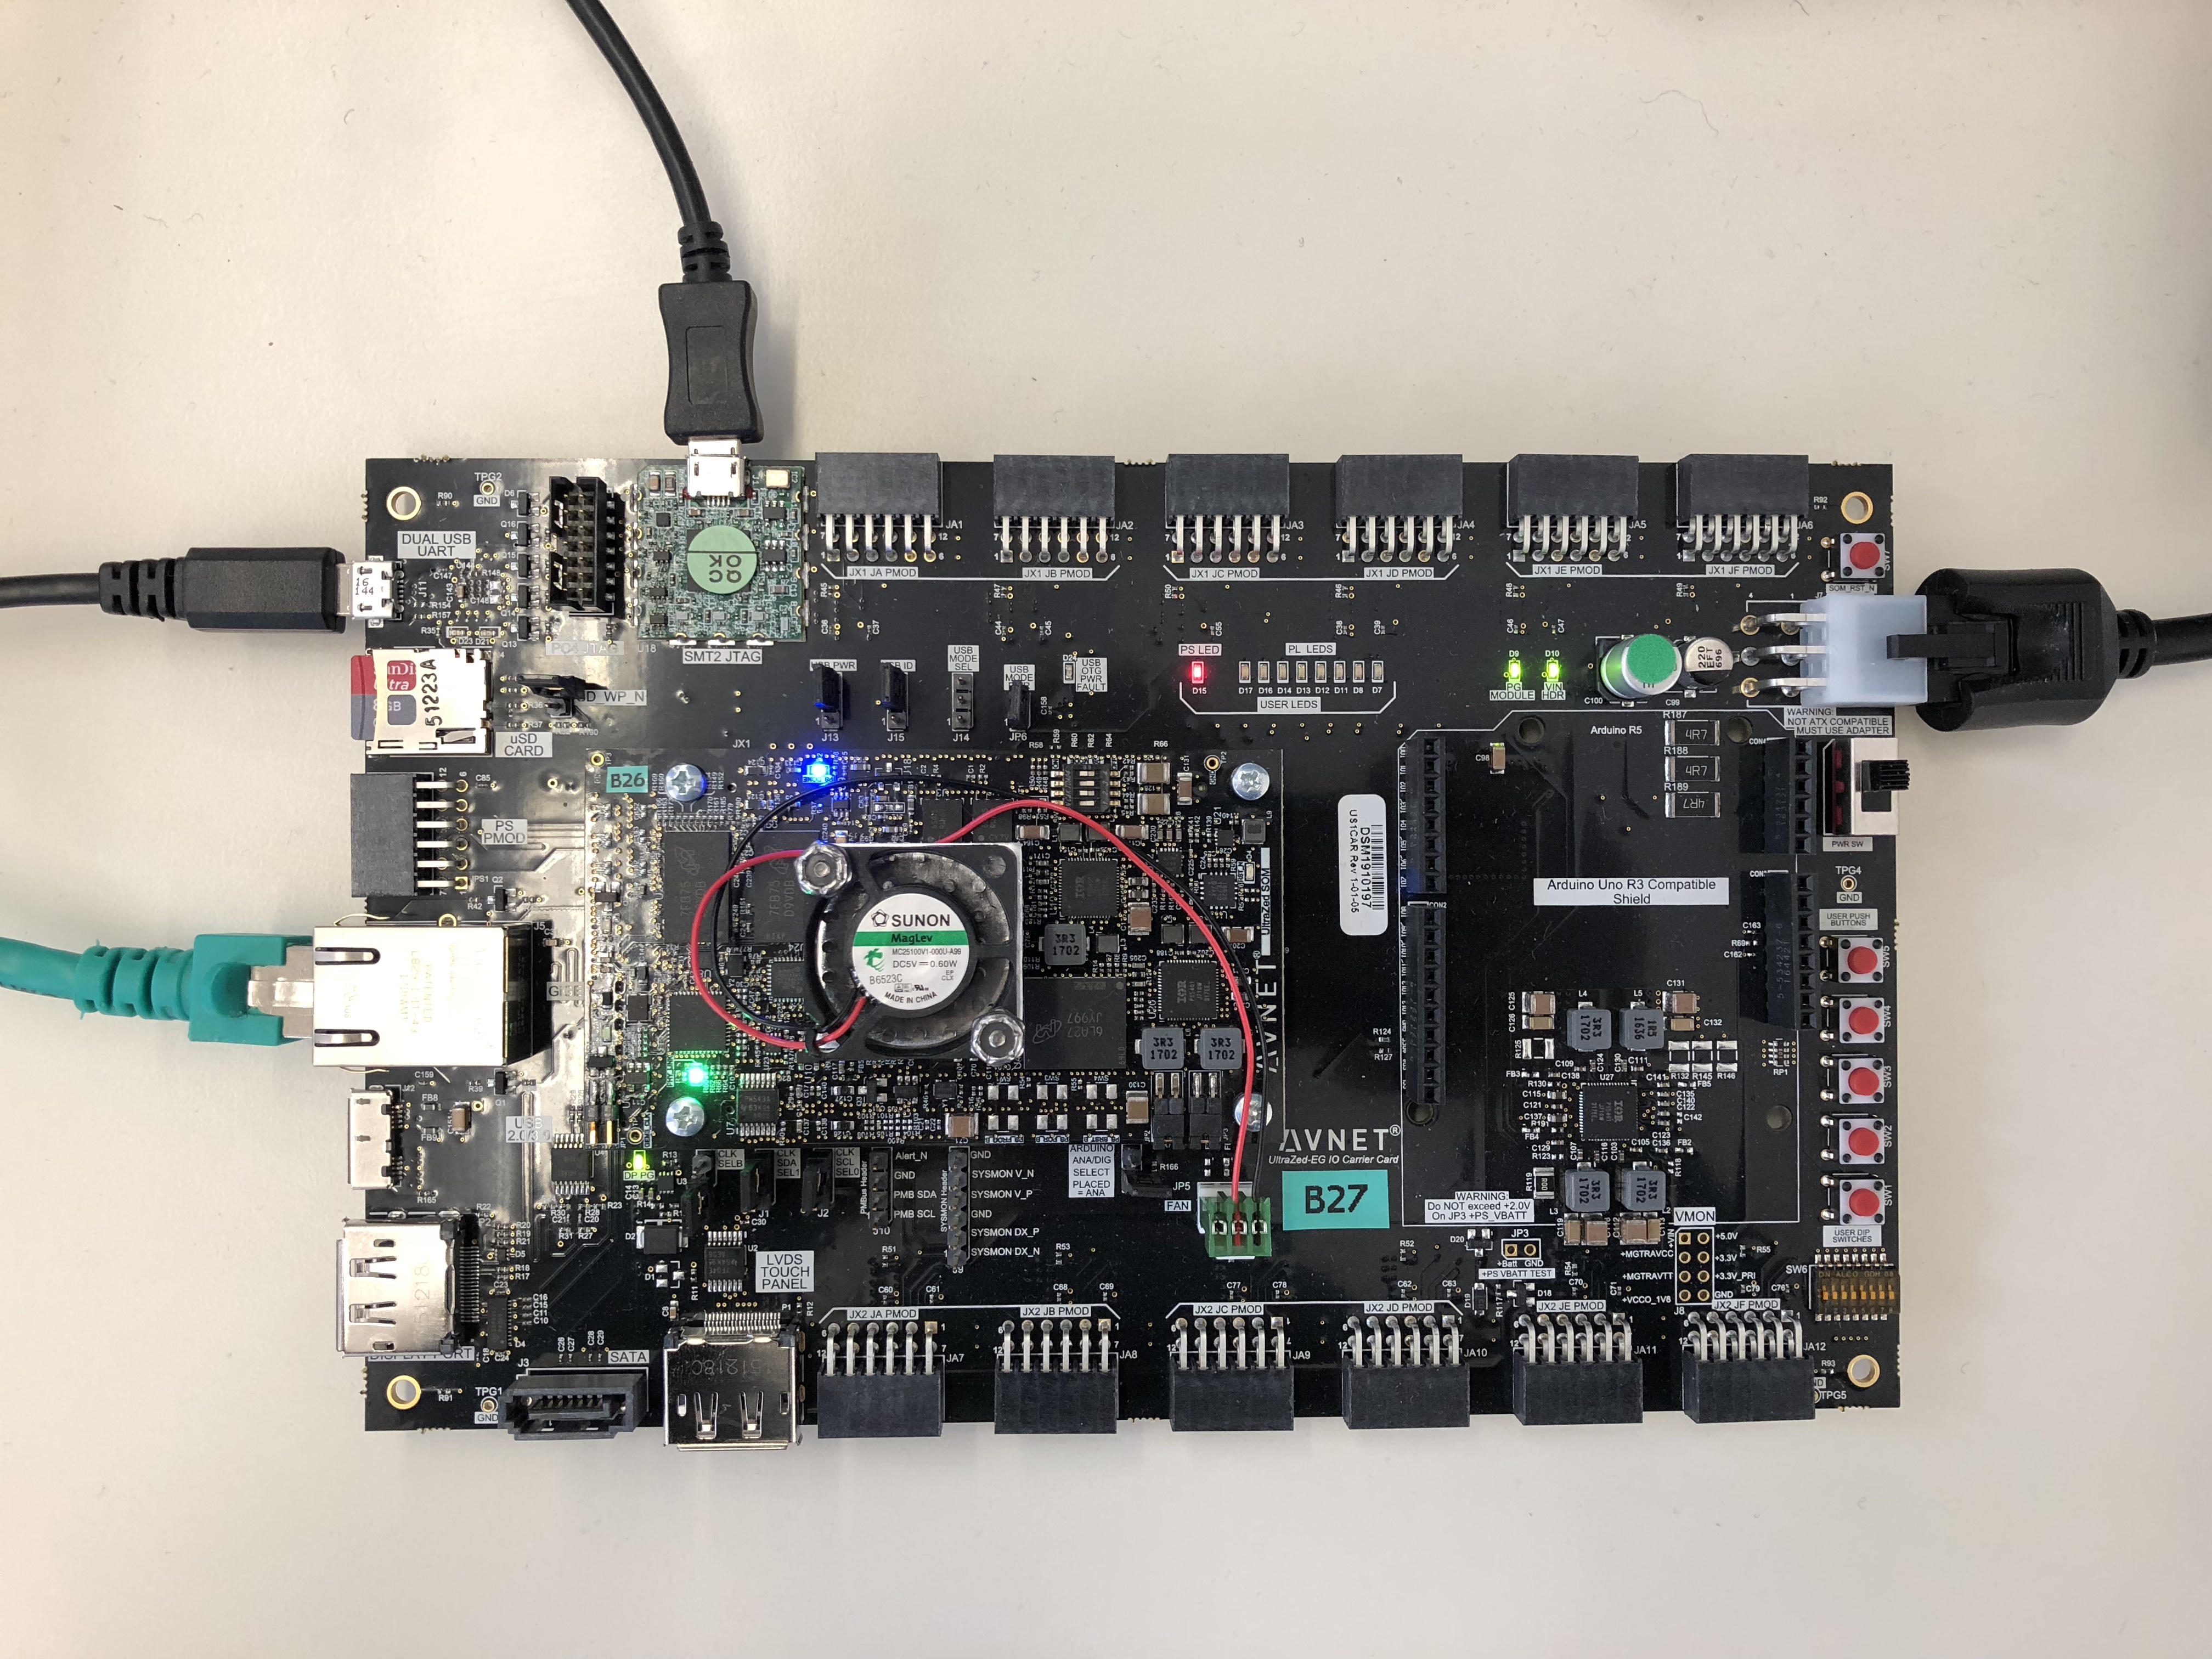
Make sure the board is turned off.
-
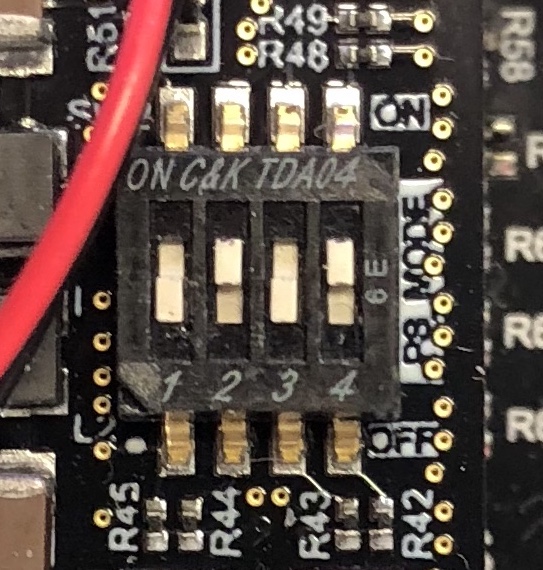
Set the Ultrazed-EG into SD card boot SW2[1:3] = OFF, ON, OFF, ON
-
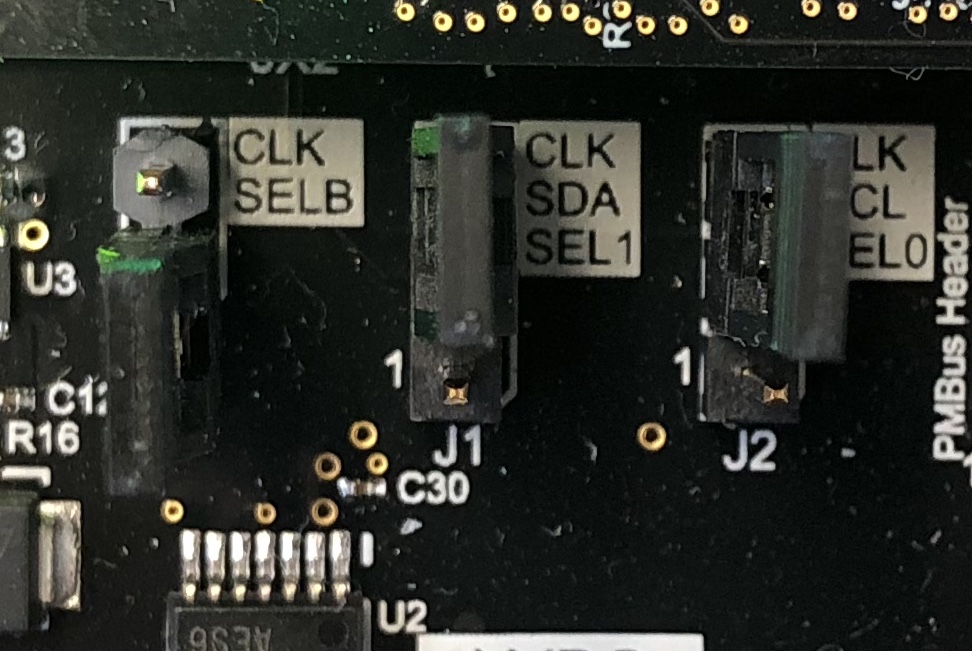
Remove Jumper from JP1 and Put Jumper on J1 and J2 to 2 and 3
-
Connect JTAG and UART USB cables with your PC and the Board.
-
Connect an Ethernet cable with the board and your network.
-
Insert the SD card into the SD card slot.
-
Turn on the board.
-
Open a terminal and connect to the UART 1 with:
picocom /dev/ttyUSB1 -b 115200 -d 8 -y n -p 1 -
Now you should see the boot console.
-
Login with user
rootand passwordroot. (if installed the Ubuntu RootFS login with user:zynqmpand password:zynqmp) -
After login type:
ifconfigto get the IP of the board. The output should look like this:eth0 Link encap:Ethernet HWaddr 00:0A:35:00:22:01 inet addr:${ULTARZED_IP} Bcast:10.42.0.255 Mask:255.255.255.0 inet6 addr: fe80::20a:35ff:fe00:2201%4879704/64 Scope:Link UP BROADCAST RUNNING MULTICAST MTU:1500 Metric:1 RX packets:3 errors:0 dropped:0 overruns:0 frame:0 TX packets:13 errors:0 dropped:0 overruns:0 carrier:0 collisions:0 txqueuelen:1000 RX bytes:702 (702.0 B) TX bytes:1705 (1.6 KiB) Interrupt:30 -
You can now connect via ssh from your PC with:
ssh -o UserKnownHostsFile=/dev/null -o StrictHostKeyChecking=no root@${ULTARZED_IP} -
You can copy files via ssh with:
scp -o UserKnownHostsFile=/dev/null -o StrictHostKeyChecking=no ${SOURCE_FILE} root@${ULTRAZED_IP}:${TARGET} -
To program the PL (FPGA) type:
echo design_1_wrapper.bit.bin > /sys/class/fpga_manager/fpga0/firmware -
Run
axidummyfrom the UltraZed command line to verify that the FPGA design works.
If you update the block design in Vivado and generate a new bitstream the following steps have to be done to update your Petalinux project:
- Update the hardware defintion file in Petalinux:
petalinux-config --get-hw-description ${VIVADO_PROJECT_ROOT}/${VIVADO_PROJECT_NAME}.sdk - Generate a new bitstream
.binfile:${PETALINUX_PROJECT_ROOT}the following:bootgen -image build/bootgen.own.bif -arch zynqmp -process_bitstream bin - Copy the new bitstream
.binfile into the application files:cp ${VIVADO_PROJECT_ROOT}/${VIVADO_PROJECT_NAME}.runs/impl_1/design_1_wrapper.bit.bin project-spec/meta-user/recipes-apps/bitstream/files - Clean up the project:
petalinux-build -x distclean - Build the project:
petalinux-build - Package the project:
petalinux-package --boot --format BIN --fsbl images/linux/zynqmp_fsbl.elf --u-boot images/linux/u-boot.elf --fpga ${VIVADO_PROJECT_ROOT}/${VIVADO_PROJECT_NAME}.runs/impl_1/design_1_wrapper.bit --force - Insert the SD card into your PC
- Copy
BOOT.BIN,image.ub, andsystem.dtbto BOOT partition of SD card:cp ${PETALINUX_PROJECT_ROOT}/images/linux/{BOOT.BIN,image.ub,system.dtb} ${BOOT_MOUNT_POINT} - Copy
rootfs.cpio.gzto root partition of SD card:sudo cp ${PETALINUX_PROJECT_ROOT}/images/linux/rootfs.cpio.gz ${ROOT_MOUNT_POINT} - Unpack
rootfs.cpio.gz:sudo gunzip rootfs.cpio.gz - Unpack
rootfs.cpio:sudo pax -r -c -f rootfs.cpio - Unmount the BOOT and root partition of SD card.
- Go to Boot the UltraZed-EG IOCC Board with SD card
Those steps were adopted from Tom Hoyt's ultrazed_dev repository: https://github.com/twosixlabs/ultrazed_dev
- Download the Ubuntu 16.04 LTS Xenial Daily Build for ARM64 squashfs from http://cdimage.ubuntu.com/ubuntu-server/xenial/daily/current/ (
xenial-server-arm64.squashfs) - Unpack the
xenial-server-arm64.squashfswith:
mkdir ${ROOTFS_DIR}
sudo unsquashfs -f -d ${ROOTFS_DIR} ${DOWNLOADS_DIR}/xenial-server-arm64.squashfs
-
Add a user with sudo permissions:
-
Edit
${ROOTFS_DIR}/etc/passwdand add the following line:zynqmp:x:1337:1337:,,,:/home/zynqmp:/bin/bash -
Edit
${ROOTFS_DIR}/etc/shadowand add the following line:zynqmp:$6$4YGUIFdh$z9VoX0koXXlnGGgkQgu4XlmVRwhB3rGVorCQ4nl.UHPtiRsJJ/4zjuRWOEdQ3q.CSr8eArdTEWMFSPrcwjE4G1:17504:0:99999:7::: -
Edit
${ROOTFS_DIR}/etc/gshadowand add the following line:zynqmp:!:: -
Edit
${ROOTFS_DIR}/etc/groupand add the following line:zynqmp:x:1337:and edit the the line
sudo:x:27:to look like this:sudo:x:27:zynqmp -
Create a home directory for the user
zynqmpwith:sudo mkdir ${ROOTFS_DIR}/home/zynqmp
-
-
Edit
${ROOTFS_DIR}/etc/hostnameto look like this:ultrazed -
Edit
${ROOTFS_DIR}/etc/hoststo look like this:127.0.0.1 localhost 127.0.1.1 ultrazed -
Edit
${ROOTFS_DIR}/etc/apt/sources.listto look like this:deb http://ports.ubuntu.com/ubuntu-ports/ xenial main deb http://ports.ubuntu.com/ubuntu-ports/ xenial universe deb http://ports.ubuntu.com/ubuntu-ports/ xenial multiverse deb http://ports.ubuntu.com/ubuntu-ports/ xenial-security main deb http://ports.ubuntu.com/ubuntu-ports/ xenial-updates main deb http://ports.ubuntu.com/ubuntu-ports/ xenial-updates universe deb http://ports.ubuntu.com/ubuntu-ports/ xenial-updates multiverse -
Edit
${ROOTFS_DIR}/etc/fstabto look like this:/dev/mmcblk1p2 / auto errors=remount-ro 0 1 /dev/mmcblk1p1 /boot auto defaults 0 2 -
Insert the SD card into your PC
-
Copy
BOOT.BIN,image.ub, andsystem.dtbto BOOT partition of SD card:cp ${PETALINUX_PROJECT_ROOT}/images/linux/{BOOT.BIN,image.ub,system.dtb} ${BOOT_MOUNT_POINT} -
Copy
rootfs.cpio.gzto root partition of SD card:sudo cp ${PETALINUX_PROJECT_ROOT}/images/linux/rootfs.cpio.gz ${ROOT_MOUNT_POINT} -
Now instead of copying the Petalinux
rootfs.cpiothe Ubuntu RootFS will be copied to the root part of the SD card:sudo cp -a ${ROOTFS_DIR}/. ${ROOT_MOUNT_POINT}/ -
Unmount the BOOT and root partition of SD card.
-
Go to Boot the UltraZed-EG IOCC Board with SD card


