Microcontroller Mousejack is a project to get Mousejack attacks into a small embedded device, with the form factor of a key chain.
Our first iteration uses an Adafruit Feather 32u4 protoboard and a SPI-based NRF24L01+ module.
Building the device is straight-forward, and the code provides a tool to use Duckyscript to launch automated keystroke injection attacks against Microsoft and Logitech devices.
To build your own device you'll need the following components:
- Adafruit Feather 32u4 protoboard or another Arduino-compatible board of your choice.
- An SPI-based NRF24L01+ module. Buying an amplified NRF24 module with an external antenna is highly recommended.
- A LiPo battery. A 500mAh battery will run for about 20 hours.
- A case to house the components. A Hammond 1551KTBU works nicely. You can usually buy these at your local electronics store.
- A 10μF and a 0.1μF capacitor to help stabilize the voltage for the NRF24 module (it's finicky).
- Double-sided adhesive tape, or mounting hardware. Depending on how polished you'd like the final product to be.
- Tools: Wire strippers, side cutters, a good soldering iron.
- Basics, such as solder, polyamide tape, small flexible multicolor wire.
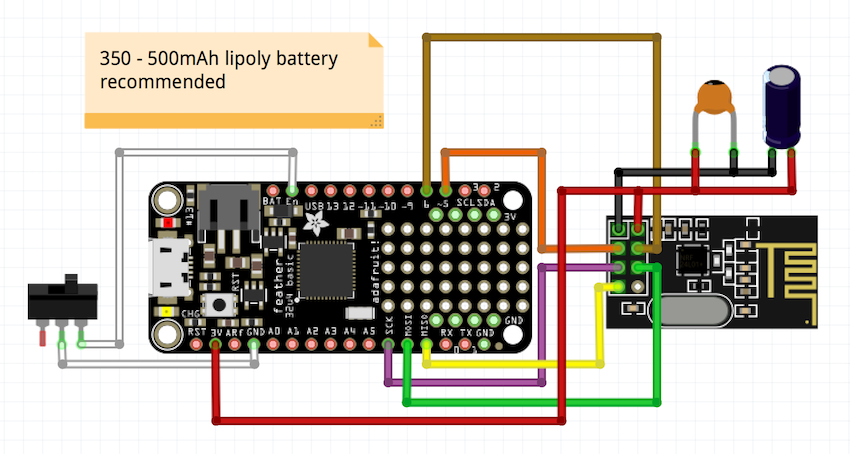
The Fritzing diagram below shows the wiring layout used in the prototype design:
The capacitors shown above are 10μF and 0.1μF. Also note that soldering the NRF24 module directly into the Feather protoboard helps keep things compact.
To build the software, download and install the PlatformIO IDE. It sucks much less than the Arduino IDE.
Before building the software, be sure to modify the attack.h file using the attack_generator.py script:
uC-mousejack $ cd tools
tools $ ./attack_generator.py ducky.txt
In the example above, the ducky.txt file contains our Duckyscript. The attack_generator.py script will "compile" the ducky script into the attack.h file, which is included in main.cpp. This simplifies the code and makes it more compact.
Once you power the device on, the internal LED connected to pin 13 (called ledpin in the code), will blink two times for each pass over the entire channel range. When it sends an attack, the LED will glow solid.
If you monitor the serial port using the PlatformIO IDE, you will see a lot of debugging information being printed while scanning and during attack.
Warning: No interaction is required to initiate an attack. Be careful where you use this device. We do not accept any responsibility for how this tool is used.
Our next iteration will feature a micro-Python version using the ESP8266-based Adafruit Huzzah module. This will provide the capability to load new attacks and obtain diagnostic information using your smartphone (via Wifi).
It's also possible (and fairly easy) to adapt our code to use an OLED display, microSD card, or any other interaction you can think of. Feel free to fork the code and make something cooler.

