


Apple introduced a new UI Testing feature starting from Xcode 7 that is, quoting Will Turner on stage at the WWDC, a huge expansion of the testing technology in the developer tools. The framework is easy to use and the integration with the IDE is great however there is a major problem with the way tests are launched. Testing code runs as a separate process which prevents to directly share data with the app under test making it hard to do things like dynamically inject data or stub network calls.
With SBTUITestTunnel we extended UI testing functionality allowing to dynamically:
- stub network calls
- interact with NSUserDefaults and Keychain
- download/upload files from/to the app's sandbox
- monitor network calls
- define custom blocks of codes executed in the application target
The library consists of two separated components which communicate with each other, one to be instantiate in the application and the other in the testing code. A web server inside the application is used to create the link between the two components allowing test code to send requests to the application.
Requires iOS 8.0 or higher.
We strongly suggest to use cocoapods being the easiest way to embed the library inside your project.
Your Podfile should include the sub project SBTUITestTunnel/Server for the app target and SBTUITestTunnel/Client for the UI test target.
target 'APP_TARGET' do
  pod 'SBTUITestTunnel/Server'
end
target 'UITESTS_TARGET' do
  pod 'SBTUITestTunnel/Client'
end
🔥 If you’re using CocoaPods v1.0 and your UI Tests fail to start, you may need to add $(FRAMEWORK_SEARCH_PATHS) to your Runpath Search Paths in the Build Settings of the UI Test target!
Add files in the Server and Common folder to your application's target, Client and Common to the UI test target.
On the application's target call SBTUITestTunnelServer's takeOff method on top of application(_:didFinishLaunchingWithOptions:).
import UIKit
import SBTUITestTunnel

@UIApplicationMain
class AppDelegate: UIResponder, UIApplicationDelegate {
    var window: UIWindow?

    func application(application: UIApplication, didFinishLaunchingWithOptions launchOptions: [NSObject: AnyObject]?) -> Bool {
        #if DEBUG
            SBTUITestTunnelServer.takeOff()
        #endif

        return true
    }
}
To use the framework you're required to define DEBUG=1 or ENABLE_UITUNNEL=1 in your preprocessor macros build settings. This is needed to make sure that test code doesn't end by mistake in production. Make sure that these macros should be defined in both your application target and Pods project.
Nothing particular needs to be done if you'll be running your test code with a build configuration that already defines DEBUG=1. This is the case of the default debug build configuration which is the one used in most cases when running test. Just make sure to wrap all calls to the framework around #if DEBUGs as shown in the example above or you may end up getting linking errors that might look something like:
Undefined symbols for architecture i386:
  "_OBJC_CLASS_$_SBTUITestTunnelServer", referenced from:
      type metadata accessor for __ObjC.SBTUITestTunnelServer in AppDelegate.o
ld: symbol(s) not found for architecture i386
clang: error: linker command failed with exit code 1 (use -v to see invocation)
In some advanced cases the DEBUG=1 may not be defined in your application's target or Pods project. This can happen when using some customly named build_configurations (ie QA) where Cocoapods doesn't automatically set the DEBUG preprocessors for you.
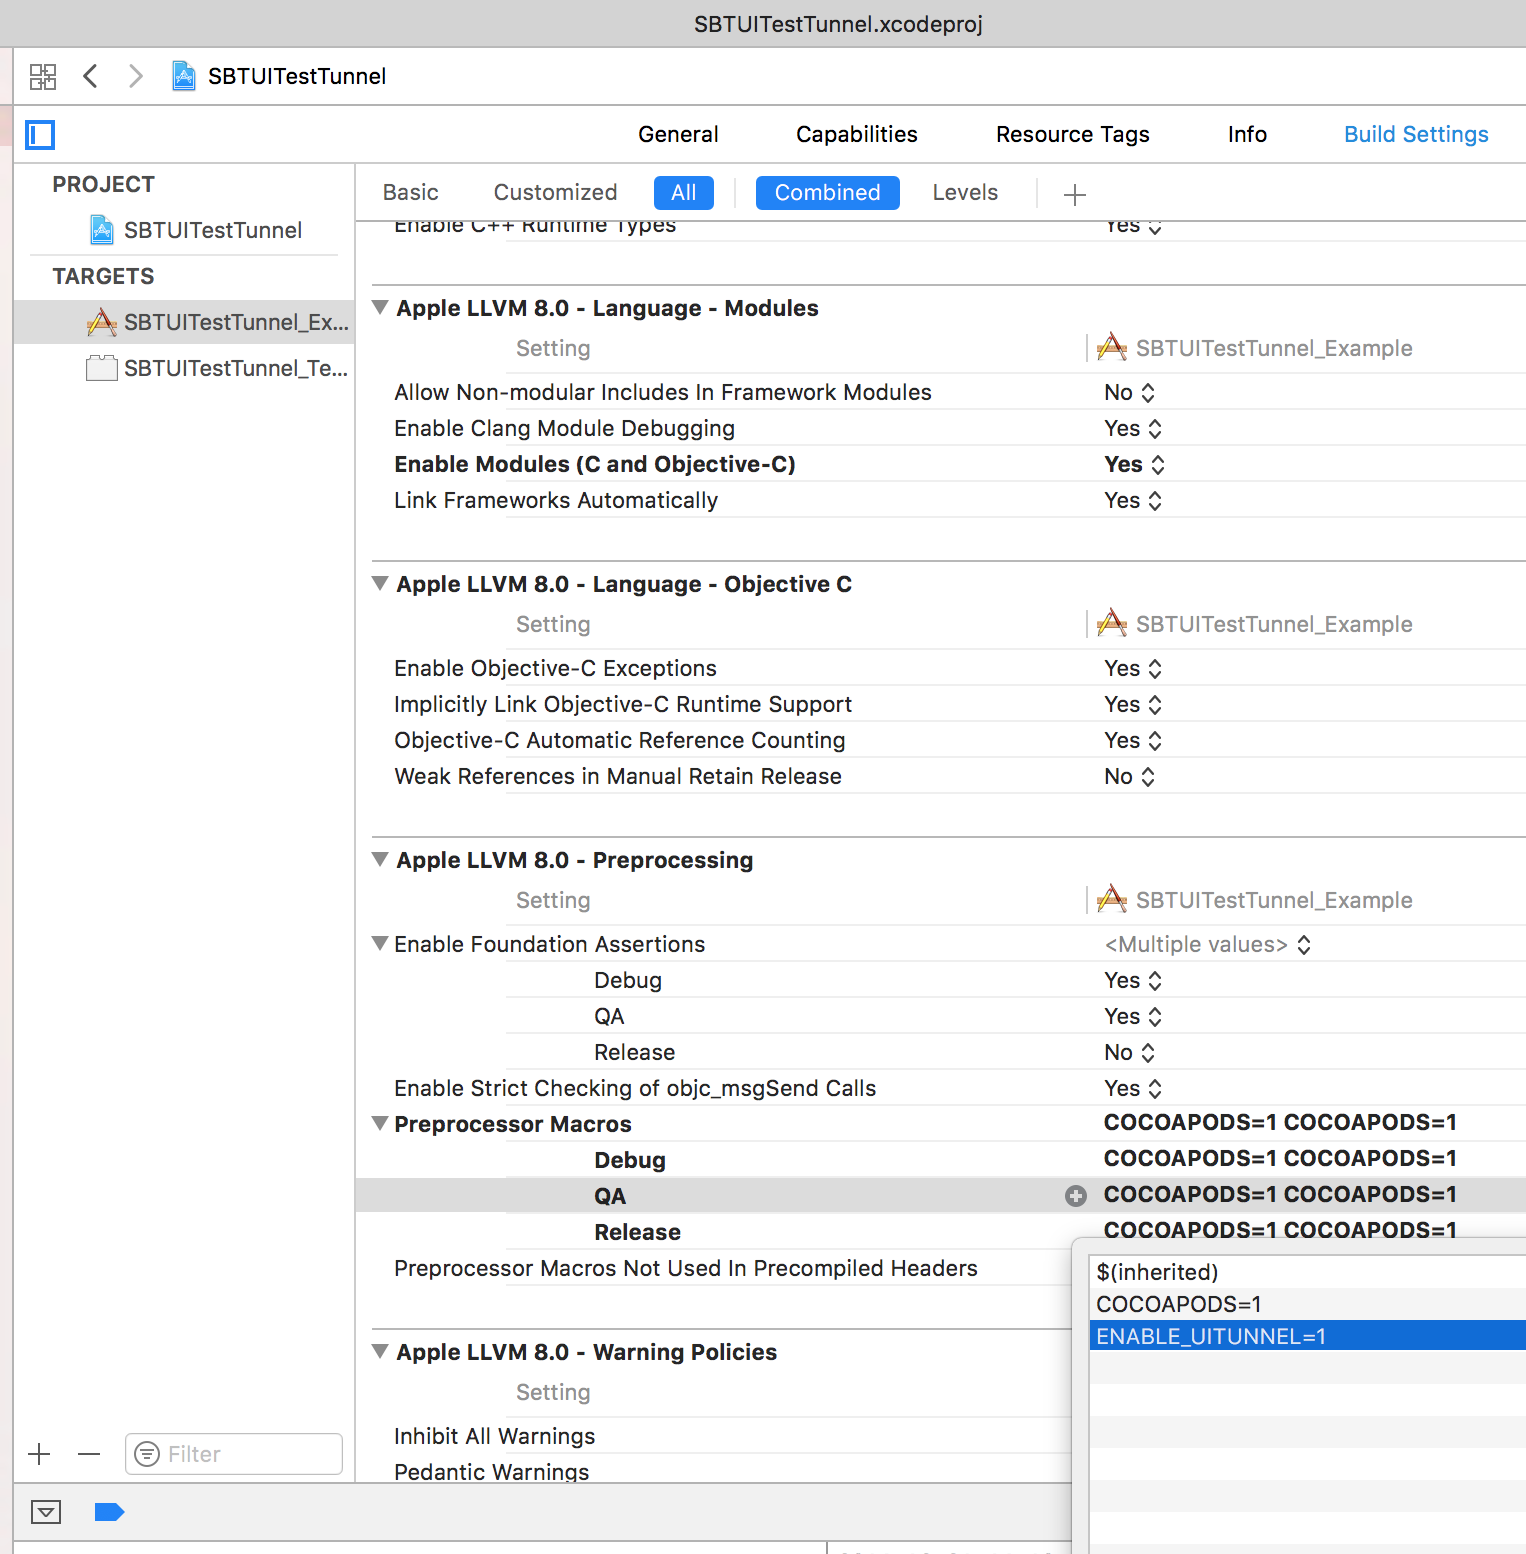
In that case you'll need to add ENABLE_UITUNNEL=1 in your application target build setting as shown above and modify your Podfile by adding the following post_install action (and re running pod install):
post_install do |installer|
    installer.pods_project.targets.each do |target|
        target.build_configurations.each do |config|
            if config.name == 'QA' # the name of your build configuration
                config.build_settings['GCC_PREPROCESSOR_DEFINITIONS'] ||= ['$(inherited)', 'ENABLE_UITUNNEL=1']
            end
        end
    end
end
On the testing target no setup is required. You don't even need to instantiate an XCUIApplication, the framework automatically adds an app property (SBTUITunneledApplication) ready to use.
SBTUITunneledApplication's headers are well commented making the library's functionality self explanatory. You can also checkout the UI test target in the example project which show basic usage of the library.
At launch you can optionally provide some options and a startup block which will be executed synchronously with app's launch. This is the right place to prepare (inject files, modify NSUserDefaults, etc) the app's startup status.
You launch your tests in a similar fashion as you're used to.
import SBTUITestTunnel

class MyTestClass: XCTestCase {xw
    override func setUp() {
        super.setUp()

        app.launchTunnel()
    }

    func testStuff() {
        // ...
    }
}
Note how we don't need to instantiate the app property
app.launchTunnel(withOptions: [SBTUITunneledApplicationLaunchOptionResetFilesystem]) {
     // do additional setup before the app launches
     // i.e. prepare stub request, start monitoring requests
}
SBTUITunneledApplicationLaunchOptionResetFilesystemwill delete the entire app's sandbox filesystemSBTUITunneledApplicationLaunchOptionDisableUITextFieldAutocompletedisables UITextField's autocomplete functionality which can lead to unexpected results when typing text.
The stubbing/monitoring/throttling methods of the library require a SBTRequestMatch object in order to determine whether they should react to a network request.
You can specify a regex on the URL, multiple regex on the query (in POST and PUT requests they will match against the body) and HTTP method using one of the several class methods available.
The query parameter found in different SBTRequestMatch initializers is an array of regex strings that are checked with the request query. If all regex in array match the request is stubbed/monitored/throttled.
In a kind of unconventional syntax you can prefix the regex with and exclamation mark ! to specify that the request must not match that specific regex, see the following examples.
The regex in GET and DELETE requests will match the entire URL including query parameters.
Below some matches for a sample request like http://wwww.myhost.com/v1/user/281218/info?param1=val1¶m2=val2 :
// this will match the request independently of the query parameters
let sr = SBTRequestMatch.url("myhost.com/v1/user/281218/info")
// this will match the request independently of the query parameters for any user id
let sr = SBTRequestMatch.url("myhost.com/v1/user/.*/info")
// this will match the request containing query parameters
let sr = SBTRequestMatch.url("myhost.com/v1/user/.*/info\?param1=val1¶m2=val2")
// this will match the request containing only param1 = val1 query
let sr = SBTRequestMatch.url("myhost.com/v1/user/.*/info\?.*param1=val1")
Given that parameter order isn't guaranteed it is recommended to specify the query parameter in the SBTRequestMatch's initializer. This is an array of regex that need to fulfill all for the request to match.
Considering the previous example the following SBTRequestMatch will match if the request contains param1=val1 AND param2=val2.
let sr = SBTRequestMatch.url("myhost.com/v1/user/.*/info", query: ["¶m1=val1", "¶m2=val2"])
let sr = SBTRequestMatch.url("myhost.com/v1/user/.*/info", query: ["¶m2=val2", "¶m1=val1"])
You can additionally specify that the query should not contain something by prefixing the regex with an exclamantion mark !:
let sr = SBTRequestMatch.url("myhost.com/v1/user/.*/info", query: ["¶m1=val1", "¶m2=val2", "!param3=val3"])
This will match if the query contains param1=val1 AND param2=val2 AND NOT param3=val3
Finally you can limit a specific HTTP method by specifying it in the method parameter.
// will match GET request only
let sr = SBTRequestMatch.url("myhost.com/v1/user/.*/info", query: ["¶m1=val1", "¶m2=val2"], method: "GET")
let sr = SBTRequestMatch.url("myhost.com/v1/user/.*/info", method: "GET")
To stub a network request you pass the appropriate SBTRequestMatch object
let stubId = app.stubRequests(matching: SBTRequestMatch.url("google.com"), returnJsonDictionary: ["key": "value"], returnCode: 200, responseTime: SBTUITunnelStubsDownloadSpeed3G)

// from here on network request containing 'apple' will return a JSON {"request" : "stubbed" }
...

app.stubRequestsRemoveWithId(stubId) // To remove the stub either use the identifier

app.stubRequestsRemoveAll() // or remove all active stubs
app.userDefaultsSetObject("test_value" as NSCoding, forKey: "test_key");
let obj = app.userDefaultsObject(forKey: "test_key")
app.userDefaultsRemoveObject(forKey: "test_key")
let pathToFile = ... // path to file
app.uploadItem(atPath: pathToFile, toPath: "test_file.txt", relativeTo: .documentDirectory)
let uploadData = app.downloadItems(fromPath: "test_file.txt", relativeTo: .documentDirectory)
This may come handy when you need to check that specific network requests are made. You pass an SBTRequestMatch like for stubbing methods.
app.monitorRequests(matching: SBTRequestMatch.url("apple.com"))

// Interact with UI. Once ready flush calls and get the list of requests

let requests: [SBTMonitoredNetworkRequest] = app.monitoredRequestsFlushAll()

for request in requests {
    let requestBody  = request.request!.HTTPBody // HTTP Body in POST request?
    let responseJSON = request.responseJSON
    let requestTime  = request.requestTime // How long did the request take?
}

app.monitorRequestRemoveAll()
The library allows to throttle network calls by specifying a response time, which can be a positive number of seconds or one of the predefined SBTUITunnelStubsDownloadSpeed*constants. You pass an SBTRequestMatch like for stubbing methods.
let throttleId = app.throttleRequests(matching: SBTRequestMatch.url("apple.com"), responseTime:SBTUITunnelStubsDownloadSpeed3G) ?? ""

 app.throttleRequestRemove(withId: throttleId)
You can easily add a custom block of code in the application target that can be conveniently invoked from the test target. An NSString identifies the block of code when registering and invoking it.
You register a block of code that will be invoked from the test target as follows:
SBTUITestTunnelServer.registerCustomCommandNamed("myCustomCommandKey") {
    injectedObject in
    // this block will be invoked from app.performCustomCommandNamed()

    return "Any object you want to pass back to test target"
}
Note It is your responsibility to unregister the custom command when it is no longer needed. Failing to do so may end up with unexpected behaviours.
You invoke the custom command by using the same identifier used on registration, optionally passing an NSObject:
let objReturnedByBlock = app.performCustomCommandNamed("myCustomCommand", object: someObjectToInject)
Workarounding UI Testing Failure - Failure getting snapshot Error Domain=XCTestManagerErrorDomain Code=9 "Error getting main window -25204
To workaround this issue, which seem to occur more frequently in apps with long startup, an additional step is required during the setup of the tunnel in the application target:
Call SBTUITestTunnelServer.takeOffCompleted(false) right after takeOff (which should be on topo of your application(_:didFinishLaunchingWithOptions:))
import UIKit
import SBTUITestTunnel

@UIApplicationMain
class AppDelegate: UIResponder, UIApplicationDelegate {
    var window: UIWindow?

    func application(application: UIApplication, didFinishLaunchingWithOptions launchOptions: [NSObject: AnyObject]?) -> Bool {
        #if DEBUG
            SBTUITestTunnelServer.takeOff()
            SBTUITestTunnelServer.takeOffCompleted(false)
        #endif

        return true
    }
}
🔥🔥🔥You then HAVE TO call SBTUITestTunnelServer.takeOffCompleted(true) once you're sure that all your startup tasks are completed and your primary view controller is up and running on screen.
This will guarantee that the tests will start executing once the view hierarchy of the app is ready.
Kudos to the developers of the following pods which we use in SBTUITestTunnel:
Contributions are welcome! If you have a bug to report, feel free to help out by opening a new issue or sending a pull request.
SBTUITestTunnel is available under the Apache License, Version 2.0. See the LICENSE file for more info.