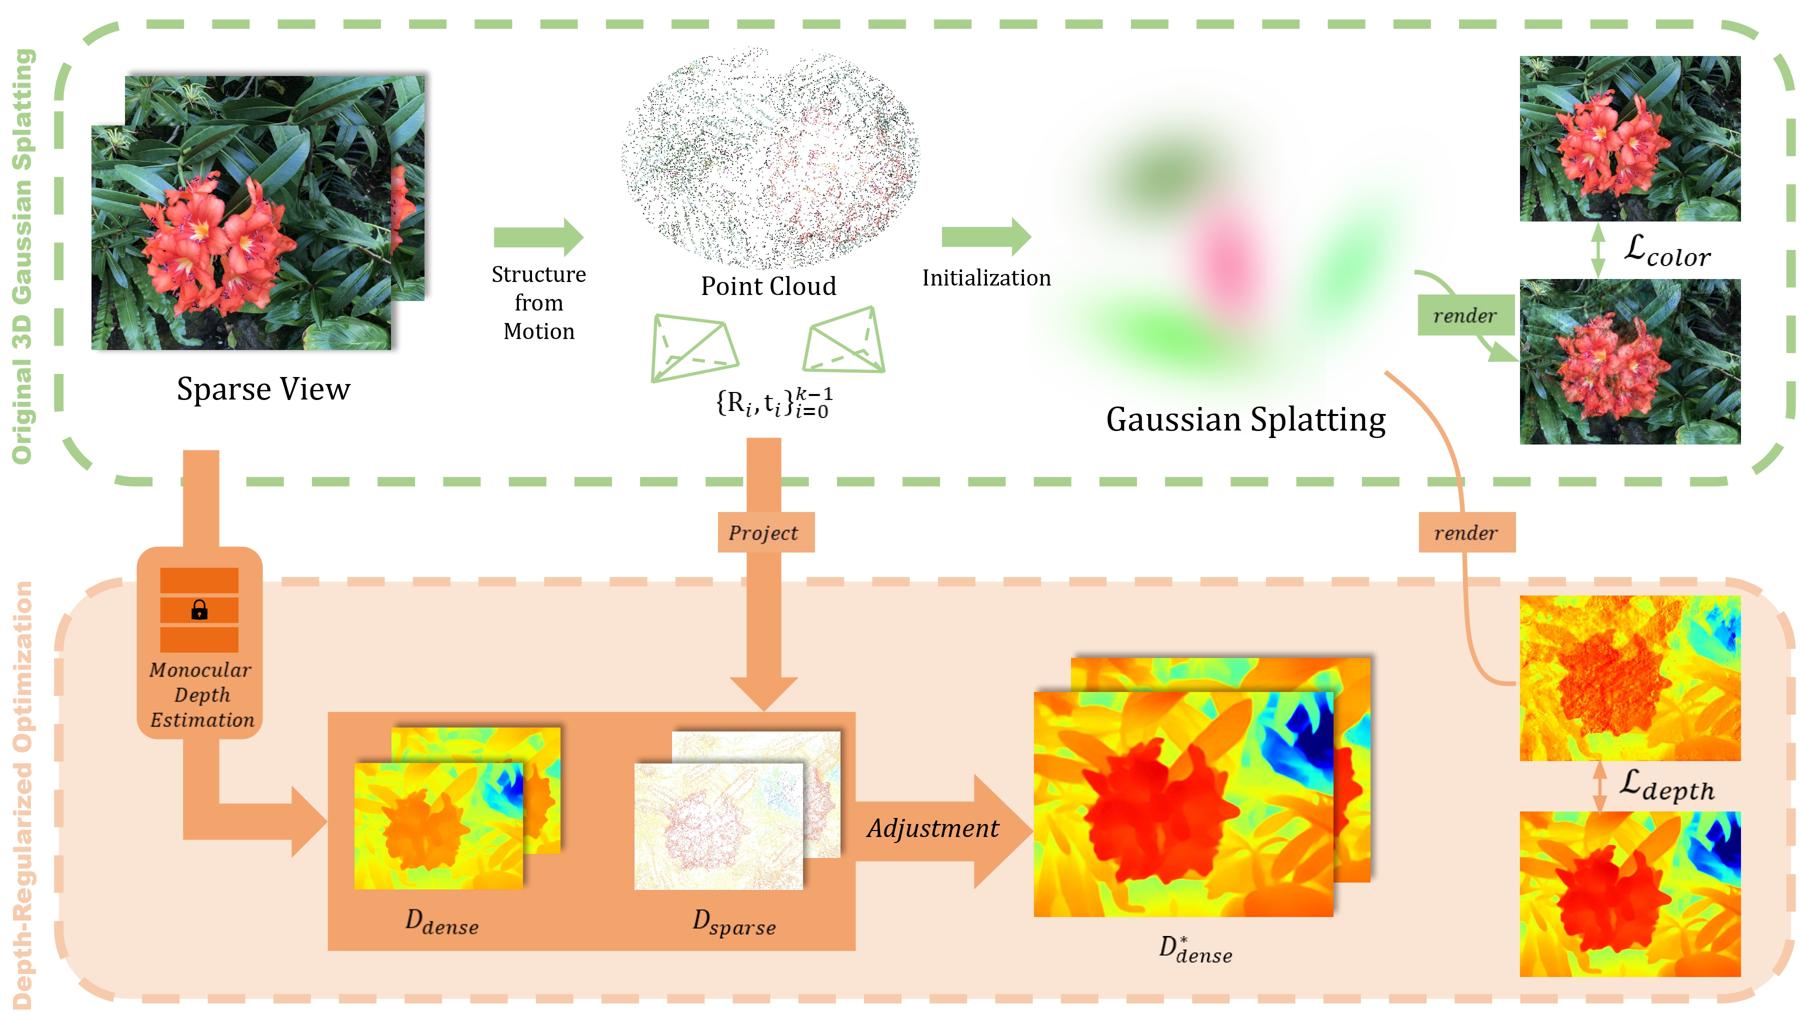
Clone this repository recursively for submodules: ZoeDepth, simple-knn, rasterizer
git clone https://github.com/robot0321/DepthRegularizedGS.git --recursiveYou can easily install the dependencies with .yml file, or just install the rasterizer only. Note: This rasterizer is an improved version implemented after the submission to arXiv.
## (Option 1) 3DGS dependencies + depth rasterizer
conda env create --file environment.yml
conda activate DepthRegularizedGS

## (Option 2) If you already install the dependencies for 3DGS, just install the new (depth) rasterizer and pytorch3d
pip install -e submodules/diff-gaussian-rasterization-depth-acc
pip install pytorch3dWe randomly select the train/test set as described in the paper. (Note: Our scripts will generate some files/folders in the dataset folder. If you want to not disturb the original dataset, use the copy of the dataset.)
🍀 You can just download the preprocessed dataset in this link
... or follow the instructions below to build the few-shot dataset from scratch.
Prepare the dataset as below.
<datadir>
|---images
|   |---00000.jpg
|   |---00001.jpg
|   |---...
(Note: If the image names differ, utilize the simple code written in convertImagename.py.)
python scripts/convertImagename.py --imgfolder ./<datadir>/images ## e.g. ./data/nerf_llff_fewshot_resize/fern/imagesRun COLMAP with the images in the data folder <datadir>.
colmap automatic_reconstructor --workspace_path ./<datadir> --image_path ./<datadir>/images --camera_model SIMPLE_PINHOLE --single_camera 1 --dense 0 --num_threads 8
mkdir ./<datadir>/sparse_txt
colmap model_converter --input_path ./<datadir>/sparse/0 --output_path ./<datadir>/sparse_txt --output_type TXTRun select_samples.py with a proper 'dset' option
- For the dset, we have
nerfllff,dtu, (forward-facing) andmipnerf360,nerfsynthetic(360-degree) - You can check how we split the train/test set with the ply files in the output split_visualization/ folder (
MeshLabis one tool for visualization.)
python scripts/select_samples.py --dset nerfllff --path ./<datadir> ## e.g ./data/nerf_llff_fewshot_resize/fern
## output: train.ply & test.ply in split_visualization/ folder and split_index.jsonFor training, use:
- python train.py -s
<datadir>--eval --port<port>--model_path<outdir>--resolution 1 --kshot<k-shot>--seed<seed_id>
## Example:
##    <datadir> = ./data/nerf_llff_fewshot_resize/fern
##    <outdir>  = ./output/baseline
## For original 3DGS (method1),
python train.py -s <datadir> --eval --port 6311 --model_path <outdir>/method1 --resolution 1 --kshot 5 --seed 3
## For our DepthRegularization (method2), add --depth and --usedepthReg arguments
python train.py -s <datadir> --eval --port 6312 --model_path <outdir>/method2 --resolution 1 --kshot 5 --seed 3 --depth --usedepthRegFor user convenience, we provide some scripts that allows for extensive experimentation by varying seeds, methods, datasets, and k-shots.
Note: The file scripts/seed_list.txt contains randomly selected sample seeds. These seeds are referenced sequentially as seed_id (0,1,2,...) in order and utilized in the script files. (You may modify or add to them as desired)
Note: Before running the scripts, ensure that you have sufficient available memory for saving experiment results.
scripts/task_producer.py is a file responsible for generating a list of experiments. Modify SCENES, SHOTS, METHODS, and SEED_IDS in the scripts/task_producer.py to create the desired list of experiments in scripts/all_tasks.txt.
## Before run this script, check the values of SCENES, SHOTS, METHODS, and SEED_IDS in the script.
## Note: the ids in METHODS are described in `scripts/task_consumer.py`
python scripts/task_producer.py
## output: scripts/all_tasks.txtRun scripts/task_consumer.py to sequentially run the experiments scheduled in scripts/all_tasks.txt.
python scripts/task_consumer.py --tasklist ./scripts/all_tasks.txt --gpu 0
## output: all the experiments will be save in EXPERIMENT_PATH folder
Note: If you intend to run experiments using multiple GPUs, generate separate experiment lists and execute scripts separately for each GPU. (e.g. all_tasks1.txt, all_tasks2.txt, ...)
scripts/task_reducer.py helps you to easily summarize the experiment results in metric_mean.txt
python scripts/task_reducer.py --method <method id>
## output: EXPERIMENT_PATH/method<method id>/metric_mean.txt

