This is an initiative to visualize Project Bedrock. Currently, it consists of a command line interface and a simple text based dashboard prototype. The instructions to use both are below.
If you have already followed the steps here to setup the pipelines for a GitOps workflow in Bedrock, you may add a task to each of your pipelines to send data to the container journey storage.
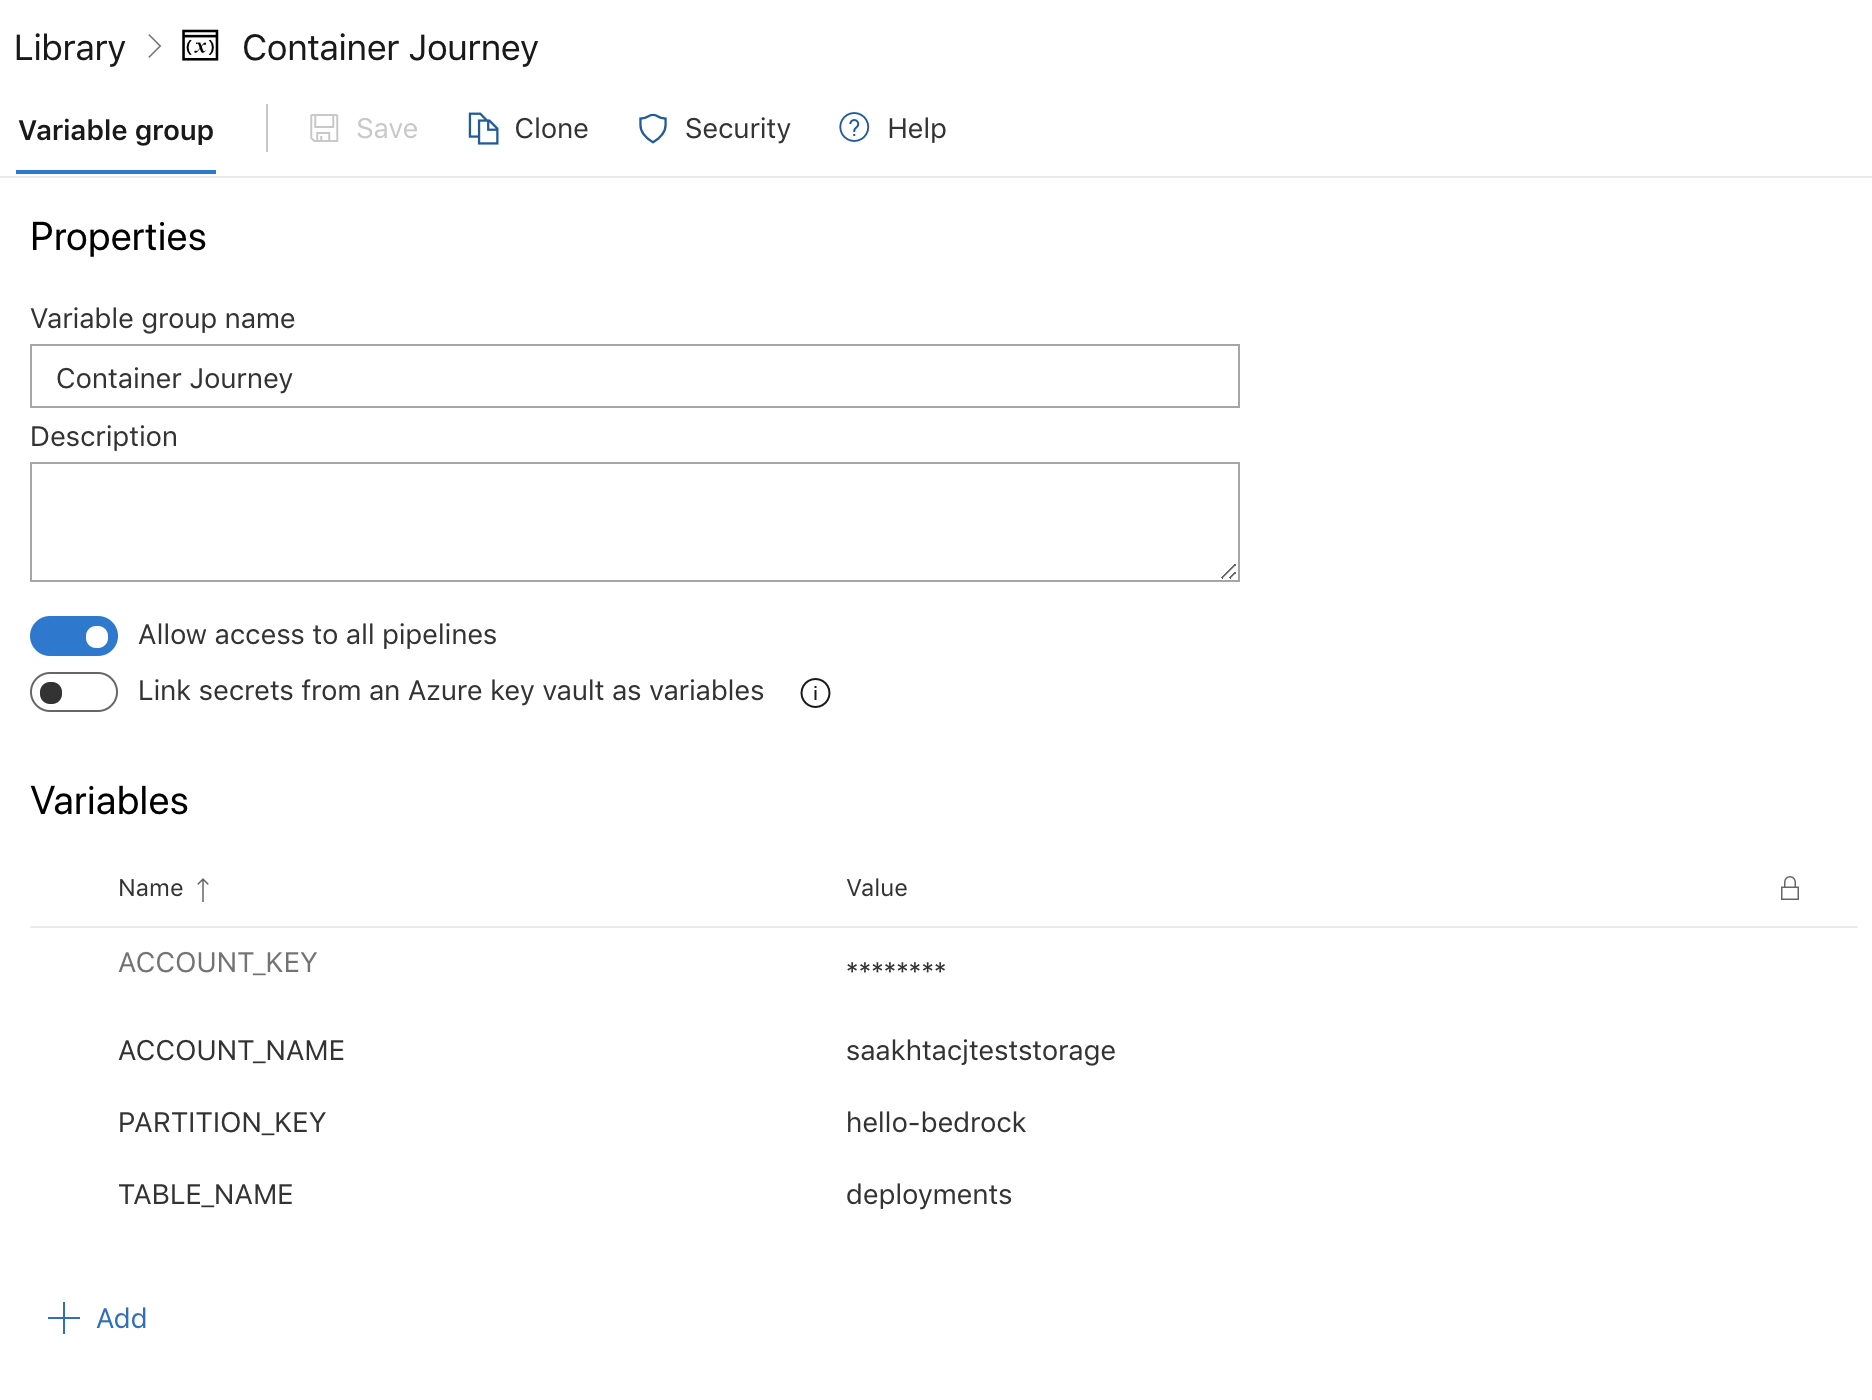
Pre-Requisite: Create an azure storage table account whose access keys you will need to use in subsequent steps.
-
Create a variable group with the following variables, which will be used by the tasks in each of the pipelines to access the storage.
ACCOUNT_KEY: Set this to the access key for your storage accountACCOUNT_NAME: Set this to the name of your storage accountPARTITION_KEY: This field can be anything you'd like to recognize your source repository in the storage by, for eg. in this example, we're using the name of the source repositoryhello-bedrockTABLE_NAME: Set this to the name of the table in your storage account that you prefer to use
-
To your CI pipeline that runs from the source repository to build the docker image, copy and paste the following task which will update the database for every build that runs from the source repository to show up in the container journey.
- bash: |
    git clone https://github.com/samiyaakhtar/container-journey.git
    cd container-journey/pipeline-scripts

    sudo /usr/bin/easy_install virtualenv
    pip install virtualenv
    pip install --upgrade pip
    python -m virtualenv venv
    source venv/bin/activate
    python -m pip install --upgrade pip
    pip install -r requirements.txt

    tag_name="$(PARTITION_KEY)-$(Build.SourceBranchName)-$(Build.BuildId)"
    commitId=$(Build.SourceVersion)
    commitId=$(echo "${commitId:0:7}")
    echo "python update_pipeline.py $(ACCOUNT_NAME) $(ACCOUNT_KEY) $(TABLE_NAME) $(PARTITION_KEY) p1 $(Build.BuildId) imageTag $tag_name commitId $commitId"
    python update_pipeline.py $(ACCOUNT_NAME) $(ACCOUNT_KEY) $(TABLE_NAME) $(PARTITION_KEY) p1 $(Build.BuildId) imageTag $tag_name commitId $commitId
displayName: Update source pipeline details in Container Journey db

Note: The earlier in the pipeline you add this task, the earlier it will send data to the container journey. Adding it before the crucial steps is recommended since it will capture details about failures if the next steps fail.
-
To your CD release pipeline (ACR to HLD), add the following lines of code to the end of your release task:
latest_commit=$(git rev-parse --short HEAD)

cd ../container-journey/pipeline-scripts

sudo /usr/bin/easy_install virtualenv
pip install virtualenv
pip install --upgrade pip
python -m virtualenv venv
source venv/bin/activate
python -m pip install --upgrade pip
pip install -r requirements.txt

echo "python update_pipeline.py $(ACCOUNT_NAME) $(ACCOUNT_KEY) $(TABLE_NAME) $(PARTITION_KEY) imageTag $(Build.BuildId) p2 $(Release.ReleaseId) hldCommitId $latest_commit"
python update_pipeline.py $(ACCOUNT_NAME) $(ACCOUNT_KEY) $(TABLE_NAME) $(PARTITION_KEY) imageTag $(Build.BuildId) p2 $(Release.ReleaseId) hldCommitId $latest_commit
-
To the HLD to manifest pipeline, add a task that updates the db with its information to connect the three pipelines end-to-end. Again, the earlier in the tasks this appears, the more information about subsequent failures it will capture.
- bash: |
    git clone https://github.com/samiyaakhtar/container-journey.git
    cd container-journey/pipeline-scripts

    sudo /usr/bin/easy_install virtualenv
    pip install virtualenv
    pip install --upgrade pip
    python -m virtualenv venv
    source venv/bin/activate
    python -m pip install --upgrade pip
    pip install -r requirements.txt

    commitId=$(Build.SourceVersion)
    commitId=$(echo "${commitId:0:7}")
    echo "python update_pipeline.py $(ACCOUNT_NAME) $(ACCOUNT_KEY) $(TABLE_NAME) $(PARTITION_KEY) hldCommitId $commitId p3 $(Build.BuildId)"
    python update_pipeline.py $(ACCOUNT_NAME) $(ACCOUNT_KEY) $(TABLE_NAME) $(PARTITION_KEY) hldCommitId $commitId p3 $(Build.BuildId)
displayName: Update manifest pipeline details in CJ db
-
Kick off a full deployment from the source to docker pipeline, and you should see some entries coming into the database for each subsequent deployment after the tasks have been added!
To use the CLI for Container Journey:
- Go to Releases in this repository and download the CLI for your platform.
- Make it an executable, for eg.
chmod +x cli-macos - Run
initcommand to initialize the CLI with configuration for your application. Note that you will only need to run this once on your machine to initialize the CLI../cli-macos init --azure-org <azure_organization> --azure-project <azure_project> --docker-pipeline-id <docker_to_HLD_pipeline_ID> --manifest <manifest_repo_name> --github-manifest-username <github_manifest_repo_username_if_using_github> --hld-pipeline-id <hld_to_manifest_pipeline_ID> --src-pipeline-id <src_to_docker_pipeline_ID> --storage-account-key <storage_account_key> --storage-account-name <storage_account_name> --storage-partition-key <storage_account_partition_key> --storage-table-name <storage_table_name>
- You may now use the CLI to get information about deployments! (Assuming that you've followed steps above to onboard pipelines to Container Journey)
- To query deployments based on
- image tag:
./cli-macos deployments --image-tag hello-bedrock-master-5439 - environment:
./cli-macos deployments --env Staging - commit id in source repository:
./cli-macos deployments --commit-id e3d6504 - build id in source pipeline:
./cli-macos deployments --build-id 5439 - a combination of any of the above, for eg.
./cli-macos deployments --build-id 5439 --image-tag hello-bedrock-master-5439
- image tag:
- To query author for a deployment based on
- commit Id in source repository:
./cli-macos author --commit-id e3d6504 - build Id in source pipeline:
./cli-macos author --build-id 5272
- commit Id in source repository:
- To query logs URL for a build or release based on
- build Id:
./cli-macos logs --build-id 5265 - release Id:
./cli-macos logs --release-id 102
- build Id:
- To query cluster sync status of the Kubernetes cluster, just run
./cli-macos cluster-syncwhich would return the commit Id in source repository of the commit which is synced on the cluster.
- Clone this repository, and run
npm install. - Make sure the file located in
src/config.tsis updated with values for the azure storage table. - Then run
npm startto view the dashboard for the hello world deployment screen.