This repo is to demonstrate the usage and implementation of following
- Nestjs CQRS
- Nextjs
- Postgres
- TypeORM
- Stripe
- Stripe webhook
- Docker
First clone this repo:
$ git clone https://github.com/kenchoong/nestjs-cqrs.git
Setup Stripe for our app
-
Download Stripe CLI here
-
extract the zip in a local folder example
D:/Desktop/Stripe -
Setup Stripe CLI
$ cd D:/Desktop/Stripe // login to dashboard $ stripe login // forward the request to our localhost endpoint $ stripe listen --forward-to localhost:3002/payment/stripe-webhook -
Here you will get a secret(string) in CLI, then paste it in '/backend/.env'
STRIPE_WEBHOOK_SECRET="PASTE_SECRET_FROM_CLI" -
Login in to Stripe and copy the test secret key in Stripe Dashboard, paste it here
End up ur /backend/.env will look like this

STRIPE_SK_TEST="THE_KEY_FROM_STRIPE_DASHBOARD" <- Get from Stripe Dashboard
STRIPE_WEBHOOK_SECRET="SECRET_FROM_STRIPE_CLI" <-- get from STRIPE CLI
Note: This need to setup the credential probably, if not you will facing this issue when Stripe hit the webhook
-
Test the CLI
$ stripe trigger payment_intent.succeededFor info: read here
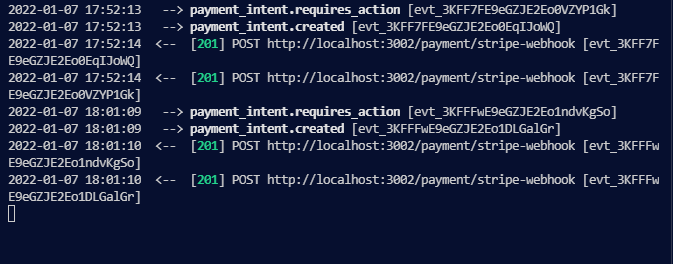
If everything setup probably, you will get the outcome like this in Stripe CLI
-
Paste Stripe Publishable key to
frontend/.envfile here, to look like thisNEXT_PUBLIC_STRIPE_PUBLISHABLE_KEY="PASTE_YOUR_KEY_HERE"
-
Pull Postgres and PgAdmin
$ docker-compose -f docker-compose.dev.yml up -
Localhost backend
$ cd backend

$ yarn

$ yarn start:dev
Now go to http://localhost:3002/api see the Swagger API documentation
-
Localhost Frontend
$ cd frontend

$ yarn

$ yarn dev
Go to http://localhost:3000 for frontend
Database look like this, just to meet the requirements:

The migration script already setup in package.json, so u can run this:
$ cd backend

$ yarn migrate:create [THE_MIGRATION_NAME]

$ yarn migrate:generate [THE_MIGRATION_NAME]

$ yarn migrate:run

// migration file will be in /backend/src/common/db/migrations
Note: if in localhost, generate migration having the connect database problem,
-
first, need to start the postgres server, if it still exist,
-
hardcode the host and port in this file, like this:
host: localhost
port: 6543
This only as a temporary solution, and remember change back to
process.envlike in original when build docker image, else laterdocker-compose up, cant connect to postgres
Using Domain Driven Design to structure the backend, I will explain this in Layman Terms below
The app will consists of 5 Layers
-
Defined each functionality into separate module
Now I have
orders,users,product,payment, each responsible for each functionality -
Domain Layer
AKA The root of each module. For example,
usersmodule, then here will defined,- what properties(data)
a userwill have, - validation of the each properties value when insert to db, what a
usercan do will includeAggreateRoot,Factory,ValueObjectin this layer. - will defined interface in
repo.tsorquery.tsfile , to expose the interface for infrastructure and application layer to access the properties of AggreateRoot
- what properties(data)
-
Application Layer
Use case. Mostly mean how you want to do with the data, for example
create-user,get-product-by-id, each use-case will in separate folder. Right now is CQRS pattern, so inside it will contain Command, Query, Handler class. Over here is only containbusiness logicaka organize the data using thedomainbefore go in infrastructure layer. -
Infrastruture Layer
The underlying infrastructure needed to support module, like Database, Cache, Messaging, another DB, all this will separate into each individual folder. Right now is just Postgres.
-
Interface layer
A surface to let real API user to hit on. Controller and Data Transfer Object for request and response.Basically the data flow like this, below.
// --> Data in: interface -> application -> domain -> infrastructure(Entity) // <-- Data out: interface <- application <- domain <- infrastructure(Entity) -
Event layer (only when needed)
Example, received event from Stripe in
Payment module, then need to update theorderStatusinordermodule. To separate this, we use event. Payment module trigger an event, Order module receive it, will update the db.You can see the flow start from here
In root folder

$  docker-compose -f docker-compose.yml up --build
Let the image build, this will take estimate 500 seconds to initialize backend, frontend, postgres, and pgadmin
-
See the outcome
localhost:3000 Nextjs app
localhost:3002/api Swagger Documentation
localhost:5555 pgadmin
-
login using
POSTGRES_USERandPOSTGRES_PASSWORDdefined in/backend/.envconnect to server using value of
hostname = POSTGRES_HOSTNAME,port = 5432POSTGRES_USERandPOSTGRES_PASSWORDas well
In this project, mainly to showcase the Domain Driven Design for the backend. If problem, open the issue. Cant make a 1 command setup because need to build Stripe credential inside the docker.