The %Distribute macro was originally developed by Cheryl Doninger and Randy Tobias of SAS. The original code and the paper detailing its operation can be found here. The original code's intent was to distribute work across multiple remote computers.
This edited version of the macro uses the SAS/Connect interface to take advantage of mulitple cores on a single machine. Multiple SAS sessions are spawned and work is distributed to the children from the parent process. Work is queued and dynamically assigned to the workers as jobs are completed.
This document details the necessary macros that need to be defined by the user and what macros the %Distribute package creates that are available to the user. Examples are located in the Examples folder of this repository to get the user more familiar with the package's usage.
NOTE: It should be noted that SAS/Connect is required for this package to work.
The first to setting up the parallelization macro is to include the code. This is contained in the file distribute.sas and contains several macros you will call to initiate, perform and shutdown the parallelization process.
%INCLUDE "/path/to/macro/distribute.sas";
In order to parallelize a task, you must identify what tasks can be performed independently of each other and collected at the end. For example, if I am fitting a model to independent data sets at the U.S State level, I would have 50 jobs to distribute. Once all jobs are finished, you can collect all the results from the workers and continue on as you would as usual.
It is required by the parallelization macro that we define the total number of these independent tasks in a macro variable as NIterAll. We may also want to submit these in batches of more than 1 task. We set the batch size in the macro variableNIter.
We have to declare these two variables as shown below. These macros variables are required by the Distribute macro to work.
%let NIterAll = <Size of entire problem>;
%let NIter = <Size of each chunk>;
We define each chunk of units as a batch, enumerated from 0 to ceil(NIterAll/NIter). We define the number of batchs as Nbatches.
The RInit Macro must be defined for the Distribute macro to work. The RInit macro consists of an rsubmit statement to be sent to each worker. It contains two mandatory macro definitions that must be defined by the user for the Distribute macro to work. The macros that need to be defined are FirstRSub and TaskRSub.
FirstRSub is used to perform any initializations that may be required for the task at hand. This may involve defining libnames for input/output or defining a macro that will perform that task you wish. Continuing with the modeling U.S. States analogy, we may define a libname where the necessary input data for each state is contained and create a macro that models the state data, and appends the results to a worker specific dataset to be gathered at the end.
TaskRSub is used to perform the actual work and is called each time a new task is distributed to the worker. In our example, this would include subsetting to the U.S States that are in the batch given to the worker and calling the macro defined in FirstRSub.
%macro RInit;
	rsubmit remote=Host&iHost wait=yes macvar=Status&iHost;
		%macro FirstRSub;

		/*First Submissions to workers.*/

		%mend;
		%macro TaskRSub;

		/*Defines the task to be done for each batch*/

		%mend;
	endrsubmit;
%mend;
Inside the TaskRSub and FirstRSub macros there are several macros available to the user to aid them in parallelizing their code.
Rem_iHost- Host number, 1 to n where n is the number of processes spawned by the%SignOnmacro.Rem_Seed- Random seed, rerandomized for each chunkRem_Batchnum- Batch number assigned to worker. This can be used to subset data needed for this batch or for other purposes. For example, in our states example, if we assigned the 50 taskscan be assigned to a batch from 0 to ceil(NIterAll/NIter)homework- libname statement to the master process work directory, this is useful if you have datasets in the parent's work directory that you want to make available to the worker units or write to a dataset in your current work library. Note, only one worker can write to a file at one time, you will get an error otherwise.
If you have macros in your current SAS session that are required, you can define
%macro Macros;
	%syslput rem_Mac1=&Mac1;
	%syslput rem_Mac2=&Mac2;
	%syslput rem_Mac3=&Mac3;
%mend;
This will submit them to each one of the worker units so that they are available.
This step is necessary when you have decided that you would like to submit batches of jobs instead of one at a time. To do this:
- Create a dataset containing a list of your jobs. We name it jobs in this example. This may be simply a list of domains like state/county or subsets of your data indexed in some manner. This can be done like so:
proc sort data=mydata out=jobs nodupkey;
by domain1 domain2;
run;
where domain1 and domain2 are a multivariable index of your domain. It can be any number of variables needed to define the domain.
- Use the
nbatchesmacro variable to assign your jobs. Using the dataset we "created" above, you can do this like so
data jobs;
set jobs;
batchnum=mod(_N_,&nbatches.)
run;
- Use the jobs dataset in conjunction with the rem_batchnum macro variable to subset. We give an example of an
RInitmacro below. In theTaskRSubmacro, we show how you can subset the data using the rem_batchnum macro. We set the jobs data set getting the domains of interest from it,
%macro RInit;
	rsubmit remote=Host&iHost wait=yes macvar=Status&iHost;
		%macro FirstRSub;

			%macro doMyStuff(domain=);

				proc whatever data= myData (where=(domain1=&domain1. and domain2=&domain2.))
				out=results;
				run;

				*append the result from the above proc to;
				*the master results data set for this host;
				proc append base=homework.result&rem_ihost. data=result force;
				run;

			%mend doMyStuff;

		%mend;
		%macro TaskRSub;

			*Create a 'loop' to call the macro for every job in this batch;
			data _null_;
			set homework.jobs (where=(batchnum=&rem_batchnum.));

				*create string that contains a call to the macro;
				*we defined in the %FirstRSub Macro;
				****NOTE: we need the %nrstr() call so that SAS;
				*does not try to prematurely resolve the macro;
				*inside the call;

				code=catt('%nrstr(%doMyStuff(domain1=',
				           domain1,
				          ', domain2=',
				          domain2,
				          '))');

				*'call execute' executes the code we created above with the arguments;
				*you passed to it. This is essentially a loop over all domains contained;
				*in this batch.;

				call execute(code);

				*we note that the result is created in the macro %doMyStuff;
				*hence this is a '_null_' data step;
			run;

		%mend;
	endrsubmit;
%mend;
Once we have split our problem into independent jobs, defined the required variables, and defined our task in the RInit, we can spawn worker units. It is advised to spawn less workers than you have CPU cores available. For example, a dual core CPU will have 4 logical cores available. It is advised only to spawn 3 processes since the parent session also needs a thread to manage the distribution of work.
To spawn the workers call the %SignOn macro, passing the number of sessions you would like to spawn to the processes argument. For example to spawn 3 worker sessions, you would submit the following code
%SignOn(processes=3);
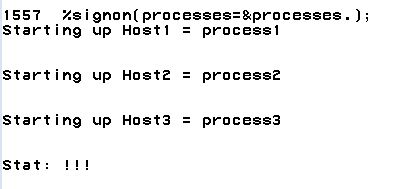
You should see the following in your log.
It notifies you that your 3 processes have started. The !!! at the end lets you know that these three processes are ready to receive instructions.
Before we start our job, let us make sure we have completed the following:
- Make sure NIterAll, NIter are defined. These are REQUIRED
- Define any macros you need in the remote sessions in %Macros.
- (If neccessary) Assign batch numbers to your dataset to subset by.
- Define your %RInit Macro
Once the above as completed simply call the distribute macro
%Distribute;
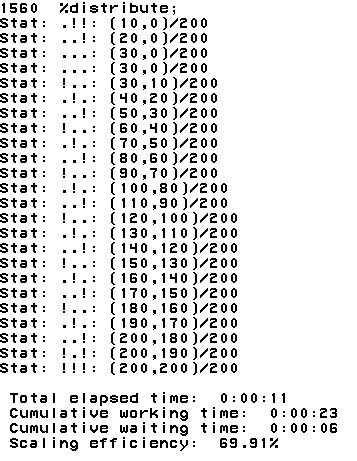
You will see the following output in your log window:
The output lets you monitor the progress of the job and the status of each one of the workers. There are three characters, either an exclamation mark or a period. The ! means that a worker is available to receive work. The . means that a worker is currently busy. For example on the first notice we have .!! meaning that the first worker unit was assigned work and the remaining two are waiting. The numbers in the paranthesis next to this mean (number of jobs submitted,number of jobs completed )/total number of jobs. These messages are output periodically to allow you to monitor the job.
Things are never as easy as they seem. Hence why debugging tools exist. There are some signs to watch out for that the %Distribute macro has failed
- The process runs a lot faster than you imagined. It probably failed.
- SAS throws an error.
- Your output does not look like it should.
In these cases we will need to dig into the problem itself. We provide insight into some of the tools below.
By default, the package creates the log and list files in your home folder as below. These defaults can be found at the top of the distribute.sas file.
%let DistLog = distribute.log;
%let DistLst = distribute.lst;
This contains all log information from all SAS worker processes. A word of caution is order that this file can become gigantic as you are pooling logs from all children. It also will append between runs. Therefore it is advised to delete this file between runs.
It would be helpful to redefine these to the folder you are working in at the top of your program using the %Distribute package.
%let DistLog = C:\Path\To\My\Folder\distribute.log;
%let DistLst = C:\Path\To\My\Folder\distribute.lst;
After running your %Distribute work, you should search these for ERROR to make sure there were no critical errors. Some typical problems may come from the user not providing a necessary macro variable
Another option is to have the worker processes print their output to your SAS Log Window. Contained in the distribute macro is the DIST_DEBUG. By default it is set to 0 meaning it will not print to your log screen.
To have the macro print the log to your log window, include the following line at the top of your program.
%let DIST_DEBUG = 1; /* Print debugging information */
You should be warned that it may fill the log window completely.
Once the %Distribute macro is finished running you will want to collect the results from each of the worker units. If you wrote the results to the homework libname which points to your current working directory, you can simply set the results in a dataset using a macro variable to index the process. You can achieve this through the following code.
*create a macro to set all the results
 together;
%macro collect;
	data results;
		*use loop to generate the name of each result set;
		set
		%do i=1 %to &processes.;
			results&i.
		%end;
		; *closing semicolon for set statement;
	run;
%mend collect;
%collect;
If the results are contained on each of the worker unit's session, then you will need to collect the results from their work directories. The distribute macro, has a macro defined to do just this named RCollect.
Assuming that all the results are named the same on each remote host, you can submit the following code.
%RCollect(from=resultsRemote,to=resultsLocal,n=&processes.);
In this example, assuming the name of your results on each worker is resultsRemote, the code will "set" the results from each worker together and name it "resultsLocal". Note that we must pass it the number of processes in the argument n.
Once you have collected all your results and are finished with
%SignOff;
NOTE: Anything in the worker units work directories will be lost. Make sure you have collected your results before signing off.

