This project is a faster pytorch implementation of faster R-CNN, aimed to accelerating the training of faster R-CNN object detection models.
During our implementing, we referred many implementations, especially jwyang/faster-rcnn.pytorch. However, our implementation has several unique and new features compared with the above implementations:
-
It supports torchvision pretrained model. We convert the code to use torchvision pretrained model weight in pytorch!.
-
It is memory efficient. We use the no grad model during the demo.
-
It is use auto training process. We give a more simple training control in our implementation, only focus on lr_inti, lr_gama and max_epoch.
-
It is support pytorch-1.0. We change the code to run faster R-CNN in pytorch-1.0.
We benchmark our code thoroughly on pascal voc datasets, using four different network architecture: resnet18, resnet34, resnet50, resnet101. Below are the results:
1). PASCAL VOC 2007 (Train/Test: 07trainval/07test, scale=600, ROI Align) by run trainval_net.py
| model | #GPUs | batch | lr | lr step | max epoch | time/epoch | mem/GPU | mAP | test fps |
|---|---|---|---|---|---|---|---|---|---|
| Res-18 | 1 | 1 | 1e-3 | 5 | 7 | 0.21 hr | 1249 MB | 68.0 | 13.0±6.0 |
| Res-18 | 1 | 6 | 1e-3 | 5 | 7 | 0.18 hr | 4993 MB | 54.7 | 13.0±6.0 |
| Res-34 | 1 | 1 | 1e-3 | 5 | 7 | 0.29 hr | 1441 MB | 72.8 | 10.5±3.0 |
| Res-34 | 1 | 6 | 1e-3 | 5 | 7 | 0.24 hr | 4813 MB | 67.4 | 10.5±3.0 |
| Res-50 | 1 | 1 | 1e-3 | 5 | 7 | 0.38 hr | 1965 MB | 70.9 | 7.0±3.0 |
| Res-50 | 1 | 6 | 1e-3 | 5 | 7 | 0.35 hr | 7469 MB | 64.1 | 7.0±3.0 |
| Res-101 | 1 | 1 | 1e-3 | 5 | 7 | 0.42 hr | 3221 MB | 73.2 | 4.3±1.0 |
| Res-101 | 1 | 6 | 1e-3 | 5 | 7 | 0.33 hr | 11925MB | 69.0 | 4.3±1.0 |
| Res-152 | 1 | 1 | 1e-3 | 5 | 7 | 0.57 hr | 4663 MB | 74.3 | 4.0±1.0 |
| Res-152 | 1 | 2 | 1e-3 | 5 | 6 | 0.45 hr | 7387 MB | 73.8 | 4.0±1.0 |
1). PASCAL VOC 2007 (Train/Test: 07trainval/07test, scale=600, ROI Align) by run auto_trainval_net.py
| model | #GPUs | batch | lr | lr gamma | lr patience | time/epoch | mem/GPU | mAP | test fps |
|---|---|---|---|---|---|---|---|---|---|
| Res-18 | 1 | 1 | 1e-3 | 0.618 | 5 | 0.21 hr | 1249 MB | 68.0 | 13.0±6.0 |
| Res-18 | 1 | 6 | 1e-3 | 0.618 | 5 | 0.18 hr | 4993 MB | 54.7 | 13.0±6.0 |
| Res-34 | 1 | 1 | 1e-3 | 0.618 | 5 | 0.29 hr | 1441 MB | 72.8 | 10.5±3.0 |
| Res-34 | 1 | 6 | 1e-3 | 0.618 | 5 | 0.24 hr | 4813 MB | 67.4 | 10.5±3.0 |
| Res-50 | 1 | 1 | 1e-3 | 0.618 | 5 | 0.38 hr | 1965 MB | 70.9 | 7.0±3.0 |
| Res-50 | 1 | 6 | 1e-3 | 0.618 | 5 | 0.35 hr | 7469 MB | 64.1 | 7.0±3.0 |
| Res-101 | 1 | 1 | 1e-3 | 0.618 | 5 | 0.42 hr | 3221 MB | 73.2 | 4.3±1.0 |
| Res-101 | 1 | 6 | 1e-3 | 0.618 | 5 | 0.33 hr | 11925MB | 69.0 | 4.3±1.0 |
| Res-152 | 1 | 1 | 1e-3 | 0.618 | 5 | 0.57 hr | 4663 MB | 74.3 | 4.0±1.0 |
| Res-152 | 1 | 2 | 1e-3 | 0.618 | 5 | 0.45 hr | 7387 MB | 73.8 | 4.0±1.0 |
- Our pre-trained model weight can simply import via torchvision.
- If not mentioned, the GPU we used is NVIDIA Titan X Pascal (12GB).
First of all, clone the code
git clone https://github.com/kevincao91/kevin.ai.faster_rcnn_pytorch_1.0_torchvision.git
Then, create a folder:
cd kevin.ai.faster_rcnn_pytorch_1.0_torchvision && mkdir data
- Python 3.6
- Pytorch 1.0
- CUDA 8.0 or higher
- PASCAL_VOC 07+12: Please follow the instructions in py-faster-rcnn to prepare VOC datasets. Actually, you can refer to any others. After downloading the data, creat softlinks in the folder data/.
We used pytorch pretrained models in our experiments. You can download these models from:
res18
wget https://download.pytorch.org/models/resnet18-5c106cde.pth
res34
wget https://download.pytorch.org/models/resnet34-333f7ec4.pth
res50
wget https://download.pytorch.org/models/resnet50-19c8e357.pth
res101
wget https://download.pytorch.org/models/resnet101-5d3b4d8f.pth
res152
wget https://download.pytorch.org/models/resnet152-b121ed2d.pth
download the pretrained resnet models and place it under data/pretrained_model. Only ones you will use are required.
Install all the python dependencies using pip:
pip install -r requirements.txt
Compile the cuda dependencies using following simple commands:
cd lib
python setup.py build develop
It will compile all the modules you need, including NMS, ROI_Pooing, ROI_Align. The default version is compiled with Python 3.6.
Before training, set the right directory to save and load the trained models. Change the arguments "save_dir" and "load_dir" in trainval_net.py and test_net.py to adapt to your environment.
To train a faster R-CNN model with resnet50 on pascal_voc, simply run:
CUDA_VISIBLE_DEVICES=$GPU_ID python trainval_net.py \
                   --dataset pascal_voc --net res50 \
                   --bs $BATCH_SIZE --nw $WORKER_NUMBER \
                   --lr $LEARNING_RATE --lr_decay_step $DECAY_STEP \
                   --cuda
To auto train a faster R-CNN model with resnet50 on pascal_voc, simply run:
CUDA_VISIBLE_DEVICES=$GPU_ID python auto_trainval_net.py \
                   --dataset pascal_voc --net res50 \
                   --bs $BATCH_SIZE --nw $WORKER_NUMBER \
                   --lr $LEARNING_RATE --lr_decay_gamma $DECAY_GAMMA \
                   --lr_decay_patience $DECAY_PATIENCE \
                   --cuda
where 'bs' is the batch size with default 1. Alternatively, to train with resnet101 on pascal_voc, simple run:
 CUDA_VISIBLE_DEVICES=$GPU_ID python trainval_net.py \
                    --dataset pascal_voc --net res101 \
                    --bs $BATCH_SIZE --nw $WORKER_NUMBER \
                    --lr $LEARNING_RATE --lr_decay_step $DECAY_STEP \
                    --cuda
Above, BATCH_SIZE and WORKER_NUMBER can be set adaptively according to your GPU memory size. On Titan Xp with 12G memory, it can be up to 6.
If you have multiple (say 8) Titan Xp GPUs, then just use them all! Try:
python trainval_net.py --dataset pascal_voc --net res101 \
                       --bs 24 --nw 8 \
                       --lr $LEARNING_RATE --lr_decay_step $DECAY_STEP \
                       --cuda --mGPUs
Change dataset to "coco" or 'vg' if you want to train on COCO or Visual Genome.
If you want to evlauate the detection performance of a pre-trained resnet101 model on pascal_voc test set, simply run
python test_net.py --dataset pascal_voc --net res101 \
                   --checksession $SESSION --checkepoch $EPOCH --checkpoint $CHECKPOINT \
                   --cuda
Specify the specific model session, chechepoch and checkpoint, e.g., SESSION=1, EPOCH=6, CHECKPOINT=416.
We give a auto code to evlauate the detection performance of a trained model in one session , just simply run
python auto_test_net.py --dataset pascal_voc --net res18 \
                   --checksession $SESSION --checkepoch $EPOCH --checkpoint $CHECKPOINT \
                   --cuda
And you will get a figure with test result in models dir.
If you want to run detection on your own images with a pre-trained model, download the pretrained model listed in above tables or train your own models at first, then add images to folder $ROOT/images, and then run
python demo.py --net res101 \
               --checksession $SESSION --checkepoch $EPOCH --checkpoint $CHECKPOINT \
               --cuda --load_dir path/to/model/directoy
Then you will find the detection results in folder $ROOT/images.
Note the default demo.py merely support pascal_voc categories. You need to change the line to adapt your own model.
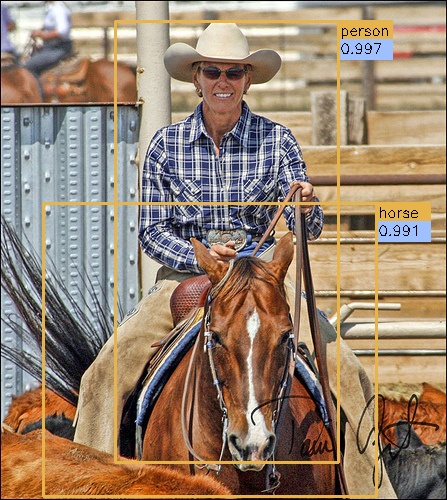
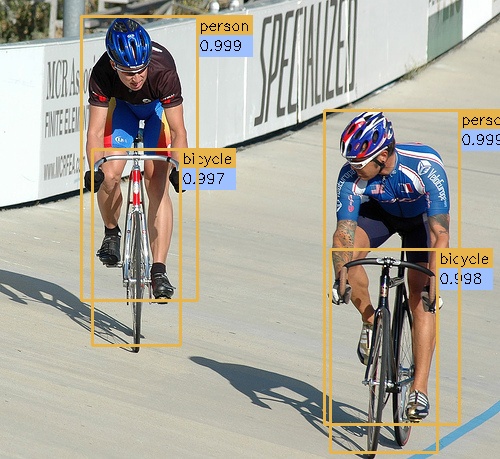
Below are some detection results:
You can use a webcam in a real-time demo by running
python demo.py --net res101 \
               --checksession $SESSION --checkepoch $EPOCH --checkpoint $CHECKPOINT \
               --cuda --load_dir path/to/model/directoy \
               --webcam $WEBCAM_ID
The demo is stopped by clicking the image window and then pressing the 'q' key.
You can read a video file and save result in a real-time demo by running
python video.py --net res101 \
                --checksession $SESSION --checkepoch $EPOCH --checkpoint $CHECKPOINT \
                --cuda --load_dir path/to/model/directoy \
                --video $VIDEO_NAME
The demo is stopped by clicking the image window and then pressing the 'q' key.
TODO
TODO


