This is an implementation of a MAVLink and DroneCAN OpenDroneID transmitter. It aims to provide a transmitter solution for the FAA standard RemoteID requrement, meeting the transmitter component of the ASTM F3586-22 Means of Compliance. It also aims to be compliant with the RemoteID regulation in the EU.
It is the responsibility of the user/manufacturer to configure the ArduRemoteID firmware in a way that it is compliant with the local RemoteID regulation. For instance, in the USA it is mandatory that UAV manufacturers submit a DoC (Declaration of Conformance) to the FAA where they state that their product is compliant with the RemoteID regulation.
The firmware currently supports the ESP32-S3 and ESP32-C3 chips. There are 7 boards supported so far with more to come:
- the ESP32-S3 dev board: https://au.mouser.com/ProductDetail/356-ESP32S3DEVKTM1N8
- the ESP32-C3 dev board: https://au.mouser.com/ProductDetail/Espressif-Systems/ESP32-C3-DevKitM-1
- a Bluemark DB110 (legacy) from https://bluemark.io/ (product page)
- a Bluemark DB200 from https://bluemark.io/ (product page | replaced by the db201))
- a Bluemark DB201 from https://bluemark.io/ (product page | buy)
- a Bluemark DB202mav from https://bluemark.io/ (product page | buy)
- a Bluemark DB210pro from https://bluemark.io/ (product page | buy)
Hardware from https://wurzbachelectronics.com/ is expected to be added soon.
For the ESP32-S3 dev board the pins assumed in this firmware are:
- UART TX on pin 18
- UART RX on pin 17
- CAN TX on pin 47
- CAN RX on pin 38
For the ESP32-C3 dev board the pins assumed in this firmware are:
- UART TX on pin 3
- UART RX on pin 2
- CAN TX on pin 5
- CAN RX on pin 4
For CAN a suitable 1MBit bxCAN transceiver needs to be connected to the CAN TX/RX pins.
You can also do MAVLink on the USB UART port (the one marked "UART" on the silkscreen). That allows for easy simulation testing by plugging in a micro USB cable.
See board_config.h and Makefile for information on porting to new boards.
This firmware supports the following transmission modes:
- WiFi Broadcast
- WiFi NAN (Neighbour Awareness Networking)
- Bluetooth 4 Legacy Advertising
- Bluetooth 5 Long Range + Extended Advertising
This firmware supports communication with an ArduPilot flight controller either using MAVLink or DroneCAN.
For MAVLink the following service is used: https://mavlink.io/en/services/opendroneid.html
For DroneCAN the following messages are used: https://github.com/dronecan/DSDL/tree/master/dronecan/remoteid
The DroneCAN messages are an exact mirror of the MAVLink messages to make a dual-transport implementation easy.
Pre-built releases are in the releases list folder on github.
https://github.com/ArduPilot/ArduRemoteID/releases
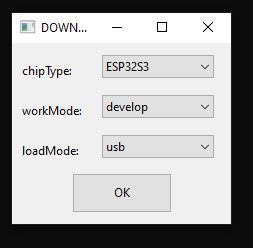
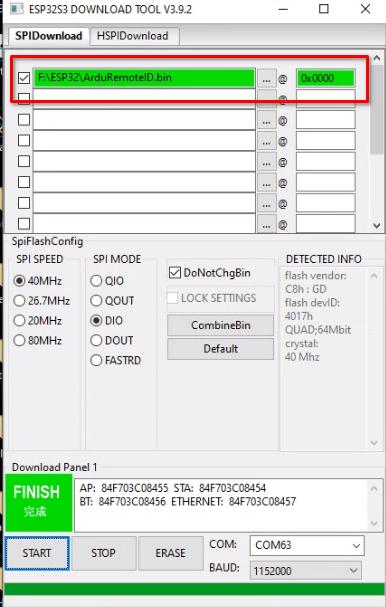
For initial firmload load, to flash to an ESP32-S3 board use the espressif FlashTool from
https://www.espressif.com/en/support/download/other-tools
If this is the first time flashing the board, you may need to hold the "boot" button down while attaching the USB cable to the USB connector marked "USB"
and then use the pre-built binary in the releases folder to flash using the following options, after selecting the COMM port that the board is attached:
subsequent re-flashing of newer releases should not require holding the "boot" button during power-up of the board as the USB cable is attached.
If the board already runs ArduRemoteID, the preferred firmware upgrade method is to upload a new firmware file via the webinterface.
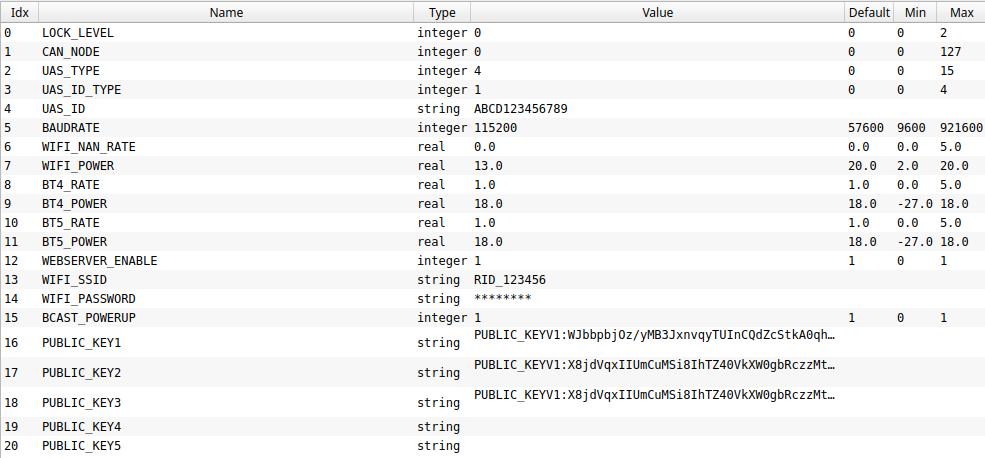
The firmware comes with a set of parameters which are accessible from DroneCAN or MAVLink. The parameters allow for a lot of flexibility in controlling the behaviour of the board.
DroneCAN allows control of any parameter. Using MAVLink only non-string parameters are accessible.
Key parameters are:
-
LOCK_LEVEL: this controls the lockdown of the board. If this is set to a non-zero value then all parameters updates via DroneCAN will be prevented. To change parameters (including the LOCK_LEVEL) once this is set you need to use a DroneCAN SecureCommand. There is an example script in scripts/secure_command.py which can change any parameter if you know a private key corresponding to one of the public keys.
-
UAS_TYPE, UAS_ID_TYPE and UAS_ID: these override the IDs in the RemoteID BasicID packet when they have all been set. These should be set by the vendor before shipping the vehicle.
-
WEBSERVER_ENABLE: this enables the building WiFi access point and webserver for status monitoring and secure firmware update.
-
PUBLIC_KEY1 to PUBLIC_KEY5: these are the public keys that will be used to verify firmware updates and secure update of parameters
The firmware comes with a builtin web server if the parameters WEBSERVER_ENABLE is set. The WiFi access point will use a SSID from WIFI_SSID and password from WIFI_PASSWORD which you can set with DroneCAN parameter tools such as the DroneCAN GUI tool or MissionPlanner CAN tool.
The default SSID is RID_xxxxxxxx where xxxxxxxx is the factory WiFi MAC address of the board. The default password is ArduRemoteID.
The web server has a secure firmware update mechanism which will only allow a properly signed firmware with a signature corresponding to one of the 5 public keys in the parameters. If no public keys are set then any firmware can be loaded.
The web server defaults to URL http://192.168.4.1 once you connect to the WiFi access point.
To generate public/private key pairs please use:
scripts/generate_keys.py
the keys are compatible with the ArduPilot secure boot system. By default the 3 ArduPilot release public keys are included.
Once you have generated a public key you can add it to the RemoteID node using a DroneCAN parameter editor. Make sure you keep the private key in a secure location.
To upload a firmware via the web server you need to use an "OTA" (Over The Air) firmware, which is generated as OTA files in the build. You then need to sign it with a private key corresponding to one of the public keys on the RemoteID node.
To sign an OTA firmware you should use a command such as this one:
scripts/sign_fw.py ArduRemoteID_ESP32S3_DEV_OTA.bin MyName_private_key.dat 1
The '1' on the end is the BOARD_ID. See board_config.h for the board IDs for your board.
Once signed you can upload the firmware via the web server.
Set LOCK_LEVEL to -1 to skip any checks for the OTA upgrade like board ID check, signed firmware with a valid key. For LOCK_LEVEL 0 or higher, only firmware files are accepted that match the board ID and are signed with a valid key. (OTA firmware files in the ArduRemoteID github page are always signed with a valid key.)
The LOCK_LEVEL parameter is the way a vendor can lock down the RemoteID board so that it is tamper resistant. if any valid public keys have been set then setting LOCK_LEVEL=1 will prevent any parameter changes using the DroneCAN or MAVLink interfaces. All parameter changes will need to be made via the SecureCommand signed interface.
Setting LOCK_LEVEL=2 will also cause the ESP32 eFuses to be set to prevent firmware updates except via the signed web interface. This is a permanent change and cannot be undone even if the LOCK_LEVEL is changed back to 0 or 1 via SecureCommand.
Setting LOCK_LEVEL=-1 will skip any checks for upgrading the firmware via the web server like board ID check, signed firmware with a valid key.
The default LOCK_LEVEL=0 allows to change parameters and only allows firmware upgrades via the web server that have been signed with a valid key. Also the board ID of the firmware file needs to match the board ID of the device.
Once LOCK_LEVEL is 1 or 2 you cannot use normal parameter commands to set parameters. Instead you need to use the DroneCAN SecureCommand interface or the MAVLink SECURE_COMMAND interface.
For DroneCAN see the script in scripts/secure_command.py, for example this command would change the UAS_TYPE to 3:
scripts/secure_command.py mavcan::14550 --private-key my_private_key.dat --target-node=125 UAS_TYPE=3
For MAVLink you can use the SecureCommand module in MAVProxy. For example:
module load SecureCommand
securecommand set private_keyfile my_private_key.dat
securecommand getsessionkey
securecommand setconfig UAS_TYPE=3
You can also use secure commands to set LOCK_LEVEL back to zero, but note that if you have set LOCK_LEVEL=2 then the setting of the eFuse bits is not undone. You will be able to change parameters but you will not be able to flash firmware via the USB port. You can still flash a signed firmware using the web interface.
Support for OpenDroneID is in ArduPilot master and is also in the 4.2.3 stable releases and 4.3.x releases. You need to enable it on a board by setting "define AP_OPENDRONEID_ENABLED 1" in the hwdef.dat for your board or by using --enable-opendroneid when doing waf configure.
Many thanks to the great work by:
- OpenDroneID: https://github.com/opendroneid/
- Steve Jack: https://github.com/sxjack/uav_electronic_ids
- Roel Schiphorst: https://bluemark.io/
- David Buzz: ESP32 CAN and bluetooth drivers
This firmware builds on their work.
This firmware is licensed under the GNU GPLv2 or later


