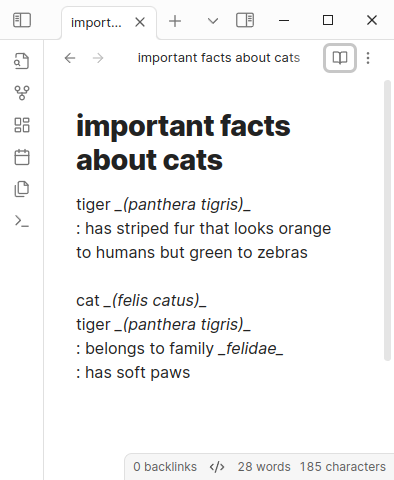
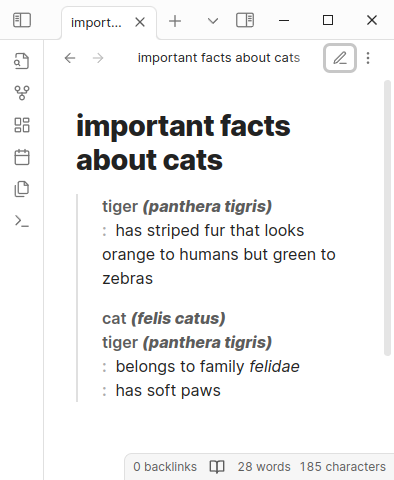
This is a plugin for Obsidian (https://obsidian.md). It renders description lists in reading mode.
| editing mode | reading mode |
|---|---|
 |
 |
Description lists are a feature of HTML. They were called «definition lists» in HTML 4 but were renamed to «description lists» in HTML 5. They are still sometimes called «definition lists» — but we shall call them «description lists», because this is in line with the current HTML standard and better reflects the generality of their possible uses.
In markdown, descriptions are denoted with a colon, like this:
tiger _(panthera tigris)_
: has striped fur that looks orange to humans but green to zebras
This markup is similar to what you would see in some printed dictionaries, say from Merriam-Webster.
There can be one or more terms and one or more details in a description:
cat _(felis catus)_
tiger _(panthera tigris)_
: belongs to family _felidae_
: has soft paws
One or more consecutive descriptions make a description list.
Obsidian's markdown engine does not support description lists. This feature has been requested since forever but there is no indication so far that any progress will happen along official channels. We have to take care of the matter ourselves.
When you switch from editing mode to reading mode, Obsidian renders your markdown into HTML, then displays this HTML. We intercept this rendered HTML and find all elements in it that look like they have some descriptions in them. We decide if an element looks like a description by parsing its children nodes with a special description parser — if the parse succeeds, we have the descriptions at hand. We then construct new description list HTML code from these descriptions and swap it in.
Technically, we do this by defining a post-processor and some parser combinators.
The philosophy of styling is to make description lists distinctive but not outstanding.
- Description lists are styled with a line on the left — like blockquotes, but of subdued colour.
- Description terms are rendered in faded bold font.
- Description details are rendered like bullet lists, but with a faded bold colon instead of a bullet.
-
We cannot handle block elements, like paragraphs and lists, inside descriptions. Since description lists are themselves block elements, this also means that we cannot handle nested description lists. Block elements are defined in markdown by whitespace, and Obsidian strips whitespace, so we do not have the information needed to handle block elements.
-
We cannot group consecutive descriptions at the top level into a description list, because Obsidian's rendering engine is incremental — it gives our post-processor one top level paragraph at a time, with no way to access the context. However, we fake this by making consecutive description lists at the top level look like a single description list.
-
Turns out there is already a plugin called Definition List that has the mission of rendering description lists. Too bad I was not aware of it until after I wrote mine.
Differences:
- The other plugin does not seem to be able to handle multiple terms within one description at the moment.
- This plugin does not support live preview, the other plugin does.
BRAT — fully, Beta Reviewers Auto-update Tester, — is a plugin that lets you install other plugins that are published on GitHub, whether or not they are registered with the Obsidian government as community plugins. In particular, you can install this plugin with BRAT. Follow the official instructions, it should work. However, it can only install released versions — if you want to install the latest source, follow the subsection installing manually.
We use classic yarn as a package manager. You need to have it installed — follow the instructions on their official site as needed.
- Run
yarnandyarn buildto buildmain.js. - Copy over
main.js,styles.css,manifest.jsonto your vaultVaultFolder/.obsidian/plugins/description-lists/.
- Run
yarnto install dependencies. - Run
yarn buildto buildmain.js - Run
yarn devto automatically buildmain.jswhenever relevant files change. - Run
yarn testto automatically run the test suite whenever relevant files change. - Run
yarn formatto tidy up the whitespace. - Run
yarn lintto make sure nothing is overly stupid. - Run
yarn check-coverageto run the test suite and see how well it covers the code base. - Run
yarn version --patch,yarn version --minororyarn version --majorto automatically update version everywhere it needs to be updated.
There is a health check workflow running on pull requests. The master branch is protected so a pull request cannot be merged until it passed the health check. In particular, it is being checked that:
- the linter has nothing to say
- the formatting is in line with the standard
- the test suite passes and has full coverage
- Automatically update versions in
manifest.json,package.jsonandversions.jsonby runningyarn version. - Make a commit and merge it to
master. - Tag the merged commit with the version number — without any decorations like
vor whatever, only the version number. Note that this will be a different commit from what you had in the branch being merged (because GitHub changes commits in subtle ways when merging), so you have to attach a tag after you merge. - Push this tag with
git push --tags. - Watch the new version automatically built by the
releaseworkflow and added as a draft release. - The draft release can be made public by hand in the GitHub web interface.