最近直播很火,工作最近做了直播,但我们主要是直播电商的方面的,因为是直播方面,产品会有功能都会去借鉴直播秀场的一些,譬如连麦功能、私聊、聊天室、点亮、推送、内购、充值、提现、弹幕、普通礼物、豪华礼物、红包、排行榜等其他功能,我在此整理了,关于直播类app普通礼物和豪华礼物的整理几个礼物动画效果,和大家分享交流一下。如果不完善地方,请提交一个issue。
UI设计师给出flash动画的实现效果图,与切图,动画的时间轴,每个动画执行的时长,标号对应动画的距离,根据动画的进场顺序和时长,结合GCD依次渲染动画,程序在加载图片和实现动画中要特别注意内存和CPU占用。
以海洋之星动画为例:
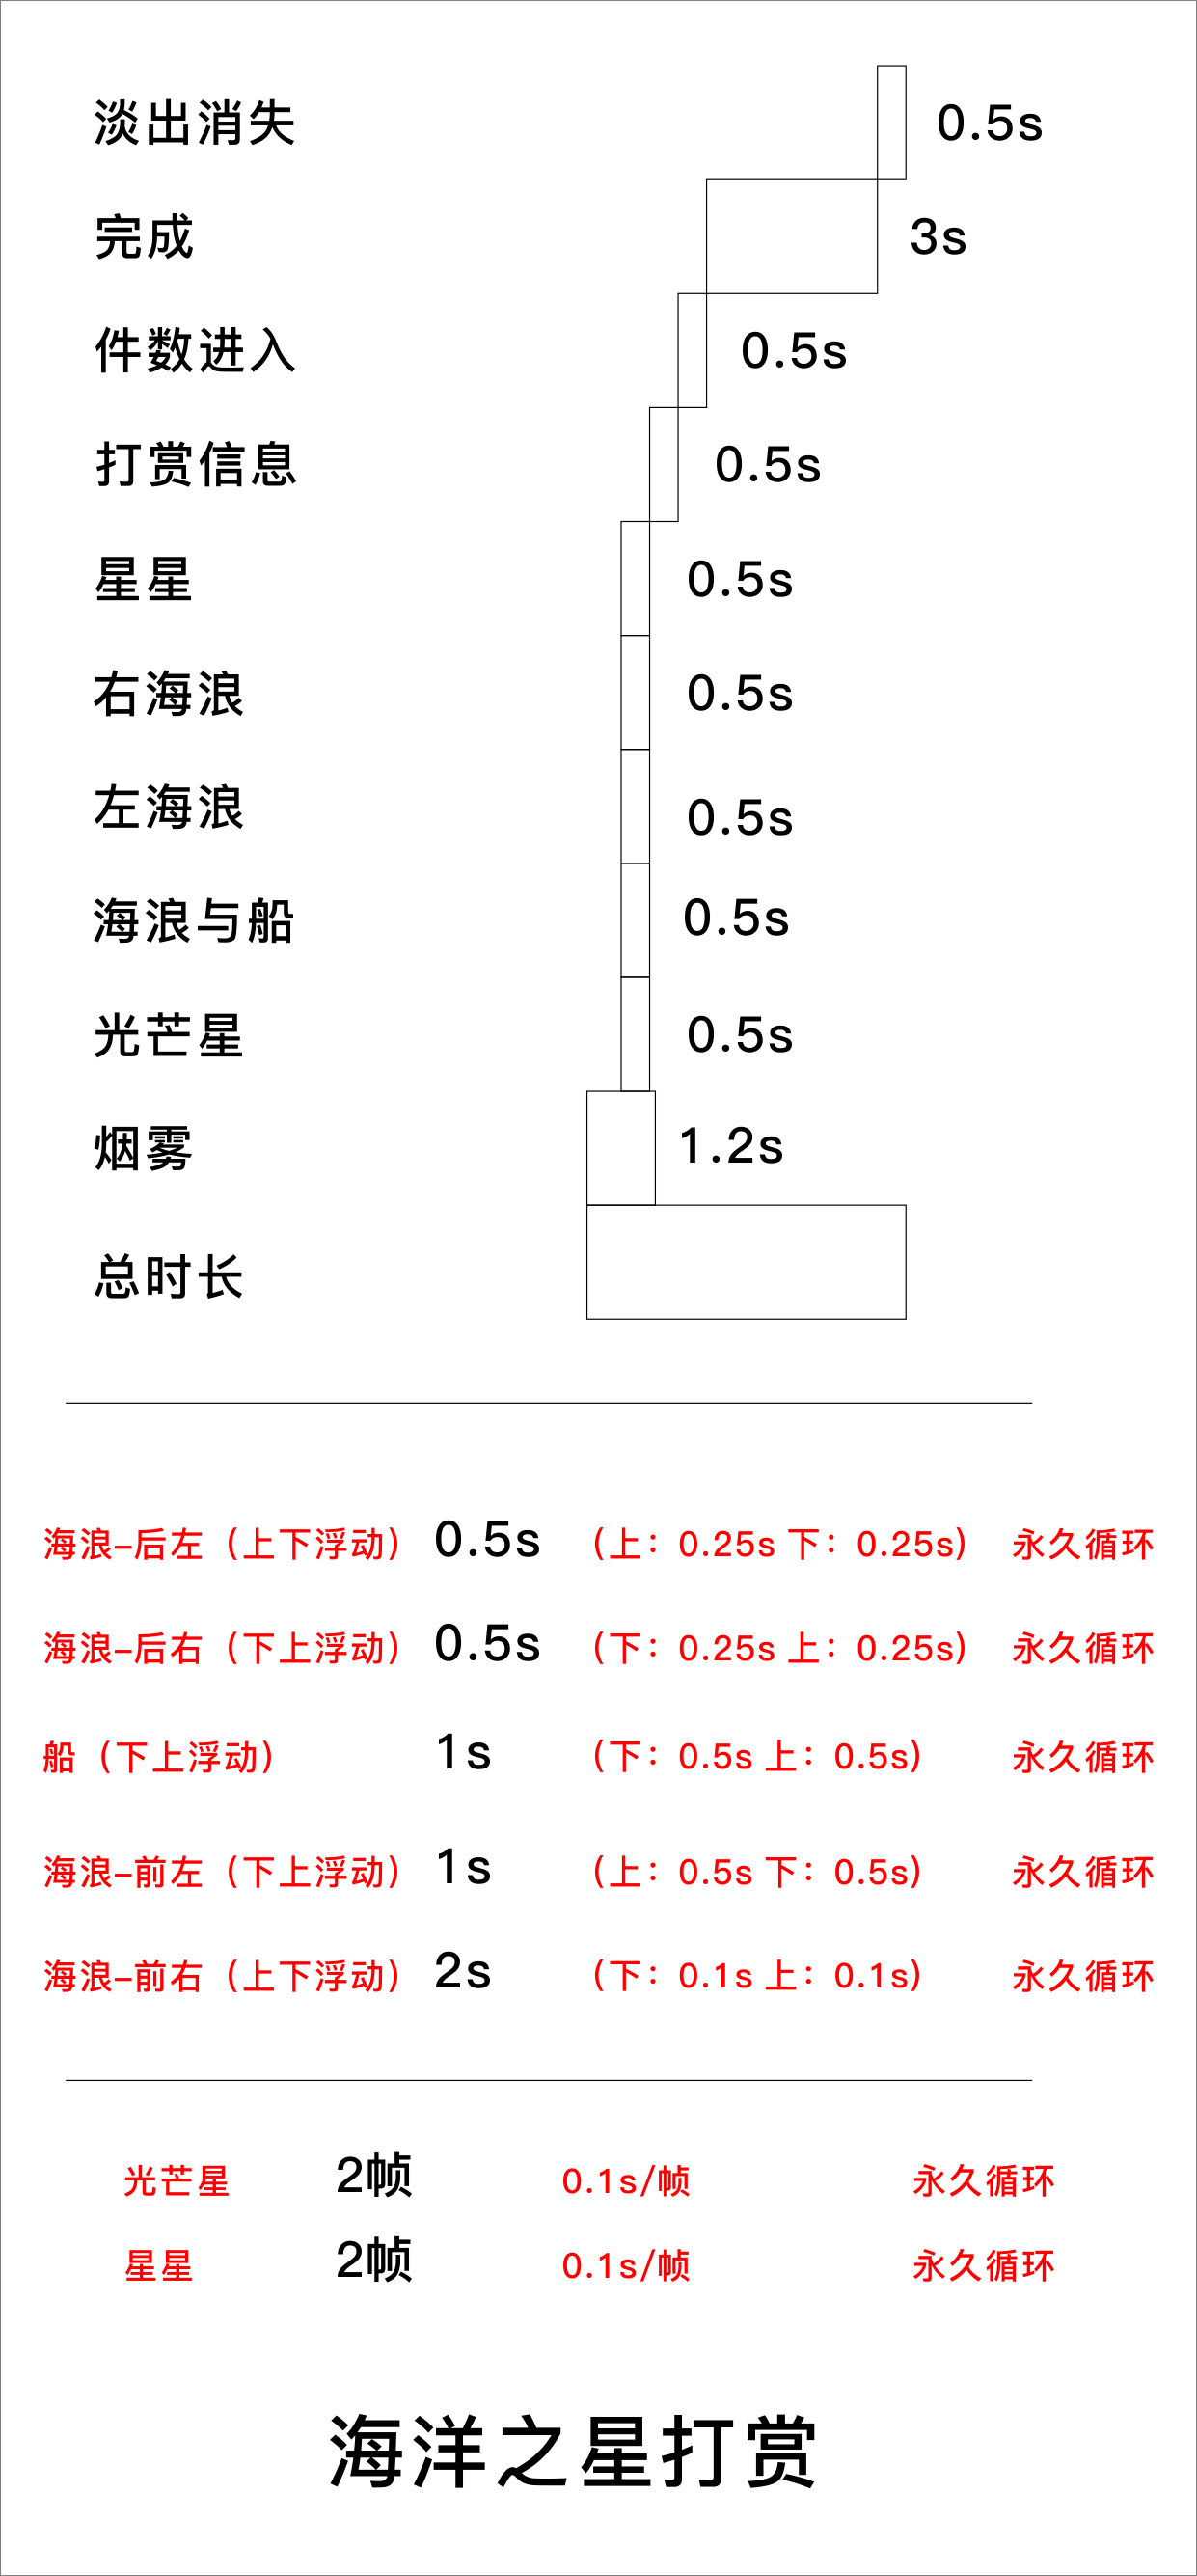
按照时间轴让动画动画的进场顺序和时长依次一次执行。
- (void)animateWithCompleteBlock:(completeBlock)completed{


  //发光的星星
  [self shiningStarAinmView];

  //星星旋转
  [self startRotationAnimView];
  //烟雾动画
  [self startBlueboomAnimView];

  [UIView animateWithDuration:0.5 delay:0 options:UIViewAnimationOptionCurveEaseIn animations:^{

      _leftImageView.frame   = CGRectMake(0,_leftImageView.frame.origin.y, KLeftImageViewWidth, KLeftImageViewHight);
      _rightImageView.frame  = CGRectMake(SCREEN_WIDTH-KRightImageViewWidth,_rightImageView.frame.origin.y, KRightImageViewWidth, KRightImageViewHight);

      //底部海浪与船
      _leftBackAnimView.frame  = CGRectMake(_leftBackAnimView.frame.origin.x,SCREEN_HEIGHT-KLeftBackAnimViewHight-KLeftBackAnimViewHightFooterSpace, KLeftBackAnimViewWidth, KLeftBackAnimViewHight);
      _rightBackAnimView.frame = CGRectMake(_rightBackAnimView.frame.origin.x,SCREEN_HEIGHT-KRightBackAnimViewHight-KRightBackAnimViewHightFooterSpace, KRightBackAnimViewWidth, KRightBackAnimViewHight);
      _shipAnimView.frame      = CGRectMake(_shipAnimView.frame.origin.x,SCREEN_HEIGHT-KShipAnimViewHight-KShipAnimViewHightFooterSpace , KShipAnimViewWidth, KShipAnimViewHight);
      _leftDownAnimView.frame  = CGRectMake(0,SCREEN_HEIGHT-KLeftDownAnimViewHight-KLeftDownAnimViewHightFooterSpace, KLeftDownAnimViewWidth, KLeftDownAnimViewHight);
      _rightDownAnimView.frame = CGRectMake(_rightDownAnimView.frame.origin.x,SCREEN_HEIGHT - KRightDownAnimViewHight - KRightDownAnimViewHightFooterSpace, KRightDownAnimViewWidth, KRightDownAnimViewHight);

   } completion:^(BOOL finished) {


      [UIView upDownAnimation:self.leftBackAnimView  withAnimUpToDownHight:KAnimUpToDownHight];
      [UIView downUpAnimation:self.rightBackAnimView withAnimUpToDownHight:KAnimUpToDownHight];
      [UIView downUpAnimation:self.shipAnimView      withAnimUpToDownHight:KAnimUpToDownHight*3 withDuration:1 withRepeatCount:HUGE_VALF];
      [UIView downUpAnimation:self.leftDownAnimView  withAnimUpToDownHight:KAnimUpToDownHight withDuration:1 withRepeatCount:HUGE_VALF];
      [UIView upDownAnimation:self.rightDownAnimView withAnimUpToDownHight:KAnimUpToDownHight*2 withDuration:2 withRepeatCount:HUGE_VALF];

      //用户打赏动画
      [self showUserInfoAinm];
  }];


  dispatch_after(dispatch_time(DISPATCH_TIME_NOW, (int64_t)(1.5 * NSEC_PER_SEC)), dispatch_get_main_queue(), ^{
     [self shakeNumberLabel];
  });


  self.completeBlock = completed;

}
###1)上下往返运动
// 上下浮动 无限浮动
+(void)upDownAnimation:(UIView *)upDownAnimationView withAnimUpToDownHight:(float )animUpToDownHight{
    [self upDownAnimation:upDownAnimationView withAnimUpToDownHight:animUpToDownHight withDuration:0.5 withRepeatCount:HUGE_VALF];
}
// 上下浮动
+(void)upDownAnimation:(UIView *)upDownAnimationView withAnimUpToDownHight:(float )animUpToDownHight withDuration:(float)duration withRepeatCount:(float)repeatCount;
{

  CAKeyframeAnimation *upDownAnimation;
   upDownAnimation = [CAKeyframeAnimation animationWithKeyPath:@"position.y"];
   upDownAnimation.values = @[@(upDownAnimationView.layer.position.y), @(upDownAnimationView.layer.position.y + animUpToDownHight),@(upDownAnimationView.layer.position.y)];
   upDownAnimation.duration = duration;
   upDownAnimation.fillMode = kCAFillModeBoth;
   upDownAnimation.calculationMode = kCAAnimationCubic;
   upDownAnimation.repeatCount = repeatCount;
  [upDownAnimationView.layer addAnimation:upDownAnimation forKey:@"upDownAnimation"];

}

+(void)downUpAnimation:(UIView *)animationView withAnimUpToDownHight:(float )animUpToDownHight{
    [self downUpAnimation:animationView withAnimUpToDownHight:animUpToDownHight withDuration:0.5 withRepeatCount:HUGE_VALF];
}
// 下上浮动
+(void)downUpAnimation:(UIView *)animationView withAnimUpToDownHight:(float )animUpToDownHight withDuration:(float)duration withRepeatCount:(float)repeatCount{

  CAKeyframeAnimation *downUpAnimation;
   downUpAnimation = [CAKeyframeAnimation animationWithKeyPath:@"position.y"];
   downUpAnimation.values = @[@(animationView.layer.position.y), @(animationView.layer.position.y - animUpToDownHight),@(animationView.layer.position.y)];
   downUpAnimation.duration = duration;
   downUpAnimation.fillMode = kCAFillModeBoth;
   downUpAnimation.calculationMode = kCAAnimationCubic;
   downUpAnimation.repeatCount = repeatCount;
  [animationView.layer addAnimation:downUpAnimation forKey:@"downUpAnimation"];

}
###2)放大缩小效果,譬如礼物的数量动画
UIView的transform是可以用仿射变换矩阵来控制平移、放大缩小
- (void)startAnimWithDuration:(NSTimeInterval)duration {

    [UIView animateKeyframesWithDuration:duration delay:0 options:0 animations:^{
        [UIView addKeyframeWithRelativeStartTime:0 relativeDuration:1/2.0 animations:^{

            self.transform = CGAffineTransformMakeScale(2, 2);
        }];
        [UIView addKeyframeWithRelativeStartTime:1/2.0 relativeDuration:1/2.0 animations:^{

            self.transform = CGAffineTransformMakeScale(0.8, 0.8);
        }];

        } completion:^(BOOL finished) {
            [UIView animateWithDuration:0.25 delay:0 usingSpringWithDamping:0.4 initialSpringVelocity:10 options:UIViewAnimationOptionCurveEaseInOut animations:^{
                self.transform = CGAffineTransformMakeScale(1.0, 1.0);
            } completion:nil];
        }];
}
文字描边效果,实现礼物数量 + 99 的效果
//  重写 drawTextInRect 文字描边效果
- (void)drawTextInRect:(CGRect)rect {

    CGSize shadowOffset = self.shadowOffset;
    UIColor *textColor = self.textColor;

    CGContextRef c = UIGraphicsGetCurrentContext();
    CGContextSetLineWidth(c, 3.0);
    CGContextSetLineJoin(c, kCGLineJoinRound);

    CGContextSetTextDrawingMode(c, kCGTextStroke);
    self.textColor = _borderColor;
    [super drawTextInRect:rect];

    CGContextSetTextDrawingMode(c, kCGTextFill);
    self.textColor = textColor;
    self.shadowOffset = CGSizeMake(0, 0);
    [super drawTextInRect:rect];

    self.shadowOffset = shadowOffset;

}
###3)视图变暗效果
alpha值属性是透明度,把背景设置成淡黑色,然后调整alpha可以达到背景渐变的视图效果
[UIView animateWithDuration:1.5 animations:^{
	self.mBackgroundView.alpha = 0.5;
}];
###4)匀速运动、交错效果
right是项目封装的一个属性,本质是对UIView的frame进行操作; 两朵云, 左边的朝右,右边的朝左,即可达到交错的效果。
   [UIView animateWithDuration:TOTAL_TIME delay:0 options:UIViewAnimationOptionCurveLinear animations:^{
        self.mAngelCloudView0.right += 250;
        self.mAngelCloudView1.right -= 190;
    } completion:nil];
####5)闪烁效果
闪烁的本质是alpha的变化,但是UIView的block动画不好实现重复效果; UIView的alpha对应的是layer的opacity属性,设定好起始、过度和结束的状态,实现闪烁的效果。
 CAKeyframeAnimation *opacityAnimation;
    opacityAnimation = [CAKeyframeAnimation animationWithKeyPath:@"opacity"];
    opacityAnimation.values = @[@(1), @(0.6), @(1)];
    opacityAnimation.duration = duration;
    opacityAnimation.fillMode = kCAFillModeBoth;
    opacityAnimation.calculationMode = kCAAnimationCubic;
    opacityAnimation.repeatCount = HUGE_VALF;
    [opacityAnimationView.layer addAnimation:opacityAnimation forKey:@"opacityAnimation"];
####7)贝塞尔曲线运动
贝塞尔曲线是优化动画体验的很重要部分,比如说天上掉下来的羽毛,地上冒起来的气泡,空中飘荡的气球,都可以用贝塞尔曲线来绘制,从而获得很好的视觉体验; 本质还是关键帧动画,这次操作的属性是position,通过path属性来确定路径; 给贝塞尔曲线设定好目标点后,把path赋值给关键帧动画,再把动画添加到layer上即可;
UIImage *image = [[AnimationImageCache shareInstance] getImageWithName:@"gift_castle_hot_air_balloon3.png"];
UIImageView *hotAirBalloonView0 = [[UIImageView alloc] initWithFrame:CGRectMake(50, 100, image.size.width / 2, image.size.height / 2)];
 [self addSubview:hotAirBalloonView0];
 [hotAirBalloonView0 setImage:image];

 // 飘动
 CGPoint position = CGPointMake(self.width, hotAirBalloonView0.top);
 CGFloat duration = 5;
 CAKeyframeAnimation *positionAnimate = [CAKeyframeAnimation animationWithKeyPath:@"position"];
 positionAnimate.repeatCount = 1;
 positionAnimate.duration = duration;
 positionAnimate.fillMode = kCAFillModeForwards;
 positionAnimate.removedOnCompletion = NO;

 UIBezierPath *sPath = [UIBezierPath bezierPath];
 [sPath moveToPoint:position];
 [sPath addCurveToPoint:CGPointMake(-image.size.width / 2, position.y) controlPoint1:CGPointMake(self.width / 3 * 2, position.y - 60) controlPoint2:CGPointMake(self.width / 3, position.y + 60)];
 positionAnimate.path = sPath.CGPath;
 [hotAirBalloonView0.layer addAnimation:positionAnimate forKey:@"positionAnimate"];
###8)旋转效果
灯光扫动,花朵旋转等旋转效果,都可以transform的rotation.z属性来实现; 同样使用CAKeyframeAnimation实现,设定好初始、中间、结束状态,动画时间已经重复次数,并添加到layer,完成旋转效果;
CAKeyframeAnimation* rotationAnimation;
rotationAnimation = [CAKeyframeAnimation animationWithKeyPath:@"transform.rotation.z"];
rotationAnimation.values = @[@(M_PI / 12), @(M_PI / 3), @(M_PI / 12)];
rotationAnimation.duration = 2.5;
rotationAnimation.fillMode = kCAFillModeBoth;
rotationAnimation.calculationMode = kCAAnimationCubic;
//    rotationAnimation.cumulative = YES;
rotationAnimation.repeatCount = HUGE_VALF;

[self.mLightLeftView.layer addAnimation:rotationAnimation forKey:@"rotationAnimation"];
###9)关键帧动画
UIView动画已经具备高级的方法来创建动画,而且可以更好地理解和构建动画。IOS7以后苹果新加了一个animateKeyframesWithDuration的方法,我们可以使用它来创建更多更复杂更酷炫的动画效果,而不需要去使用到核心动画(CoreAnimatino)。
创建关键帧方法: 一种是通过UIImageView的支持,实现帧动画;
另外一种是通过Timer(定时器),设定好时间间隔,手动替换图片。
UIImageView的帧动画没有回调,如果需要实现达到第几帧之后,开始另外的动画的效果,需要用第二种方法。
- UIImageView实现关键帧动画
彩虹变化视图为例子代码实现如下:
void (^keyFrameBlock)() = ^(){ // 创建颜色数组
    NSArray *arrayColors = @[
                             [UIColor orangeColor],
                             [UIColor yellowColor],
                             [UIColor greenColor],
                             [UIColor blueColor],
                             [UIColor purpleColor],
                             [UIColor redColor]];

    NSUInteger colorCount = [arrayColors count];
    // 循环添加关键帧
    for (NSUInteger i = 0; i < colorCount; i++) {

      [UIView addKeyframeWithRelativeStartTime:i / (CGFloat)colorCount   //动画开始的时间
                              relativeDuration:1 / (CGFloat)colorCount   //动画持续时间
                                    animations:^{
                                      [_graduallyView setBackgroundColor:arrayColors[i]];
                                    }];

    }
  };

  [UIView animateKeyframesWithDuration:4.0  //动画的总持续时间
                                 delay:0.0
                               options:UIViewKeyframeAnimationOptionCalculationModeCubic | UIViewAnimationOptionCurveLinear
                            animations:keyFrameBlock
                            completion:^(BOOL finished) {
                              // 动画完成后执行
                              // code...
                            }];
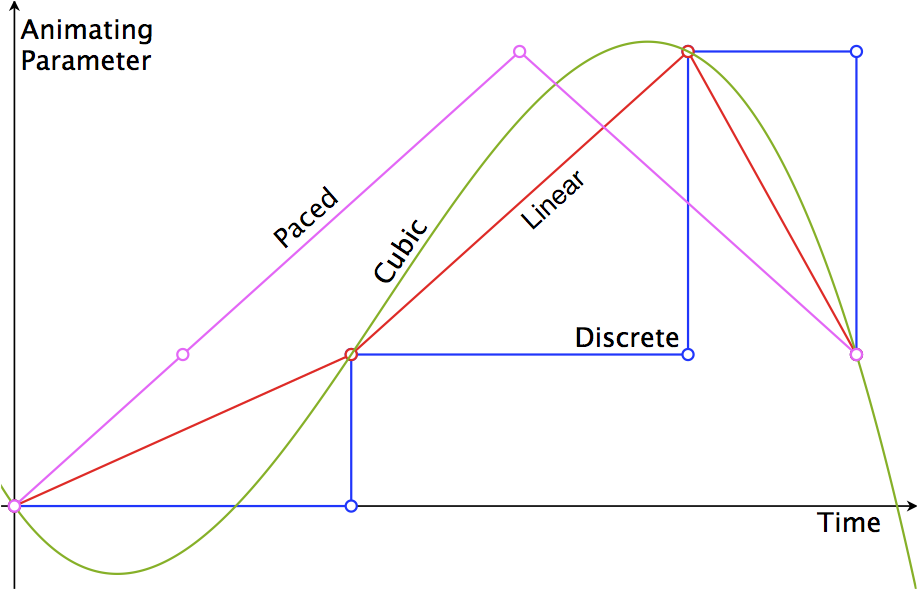
对比UIView动画跟关键帧动画,关键帧动画引入了动画占比时长的概念,这让我们能控制每个关键帧动画的占用比例而不是传入一个无意义的动画时长 —— 这让我们的代码更加难以理解。当然,除了动画占比之外,关键帧动画的options参数也让动画变得更加平滑,下面是关键帧特有的配置参数:
- UIViewKeyframeAnimationOptionCalculationModeLinear // 连续运算模式,线性,为默认的
- UIViewKeyframeAnimationOptionCalculationModeDiscrete // 离散运算模式,只显示关键帧
- UIViewKeyframeAnimationOptionCalculationModePaced // 均匀执行运算模式,线性
- UIViewKeyframeAnimationOptionCalculationModeCubic // 平滑运算模式
- UIViewKeyframeAnimationOptionCalculationModeCubicPaced // 平滑均匀运算模式
下面我们看一张图,让我们更容易理解:
- 另外一种是通过
Timer(定时器),设定好时间间隔,手动替换图片
将一系列帧添加到一个数组里面,然后设置animation一系列属性,如动画时间,动画重复次数,如 【连续动画:一个接一个地显示一系列的图像例子】,如果图片少的话也许这种方式是最快速最容易达到目的的,但是图片很多的话,根据目前我做的实验,图片很多的话 这种方式程序必须会蹦,随后我会提到我们现在的实现方式,而且动画不能够实现暂停,只有停止,项目中要求序列帧播放的时候当手轻触(touch)播放暂停,松开后继续播放 ,横扫(swipe)播放加速,这一系列的需求表明了用animationImages这种方式实现已经不太现实.因为UIImageView的animation不会边用边释放(当然这点仅是我自己的拙见),那就导致了如果图片很多,animation直接崩掉根本 用不了。这时候就需要使用NSTimer去实现了,设定好时间间隔,手动替换图片,代码如下:
NSTimer *myAnimatedTimer = [NSTimer scheduledTimerWithTimeInterval:0.04 target:self selector:@selector(setNextImage) userInfo:nil repeats:YES];

-(void) setNextImage
{
   myAnimatedView.image = [UIImage imageNamed:[NSStringstringWithFormat:@"image%i.png",nextImage]];
}
- 连续动画:一个接一个地显示一系列的图像
/**
 烟雾动画
 */
-(void)startBlueboomAnimView{
  NSArray *magesArray = [NSArray arrayWithObjects:
                         [[MZAnimationImageCache shareInstance] getImageWithName:@"ic_Blueboom_1"],
                         [[MZAnimationImageCache shareInstance] getImageWithName:@"ic_Blueboom_2"],
                         [[MZAnimationImageCache shareInstance] getImageWithName:@"ic_Blueboom_3"],
                         [[MZAnimationImageCache shareInstance] getImageWithName:@"ic_Blueboom_4"],
                         [[MZAnimationImageCache shareInstance] getImageWithName:@"ic_Blueboom_5"],
                         [[MZAnimationImageCache shareInstance] getImageWithName:@"ic_Blueboom_6"],
                         [[MZAnimationImageCache shareInstance] getImageWithName:@"ic_Blueboom_7"],
                         [[MZAnimationImageCache shareInstance] getImageWithName:@"ic_Blueboom_8"],
                         [[MZAnimationImageCache shareInstance] getImageWithName:@"ic_Blueboom_9"],
                         [[MZAnimationImageCache shareInstance] getImageWithName:@"ic_Blueboom_10"],
                         [[MZAnimationImageCache shareInstance] getImageWithName:@"ic_Blueboom_11"],
                         [[MZAnimationImageCache shareInstance] getImageWithName:@"ic_Blueboom_12"],nil];
  _blueboomAnimView.animationImages = magesArray;//将序列帧数组赋给UIImageView的animationImages属性
  _blueboomAnimView.animationDuration = 0.6;//设置动画时间
  _blueboomAnimView.animationRepeatCount = 1;//设置动画次数 0 表示无限
  [_blueboomAnimView startAnimating];//开始播放动画

  //延时结束刷新
  dispatch_after(dispatch_time(DISPATCH_TIME_NOW, (int64_t)(1.2 * NSEC_PER_SEC)), dispatch_get_main_queue(), ^{
    [_blueboomAnimView stopAnimating];
    _blueboomAnimView.alpha = 0;
    [_blueboomAnimView removeFromSuperview];
  });

}
- 使用基本关键帧动画
CABasicAnimation,特点:可做3D动画
详细介绍可参看两个帖子: http://blog.csdn.net/iosevanhuang/article/details/14488239 http://blog.csdn.net/iosevanhuang/article/details/14488239
注:( CGAffineTransform 和 CATransform3D 的比较 )
CGAffineTransform is used for 2-D manipulation of NSViews, UIViews, and other 2-D Core Graphics elements. CATransform3D is a Core Animation structure that can do more complex 3-D manipulations of CALayers.( 搬运from stackOverFlow)
CABasicAnimation *animation = [CABasicAnimation animationWithKeyPath:@"transform.rotation.y"];
    animation.fromValue = @(0);
    animation.toValue = @(-M_PI);
    animation.repeatCount = 0;
    animation.duration = 0.4;

    [show3DView.layer addAnimation:animation forKey:@"rotation"];

    CATransform3D transform = CATransform3DIdentity;
    transform.m34 = 1.0 / 500.0;
    show3DView.layer.transform = transform;
- 缓动动画Easing算法使用方法
具体思路如下:
首先是计算出这个区间内的各个阶段, 比如这个过程是分60帧的动画,那么在这60帧中的每一帧,计算出这一帧所得的值,放到一个数组里面,然后通过CAKeyframeAnimation来对这一组数值分别进行更换 而这组数值就是通过Easing的各种不同算法算出来的。
代码实现如下:
+ (id)animationWithKeyPath:(NSString *)path function:(AHEasingFunction)function fromPoint:(CGPoint)fromPoint toPoint:(CGPoint)toPoint keyframeCount:(size_t)keyframeCount

{

NSMutableArray *values = [NSMutableArray arrayWithCapacity:keyframeCount];

CGFloat t =0.0;

CGFloat dt =1.0/ (keyframeCount -1);

for(size_t frame =0; frame < keyframeCount; ++frame, t += dt)

{

CGFloat x = fromPoint.x + function(t) * (toPoint.x - fromPoint.x);

CGFloat y = fromPoint.y + function(t) * (toPoint.y - fromPoint.y);

[values addObject:[NSValue valueWithCGPoint:CGPointMake(x, y)]];

}

CAKeyframeAnimation *animation = [CAKeyframeAnimation animationWithKeyPath:path];

[animation setValues:values];

return animation;

}
定义一个数组,用来存放每一帧的预期值
定义一个时间t,其实是0.0
定义一个每帧平分的比例,dt
然后for循环,计算中间平分每一帧的预期值,如x
预期值=起始值+Easing的变换方程带入(当前帧占总帧的百分比)*起始到预期之间的差距值
这样每帧就会按照Easing不同方程的规律得出相应的变化值了
关于animationWithKeyPath方法的参数,可以是如下
transform.scale = 比例轉換
transform.scale.x = 闊的比例轉換
transform.scale.y = 高的比例轉換
transform.rotation.z = 平面圖的旋轉
opacity = 透明度
margin
zPosition
backgroundColor
cornerRadius
borderWidth
bounds
contents
contentsRect
cornerRadius
frame
hidden
mask
masksToBounds
opacity
position
shadowColor
shadowOffset
shadowOpacity
shadowRadius
当然,这些事CAKeyframeAnimation所支持的,还可以自己去写自定义的属性值
####10) 使用UIView类实现动画
基本写法,代码必须放在Begin和Commit之间:
[UIView beginAnimations:nil context:nil]; // 开始动画
[UIView setAnimationDuration:10.0]; // 动画时长
CGPoint point = _imageView.center; point.y += 150;
[_imageView setCenter:point];
[UIView commitAnimations]; // 提交动画
同时运行多个动画效果:
[UIView beginAnimations:nil context:nil];
[UIView setAnimationDuration:3.0];
[_imageView setAlpha:0.0];
[UIView commitAnimations];

[UIView beginAnimations:nil context:nil];
[UIView setAnimationDuration:3.0];
CGPoint point = _imageView.center;
point.y += 150;
[_imageView setCenter:point];
[UIView commitAnimations];
以上代码实现的动画效果为( 同时执行 ):
1、图像向下平移150像像
2、设置图像透明度为0。
指定上下文:
CGContextRef context = UIGraphicsGetCurrentContext();
[UIView beginAnimations:nil context:context];
[UIView setAnimationDuration:2.0];
[_imageView setAlpha:0];
[UIView commitAnimations];
UIGraphicsGetCurrentContext():获取当前视图的上下文
####11)使用UIView的动画块代码
方法一:
[UIView animateWithDuration:4.0 // 动画时长
                 animations:^{
                     // code
                 }];
方法二:
[UIView animateWithDuration:4.0 // 动画时长
                                 animations:^{
                                         // code...
                                }
                                 completion:^(BOOL finished) {
                                         // 动画完成后执行
                                         // code...
                                 }];
方法三:
[UIView animateWithDuration:4.0 // 动画时长
                                          delay:2.0 // 动画延迟
                                        options:UIViewAnimationOptionCurveEaseIn // 动画过渡效果
                                 animations:^{
                                         // code...
                                }
                                 completion:^(BOOL finished) {
                                         // 动画完成后执行
                                         // code...
                                 }];
方法四,Spring Animationring Animation:
在IOS7开始,系统动画效果广泛应用Spring Animation :
[UIView animateWithDuration:4.0 // 动画时长
    delay:0.2  // 动画延迟
    usingSpringWithDamping:1.0 // 类似弹簧振动效果 0~1
    initialSpringVelocity:5.0 // 初始速度
    options:UIViewAnimationOptionCurveEaseInOut // 动画过渡效果
    animations:^{
      //code.....

      CGPoint point = _imageView.center;
      point.y += 150;
      [_imageView setCenter:point];
    } completion:^(BOOL finished) {
      //动画完成后执行
      //code......
      [_imageView setAlpha:1];

    }];
####12)使用 CATransition 进行控制动画
CATransition *animation = [CATransition animation];
[animation setDuration:1.25f];
[animation setTimingFunction:[CAMediaTimingFunction functionWithName:kCAMediaTimingFunctionEaseIn]];
[animation setType:kCATransitionReveal];
[animation setSubtype: kCATransitionFromBottom];
[self.view.layer addAnimation:animation forKey:@"Reveal"];
这里使用了setType与setSubtype组合,这使用个比较保险,因为他的参数就是官方API里定义的,他们的参数说明可以参考如下:
[animation setType:@"suckEffect"];
这里的suckEffect就是效果名称,可以用的效果主要有:
pageCurl向上翻一页pageUnCurl向下翻一页rippleEffect滴水效果suckEffect收缩效果,如一块布被抽走cube立方体效果oglFlip上下翻转效果
常用代码实现如下,供大家参考
// Curl the image up or down

 CATransition *animation = [CATransition animation];
 [animation setDuration:0.35];
 [animation setTimingFunction:UIViewAnimationCurveEaseInOut];

 if (!curled){
    //animation.type = @"mapCurl";
    animation.type = @"pageCurl";
    animation.fillMode = kCAFillModeForwards;
    animation.endProgress = 0.99;
} else {
    //animation.type = @"mapUnCurl";
    animation.type = @"pageUnCurl";
    animation.fillMode = kCAFillModeBackwards; animation.startProgress = 0.01;
 }
[animation setRemovedOnCompletion:NO];
[view exchangeSubviewAtIndex:0 withSubviewAtIndex:1];
[view addAnimation:animation forKey"pageCurlAnimation"];
// Disable user interaction where necessary

if (!curled) {
	// code ...
}else {
	// code ...
}
curled = !curled;
#总结
上面总结很多UIView实现动画的方法有很多种。简单的动画效果你可以随意,比较复杂的动画效果你可以选用关键帧KeyFrame方法。比如说天上掉下来的羽毛,地上冒起来的气泡,空中飘荡的气球,都可以用贝塞尔曲线来绘制,从而获得很好的视觉体验,贝塞尔曲线其实也是关键帧KeyFrame,position属性的改变,通过path属性来确定路径,给贝塞尔曲线设定好目标点后,把path赋值给关键帧动画,再把动画添加到layer上即可。