Verilog network module for simulation. Models network traffic from pcap to AXI-Stream
Net2axis is a simulation-only Verilog module that generates Master AXI-Stream transactions from network packets described in packet capture files (PCAP). It provides a convenient way for a user to develop his/hers network hardware design by simulating a Network/Ethernet/MAC/Internet Protocol IP cores.
Development of a network design in hardware can be very troublesome. Even when designing over simple protocols, ARP for instance, creation of a consise testbench can take time.
As FPGA vendors are increasily adopting AXI4 protocol, such as Xilinx, their proprietary network-related IPs are using AXI-Stream channels send network traffic data to (your) custom IP module. Net2axis can be used to model those proprietary IPs in simulation.
There are advantages on using PCAP files as input:
-
They can be captured in a real-world network using tcpdump or whireshark, providing your custom IP with a confident data input.
-
They can be easily created in software with scapy, for instance, even enabling description of new protocols.
The project dependencies are:
- Python 2.7.X
- Scapy 2.X
The provided testbed project example depends on Xilinx Vivado (tested on version
2017.2). However, net2axis testbench and module will probably simulate in others HDL
tools as well.
In a glance, net2axis is formed by two component:
- A python script (
tool/net2axis.py) - A verilog module (
hdl/net2axis.v), which models network IP cores and generates Master AXI-Stream transactions.
For the verilog module there are two options: package net2axis module as an (Vivado's) IP, or instantiate it in RTL. Both options will be covered latter on.
The following picture shows the net2axis workflow:
+-------------------+                          +------------------+
|                   |                          |                  |
| PCAP file (.pcap) |--->[tool/net2axis.py]--->| DATA file (.dat) |--->[hdl/net2axis.v]
|                   |                          |                  |
+-------------------+                          +------------------+
The input PCAP file read by the net2axis.py that generates a intermediate DATA
file, which filename should be configured in the C_INPUTFILE parameter of net2axis.v.
For using net2axis in IPI, you need just to execute:
$ make ipAnd add the current directory as an IP repository in your project. You can do it graphically (check Vivado's docs) or running the follwing TCL command in Vivado's TCL console/prompt.
set_property  ip_repo_paths  [pwd] [current_project]
update_ip_catalog -rebuild
If the Vivado's current directory is the net2axis directory, or
having cloned, for instance, the repository in /home/user/net2axis:
set_property  ip_repo_paths /home/user/net2axis [current_project]
update_ip_catalog -rebuild
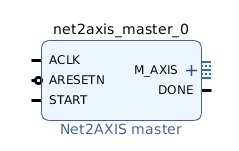
You should now be able to instantiate a net2axis IP in IPI, that looks like:
Finally, a DATA file must be configured in the net2axis IP. Right-click over it,
select Customize Block and add the (preferably) absolute path in the
Inputfile field, or execute:
set_property CONFIG.INPUTFILE {/home/user/net2axis/arp.dat} [get_bd_cells net2axis_0]This is not mandatory, but for convenience the tcl/net2axis_bd.tcl script creates a entire block design, including a
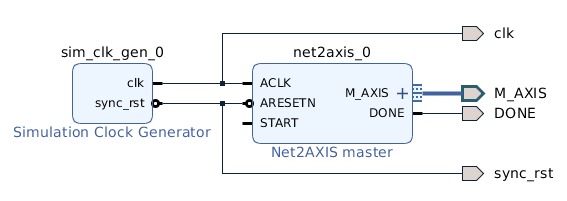
clock/reset generator. It will be just necessary to create a HDL wrapper an then
instantiate that wrapper in a testbench and connect your design to it.
In Vivado's TCL console/prompt, with a project already created, just run:
source tcl/net2axis_bd.tclAnd the following Block design will be created:
And don't forget to configure DATA file, as described earlier.
It is pretty straightforward to instantiate the net2axis verilog module. Its parameters and ports are:
-
Parameters:
INPUTFILE: (Mandatory) : Path to the intermediate DATA file. Absolute path is recommended.TDATA_WIDTH: (Optional) : AXI-Stream TDATA bus width in bits. Default32.START_EN: (Optional) : EnablesSTARTport. WhenSTARTport is asserted, tells Net2axis master to send packets. Default0(starts sending packets right away). Set to1to enable port.
-
Ports:
ACLK: ClockARESETN: Active-low resetM_AXIS_*: Master AXI-Stream interfaceDONE: Active-high done signal. Goes high when after the last packet is transmitted, i.e., the model reaches the end of DATA file.START: Active-high start signal. WhenSTART_ENparameter is1, and this port is asserted, starts sending packets.
See sim/net2axis_tb.v as an instantiation example.
The net2axis.py script has the following command line options:
$ ./tool/net2axis.py -help
usage: net2axis.py [-h] [-w [DATAWIDTH]] [-i [INITDELAY]] [-d [DELAY]]
                   [-e [ENDIANNESS]]
                   pcapfile

positional arguments:
  pcapfile              Input PCAP file

optional arguments:
  -h, --help            show this help message and exit
  -w [DATAWIDTH], --datawidth [DATAWIDTH]
                        Data bus width (in bits)
  -i [INITDELAY], --initdelay [INITDELAY]
                        Initial packet delay
  -d [DELAY], --delay [DELAY]
                        Inter packet delay
  -e [ENDIANNESS], --endianness [ENDIANNESS]
                        Set endianness
Where:
-w: Set the TDATA bus width in bits. Default: 32-i: Set initial delay (in clock cycles), i.e., first packet's delay. Default: 0-d: Set delays (in clock cycles) between packets. Default: 10-e: Endianness (littleorbig). Default:little
The output DATA file will be the same name of input PCAP file, however with
.dat extension.
First of all, clone the repository and cd to it and set exec permission on
net2axis.py script:
$ chmod +x tool/net2axis.pyHaving cloned the repository in /home/user/net2axis and using a PCAP file, say
tcp.pcap, generate the intermediate file tcp.dat
using TDATA width of 32 bits:
$ ./tool/net2axis.py tcp.pcapFinally, instantiate net2axis module in your Verilog code using (preferably) the absolute path to
the intermediate file as argument of INPUTFILE parameter:
    net2axis #(
        .INPUTFILE      ("/home/user/net2axis/tcp.dat"),
        ) net2axis_0 (
        .ACLK             (ACLK            ),
        .ARESETN          (ARESETN         ),
        .DONE             (DONE            ),
        .M_AXIS_TVALID    (M_AXIS_TVALID   ),
        .M_AXIS_TDATA     (M_AXIS_TDATA    ),
        .M_AXIS_TKEEP     (M_AXIS_TKEEP    ),
        .M_AXIS_TLAST     (M_AXIS_TLAST    ),
        .M_AXIS_TREADY    (M_AXIS_TREADY   ));
That's all folks!!
A simple testbench is provided in the project to show how to used it. A TCL
tcl/net2axis_sim.tcl script creates a Vivado project and simulates using a
PCAP file containing 4 ARP packets as input.
Running make sim creates the project and runs in batch mode, which output each
clock cycle of packet being sent. First column is timestamp, second is TVALID
signal, third is TDATA, fourth is TKEEP and the last is TLAST.
$ make sim
[.... lots of log ....]
[120.00 ns] Reset deasserted
[221.00 ns] 0 | xxxxxxxx | x | x
[230.00 ns] Starting packet 1 after delay of 0 clock cycles
[251.00 ns] 1 | ffffffff | f | 0
[261.00 ns] 1 | bbaaffff | f | 0
[271.00 ns] 1 | 010000cc | f | 0
[281.00 ns] 1 | 01000608 | f | 0
[291.00 ns] 1 | 04060008 | f | 0
[301.00 ns] 1 | bbaa0100 | f | 0
[311.00 ns] 1 | 010000cc | f | 0
[321.00 ns] 1 | 00000000 | f | 0
[331.00 ns] 1 | ffffffff | f | 0
[341.00 ns] 1 | 000affff | f | 0
[351.00 ns] 1 | 00000100 | 3 | 1
[361.00 ns] 0 | 00000100 | 3 | 1
[390.00 ns] Starting packet 2 after delay of 10 clock cycles
[511.00 ns] 1 | ffffffff | f | 0
[521.00 ns] 1 | bbaaffff | f | 0
[531.00 ns] 1 | 010000cc | f | 0
[541.00 ns] 1 | 01000608 | f | 0
[551.00 ns] 1 | 04060008 | f | 0
[561.00 ns] 1 | bbaa0100 | f | 0
[571.00 ns] 1 | 010000cc | f | 0
[581.00 ns] 1 | 00000000 | f | 0
[591.00 ns] 1 | ffffffff | f | 0
[601.00 ns] 1 | 000affff | f | 0
[611.00 ns] 1 | 00000100 | 3 | 1
[621.00 ns] 0 | 00000100 | 3 | 1
[650.00 ns] Starting packet 3 after delay of 10 clock cycles
[771.00 ns] 1 | ffffffff | f | 0
[781.00 ns] 1 | bbaaffff | f | 0
[791.00 ns] 1 | 010000cc | f | 0
[801.00 ns] 1 | 01000608 | f | 0
[811.00 ns] 1 | 04060008 | f | 0
[821.00 ns] 1 | bbaa0200 | f | 0
[831.00 ns] 1 | 010000cc | f | 0
[841.00 ns] 1 | 0100000a | f | 0
[851.00 ns] 1 | 00ccbbaa | f | 0
[861.00 ns] 1 | 000a0100 | f | 0
[871.00 ns] 1 | 00000100 | 3 | 1
[881.00 ns] 0 | 00000100 | 3 | 1
[910.00 ns] Starting packet 4 after delay of 10 clock cycles
[1031.00 ns] 1 | ffffffff | f | 0
[1041.00 ns] 1 | bbaaffff | f | 0
[1051.00 ns] 1 | 010000cc | f | 0
[1061.00 ns] 1 | 01000608 | f | 0
[1071.00 ns] 1 | 04060008 | f | 0
[1081.00 ns] 1 | bbaa0100 | f | 0
[1091.00 ns] 1 | 010000cc | f | 0
[1101.00 ns] 1 | 0100000a | f | 0
[1111.00 ns] 1 | ffffffff | f | 0
[1121.00 ns] 1 | 000affff | f | 0
[1131.00 ns] 1 | 00000100 | 3 | 1
[1240.00 ns] Simulation finished
Running make sim-gui does the same simulation, but executes Vivado GUI, where
you can graphically see the waveforms. The following figure is the testbench
result as well:


