
A tiny web application to invite a user into your Slack team.
Inspired by How I hacked Slack into a community platform with Typeform and Socket.io's Slack page.
This project supports Heroku, Azure, Cloud Foundry, Amazon Web Services (AWS), and ic.dev.


You can set variables for your own purpose in config.js or environment variables.
Fill out config.js as your infomation.
community: your community or team name to display on join page.slackUrl: your slack team url (ex.: socketio.slack.com)slacktoken: Your access token for Slack. (see Issue token)inviteToken: An optional security measure - if it is set, then that token will be required to get invited.recaptchaSiteKey: An optional security measure - if it is set, andrecaptchaSecretKeyis set, then a captcha will be required to get invited.recaptchaSecretKey: An optional security measure - if it is set, andrecaptchaSiteKeyis set, then a captcha will be required to get invited.locale: Application language (currentlycs,de,en,es,fr,it,ja,ko,nl,pl,pt,pt-BR,tr,zh-CNandzh-TWavailable).subpath: Sub-path in URL. For example, if/exampleis set, it's served in/example, not/. Default is/.
You can set environment variables directly or in .env file.
If you want to use a .env file, create a file in the root called .env with the following key/value pairs.
(.env files are added to the .gitignore.)
COMMUNITY_NAME: Your community or team name to display on join page.SLACK_URL: Your Slack team url (ex.: socketio.slack.com)SLACK_TOKEN: Your access token for Slack. (see Issue token)INVITE_TOKEN: An optional security measure - if it is set, then that token will be required to get invited.RECAPTCHA_SITE: An optional security measure - used to enable reCAPTCHA.RECAPTCHA_SECRET: An optional security measure - used to enable reCAPTCHA.LOCALE: Application language (currentlycs,de,en,es,fr,it,ja,ko,nl,pl,pt,pt-BR,tr,zh-CNandzh-TWavailable).SUBPATH: Sub-path in URL. For example, if/exampleis set, it's served in/example, not/. Default is/.
Sample
COMMUNITY_NAME=socketio
SLACK_URL=socketio.slack.com
SLACK_TOKEN=ffsdf-5411524512154-16875416847864648976-45641654654654654-444334f43b34566f
INVITE_TOKEN=abcdefg
LOCALE=en
You can test your token via curl:
 curl -X POST 'https://YOUR-SLACK-TEAM.slack.com/api/users.admin.invite' \
 --data 'email=EMAIL&token=TOKEN&set_active=true' \
--compressedAdd the application settings that are defined in the environment variables above.
If you have an AWS account and have already installed and configured the AWS CLI tool, you can easily deploy this application to API Gateway and Lambda via CloudFormation in a few minutes.
Instead of editing config.js, take these steps:
- Copy
aws/config.example.shtoaws/config.sh - Edit the values in
aws/config.sh, which correspond to the variables described above, plus these:StackName: the name of the CloudFormation stack to createS3BucketArtifacts: the name of an existing S3 bucket you have write access to, for storing deployment artifactsS3PrefixArtifacts: the prefix to use within that S3 bucket for all deployment artifacts written
- Run
aws/deploy.shto create the CloudFormation stack and deploy your application, outputting the URL - (Optional) For a friendlier URL, log into the AWS web console and establish a custom domain pointing to the API Gateway stage deployed in step 3.
If you haven't already installed the IC CLI, please refer to the documentation.
Deploy the lsuss.slack_inviter brick directly from the IC Public Index:
$ ic aws up lsuss.slack_inviter slack_inviter --params community_name='Your Community Name',slack_url=yourcommunity.slack.com,slack_token=xoxp-xxx-xxx-xxx-xxxRetreive the id and url of the API:
$ ic aws value slack_inviterNode.js is required.
$ git clone https://github.com/outsideris/slack-invite-automation.git
$ cd slack-invite-automation
$ npm install
$ npm start
You can access http://localhost:3000 on your web browser.

It's easy to run this service if you have installed Docker on your system. Pull the Docker image from Docker Hub.
$ docker pull outsideris/slack-invite-automation
$ docker run -it --rm -e COMMUNITY_NAME="YOUR-TEAM-NAME" -e SLACK_URL="YOUR-TEAM.slack.com" -e SLACK_TOKEN="YOUR-ACCESS-TOKEN" -p 3000:3000 outsideris/slack-invite-automation
Or, You can build a Docker image yourself.
$ git clone https://github.com/outsideris/slack-invite-automation.git
$ cd slack-invite-automation
$ docker build -t outsideris/slack-invite-automation .
$ docker run -it --rm -e COMMUNITY_NAME="YOUR-TEAM-NAME" -e SLACK_URL="YOUR-TEAM.slack.com" -e SLACK_TOKEN="YOUR-ACCESS-TOKEN" -p 3000:3000 outsideris/slack-invite-automationYou should generate the token in admin user, not owner. If you generate the token in owner user, a missing_scope error may occur.
There are two ways to issue the access token.
-
Visit https://api.slack.com/custom-integrations/legacy-tokens.
-
Click
Create token.

-
Visit https://api.slack.com/apps and Create New App.
-
Click "Permissions".
-
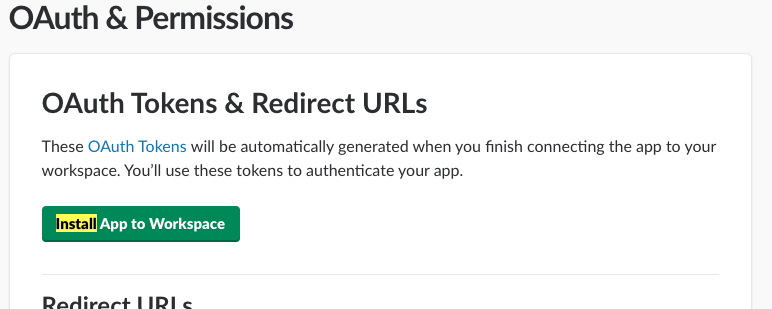
In "OAuth & Permissions" page, select
adminscope under "Permission Scopes" menu and save changes.
-
Click "Install App to Workspace".
-
Visit https://slack.com/oauth/authorize?&client_id=CLIENT_ID&team=TEAM_ID&install_redirect=install-on-team&scope=admin+client in your browser and authorize your app.
- This form requires the
clientpermission. Otherwise, you can see{"ok":false,"error":"missing_scope","needed":"client","provided":"admin"}error. - Your
TEAM_IDis the subdomain for your slack team, e.g. myteam.slack.com - your TEAM_ID ismyteam. - Your
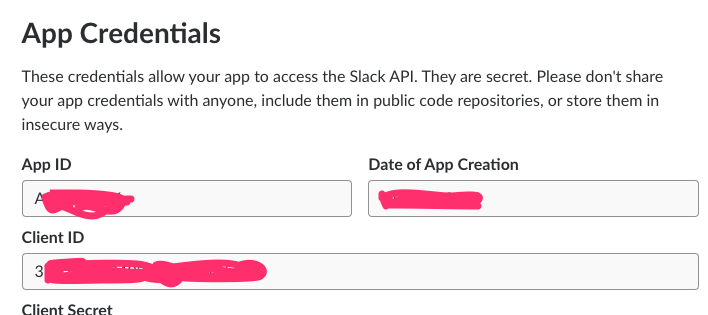
CLIENT_IDfound in "Basic Information" section for your App. - You will be shown a
Installed App Settings > OAuth Tokens for Your Teamscreen. - You can test auto invites with curl by providing the
OAuth Access Token.
curl -X POST 'https://myteam.slack.com/api/users.admin.invite' \
--data 'email=test@email.com&token=OAuthAccessToken&set_active=true' \
--compressed
- This form requires the


![]()
You can use the badge to show status of user in your slack.
-
With default colors:
<img src="https://your.domain/badge.svg"> -
With custom colors:
?colorA=abcdefSet background of the left part (hex color only)?colorB=fedcbaSet background of the right part (hex color only)
<img src="https://your.domain/badge.svg?colorA=155799&colorB=159957">
Register a new site in Google reCAPTHCA as reCAPTCHA v2 type.

Set "Site key" as recaptchaSiteKey or RECAPTCHA_SITE,
and "Secret key" as recaptchaSecretKey or RECAPTCHA_SECRET.
If you use the "Deploy to Heroku" button and want to modify your App you should fork this project. After forking and making changes you should associate your repo with the deployed instance by running:
$ heroku git:remote -a thawing-inlet-61413 replacing your heroku app's name
and running
$ git push heroku master to upload the changes. For full details see
Heroku: deploying with git