Using RFID RC522 Parking control parking barricade using Raspberry pi
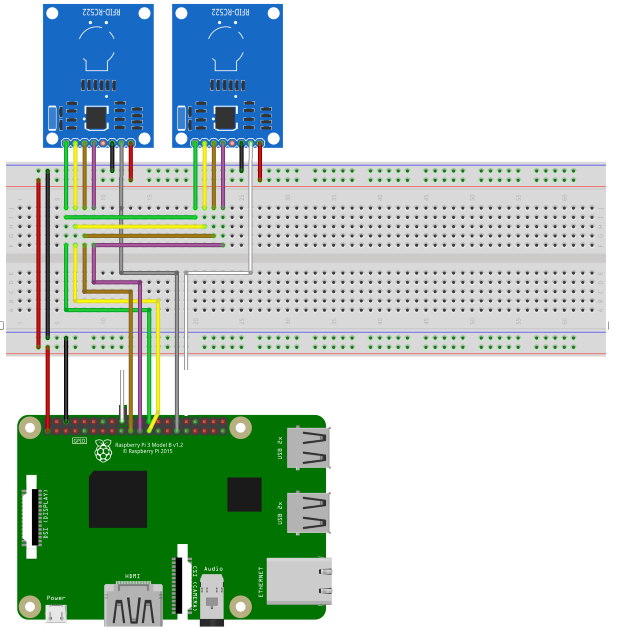
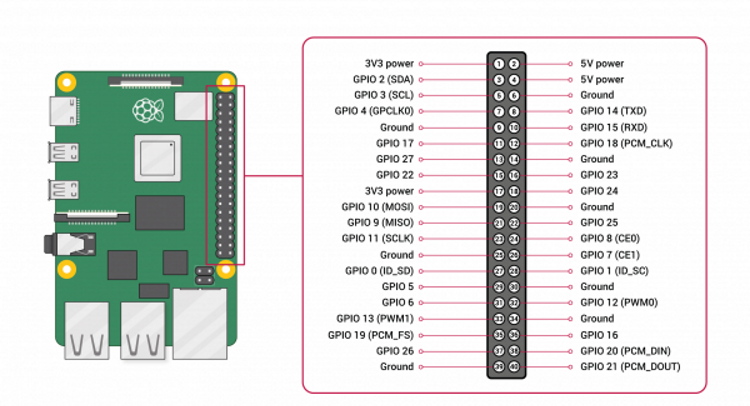
On your RFID RC522 you will notice that there are 8 possible connections on it, these being SDA (Serial Data Signal), SCK (Serial Clock), MOSI (Master Out Slave In), MISO (Master In Slave Out), IRQ (Interrupt Request), GND (Ground Power), RST (Reset-Circuit) and 3.3v (3.3v Power In). We will need to wire all of these but the IRQ to our Raspberry Pi’s GPIO pins. You can either wire these directly to the GPIO Pins or like we did in this tutorial, plug the RFID RC522 into our Breadboard then wire from there to our Raspberry Pi’s GPIO Pins. Wiring your RFID RC522 to your Raspberry Pi is fairly simple, with it requiring you to connect just 7 of the GPIO Pins directly to the RFID reader. Follow the table below, and check out our GPIO guide to see the positions of the GPIO pins that you need to connect your RC522 to.
- SDA connects to Pin 24.
- SCK connects to Pin 23.
- MOSI connects to Pin 19.
- MISO connects to Pin 21.
- GND connects to Pin 6.
- RST connects to Pin 18 and Pin 29.
- 3.3v connects to Pin 1.
- RELAY connects to Pin 31.
-
Let’s begin by first opening the raspi-config tool, and we can do this by opening the terminal and running the following command.
sudo raspi-config -
This tool will load up a screen showing a variety of different options. If you want a more in-depth look into these options, you can check out our raspi-config guide. On here use the arrow keys to select “5 Interfacing Options“. Once you have this option selected, press Enter.
-
Now on this next screen, you want to use your arrow keys to select “P4 SPI“, again press Enter to select the option once it is highlighted.
-
You will now be asked if you want to enable the SPI Interface, select Yes with your arrow keys and press Enter to proceed. You will need to wait a little bit while the raspi-config tool does its thing in enabling SPI.
-
Once the SPI interface has been successfully enabled by the raspi-config tool you should see the following text appear on the screen, “The SPI interface is enabled“. Before the SPI Interface is fully enabled we will first have to restart the Raspberry Pi. To do this first get back to the terminal by pressing Enter and then ESC.
-
Once your Raspberry Pi has finished rebooting, we can now check to make sure that it has in fact been enabled. The easiest way to do this is to run the following command to see if spi_bcm2835 is listed.
lsmod | grep spiIf you see spi_bcm2835, then you can proceed on with this tutorial and skip on to the next section. If for some reason it had not appeared when you entered the previous command, try following the next three steps. -
If for some reason the SPI module has not activated, we can edit the boot configuration file manually by running the following command on our Raspberry Pi.
sudo nano /boot/config.txt
If you have found it, check to see if there is a # in front of it. If there is, remove it as this is commenting out the activation line. If you can’t find the line at all, add “dtparam=spi=on” to the bottom of the file.
Once you have made the changes, you can press CTRL + X then pressing Y and then Enter to save the changes.
You can now proceed from Step 5 again, rebooting your Raspberry Pi then checking to see if the module has been enabled.
 sudo apt update
 sudo apt upgrade
 sudo apt install python3-dev python3-pip
 sudo pip3 install spidev
 sudo pip3 install mfrc522
 mkdir ~/pi-rfid
 cd ~/pi-rfid
Download and keep all the files from this repository in this folder
Edit rfid.txt file with the below format
< lower case hex> < Name with out space>
7a706d0d MyName
sudo nano -w /etc/rc.localAdd at the end sudo /home/rpi/rfid.sh
Provide full path

