The purpose of this activity is to "get your hands dirty" with computer hardware and code. We'll be using a microcontroller called the Ardiuno to control light emitting diodes (LED) via software we write.
Open up the blank program on the Arduino IDE, connect the Arduino to your computer via USB, and upload the program to the Arduino. This will clear the existing code on the microcontroller, and test your connection as well. Once this is done, you'll be ready to go!
To get started, let's make sure we can light up a single LED. You'll need the following supplies, which you should receive from the instructors:
- an Arduino Uno
- some jumper wires
- a USB A-to-B1 power cable
- some LEDs
- some resistors
- a breadboard
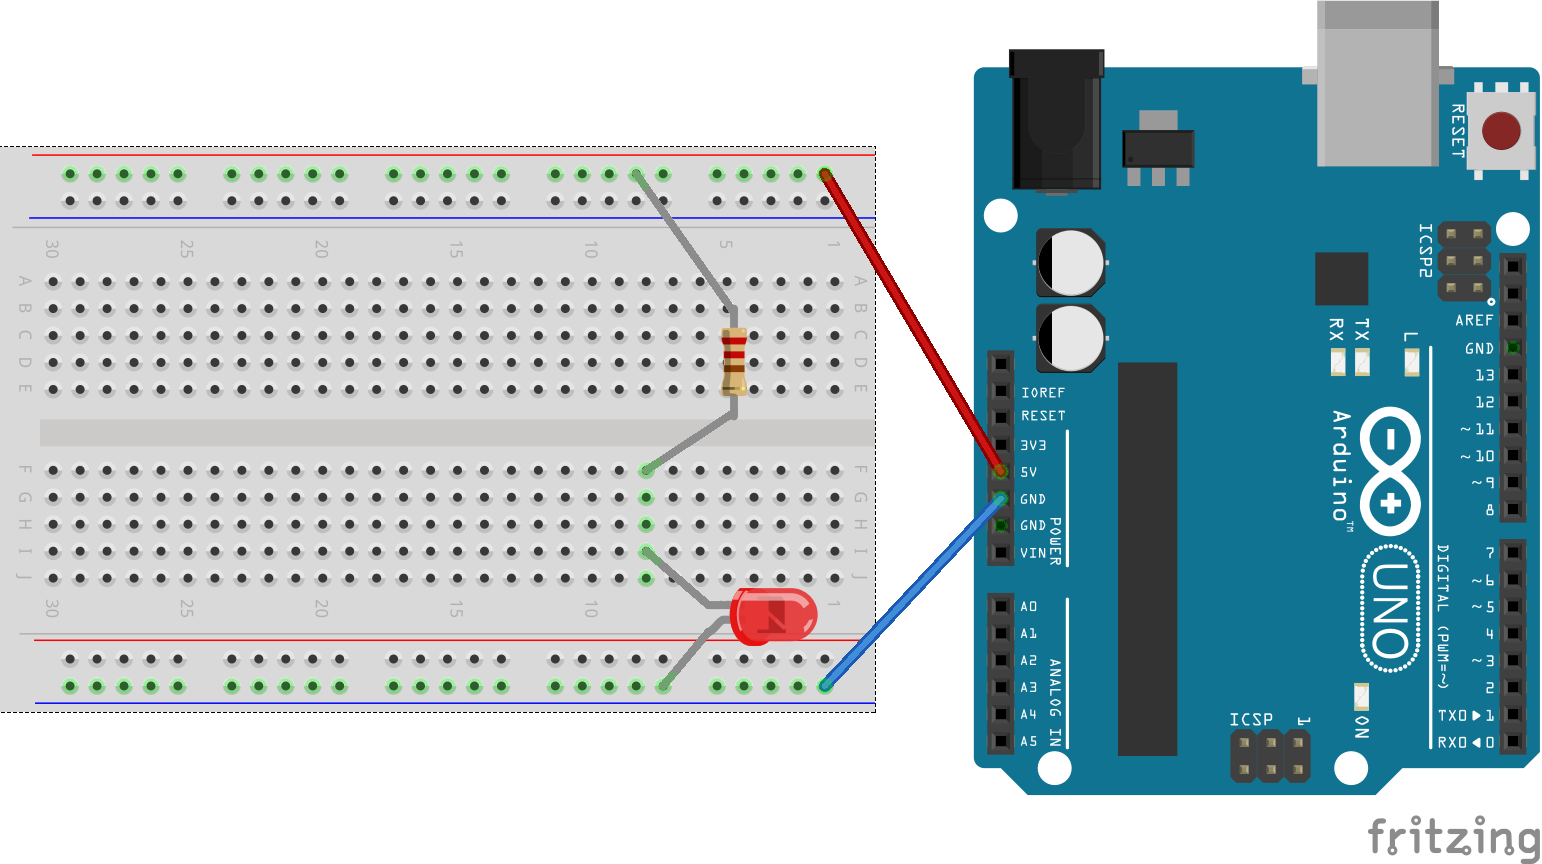
Plug the A-end of your USB into your computer and your B-end into the Arduino to turn on the Arduino. (Don't plug the A-end into anything other than a computer.) Your Arduino should power on. Now, you want to choose a resistor and wire up your system like shown here
The LED should light up.
Here are some questions you should be able to answer as a group (likely via searching about on the web and discussing among yourselves).
- Where is electricity flowing?
- How much electricity is the Arduino drawing from your computer?
- What does the resistor do?
- What happens if you choose a different resistor?
- How are the resistors different? (Notice their patterns)
- Why do you think the resistor is used?
- What is different about the LEDs that you have?
- What are the different parts of the Arudino?
- What is missing on the Arudino that you'd find in your phone or laptop?
Please don't feel like you need to answer these questions before you move on to the next step. Instead, this can happen in parallel and team members should choose to what they'd like to devote their attention based on that which most captures their interest.
The Arduino can be told to do send electricity in varying amounts to the different outputs on the side of the board. In part one, you used the 5V constant power. Now, we're going to use the numbered pins. In order to control the power of those pins, we'll need to write a program for the Arduino and load it onto the Arduino. To do that, you'll need to download the Arduino IDE onto your laptop. We'll write a program with the IDE and upload it via the USB cable onto the Arduino.
All of these directions in this section are based on the "Getting Started with Arduino" guides, so if you run into trouble, take a look at those guides. Here are the versions for Windows and Mac. The only possible complicated part is that, on Windows, you might need to install some drivers if it doesn't happen automatically. On a Mac, it should "just work".)
Once you've installed the Arduino IDE, you'll want to load up the "blink" example code as discussed in the guides.
Go to File > Examples > 01. Basics > Blink, just like I'm doing in the images below.
You should see some code that looks like this
Save your own copy of that code by going to "Save as" or equivalent on your computer. You can call it anything you want, like "mgt656-led-blink".
At the bottom of the window, the IDE should be showing you how it is connected to the Arduino. This may not be correct. It may look like this
You want to make sure it says something like "Arduino Uno on _____", where _____ is likely "COM4" or similar on Windows. On a Mac, this might look like or "/dev/tty.usbmodem1451" or similar. To adjust these settings if they are not correct, you'll want to go to "Tools > Board" or "Tools > Port". (If you have trouble, please ask the teaching staff and we'll be happy to help.)
Now, you want to move the code from your computer to the Arduino. Click on the 'Upload' button. The second button from the left on the toolbar.
You'll see a progress bar as it uploads the code to the Arduino
It should complete successfully
Or, you might get an error if your computer didn't have the right settings to talk to the attached Arduino. If that is the case, you will need to change them. It should be easy, if not a TA can help.
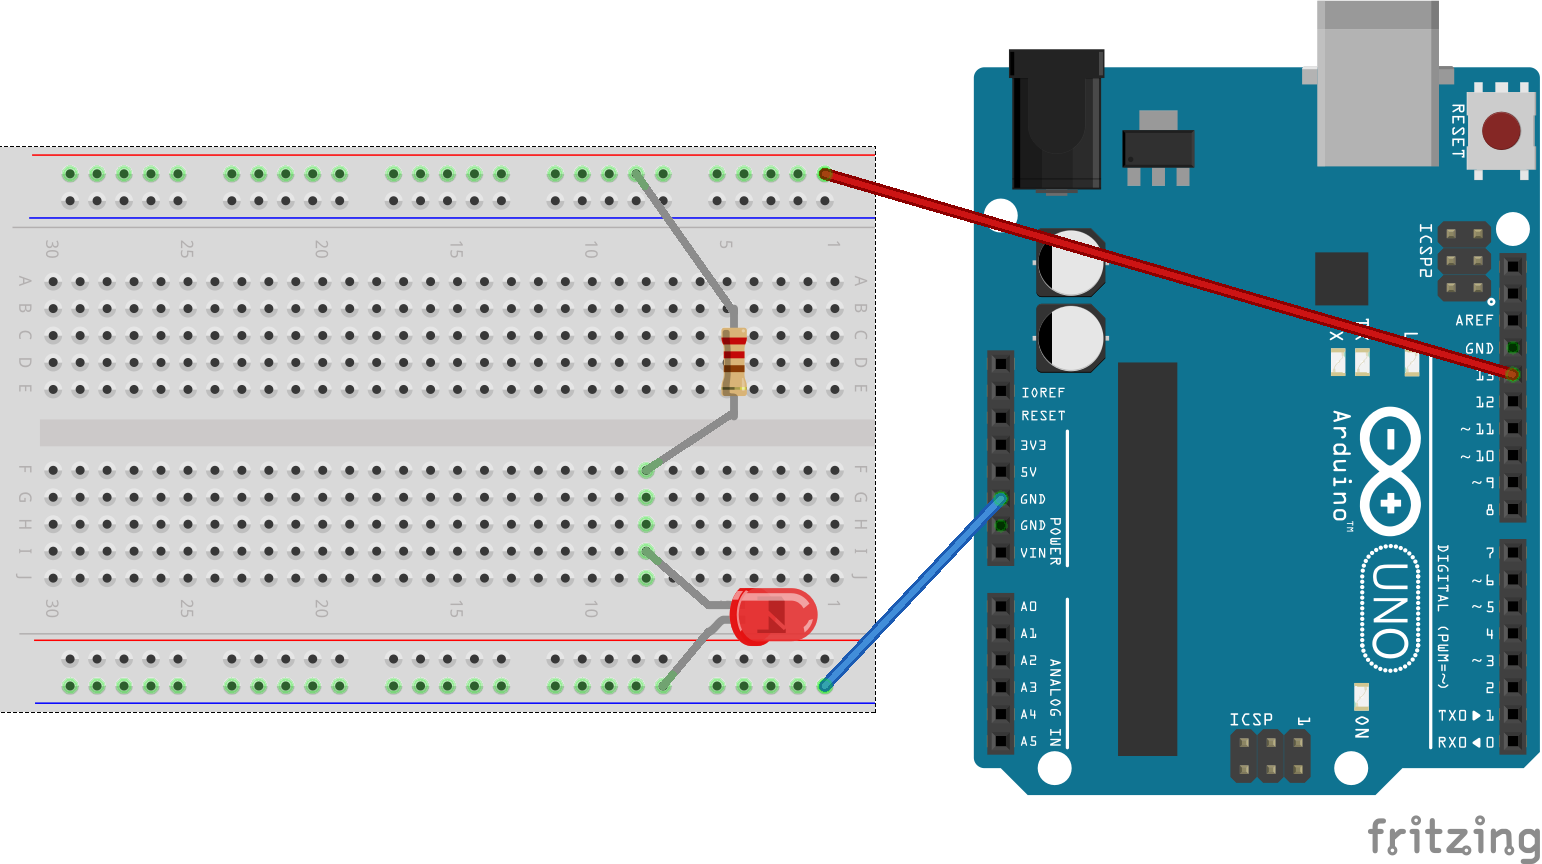
Now, what should you see on the board? You should see a constant red LED if you left your board the same way it was in part one of this activity: it's still plugged into the 5V pin! If you look at the code you uploaded, you'll notice that it is manipulating the power sent to pin 13.
In order to control the LED, we'll want to move the wire from the 5v pin to pin 13. Your writing should look roughly as follows
Your example blink code should look something like as follows
/*
  Blink
  Turns on an LED on for one second, then off for one second, repeatedly.

  Most Arduinos have an on-board LED you can control. On the Uno and
  Leonardo, it is attached to digital pin 13. If you're unsure what
  pin the on-board LED is connected to on your Arduino model, check
  the documentation at http://www.arduino.cc

  This example code is in the public domain.

  modified 8 May 2014
  by Scott Fitzgerald
 */


// the setup function runs once when you press reset or power the board
void setup() {
  // initialize digital pin 13 as an output.
  pinMode(13, OUTPUT);
}

// the loop function runs over and over again forever
void loop() {
  digitalWrite(13, HIGH);   // turn the LED on (HIGH is the voltage level)
  delay(1000);              // wait for a second
  digitalWrite(13, LOW);    // turn the LED off by making the voltage LOW
  delay(1000);              // wait for a second
}
All of the parts after the // symbols are comments. Also, the parts at the top between /* and */ are comments. Really, there is very little code there. The important parts are the two functions: setup and loop. The setup function runs once at the start and the loop function runs endlessly, again and again.
Can you see what is happening in the loop function? As the comments indicate, we set pin 13 to a high voltage, then wait 1,000 milliseconds, then we set pin 13 to a low voltage, then we wait 1,000 millisecond, and then loop runs again. That's it.
Here are some questions to ask and some experiments you may enjoy.
- Where is electricity flowing?
- Can you power more than one LED at the same time and have them blink in unison? How would you arrange them on the breadboard?
- How would you arrange the LEDs to have one always on and one blinking? How would you have to arrange the wires to independently control two different LEDs on the breadboard? (To answer these questions, you might want to read this tutorial on breadboards).
We included in most kits a piezoelectric buzzer and in other kits a included a button and a photoresistor.
If your group has the buzzer, you should be able to make noises (and if you steal one from another
group, you can make harmonies). The Ardiuo IDE includes functions called
tone and
noTone, which you can use
to send electricity of a certain frequency to the buzzer for a certain
duration, thereby playing musical notes and even a melody. For example,
here is a Star Wars melody for Arduino.
- Can you make a melody?
- Can you blink an LED with the melody?
- Does your kit have a button? Can you use the button to make an instrument?
If your group has the the photoresistor, you should be able to create a light detector.
We have some buttons and photoresistors up front, which you can use on your breadboard so that you can control the LEDs using a mix of software and physical inputs. (The photoresistors can be used to make light sensitive sounds or led blinks.) Feel free to muck around.
Please return the LEDs and the resistors (the small parts) to the small static-free ziplock back. Please place the Arduino back in its box. And, then, please throw everything in the large ziplock bag and return it to the front of class. We hope you enjoyed this.


