This project grew out of a desire to get an old Ampro LB+/Z80 hooked up to the Internet.
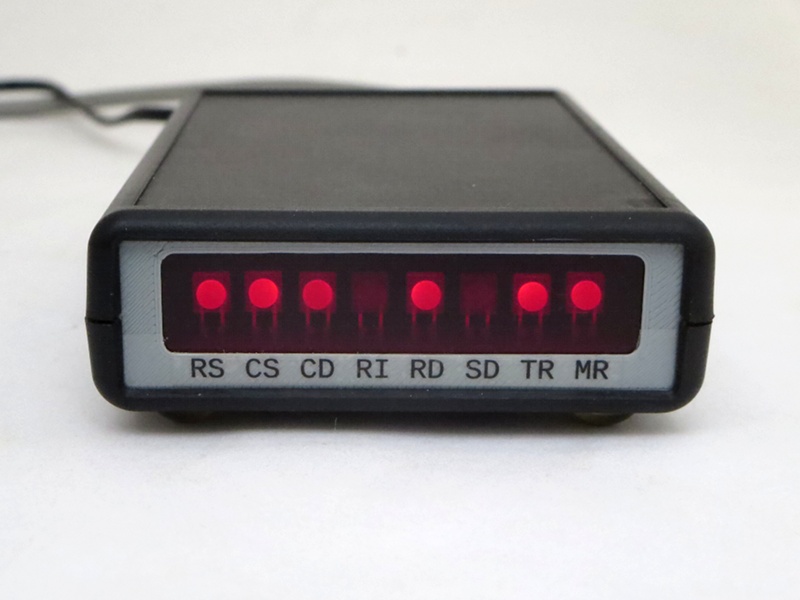
Right from the start, I knew I wanted a row of LED indicators at the front of the modem so that it would be reminiscent of an old Hayes Smartmodem. (I briefly considered finding an old Smartmodem on eBay, but soon remembered that the case had in fact been made of metal; they don't build 'em like that anymore.)
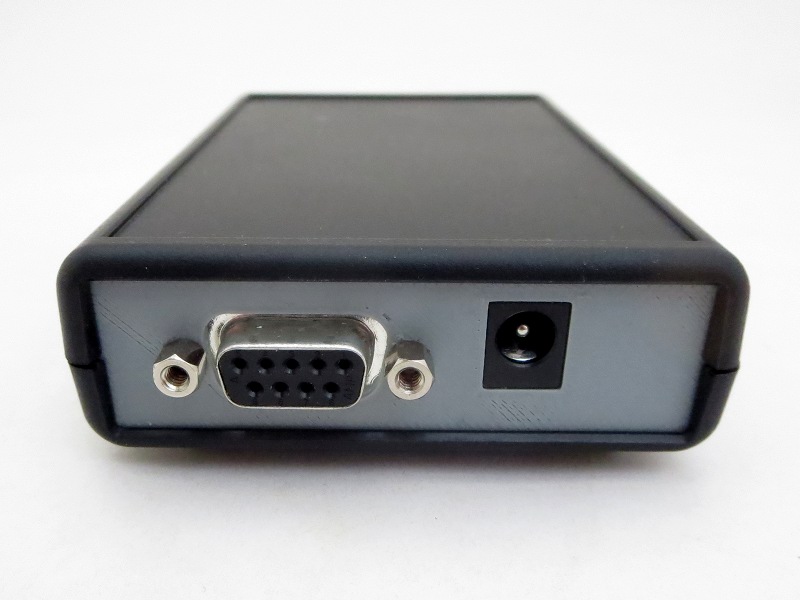
Since the modem was going to be hooked up to the Little Board's serial port, I needed an actual RS-232 level serial port, with either a DB-25 or DE-9 connector.
And finally, since I wanted the Hayes style LEDs, I thought it would be handy to have the Hayes AT commands too, at least as close as I could manage.
That was all I started with. I couldn't tell you how I stumbled across the whole WiFi modem thing; I can't even remember what terms I searched with but very quickly I came across the message thread at WiFi232's Evil Clone. Inspired by that, and Paul Rickards' WiFi232, and Daniel Jameson's ESP8266 based virtual modem I got started.
I had a preliminary version put together and working by the first evening. Then the wholesale changes to the software began. And for the longest time, it looked like they'd never end. Eventually though, they calmed down and "wholesale changes" downshifted to "another tweak I'd like to make."
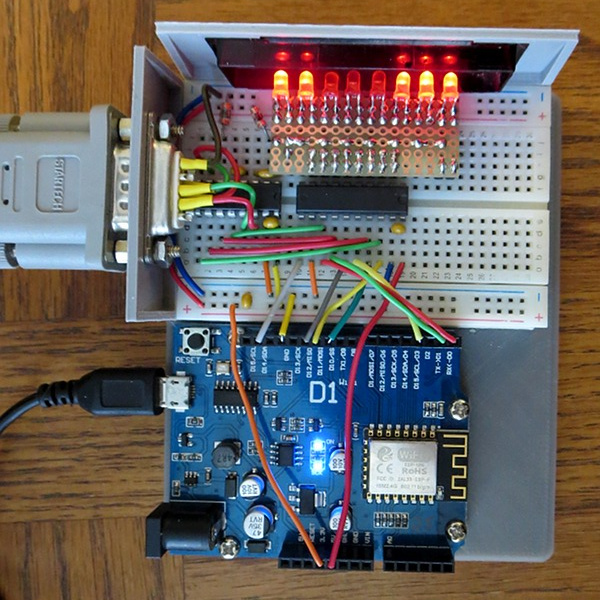
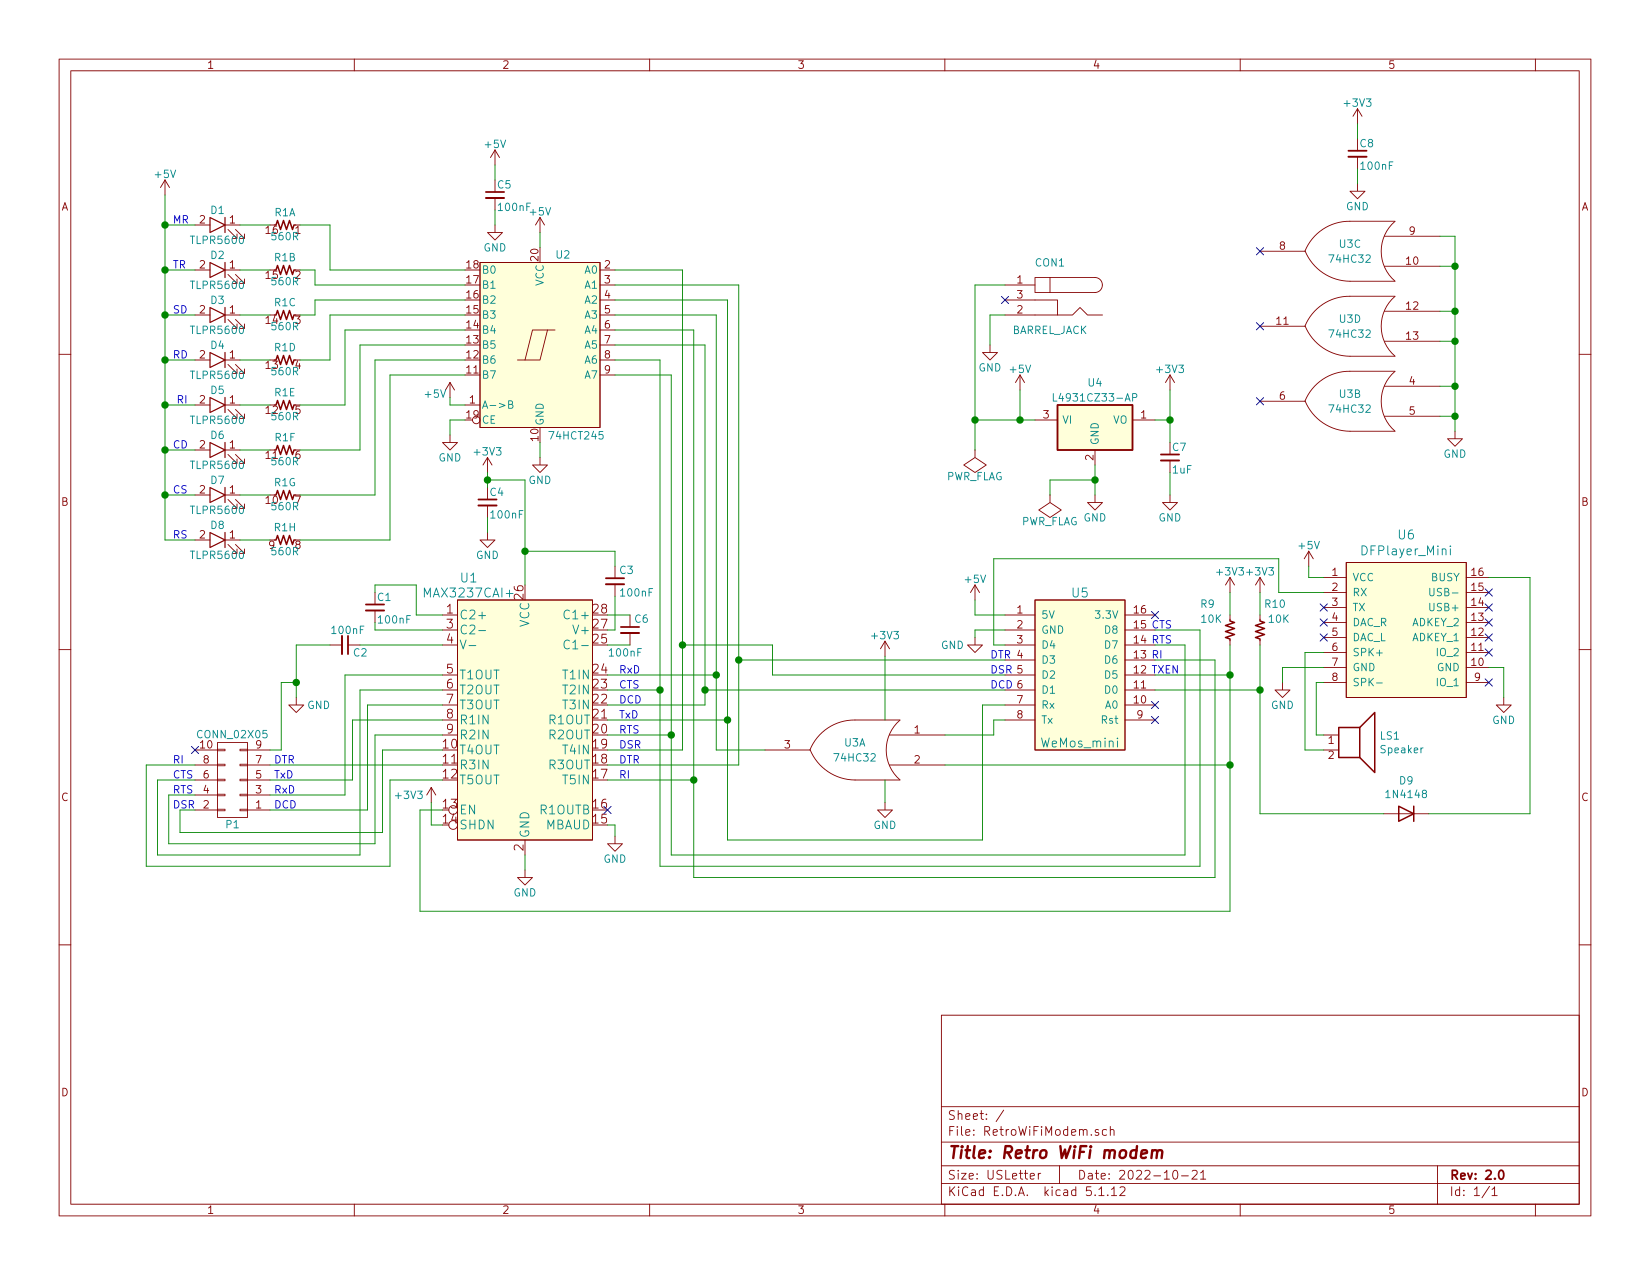
The hardware didn't change nearly as much from beginning to end. I did the development on a Wemos D1 R1 and a little half length solderless breadboard mounted together. The plan for the final hardware was always to use a Wemos D1 mini. A MAX3237 took care of the 3.3V <-> RS-232 level shifting, and a 74HCT245 was used to drive the indicator LEDs.
The only major additions to the hardware during development was an OR gate on the serial output from the ESP8266 and the addition of a DFPlayer Mini for the dialing and connection sounds.
On startup, the ESP8266 sends out some debug information (at an oddball baud rate) through the serial port. It shows up as garbage characters to whatever's hooked up to the serial port. It annoyed me enough that I fed the Tx signal through the OR gate, with the other input hooked up to an output pin that I could count on remaining high (thereby masking off the Tx signal) until after the sketch had started and set it low.
And while it didn't make the cut the first time around, there's a DFPlayer Mini in this version for faux dialing and connection sounds. They really do complete the whole retro feel (but they can be turned off too).
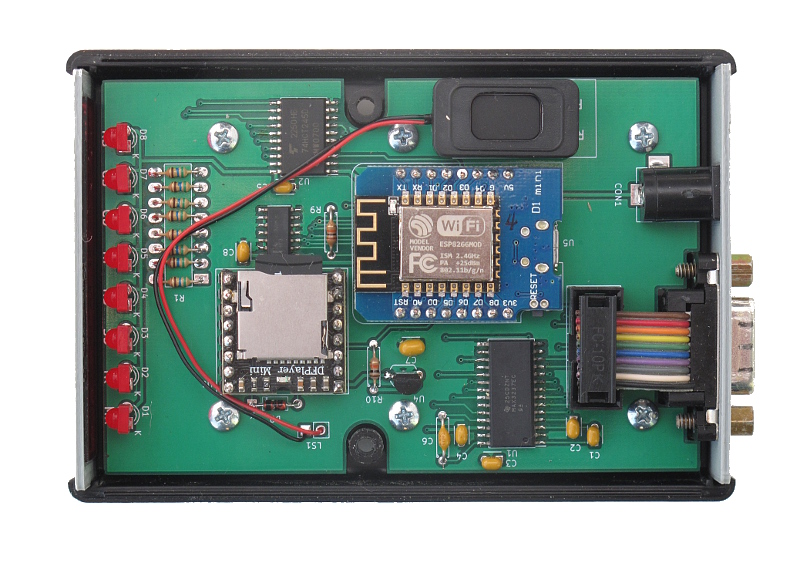
The second time around, I decided that I was going to bite the bullet and go with some surface mount stuff, starting with the MAX3237. Having a full suite of RS-232 control signals seemed worth it. I stuck with through hole components where I could (I already had most of them in my parts box) but adding the DFPlayer Mini meant that the 74HC32 and 74HCT245 had to be surface mount just to make them fit.
In keeping with the retro theme, the modem uses classic Hayes style blinking LEDs and a DE-9F for the RS-232 connector. Everything is displayed and brought out to the DE-9F connector: RTS, CTS, DSR, DTR, DCD, RI, TxD and RxD.
The PCB is laid out for a Wemos D1 mini and the software expects to see just that. If you're just using the software and not the PCB, there's no reason you couldn't use another kind of ESP8266 board; I used a D1 R1 myself when I was developing the modem. You'd just need to add pin definitions for your board in RetroWiFiModem.h.
A separate 3.3V regulator is used to power the MAX3232 IC and 74HC32 quad OR gate. Some (most?) D1 mini clones have the smallest 3.3V regulator on board that they can get away with to power the board, and they don't have a lot of mA's left over to power anything else. Better safe than sorry.
The power connector expects a 2.1mm I.D. x 5.5mm O.D. barrel plug, delivering 5 volts, centre positive. I used a Tri-Mag L6R06H-050 (5V, 1.2A), DigiKey part# 364-1251-ND. If you plug in a 9V adapter like you'd use for an Arduino, you will let the magic smoke out and have an ex-modem on your hands.
On the off chance that there's someone else out there with a well stocked parts box and a burning desire to put together their own WiFi modem, there's a BOM in the kicad sub directory. If you actually had to go out and buy all the parts, it really wouldn't be cost effective.
Then again, how practical is getting an Ampro Little Board on the Internet? Practicality isn't always everything. Sometimes nostalgia is worth the effort.
Like I said at the start, I would have loved to have used an old Hayes Smartmodem case, but they were metal and wouldn't have allowed the WiFi to work particularly well.
In the end I went with a Hammond 1593N case (DigiKey part #
HM963-ND
or HM964-ND
depending on whether you like black or grey). STL and OpenSCAD
files are included for the front and back panels. You could use the
proper Hammond red panel for the front (DigiKey part #
HM965-ND),
but they're only available in 10 packs and their price is highway robbery.
I ended up using a slightly smaller red panel (DigiKey part #
HM889-ND)
that was much cheaper (it has recently increased in price by 500%)
and available in single units.
The labels are unbelievably low tech. I print them on a piece of inkjet transparency film. I then cut that down to size so that it will fit under the LED opening. Then I attach the trimmed down transparency piece to a length of matte finish, invisible tape and carefully position it in place. A bit of careful work with an x-acto knife and you've got yourself a label that looks like it's part of the panel. If you look closely at the front panel image you can see the edges of the transparency film and the tape, but in practice they both essentially disappear.
The PCB includes cutouts for the two columns that join the case together, and mounting holes for the 6 standoffs. Also, there's an oddly shaped cutout in back end to allow a particular IDC DE-9F I had on hand. It's available from DigiKey (or a very close clone is) but it's fairly pricey. But there's plenty of room for an ordinary solder cup DE-9F. You'd most likely want to omit the 10 pin header and just wire the DE-9F right to the board.
In a nod to its popularity, the command set I used largely follows that used in Paul Rickards' WiFi232 modem. Even if the innards are completely different, it made sense to make it work like what people were already used to. There's a reason everyone's been copying the Hayes command set for almost 40 years!
The default serial configuration is 9600bps, 8 data bits, no parity, 1 stop bit.
Here's the commands you need to set up the modem to automatically connect to your WiFi network:
AT$SSID=your WiFi network nameto set the WiFi network that the modem will connect to when it powers up.AT$PASS=your WiFi network passwordto set the password for the network.ATC1to connect to the network.- Optional stuff:
AT$SB=speedto set the default serial speed.AT$SU=dpsto set the data bits, parity and stop bits.ATNETnto select whether or not to use Telnet protocol.AT&Knto use RTS/CTS flow control or not.AT&Dnto set up DTR handling.
AT&Wto save the settings.
Once you've done that, the modem will automatically connect to your WiFi network on power up and will be ready to "dial up" a connection with ATDT.
Multiple AT commands can be typed in on a single line. Spaces between commands are allowed, but not within commands (i.e. AT S0=1 X1 Q0 is fine; ATS 0= 1 is not). Commands that take a string as an argument (e.g. AT$SSID=, AT$TTY=) assume that everything that follows is a part of the string, so no commands are allowed after them.
| Command | Details |
|---|---|
| +++ | Online escape code. Once your modem is connected to another device, the only command it recognises is an escape code of a one second pause followed by three typed plus signs and another one second pause, which puts the modem back into local command mode. The character used can be set with ATS2=n. |
| A/ | Repeats the last command entered. Do not type AT or press Enter. |
| AT | The attention prefix that precedes all command except A/ and +++. |
| AT? | Displays a help cheatsheet. |
| ATA | Force the modem to answer an incoming connection when the conditions for auto answer have not been satisfied. |
| ATC? ATCn |
Query or change the current WiFi connection status. A result of 0 means that the modem is not connected to WiFi, 1 means the modem is connected. The command ATC0 disconnects the modem from a WiFi connection. ATC1 connects the modem to the WiFi. |
| ATDSn | Calls the host specified in speed dial slot n (0-9). |
| ATDT[+=-]host[:port] | Tries to establish a WiFi TCP connection to the specified host name or IP address. If no port number is given, 23 (Telnet) is assumed. You can also use ATDT to dial one of the speed dial slots in one of two ways:
|
| ATE? ATEn |
Command mode echo. Enables or disables the display of your typed commands.
|
| ATGEThttp://host[/page] | Displays the contents of a website page. https connections are not supported. Once the contents have been displayed, the connection will automatically terminate. |
| ATH | Hangs up (ends) the current connection. |
| ATI | Displays the current network status, including sketch build date, WiFi and call connection state, SSID name, IP address, and bytes transferred. |
| ATL? ATLn |
Query or set the volume of the speaker (0-3). |
| ATM? ATMn |
Query or set whether the speaker is enabled or disabled. ATM0 disables the speaker. ATM1 enables it. |
| ATNET? ATNETn |
Query or change whether telnet protocol is enabled. A result of 0 means that telnet protocol is disabled; 1 is Real telnet protocol and 2 is Fake telnet protocol. If you are connecting to a telnet server, it may expect the modem to respond to various telnet commands, such as terminal name (set with AT$TTY), terminal window size (set with AT$TTS) or terminal speed. Telnet protocol should be enabled for these sites, or you will at best see occasional garbage characters on your screen, or at worst the connection may fail.The difference between real and fake telnet protocol is this: with real telnet protocol, a carriage return (CR) character being sent from the modem to the telnet server always has a NUL character added after it. The implementation of the telnet protocol used by some BBSes doesn't properly strip out the NUL character. When connecting to such BBSes (Particles! is one), use fake telnet. When using real telnet protocol, when the telnet server sends a CR character followed by a NUL character, only the CR character will be sent to the serial port; the NUL character will be silently stripped out. With fake telnet protocol, the NUL will be passed through. |
| ATO | Return online. Use with the escape code (+++) to toggle between command and online modes. |
| ATQ? ATQn |
Enable or disable the display of result codes. The default is Q0.
|
| ATRD ATRT |
Displays the current UTC date and time from NIST in the format YY-MM-DD HH:MM:SS. A WiFi connection is required and you cannot be connected to another site. |
| ATS0? ATS0=n |
Display or set the number of "rings" before answering an incoming connection. Setting S0=0 means "don't answer". |
| ATS2? ATS2=n |
Display or set the ASCII code used in the online escape sequence. The default value is 43 (the + plus character). Setting it to any value between 128 and 255 will disable the online escape function. |
| ATV? ATVn |
Display result codes in words or numbers. The default is V1.
|
| ATX? ATXn |
Control the amount of information displayed in the result codes. The default is X1 (extended codes).
|
| ATZ | Resets the modem. |
| AT&F | Reset the NVRAM contents and current settings to the sketch defaults. All settings, including SSID name, password and speed dial slots are affected. |
| AT&D? AT&Dn |
Display or set the handling of DTR going inactive. The default is &D0 (ignored).
|
| AT&K? AT&Kn |
Data flow control. Prevents the modem's buffers for received and transmitted from overflowing.
|
| AT&R? AT&R=server pwd |
Query or change the password for incoming connections. If set, the user has 3 chances in 60 seconds to enter the correct password or the modem will end the connection. |
| AT&Vn | Display current or stored settings.
|
| AT&W | Save current settings to NVRAM. |
| AT&Zn? AT&Zn=host[:port],alias |
Store up to 10 numbers in NVRAM, where n is the position 0-9 in NVRAM, and host[:port] is the host string, and alias is the speed dial alias name. The host string may be up to 50 characters long, and the alias string may be up to 16 characters long. Example: AT&Z2=particlesbbs.dyndns.org:6400,particlesThis number can then be dialed in any of the following ways:
|
| AT$AE? AT$AE=startup AT cmd |
Query or change the command line to be executed when the modem starts up. |
| AT$AYT | Sends a Telnet "Are You There?" command if connected to a Telnet remote. |
| AT$BM? AT$BM=server busy msg |
Query or change a message to be returned to an incoming connection if the modem is busy (i.e. already has a connection established). |
| AT$MDNS AT$MDNS=mDNS name |
Query or change the mDNS network name (defaults to "espmodem"). When a non zero TCP port is defined, you can telnet to that port with telnet mdnsname.local port. |
| AT$PASS? AT$PASS=WiFi pwd |
Query or change the current WiFi password. The password is case sensitive. Clear the password by issuing the set command with no password. The maximum length of the password is 64 characters. |
| AT$SB? AT$SB=n |
Query or change the current baud rate. Valid values for "n" are 110, 300, 450, 600, 710, 1200, 2400, 4800, 9600, 19200, 38400, 57600, 76800 and 115200. Any other value will return an ERROR message. The default baud rate is 1200. The Retro WiFi modem does not automatically detect baud rate like a dial-up modem. The baud rate setting must match that of your terminal to operate properly. It will display garbage in your terminal otherwise. |
| AT$SP? AT$SP=n |
TCP server port to listen on. A value of 0 means that the TCP server is disabled, and no incoming connections are allowed. |
| AT$SSID? AT$SSID=ssid name |
Query or change the current SSID to the specified name. The given SSID name is case sensitive. Clear the SSID by issuing the set command with no SSID. The maximum length of the SSID name is 32 characters. |
| AT$SU? AT$SU=dps |
Query or change the current number of data bits ('d'), parity ('p') and stop bits ('s") of the serial UART. Valid values for 'd' are 5, 6, 7 or 8 bits. Valid values for 'p' are (N)one, (O)dd or (E)ven parity. Valid values for 's' are 1 or 2 bits. The default settings are 8N1. The UART setting must match your terminal to work properly. |
| AT$TTL? AT$TTL=telnet location |
Query or change the Telnet location value to be returned when the Telnet server issues a SEND-LOCATION request. The default value is "Computer Room". |
| AT$TTS? AT$TTS=WxH |
Query or change the window size (columns x rows) to be returned when the Telnet server issues a NAWS (Negotiate About Window Size) request. The default value is 80x24. For terminals that are smaller than 80x24, setting these values appropriately will enable paging on the help (AT?) and network status (ATI) commands. |
| AT$TTY? AT$TTY=terminal type |
Query or change the terminal type to be returned when the Telnet server issues a TERMINAL-TYPE request. The default value is "ansi". |
| AT$W? AT$W=n |
Startup wait.
|
While I liked the idea of being able to update the software OTA, it seemed to make more sense in my situation to be able to push a new version as I built it rather than have the modem pull it. So that's what I did. It uses the default OTA upload capability built into the Arduino IDE.
Jan 24/22: It's been reported that the ESP8266 core is slightly snafu'd at the moment, and that it's breaking things in the modem software. As a workaround, I've added the bin file that gets uploaded to the modem in the repository. I haven't updated my ESP8266 core in ages; "if it isn't broken, don't break it", and everything still works for me. The bin file can be uploaded with the espota.py tool in the ESP8266 tool directory tree.
(If TPTB have deleted/renamed/moved that tool in the current core, you'll have to figure out how to do a manual OTA update.)
Something I noticed with ESP8266 software that puzzled me was the number of places I saw a series of Serial print statements being broken up with calls to yield(), like so:
   Serial.print("Hello world!\n");
   yield();
   Serial.print("How are you today?\n");
   yield();
It didn't take long to figure out what was going on; The print() call was blocking, and at lower baud rates, even printing a few relatively short strings was enough to cause the watchdog to bark and cause a reset. So the repetitive yield() calls were an attempt to feed the watchdog often enough to keep it from barking.
What does this have to do with RTS/CTS handshaking? Simply put, lowering RTS for more than a few seconds was causing the watchdog to bark as well. So I started digging.
In cores/esp8266/uart.cpp I found the following function:
static void
uart_do_write_char(const int uart_nr, char c)
{
    while(uart_tx_fifo_full(uart_nr));

    USF(uart_nr) = c;
}
This is the low level function that everything calls to send a character out the serial port. The cause of the watchdog barking is in the dead spin while loop. It waits until there's room in the transmit FIFO to add another character. So if RTS/CTS handshaking is enabled, and RTS is low for longer than the watchdog likes: woof.
What I did to quiet the watchdog down both when sending long strings at low baud rates and during long waits for RTS to come active again was to add a yield() call to the dead spin while loop, like so:
static void
uart_do_write_char(const int uart_nr, char c)
{
    while(uart_tx_fifo_full(uart_nr))
      yield();

    USF(uart_nr) = c;
}
This way, no matter how long the code has to wait for space in the transmit FIFO, the watchdog is kept well fed and quiet.
As I said way back in 2020, is a personal project like this ever really finished? I've had two units assembled and in use since the spring of 2020, and a third since 2022, and while there's been some software changes since then, and a second rev of the hardware to bring out all the RS-232 control signals and add in the faux dialing and connections sounds, I really don't expect any more changes. But I've said that before! There are no outstanding bugs that I'm aware of, and no new features on my wish list. For the time being at least, I think it's complete.
Have you used the modem to 'dial' into a Linux box? And have you done a
sz binary_file on the Linux box? And at a completely reproducible
point in the file, has the connection dropped? But other binary files
work just fine? Then read on.
This drove me slightly batty for months. I finally narrowed it down to trying to send blocks of binary data with a large number of FF bytes. I eventually created a test file consisting of 2K of FF and used that to test with. I could download it through the modem with Xmodem just fine. Ymodem also worked if I kept the block size down to 128 bytes - but the connection would drop instantly if I tried sending 1K blocks. Same thing with Zmodem.
In fact, if I just tried cat binary_file, the connection would
drop. Which eventually got me thinking. Sitting at the console on my
main Linux box, I telnet'd to the same box and logged in. No WiFi modem
involved anywhere, just a telnet session on the console to the same box.
I then did a cat binary_file. The telnet connection dropped, and I
was back in my original session.
It's the Linux telnet daemon. Not the modem at all.
To prove it to myself, I hooked up WiFi modems to two systems on their serial ports and had one dial into the other. I could send the all FF binary file back and forth with Zmodem and Ymodem, no trouble at all.
But you really, really need to download that binary file through the modem from a telnet connection to a Linux box? You're not going to be able to use Zmodem. Ymodem will work (the sy command defaults to 128 byte blocks), as will Xmodem. But not Zmodem.
Oddly enough, the telnet daemon has no trouble receiving the all FF binary file. Only sending it. Your guess as to why is probably better than mine.
- WiFi232 - An Internet Hayes Modem for your Retro Computer
- WiFi232's Evil Clone
- Jussi Salin's Virtual modem for ESP8266
- Stardot's ESP8266 based virtual modem
- Roland Juno's ESP8266 based virtual modem
- A whole lot of people owe a big vote of thanks to Jussi Salin for releasing their virtual modem code for the ESP8266 and starting the ball rolling.
- Paul Rickards for an amazing bit of hardware to draw inspiration from.
- All the Stardot contributors for their work.
- And, of course, Dennis C. Hayes for creating something so simple and elegant that has stood the test of time.
