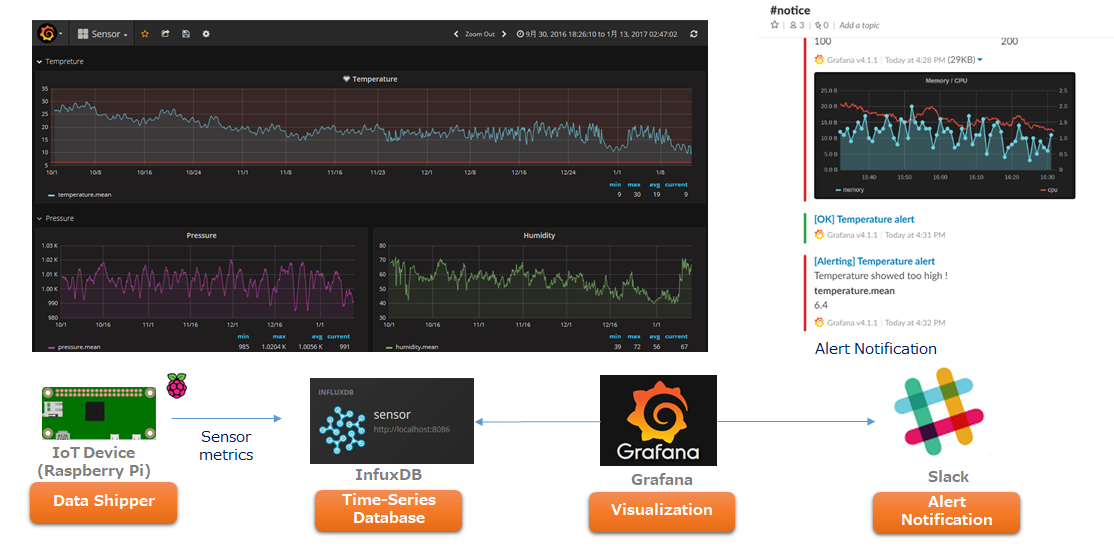
- 1. Sensor with Rasberry Pi using BME280
- 2. Devices and Tools
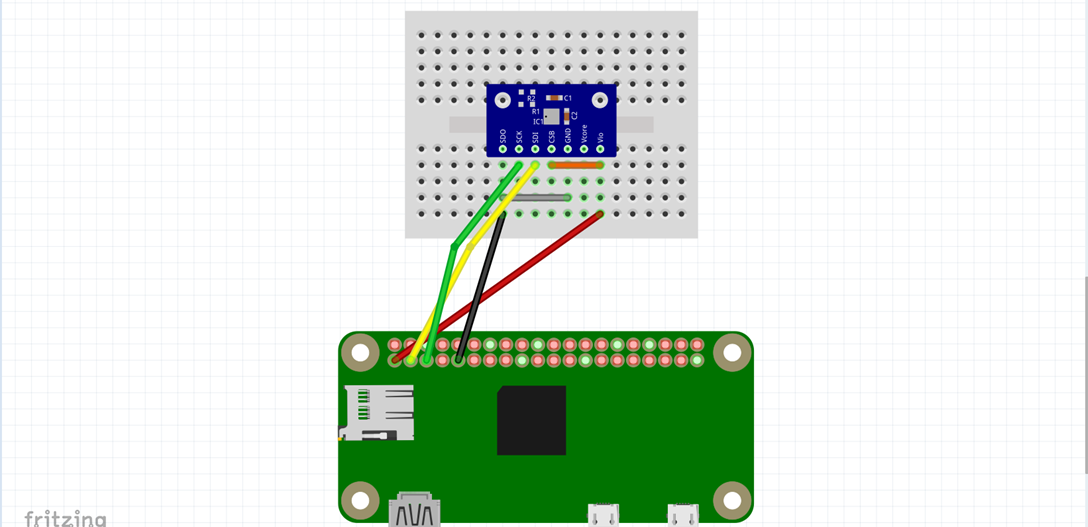
- 3. Wiring Sensor module - BME280
- 4. How to use
- 5. Visualization - Grafana + Influxdb
- 6. Send metrics to influxDB
- 7. grafana dashboard example
- 8. Let's encrypt Certbot auto renew

| devices and tools | role |
|---|---|
| bme280 | Sensor module |
| Raspberry Pi Zero | IoT device |
| Grafana ( v6.7.1) | Visualizer |
| Influxdb ( v1.7.10 ) | Time series database |
- BME280
https://www.switch-science.com/catalog/2323/
| Raspberry Pi (from) | BME (To) |
|---|---|
| 3.3v (1pin) | Vio,CSB |
| SDA (3pin) | SDI |
| SCL 3 (5pin) | SCK |
| GROUND (9pin) | SDO,GND |
- Wiring

- Raspberry Pi Pinout

Enable i2c interface on Razpberry Pi and reboot
$ sudo raspi-config
 > Interfacing Options  Configure connections to peripherals
> P5 I2C Enable/Disable automatic loading of I2C kernel module$ sudo apt install i2c-tools -y
$ i2cdetect -y 1
0 1 2 3 4 5 6 7 8 9 a b c d e f
00: -- -- -- -- -- -- -- -- -- -- -- -- --
10: -- -- -- -- -- -- -- -- -- -- -- -- -- -- -- --
20: -- -- -- -- -- -- -- -- -- -- -- -- -- -- -- --
30: -- -- -- -- -- -- -- -- -- -- -- -- -- -- -- --
40: -- -- -- -- -- -- -- -- -- -- -- -- -- -- -- --
50: -- -- -- -- -- -- -- -- -- -- -- -- -- -- -- --
60: -- -- -- -- -- -- -- -- -- -- -- -- -- -- -- --
70: -- -- -- -- -- -- 76 -Clone SWITCHSCIENCE BME280 Repository
# script for python 2.7
$ git clone https://github.com/SWITCHSCIENCE/BME280
$ python2.7 Python27/bme280_sample.py

temp : 31.17  ℃
pressure :  999.84 hPa
hum :  62.13 %
Python3 environment
$ sudo apt install python3-pip python3-venv
$ python3 -m venv venv
$ . venv/bin/activate
$ pip3 install smbus2
$ git clone https://github.com/kodamap/sensor_bme280

$ python3 Python3/bme280.py

temperature : 31.44  ℃
pressure : 1004.24 hPa
humidity : 74.29 %You need to be installed bellow on your docker host.
-
docker-compose https://docs.docker.com/compose/install/#install-compose
On your docker host
git clone https://github.com/kodamap/sensor_bme280By default, authentication is disabled in the configuration file.
https://docs.influxdata.com/influxdb/v1.6/administration/authentication_and_authorization/
$ vi sensor_bme280/dockerfiles/influxdb/influxdb.conf

[http]
  enabled = true
  bind-address = ":8086"
  auth-enabled = true # change this
  .
.Set root_url for using prefix (/grafana/)
$ vi sensor_bme280/dockerfiles/grafana/grafana.ini

# The full public facing url you use in browser, used for redirects and emails
# If you use reverse proxy and sub path specify full url (with sub path)
#;root_url = http://localhost:3000
root_url = %(protocol)s://%(domain)s:%(http_port)s/grafana/
Configure Nginx to work as reverse proxy for grafana. Set location prefix (/grafana/)
$ vi sensor_bme280/dockerfiles/nginx/default.conf

server {
    listen 443 ssl;

    ssl_certificate /etc/nginx/conf.d/server.crt;
    ssl_certificate_key /etc/nginx/conf.d/server.key;
    ## replace this when you use lets encrypt certificate
    #ssl_certificate /etc/letsencrypt/live/<your domain fqdn>/fullchain.pem;
    #ssl_certificate_key /etc/letsencrypt/live/<your domain fqdn>/privkey.pem;

    ssl_session_cache builtin:1000 shared:SSL:10m;
    ssl_protocols TLSv1 TLSv1.1 TLSv1.2;
    ssl_ciphers HIGH:!aNULL:!eNULL:!EXPORT:!CAMELLIA:!DES:!MD5:!PSK:!RC4;
    ssl_prefer_server_ciphers on;

    location /grafana/ {
        proxy_set_header X-Real-IP $remote_addr;
        proxy_set_header X-NginX-Proxy true;

        proxy_http_version 1.1;
        proxy_set_header Connection "";

        proxy_pass http://grafana:3000/;
        proxy_redirect off;
    }
}
Modify the enviroment valiable "GF_SECURITY_ADMIN_PASSWORD".
$ vi sensor_bme280/dockerfiles/docker-compose.yml

  grafana:
    image: grafana/grafana:6.7.1
    build: ./grafana
    container_name: grafana
    links:
      - influxdb
    ports:
      - "3000:3000"
    logging:
      driver: "json-file"
      options:
        max-size: "10240k"
        max-file: "10"
    environment:
- GF_SECURITY_ADMIN_PASSWORD=changeme # change this$ cd sensor_bme280/dockerfiles/
$ docker-compose up --build -d
$ docker-compose ps
Name Command State Ports
------------------------------------------------------------------------------------
grafana /run.sh Up 0.0.0.0:3000->3000/tcp
influxdb /entrypoint.sh influxd Up 0.0.0.0:8086->8086/tcp
nginx /run.sh Up 0.0.0.0:443->443/tcp, 0.0.0.0:80->80/tcpYou can access grafana gui
https://<your ip address>/grafana/Create database(name is sensor) on docker.
$ curl -XPOST 'http://localhost:8086/query?u=admin&p=changeme' --data-urlencode 'q=CREATE DATABASE "sensor"'
{"results":[{"statement_id":0}]}

$ curl -XPOST 'http://localhost:8086/query?u=admin&p=changeme' --data-urlencode 'q=SHOW DATABASES'
{"results":[{"statement_id":0,"series":[{"name":"databases","columns":["name"],"values":[["_internal"],["sensor"]]}]}]}
ref: https://docs.influxdata.com/influxdb/v1.6/tools/api/
Create sensor user and grant READ/WRITE privileges to sensor user
$ cd sensor_bme280/dockerfiles/
$ sudo /usr/local/bin/docker-compose exec influxdb sh
# influx -username admin -password changeme

Connected to http://localhost:8086 version 1.7.10
InfluxDB shell version: 1.7.10

> use sensor
> create user sensor with PASSWORD 'password'
> show users
user   admin
----   -----
admin  true
sensor false
> grant all on sensor to sensor
> show grants for sensor
database privilege
-------- ---------
sensor   ALL PRIVILEGES
> exitLogin the grafana ui
- "Add data soruce"
- Click "Save & Test"
| Setting | Value |
|---|---|
| Name | sensor |
| Type | influxDB |
| URL | http://influxdb:8086 |
| Database | sensor |
| User | sensor |
| Password | password (change me!) |
Click "Save & Test" and "Data source is working"
Send metrics test on the docker host
$ curl -i -XPOST "http://localhost:8086/write?db=sensor&u=sensor&p=password" --data-binary "temperature,node=localhost,location=home,unit=Celcius value=20"
HTTP/1.1 204 No Content
Content-Type: application/json
Request-Id: 6c524cf1-c60d-11e8-8026-000000000000
X-Influxdb-Build: OSS
X-Influxdb-Version: 1.4.2
X-Request-Id: 6c524cf1-c60d-11e8-8026-000000000000
Date: Tue, 02 Oct 2018 06:35:58 GMT

$ curl -XPOST 'http://localhost:8086/query?db=sensor&u=sensor&p=password' --data-urlencode 'q=select * from temperature'
{"results":[{"statement_id":0,"series":[{"name":"temperature","columns":["time","location","node","unit","value"],"values":[["2018-10-02T07:15:12.537207759Z","home","localhost","Celcius",20]]}]}]}
Script example
- Change "PYTHON" path(example script uses pyenv for python3.x ). ref: https://github.com/pyenv/pyenv
- I changed output for python3.x in /home/pi/BME280/Python35/bme280.py specified by "PY_SCRIPT" (script ref: https://github.com/SWITCHSCIENCE/BME280)
#!/bin/bash
INFLUXDB_HOST=$1
PORT=$2
NODE=`hostname`
LOCATION="home"
STREAMS="temperature:Celcius humidity:Percent pressure:hPa"
PYTHON=/home/pi/venv/bin/python
PY_SCRIPT=/home/pi/BME280/Python3/bme280.py
PY_SCRIPT_TMP=/home/pi/BME280/Python3/bme280.tmp
PY_SCRIPT_LOG=/home/pi/BME280/Python3/bme280.log
EXEC_DATE=`date +%Y-%m-%d" "%H:%M:%S`
NANO="000000000"
UNIXTIME=`date -d "${EXEC_DATE}" +%s`
DATETIME=${UNIXTIME}${NANO}

## Main
RESULT=${EXEC_DATE}
${PYTHON} ${PY_SCRIPT} > ${PY_SCRIPT_TMP}
for streams in `echo ${STREAMS}`
do
    stream=`echo ${streams} | awk -F: '{print $1}'`
    VALUE=`grep ${stream} ${PY_SCRIPT_TMP} | awk '{print $3}'`
    UNIT=`echo ${streams} | awk -F: '{print $2}'`
    curl -i -XPOST "http://${INFLUXDB_HOST}:${PORT}/write?db=sensor&u=sensor&p=password" --data-binary "${stream},node=${NODE},location=${LOCATION},unit=${UNIT} value=${VALUE} ${DATETIME}"
    RESULT+=" ${stream}:${VALUE}"
done

echo ${RESULT} >> ${PY_SCRIPT_LOG}
You'll get status code "204" on each metrics (tempreture, humidity and pressure)
# connect to localhost port 8086
$ pi@sensor2:~/BME280 $ ./send_metrics.sh localhost 8086
HTTP/1.1 204 No Content
.
.Upload .json file "Sensor-1486613315807.json" from grafana ui (import dashboard menu) and select a influxdb data source: "sensor"
You'll see "Temperature , Pressure and Humidity" on the grafana dashboard.
https://certbot.eff.org/lets-encrypt/debianbuster-nginx
Following instruction above, configure nginx Dockerfile as bellow
$ vi sensor_bme280/dockerfiles/nginx/Dockerfile

RUN apt-get update -y
RUN apt-get install certbot python-certbot-nginx cron -y

CMD ["nginx", "-g", "daemon off;"]
Get a certificate in the nginx container
$ docker-compose exec nginx /bin/bash

root@32d5f0acc8d0:/# certbot certonly --nginx
Test automatical renew and verify crontab
root@32d5f0acc8d0:/# certbot renew --dry-run
root@32d5f0acc8d0:/# cat /etc/cron.d/certbot
SHELL=/bin/sh
PATH=/usr/local/sbin:/usr/local/bin:/sbin:/bin:/usr/sbin:/usr/bin

0 */12 * * * root test -x /usr/bin/certbot -a \! -d /run/systemd/system && perl -e 'sleep int(rand(43200))' && certbot -q renew
New Ceriticates save in /etc/letsencrypt/ that is a shared volume on the docker-host certbot-data (ex. /var/lib/docker/volumes/dockerfiles_certbot-data/_data)
$ vi docker-compose.yml

  nginx:
    #image: nginx/nginx:latest
    build: ./nginx
    container_name: nginx
    links:
      - grafana
    volumes:
      - ./nginx/default.conf:/etc/nginx/conf.d/default.conf
      - certbot-data:/etc/letsencryp
..
volumes:
  influx-data:
  grafana-data:
  certbot-data
  nginx:
Now you are ready for let's encrypt, modify ssl_certificate in the nginx config and restart nginx.
$ vi ./nginx/default.conf

server {
    listen 443 ssl;

    #ssl_certificate /etc/nginx/conf.d/server.crt;
    #ssl_certificate_key /etc/nginx/conf.d/server.key;
    ## replace this when you use lets encrypt certificate
    ssl_certificate /etc/letsencrypt/live/<your domain fqdn>/fullchain.pem;
    ssl_certificate_key /etc/letsencrypt/live/<your domain fqdn>/privkey.pem;
    .
    .