Fork shadowsocks-heroku
Heroku is a cloud platform as a service that supports multiple programming languages, and shadowsocks-heroku is an ss service that can be deployed on the Heroku platform. Unlike shadowsocks, shadowsocks-heroku uses WebSocket instead of original sockets.
- Please check if you follow the steps first (read the tutorial again)
- Please find the answer through Google/Github
- If it has not been resolved, please feel free to ask questions via issue (posted log and configuration Pay attention to hiding the password & personal ip when)
Heroku provides free accounts, some of which are as follows: -512 MB RAM per dyno -Free apps sleep automatically after 30 mins of inactivity to conserve your dyno hours -Free apps wake automatically when a web request is received -https://devcenter.heroku.com/articles/limits -https://devcenter.heroku.com/articles/free-dyno-hours#usage
Registration address: https://signup.heroku.com/ (The registration and deployment process may require a ladder#10, #14)
- Click on
,One-click deployment to heroku

You can also choose another version of the server shadowsocks-websocket-python; Mobile users are recommended to deploy cross-platform Support better v2ray
- Set the encryption algorithm and app password
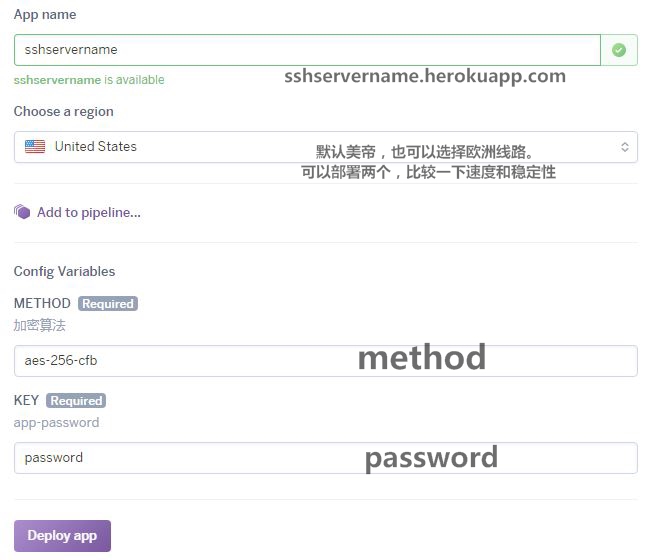
The supported encryption algorithm types are as follows: https://github.com/mrluanma/shadowsocks-heroku#supported-ciphers
-
Download the release https://github.com/onplus/shadowsocks-heroku/releases (backup)
-
Modify the config.json parameters and run ss-h.exe or start.vbs (or win tray tool taskbar.exe)
-
The startup is successful and the command line displays:
server listening at {address: '127.0.0.1', family:'IPv4', port: 1080 }
-
Download: Chrome browser SwitchyOmega plug-in (reference tutorial, import Backup file SSHeroku.Bak.zip)
-
Installation: Open the browser extension page
chrome://extensions, drag and drop the fileSwitchyOmega.crxto the browser extension page to install -
Configuration: add SwitchyOmega proxy server
    Proxy agreement: SOCKS5
 Proxy server local_address: 127.0.0.1
    Proxy port local_port: 1080
- Use pollution-free DNS https://www.zhihu.com/question/32229915
- cow/meow smart proxy https://github.com/cyfdecyf/cow#cow-climb-over-the-wall-proxy
 #Rc configuration file
 Listen = http://127.0.0.1:7777
    proxy = socks5://127.0.0.1:1080
- Website navigation http://www.ipv6daohang.com/