This is a guide for using UCLA IDRE’s Hoffman2 cluster computing system. There are guides for running jobs specific to R and Julia, as well as general guides for commands and what is available for users.
To try out the sample code in the tutorial, simply issue
git clone https://github.com/kose-y/Hoffman2Tutorials.git
on Hoffman2 to clone this repository.
This document is mainly compiled by Chris German and Hua Zhou, with
valuable input from Alec Chan-Goldston and Lu Zhang. It is maintained
and updated by Seyoon Ko. If you want to contribute to this tutorial,
work on the RMarkdown files README.Rmd, RTutorial/R_Hoffman2.Rmd,
and JuliaTutorial/Julia_Hoffman2.Rmd, which can be knitted into the
corresponding README.md files, and make pull requests.
A computer cluster is a set of connected computers (nodes) that work together under one system. Each node has its own instance of an operating system and hardware. Clusters are used for high-performance distributed computing tasks. They are ideal for multilevel simulations and large-scale computations.
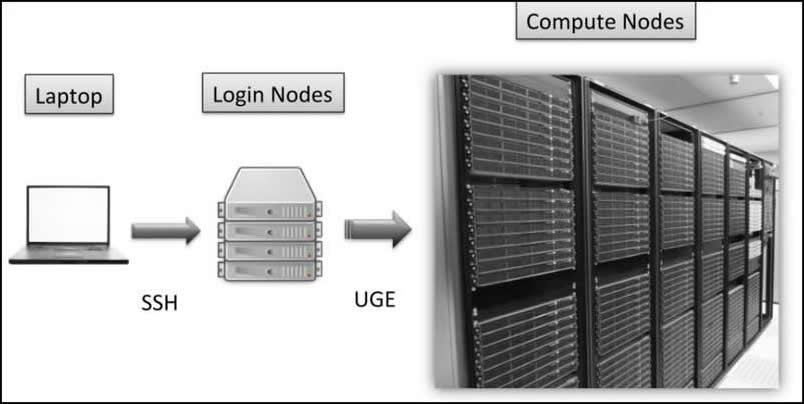
The Hoffman2 Cluster is a group of computing nodes that consists of over 1,200 64-bit nodes and 13,340 cores. It has an aggregate of over 50TB of memory. It consists of login nodes and compute nodes. Login nodes are where you can organize data (install packages, arrange data) and submit jobs and compute nodes are where computer-intensive tasks are run.
The first step is to create an account.
Register for an account at https://www.hoffman2.idre.ucla.edu/Accounts/Requesting-an-account.html.
For faculty sponsor, you can choose your advisor if (s)he is on the
list. If you do not have an advisor yet or (s)he is not on list, you can
choose Hua Zhou or Sudipto Banerjee. The faculty sponsor will
receive an email after you submit the registration form. Once your
account gets approved, you’ll get an email with a link to see your
temporary password that must be used within 4 weeks.
To login, go to terminal in Linux/MacOS and type:
ssh username@hoffman2.idre.ucla.edu
and enter your password when prompted. You can also set up the more secure SSH keys and no password is required, following https://www.hoffman2.idre.ucla.edu/Using-H2/Connecting/Connecting.html#connecting-via-terminal-and-ssh.
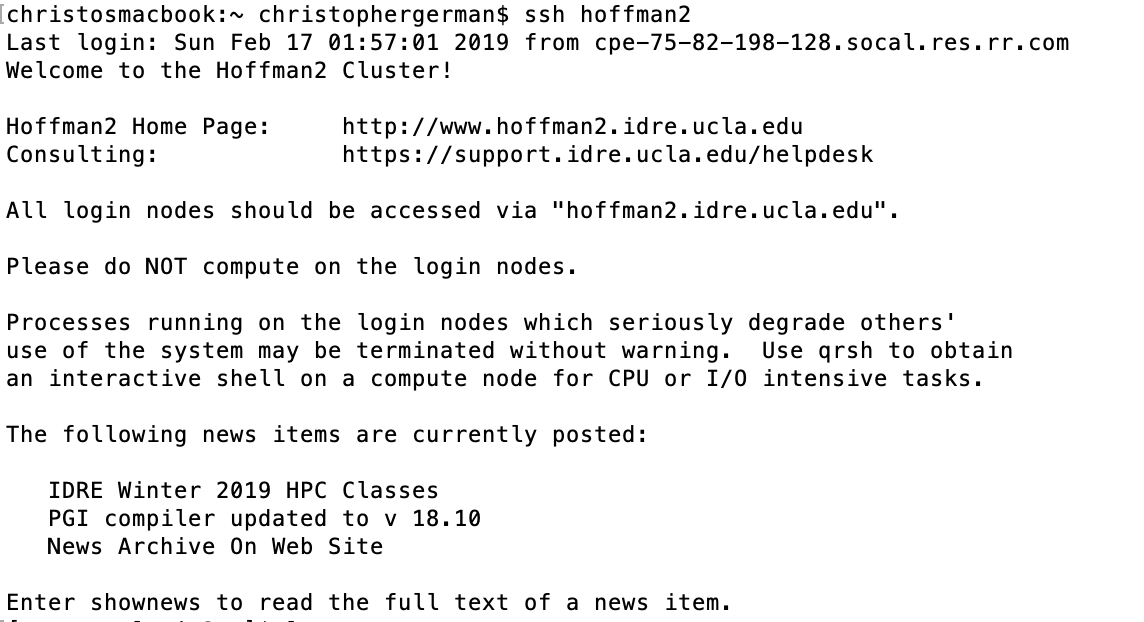
Upon login, you see a welcome message:
Windows users can use Git Bash, PuTTY, MobaXterm, or Cygwin programs to establish SSH connection to Hoffman2. See https://www.hoffman2.idre.ucla.edu/Using-H2/Connecting/Connecting.html#setting-up-ssh-clients-for-windows for details.
To use Hoffman2, which runs on CentOS 7 (a specific Linux distribution), you have to use linux/unix commands to navigate.
Some most useful commands:
- make a directory:
mkdir dirname - go to home directory:
cd - go to a certain directory:
cd /path/ - see current directory:
pwd - remove a file:
rm filename - remove a directory:
rm -r dirname - see whats in current directory:
ls - see whats in current directory (including hidden items):
ls -a - see size of current directory:
du -h - transfer files between cluster/local computer via ssh:
scp(more on this later) - to go to directory containing the current directory:
cd ..
You can learn more about Linux in Dr. Hua Zhou’s Biostat 203B: Introduction to Data Science course.
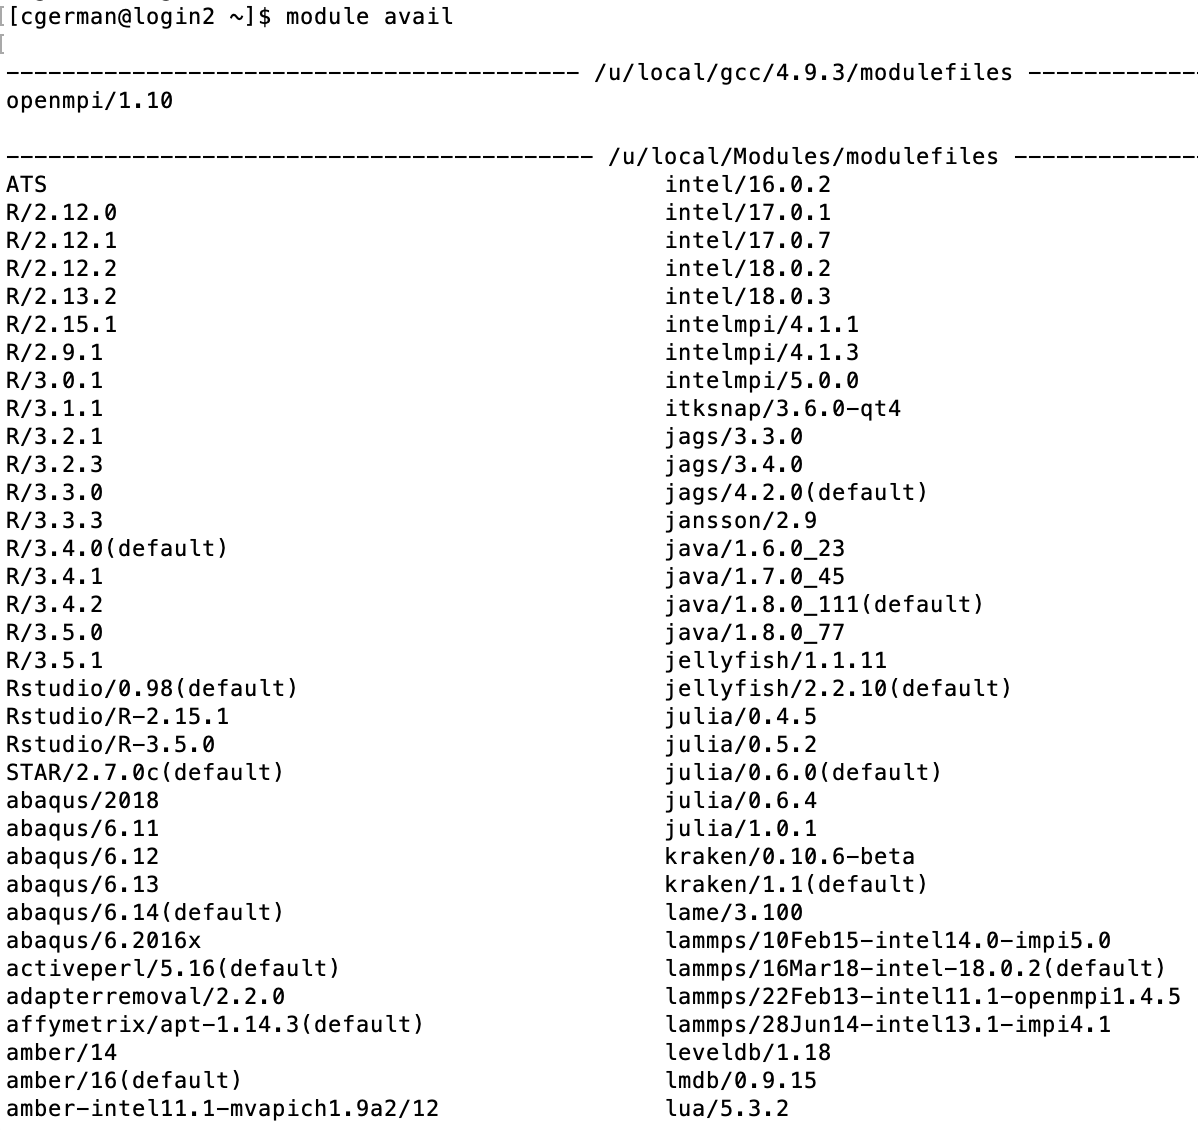
You can query available software on Hoffman2 by
module avail
More than the ones shown are available. It’s a very long list. Most relevant to biostatisticians include R, Julia, Python, JAGS (Just Another Gibbs Sampler), Matlab, and Stata.
To see available modules that begin with a specific phrase, such as
those that start with julia, type
module avail julia
To load a module, say julia version 1.6, for use type:
module load julia/1.6
If you are going to need packages installed for your use on Hoffman2,
load julia using julia and then install the packges. Note: This should
be done on a compute node as compiling julia and libraries can take
quite a bit of resources. Therefore, you should use qrsh, discussed
later to do this. Computing power is limited on login nodes so you
should not run any analyses on the login node.
scp, standing for secure copy paste, allows you to transfer files
between an ssh server and your local computer. It’s a useful command if
you set up ssh keys so that you don’t have to enter your password every
time you want to transfer files.
To use scp:
- go to directory you want to store things/send things in/from on local computer.
- To send a file from local to cluster :
scp filename.extension username@hoffman2.idre.ucla.edu:∼/directory_to_save_in/
- To send multiple files from local to cluster
scp filename1.extension filename2.extension username@hoffman2.idre.ucla.edu:∼/directory_to_save_in/
- To send a file from cluster to local
scp username@hoffman2.idre.ucla.edu:∼/directory_its_in/filename.extension .
- To send multiple files from cluster to local
scp username@hoffman2.idre.ucla.edu:∼/directory_its_in/{filename1.extension,filename2.extension} .
- To send directory with all files from cluster to local
scp -r username@hoffman2.idre.ucla.edu:∼/directory_to_send .
Hoffman2 has two dedicated nodes for data
transfer.
For large file transfers, it is recommended to use them through the URL
dtn.hoffman2.idre.ucla.edu using rsync or Globus.
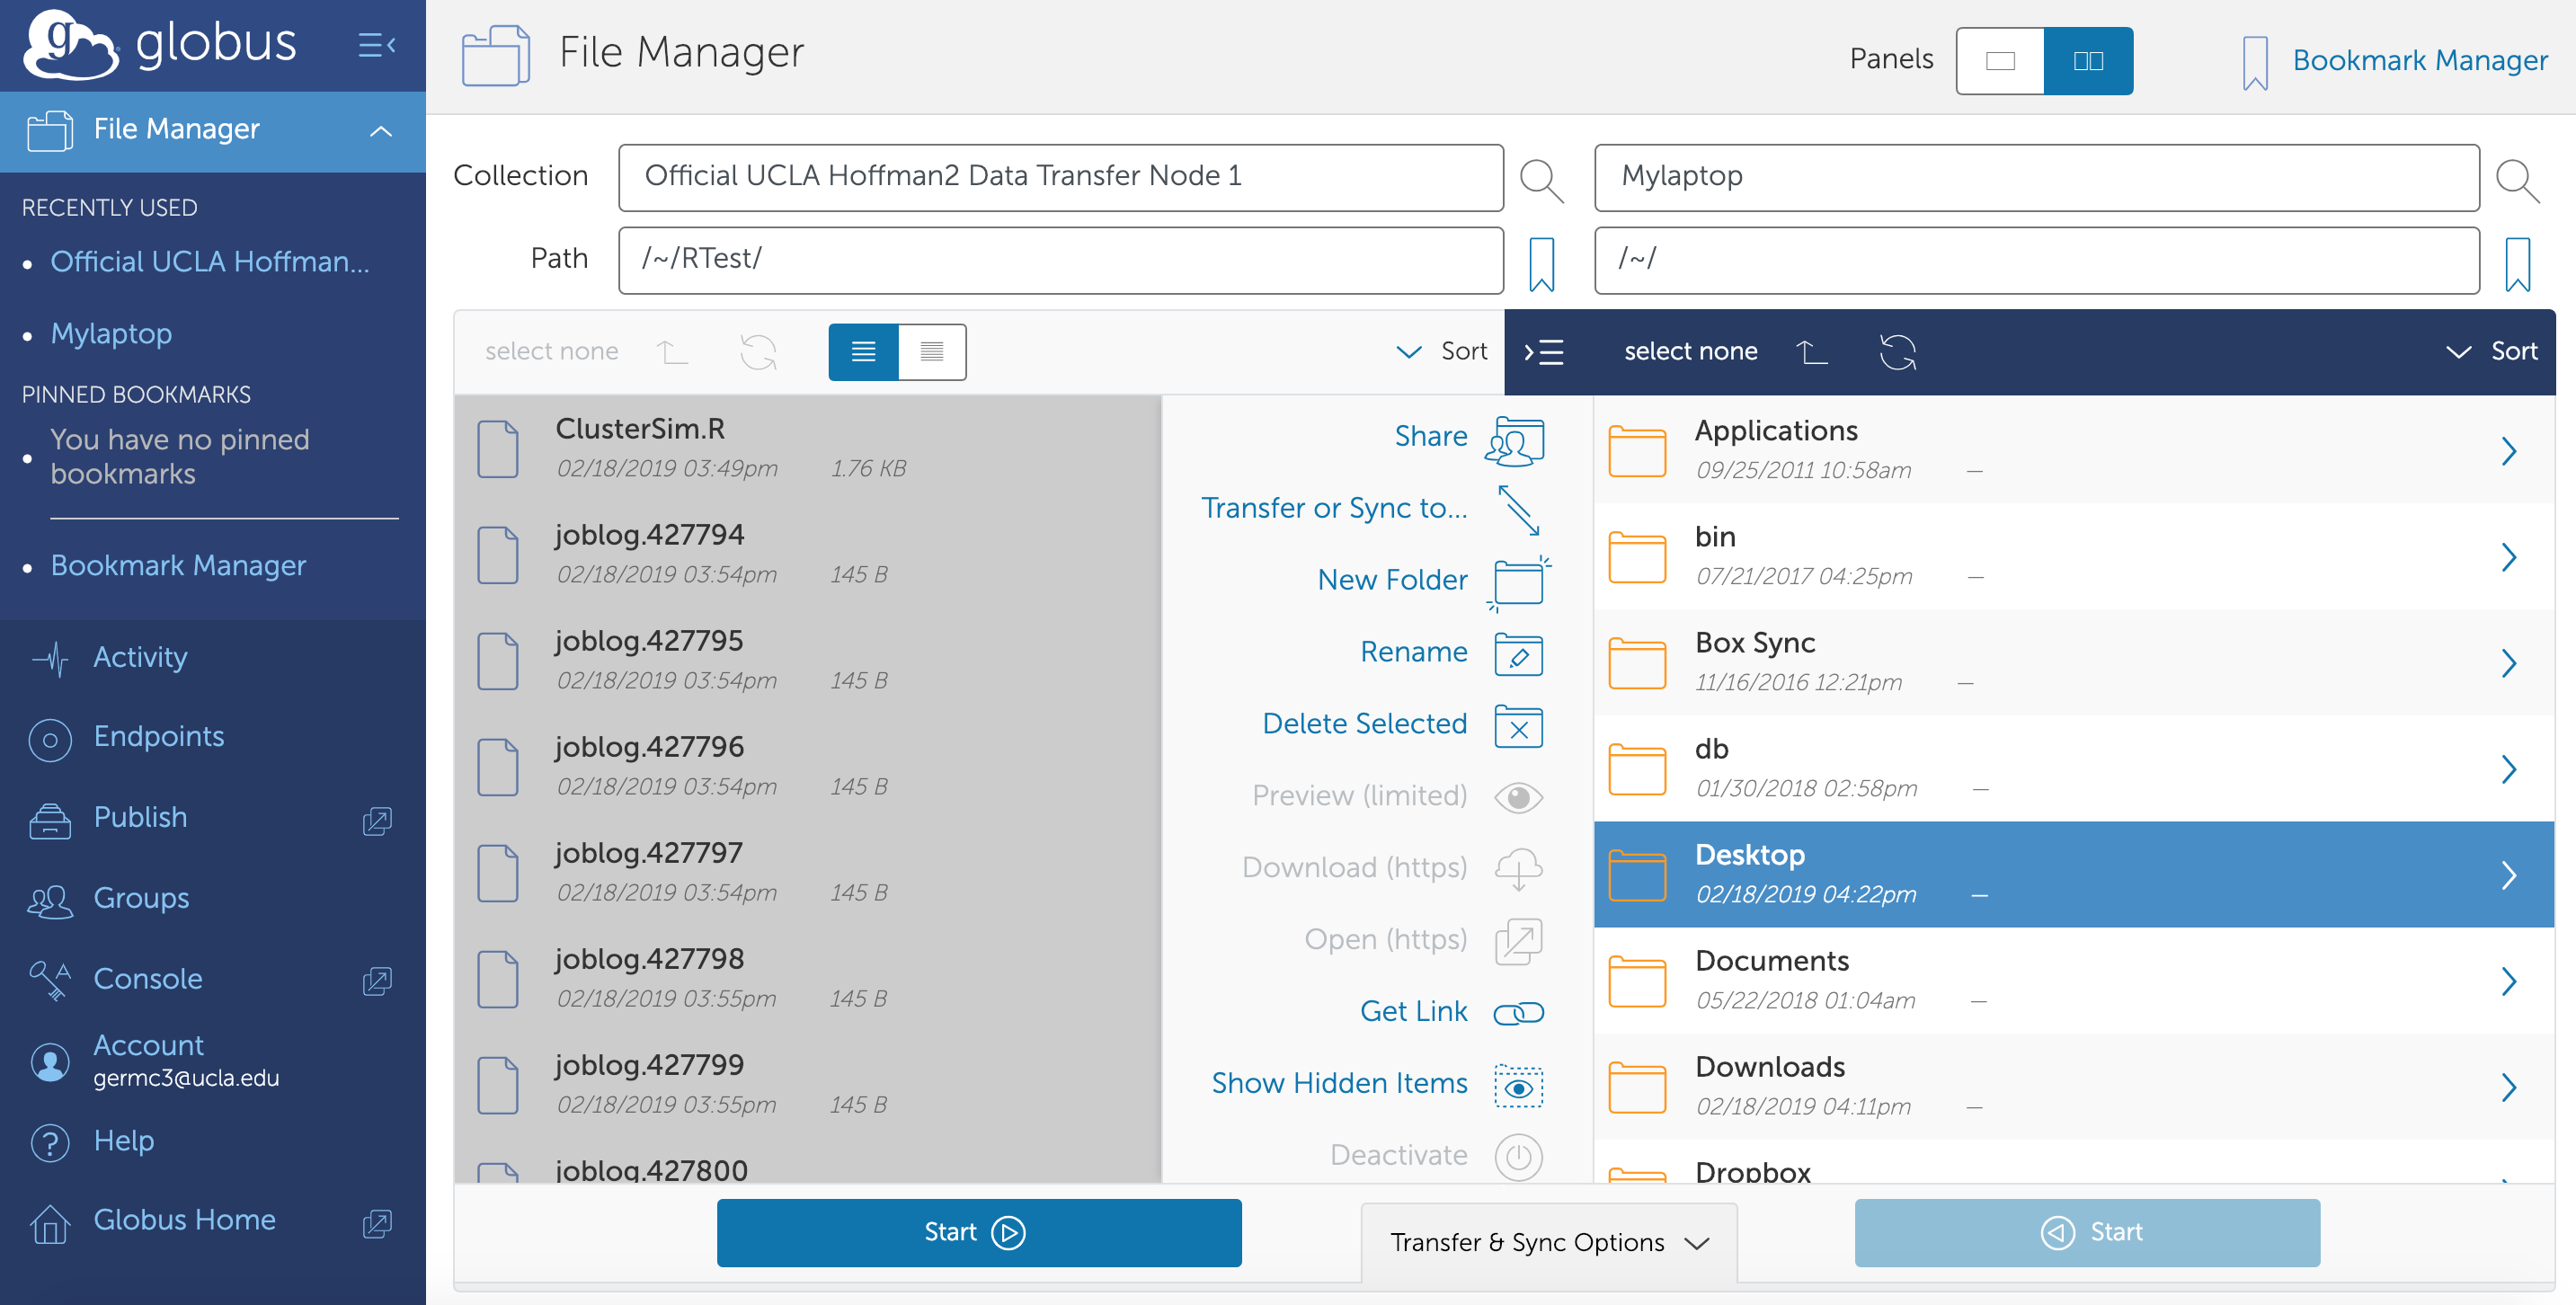
Globus allows you to transfer files between your local computer and the cluster. To use Globus you will have to go to www.globus.org and login through UCLA by selecting your existing organizational login as UCLA. Then you will need to download their Globus Connect Personal software, then set your laptop as an endpoint.
Very detailed instructions can be found here https://www.hoffman2.idre.ucla.edu/Using-H2/Data-transfer.html#globus
In short, login to globus, then under endpoints, select
Create new endpoint. Select a Globus Personal connect, then enter a
name. Generate an installation setup key, save it somewhere, and then
download the client. Once you launch the client, enter the setup key and
you will have created an endpoint where you can transfer files to.
From there, you can login to globus.com or launch Globus Connect Personal and click files transfer. There you can choose to transfer files between your machine and the cluster. To find the endpoint to transfer files to/from on the server, search “Hoffman2” in the Collection bar of the File Manager and select one of the official UCLA Hoffman2 Data Transfer Nodes.
Hoffman2 has Git and svn available, which offer a more productive and reproducible way to synchornize source code between computers and platforms. For example, to get a copy of these tutorials, simply type
git clone https://github.com/kose-y/Hoffman2Tutorials.git
Hoffman2 uses the Altair’s Grid Engine (formerly Univa Grid Engine) to manage computing jobs on the cluster. It is a fork of Sun Grid Engine (now known as Oracle Grid Engine), and most commands and environment variables are identical to it. See https://www.hoffman2.idre.ucla.edu/Using-H2/Computing/Computing.html for some commonly used commands or the introductory guide. Following examples are more specific to biostatistical applications.
For most analyses/jobs, you should use the qsub command. This submits
a batch job to the queue (scheduler). The type of file you qsub has to
have a specific format (shell script). For example, following sample
script submit.sh, with line-by-line comment,
submits an R job.
cat RTutorial/submit.sh
To send this script to the scheduler to run on a compute node, you would simply type:
qsub submit.sh
In the detailed R and Julia tutorials, we demonstrate how to generate such scripts systematically in a typical simulation study and submit them to potentially many compute nodes.
For some analyses, you may want to do things interactively instead of
just submitting jobs. The qrsh command is for loading you onto an
interactive compute node.
Typing qrsh on the Hoffman2 login node will request an interactive
session. By default, the session will run for two hours and the physical
memory alotted will be 1GB. To request more, you can use the commmand
qrsh -l h_rt=4:00:00,h_data=4G
This will request a four hour session where the maximum physical memory is 4GB.
If you’d like to use more than one CPU core for your job, add
-pe shared # to the end. Note, the amount of memory requested will be
for each core. For example, if you’d like to request 4 CPU cores, each
with 2GB of memory for a total of 8GB for 5 hours, run:
qrsh -l h_rt=5:00:00,h_data=2G -pe shared 4
The more time and memory you request, the longer you will have to wait for an interactive compute node to become available to you. It’s normal to wait a few minutes to get an interactive session.
For more advanced options you can use
qrsh -help
The maximum time for a session is 24 hours unless you’re working in a
group that owns their compute nodes. So do not have an h_rt value
greater than h_rt=24:00:00.
Different compute nodes have different amounts of memory. There are fewer nodes with lots of memory, so the larger the amount of memory you’re requesting the longer you will have to wait for the job to start running. If you request too much, the job may never run.
Requesting more than 4 cores for an interactive session can possibly take a long time for the interactive session to start.
To cancel a job that is running or in the queue qdel is the command,
use myjob to determine the job ID and then type:
qdel -u yourusername jobID
and the job will be canceled. To cancel all jobs simply leave jobID
blank.
To use Jupyter Notebook interactively in Hoffman2, follow the
instructions at
https://www.hoffman2.idre.ucla.edu/Using-H2/Connecting/Connecting.html#connecting-via-jupyter-notebook-lab.
It needs you to set up password-less ssh connection and download a
Python
script,
and change its permission to u+x (chmod u+x h2jupynb)
Julia users might want to request an “any Intel” node. This can be
achieved by adding an option of (not arch == 'i\*') to Line
230
of the most recent commit of the file as of Nov 3, 2021. The file
modified is provided
here.
You can run:
./h2jupynb -t 4 --arch "i\*"
to request a single core on a single Intel node for four hours.
Note, to use Julia in Jupyter notebook, you will need to make sure you
have installed the IJulia package in the version of julia that you
would like to use. To use julia v1.6, login to Hoffman2, use the
qrsh command to get an interactive compute note, then load julia 1.6,
launch julia, and install the IJulia package.
Users have access to three types of data storage on Hoffman2: group space, scratch space, and user home space. See this document for the most updated information.
-
Group space is available if you are in a group that purchased space through Hoffman2. If you are affiliated with Department of Biostatistics, most likely you have access to the space at
/u/project/biostat-chair/[your_username], and you will have a link to this directory at$HOME/project-biostat-chair. -
Scratch space allows you to store up to 2TB of data on the cluster, accessible by
$SCRATCH. i.e.cd $SCRATCH. This is meant for temporary storage only, and files are only guaranteed to stay on the space for 14 days. After, they are eligible to be erased. -
User home space is 20GB of data. This is where you can store files permanently.
To check your storage usage and availability, use the command myquota.
If you are a biostatistics doctoral student, there are compute nodes that the biostatistics department has which will allow you to run jobs longer than 24 hours (up to 14 days). These nodes give group users priority to use them, so a job is guaranteed to run within 24 hours of the job submission on these nodes unless they’re all being used by other biostatistics group members. To get membership for these nodes, you will need to select Dr. Hua Zhou or Dr. Sudipto Banerjee as faculty sponsor.
The biostatistics nodes are under the group name @sudipto_pod. To view
the list of biostatistics nodes you can run the command
qconf -shgrp @sudipto_pod
with example output
group_name @sudipto_pod
hostlist n6643 n7643
To see what types of nodes there are (how many cores and how much memory each node has) you can run
qhost -h n6643 n7643
with output
HOSTNAME                ARCH         NCPU NSOC NCOR NTHR NLOAD  MEMTOT  MEMUSE  SWAPTO  SWAPUS
----------------------------------------------------------------------------------------------
global                  -               -    -    -    -     -       -       -       -       -
n6643                   intel-gold-61  36    2   36   36  0.00  188.6G    5.8G    1.9G   58.2M
n7643                   intel-gold-61  36    2   36   36  0.00  188.6G    5.8G    1.9G   60.8M
This shows that the biostatistics group has two nodes (n6643 n7643), each with 36 cores and 192GB of memory (an average of 5.3GB/core).
To request these nodes specifically, include -l highp when requesting
the job.
For example, the line in your .sh file should look like:
-l h_data=1G,h_rt=48:00:00,highp
To alter (without re-submitting it) a already-pending job from non-highp to highp, follow steps:
-
Get the “hard resource” parameter list:
qstat -j job_id | grep ^'hard resource_list'For example, you have hard resource_list:
h_data=1024M,h_rt=259200You will use the list beyond the colon (“:”) in the “hard resource_list” output above in the next step. -
Add the highp option to the hard resource_list using the qaltercommand:
qalter -l h_data=1024M,h_rt=259200,highp job_id, where job_id is replaced by the actual job ID (number). For more information aboutqalter, try the command:man qalter.
Specific guides for submitting R jobs, including example code of submitting to multiple nodes for a typical simulation study.
Specific guides for submitting Julia jobs, including example code of submitting to multiple nodes for a typical simulation study.
-
Hoffman2 website has detailed documentation and information on using the cluster.
-
Dr. Raffaella D’Auria at IDRE is a valuable resource. She has helped various biostatistics students and faculty with running their projects on Hoffman2. You can set up an appointment by sending an email (ticket) to hpc@ucla.edu.
-
Dr. Hua Zhou’s course Biostat 203B: Introduction to Data Science covers Linux basics, SSH keys, Git/GitHub, cluster computing using Hoffman2, and various other topics.


