react-native-kosmo-stepper
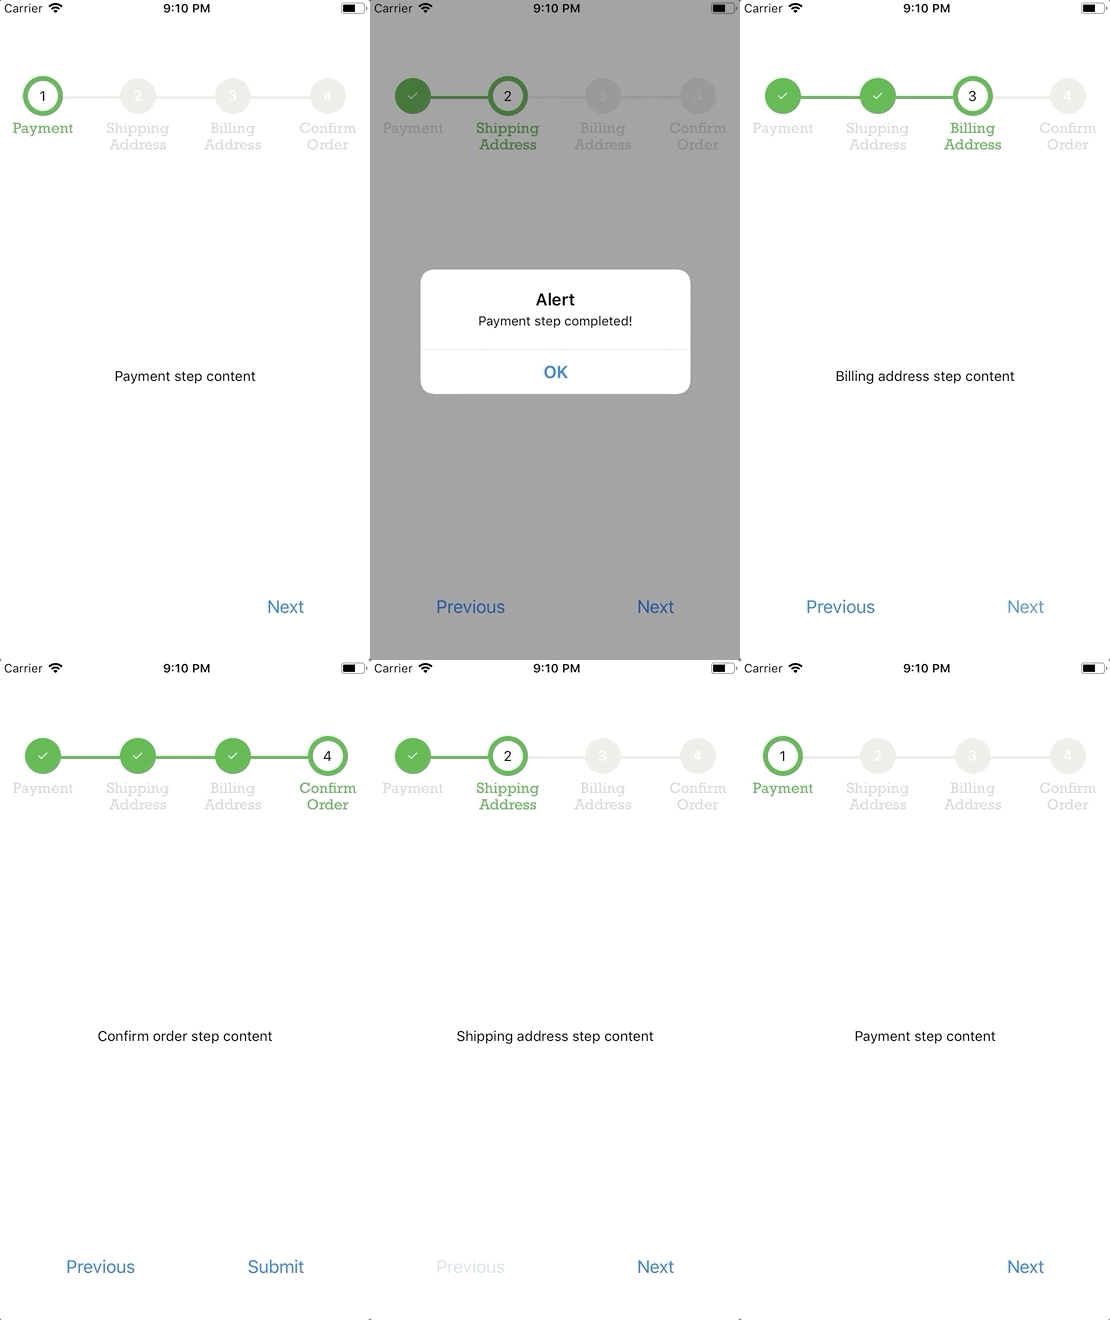
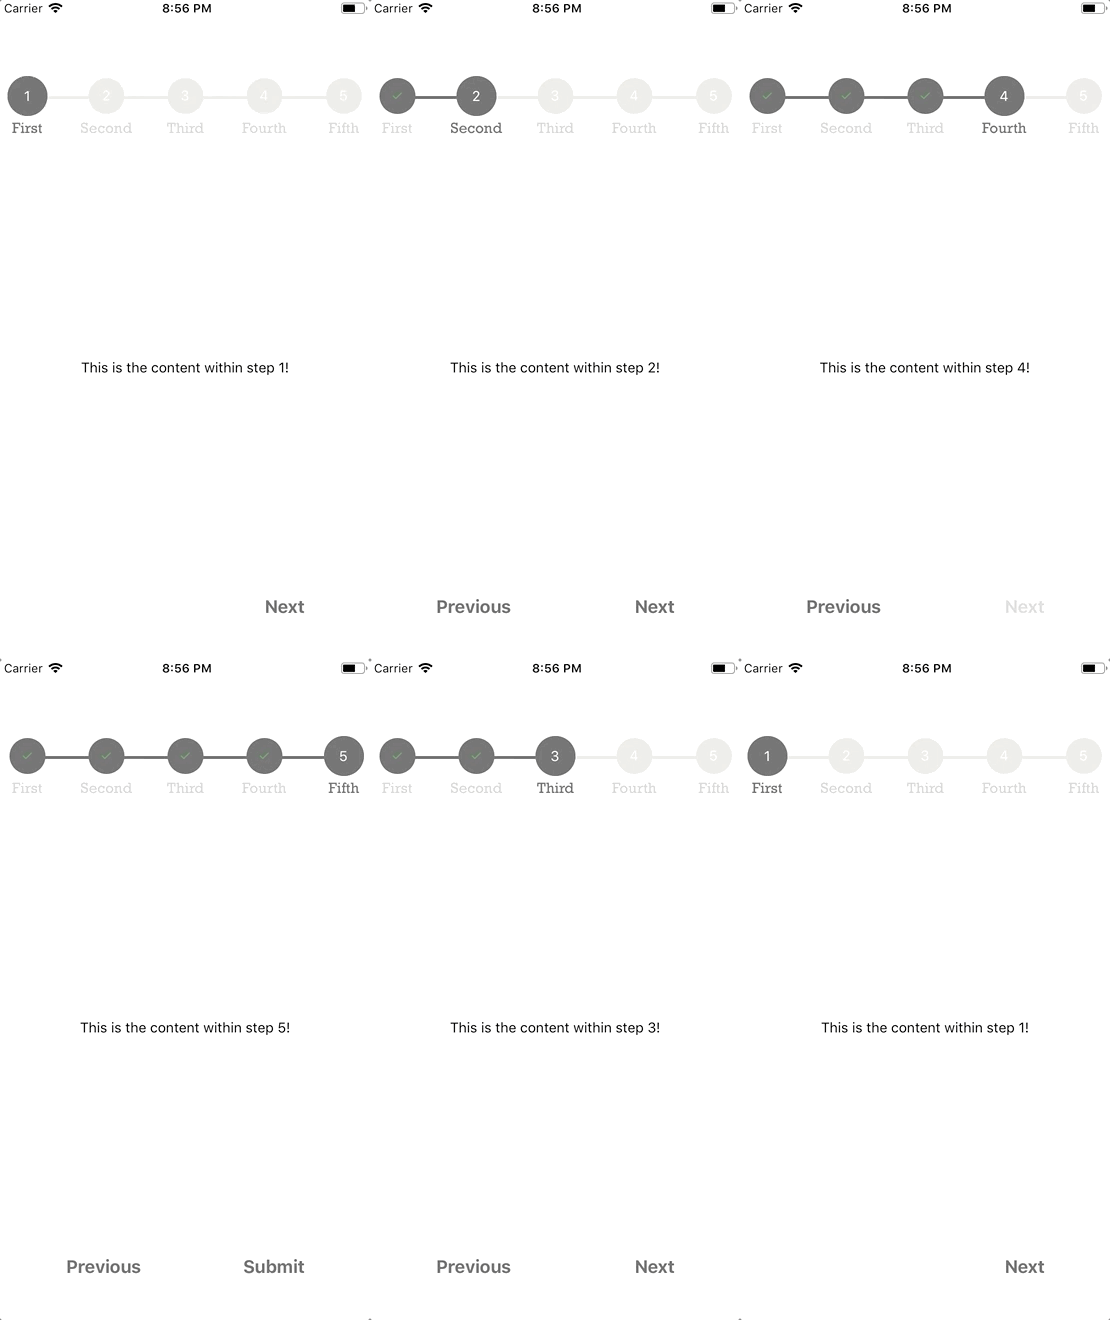
A simple and fully customizable React Native component that implements a progress stepper UI.
- Each steps content is displayed inside of a customizable ScrollView.
- Fully customizable buttons are displayed at the bottom of the component to move between steps.
| Example One | Example Two |
|---|---|
 examples/ExampleOne.js examples/ExampleOne.js |
 examples/ExampleTwo.js examples/ExampleTwo.js |
Installation
If using yarn:
yarn add react-native-kosmo-stepper
If using npm:
npm i react-native-kosmo-stepper
Usage
import { ProgressSteps, ProgressStep } from 'react-native-progress-steps';
Simply place a <ProgressStep /> tag for each desired step within the <ProgressSteps /> wrapper.
<View style={{flex: 1}}>
    <ProgressSteps>
        <ProgressStep label="First Step">
            <View style={{ alignItems: 'center' }}>
                <Text>This is the content within step 1!</Text>
            </View>
        </ProgressStep>
        <ProgressStep label="Second Step">
            <View style={{ alignItems: 'center' }}>
                <Text>This is the content within step 2!</Text>
            </View>
        </ProgressStep>
        <ProgressStep label="Third Step">
            <View style={{ alignItems: 'center' }}>
                <Text>This is the content within step 3!</Text>
            </View>
        </ProgressStep>
    </ProgressSteps>
</View>
Button Styling Usage
Button container and text are fully customizable using the nextBtnStyle, nextBtnTextStyle, previousBtnStyle, and previousBtnTextStyle props.
Example usage to change a buttons text color:
const buttonTextStyle = {
    color: '#393939'
};

return (
    <View style={{flex: 1}}>
        <ProgressSteps>
            <ProgressStep label="First Step" nextBtnTextStyle={buttonTextStyle} previousBtnTextStyle={buttonTextStyle}>
                <View style={{ alignItems: 'center' }}>
                    <Text>This is the content within step 1!</Text>
                </View>
            </ProgressStep>
            <ProgressStep label="Second Step" nextBtnTextStyle={buttonTextStyle} previousBtnTextStyle={buttonTextStyle}>
                <View style={{ alignItems: 'center' }}>
                    <Text>This is the content within step 2!</Text>
                </View>
            </ProgressStep>
        </ProgressSteps>
    </View>
)
Current Step Error and Validation Handling
The errors prop should be used if there's a need for validation and error handling when clicking the next button. If you would like to prevent the next step from being rendered, set the errors prop to true. By default, it will be false.
Example usage of validation check:
state = {
    isValid: false,
    errors: false
};

onNextStep = () => {
    if (!this.state.isValid) {
      this.setState({ errors: true });
    } else {
      this.setState({ errors: false });
    }
};

render() {
    return (
      <View style={{ flex: 1 }}>
        <ProgressSteps>
          <ProgressStep label="First Step" onNext={this.onNextStep} errors={this.state.errors}>
            <View style={{ alignItems: 'center' }}>
              <Text>This is the content within step 1!</Text>
            </View>
          </ProgressStep>
          <ProgressStep label="Second Step">
            <View style={{ alignItems: 'center' }}>
              <Text>This is the content within step 2!</Text>
            </View>
          </ProgressStep>
        </ProgressSteps>
      </View>
    );
}
Documentation
Progress Steps Component
| Name | Description | Default | Type |
|---|---|---|---|
| borderWidth | Width of the progress bar between steps | 6 | Number |
| borderStyle | Type of border for the progress bar | solid | String |
| activeStepIconBorderColor | Outside border color for the active step | #4bb543 | String |
| progressBarColor | Color of the default progress bar | #ebebe4 | String |
| completedProgressBarColor | Color of the completed progress bar | #4bb543 | String |
| activeStepIconColor | Color of the active step icon | transparent | String |
| completedStepIconColor | Color of the completed step icon | #4bb543 | String |
| disabledStepIconColor | Color of the disabled step icon | #ebebe4 | String |
| labelFontFamily | Font family for the step icon label | iOS/Android default font | String |
| labelColor | Color of the default label | lightgray | String |
| activeLabelColor | Color of the active label | #4bb543 | String |
| completedLabelColor | Color of the completed label | lightgray | String |
| activeStepNumColor | Color of the active step number | black | String |
| completedStepNumColor | Color of the completed step number | black | String |
| disabledStepNumColor | Color of the disabled step number | white | String |
| completedCheckColor | Color of the completed step checkmark | white | String |
| activeStep | Manually specify the active step | 0 | Number |
| isComplete | Set all Steps to active state | false | Boolean |
| topOffset | Set progress bar top offset | 30 | Number |
| marginBottom | Set progress bar bottom margin | 50 | Number |
Progress Step Component
| Name | Description | Default | Type |
|---|---|---|---|
| label | Title of the current step to be displayed | null | String |
| onNext | Function called when the next step button is pressed | null | Func |
| onPrevious | Function called when the previous step button is pressed | null | Func |
| onSubmit | Function called when the submit step button is pressed | null | Func |
| nextBtnText | Text to display inside the next button | Next | String |
| previousBtnText | Text to display inside the previous button | Previous | String |
| finishBtnText | Text to display inside the button on the last step | Submit | String |
| nextBtnStyle | Style object to provide to the next/finish buttons | { textAlign: 'center', padding: 8 } | Object |
| nextBtnTextStyle | Style object to provide to the next/finish button text | { color: '#007aff', fontSize: 18 } | Object |
| nextBtnDisabled | Value to disable/enable next button | false | Boolean |
| previousBtnStyle | Style object to provide to the previous button | { textAlign: 'center', padding: 8 } | Object |
| previousBtnTextStyle | Style object to provide to the previous button text | { color: '#007aff', fontSize: 18 } | Object |
| previousBtnDisabled | Value to disable/enable previous button | false | Boolean |
| scrollViewProps | Object to provide props to ScrollView component | {} | Object |
| errors | Used to assist with current step validation. If true, the next step won't be rendered | false | Boolean |
| removeBtnRow | Used to render the progress step without the button row | false | Boolean |
| styleBtnRow | Used to style container row of buttons | { flexDirection: 'row', marginTop: 90 } | Object |
Contributing
Pull requests are always welcome! Feel free to open a new GitHub issue for any changes that can be made.
Working on your first Pull Request? You can learn how from this free series How to Contribute to an Open Source Project on GitHub
Author
Colby Miller | https://colbymillerdev.com


