

Anat is a set of Python tools that involve a network discoverer, a port scanner and a ping scanner. This is an ethical hacking educational toolset used for educational purposes only (please see code of conduct). Anat tools are similar to a simple version of the famous nmap tool: a network exploration tool and a port scanner. Anat is also similar to a simple version of the Debian Netdiscover which is an ARP reconnaissance tool. Anat is named after the war Goddess of the Phoenician.
The tool is part of an ethical hacking educational toolset which is normally taught in ethical hacking and computer security degrees or courses (please see code of conduct).
Anat is part of a toolset of ethical hacking tools that I will publish gradually on Github.
- Tanit Keylogger (Language: Python) - Go to repository URL.
- Adonis ARP Spoofer (Language: Python) - Go to repository URL.
- Simple MAC Changer (Language: Python), repository URL (will be added later).
- Anat Network Discoverer and Port Scanner (Language: Python), current repository.
- Hadad Packet Sniffer (Language: Python), repository URL (will be added later).
- Shahar DNS Spoofer (Language: Python), repository URL (will be added later).
- Sweet Death Virus (Language: Python), repository URL (will be added later).
- Baal Backdoors (Language: Python), Go to repository URL.
- Vulnerability Scanner (Language: Python), repository URL (will be added later).
Launching this tool against unauthorised and unwilling users is both immoral and illegal. As a white hat hacker or security specialist, your job after taking permission, is to discover vulnerabilities in programs, systems and networks (white hat hacking) or help in discovering any gullibility in users (by social engineering). Thus, you can launch Anat or any other tool I might publish later in this hacking series only when you are given explicit permission by the company that hires you or you only launch it against your own servers or networks. This tool is written after taking several Ethical Hacking and Security courses. So, in other words, the code (which has a generated executable intentionally detectable by antiviruses) can be found in a form or another in many ethical hacking books and courses. I have added some enhancements on the tool of course. To reiterate: This is a tool written for the sole purpose of teaching you how a network ARP reconnaissance tool and a port scanner work and it also shows you how much it is easy to write a simple, effective and yet powerful network scanner in Python. This tool is for educational purposes only and it is not meant to be used in any harmful way. To reiterate, this tool is meant to be a tool to be studied by white hat hackers and security specialists and is not meant to be deployed or used against users that do not give you explicit permission.
Anat constitutes three Python files:
- NetworkDiscoverer.py is an ARP reconnaissance tool that displays all IPs, MAC addresses and MAC vendor names of all the devices connected to your network.
- PortScanner.py is a port scanner that scans specified ports on a device/machine and checks whether the ports are open or close.
- PingScanner.py is a icmp scanner (i.e. ping scanner) that scans a range of IPs and checks if the hosts are reachable or not.
You need to install all the Python modules need by the tools. You can install them by using pip3 or any other method that you are confortable with. Examples:
- termcolor module for coloring the terminal text - pip3 install termcolor
- scapy module for the communication using ARP - pip3 install scapy
- mac_vendor_lookup for getting the MAC vendor name - pip3 install mac_vendor_lookup
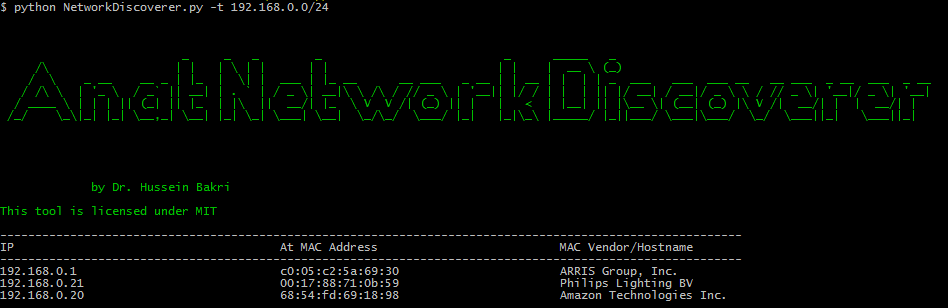
To use NetworkDiscoverer.py, you need to find your IP and subnet mask from your terminal/command line via ifconfig (Linux/MacOS) or ipconfig (MS Windows) and get the subnet. In the following example: by using such subnet ideally, you are scanning for all the devices connected to your router since the majority of home routers usually have by default an internal IP of 192.168.0.1 - of course change this IP according to your situation.
python3 NetworkDiscoverer.py -t 192.168.0.0/24
This will scan the whole subnet and will print all the devices connected to your network including all IPs, MAC addresses and MAC vendor names. You can figure out from Vendor names if it is per example an Apple iPhone or a Lenovo Laptop etc...
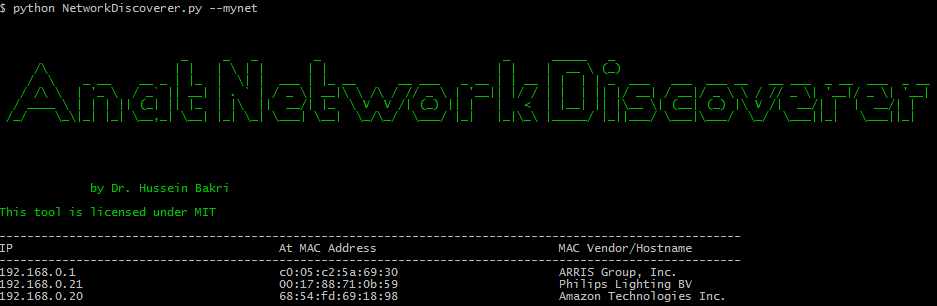
I have added recently a cool feature. You can specify only the argument --mynet and the tool will discover for you, the IP of your machine and your gateway address and then it will construct the right subnet for you. It could not be more easy than that. This feature will make the process more automatic. It will allow ethical hackers to just run the program without specifying any IP. The tool will then retrieve all the devices connected to the network. NB: this feature might not work in some situations but it is worth to try it first.
python3 NetworkDiscoverer.py --mynet
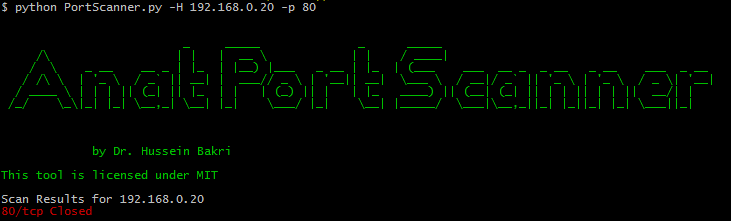
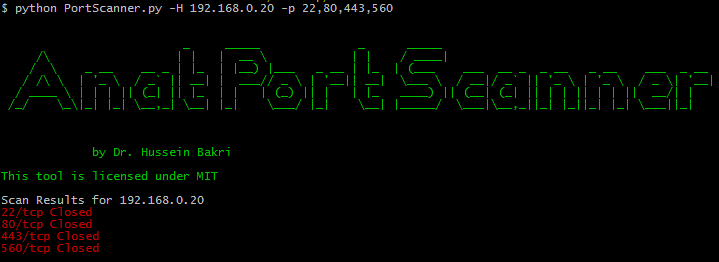
To use PortScanner.py, you need a target machine IP or a discoverable domain name and you need to specify one or more ports to scan, so you can know if they are open or close.
python3 PortScanner.py -H 192.168.0.20 -p 80
Or
python3 PortScanner.py -H 192.168.0.20 -p 22,80,443,560
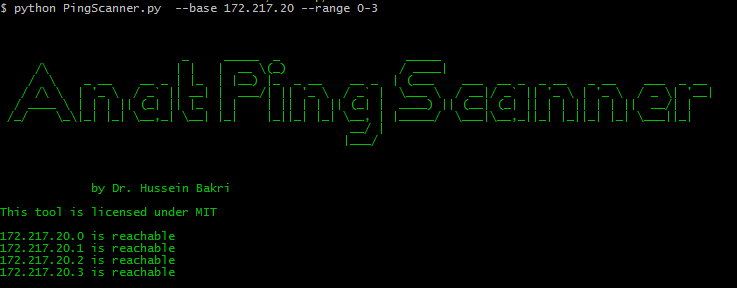
To use PingScanner.py, you need to specify a baseIP (via the argument --base) and a range between 0 and 255 in the form of 30-100 via the --range argument.
python PingScanner.py --base 172.217.169 --range 46-48
When you provide less than 3 IP parts as a base, the tool fills out the missing parts with 0 which is the same behaviour used by the socket class in Python. The following ranges of IPs would be 172.217.0.26 to 172.217.0.56
python PingScanner.py --base 172.217 --range 46-56
If you do not specify a range, the tool will ping only the base IP and considers it as a complete IP.
python PingScanner.py --base 172.217.20.2
You need the pyinstaller. You can install it via pip or pip3 or via apt package manager.
pip install pyinstaller
A program called pyinstaller is installed in the Python directory. On Windows, it would be an executable: pyinstaller.exe
To package the file as a .exe for MS Windows, move your python file(s) to a folder and run pyinstaller as follows. NB: the --onefile switch is needed especially when you have many python files:
pyinstaller PortScanner.py --onefile
and
pyinstaller NetworkDiscoverer.py --onefile
Your .exe files will be found in the respective dist folders.
As you know, in order to run a Windows .exe or .msi or anything similar on a Linux OS or Mac OS, you need a program called wine. I would assume you have installed wine on Linux. Go to the official Python website and download the right Python 2.7.x msi installation file or whatever version for Python 3.x.x. Navigate to the directory of the download folder of this file and then run the following command: (/i is for installing):
wine msiexec /i python-2.X.X.msi
You will get a normal installation process as you would have on any MS Windows OS, please follow the instructions to install the Python interpreter. All the programs in Wine are usually installed in a hidden folder called '.wine' in the Home folder of the user. So probably your Windows Python will be installed in per example ~/.wine/drive_c/Python27/. In such directory, you will find all the executables that are normally installed with any Python interpreter such as Python.exe, pip.exe etc. Navigate to this folder and run via wine the Python interpreter invoking pip in order for you to install the 'pyinstaller' module.
PS: wine does not access the pip modules of the Linux/MacOs so this why you need to do this.
cd ~/.wine/drive_c/Python27/
wine python.exe -m pip install pyinstaller
After the installation of the module terminates successively, you will find the pyinstalller.exe in the Scripts directory. To install pynput (Again, why we need to do that? as I mentioned before, you need to do that because even if this module is installed on Linux/Mac OS level, the Windows Python interpreter of wine won't be able to access it)
wine python.exe -m pip install pynput
You can then package Anat into a single executable:
wine /root/.wine/drive_c/Python27/Scripts/pyinstaller.exe NetworkDiscoverer.py --onefile
The binary will be stored in the dist folder.
If you are on a Mac OS, the process is the same for installing 'pyinstaller'. First install pyinstaller through latest pip - with sudo privileges. NB: it is better to get the latest pip so to avoid errors.
sudo pip install pyinstaller
Then run pyinstaller on main.py
pyinstaller main.py --onefile
The binary will be stored in the dist folder.
The process is similar to what is explained in the previous sections. Binaries can be executed by just double clicking them. They need to be run from the terminal after running chmod +x in order to make them executable.
For PortScanner.py:
- Compare the banner information received from the open network ports with the recent discovered vulnerabilities . Vulnerabilities would be stored either in a file or in a sqlite database.
- Let the users include ranges of ports such as -p 22-300 since we can only write comma seperated ports or a single port in the current version. Try to make it work with a mixture of ranges and comma sperated values eg: -p 22,45,50-90 meaning port 22, port 45 and all ports from 50 to 90.
This program is licensed under MIT License - you are free to distribute, change, enhance and include any of the code of this application in your tools. I only expect adequate attribution and citation of this work. The attribution should include the title of the program, the author (me!) and the site or the document where the program is taken from.